
Log shipping is a high-availability configuration that perhaps most of us are familiar with. It’s one of the oldest techniques wherein we ship transaction logs from a Primary database to a Secondary database. Log Shipping is still a vital feature used in case of applications that use warm standby for Disaster Recovery. We can see many articles which discuss the process of configuring Log shipping using T-SQL or SSMS.
On a high level, Log Shipping consists of preparing the secondary database (NORECOVERY or STANDBY) using a backup of the primary instance database and then applying the transaction logs from the primary database onto the secondary database using SQL Server agent Jobs and a shared file location. In other words, it’s an automated process of restoring transaction log backups from the primary database server on to the secondary database/database server. This way, the database is available for failover.
We’ve seen multiple models of implementation of log shipping: log shipping on the same server, on to a different server, across domains or workgroups, or to different versions of SQL Server. SQL Server, now being available for Linux, makes us think, “Can we set up log shipping across platforms?”
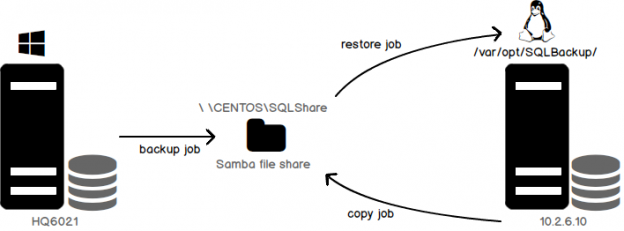
As it turns out, yes, we can. This article discusses the setup. We’ll use a network file share for the demonstration. Let’s jump right in!
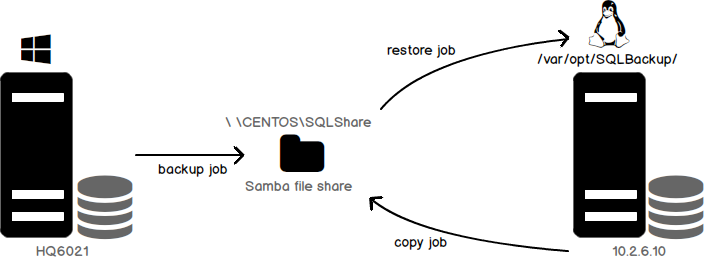
- A File Share, the placeholder for the primary database transaction log files
- A backup job created to backup transaction log file to the share
- A copy job on the secondary used to copy the transaction log files from the share
- A restore job to perform the restoration of the transaction log backup files
Prerequisites
- The SQL Server configuration must use the FULL or Bulk Logged database recovery model
- A File Share using the SMB protocol
- SQL Server Agent installation on the Linux instance
- The SQLCMD command reference
- The log-shipping stored procedures require membership in the sysadmin fixed server role.
Check the databases recovery model
Use the below SQL query to check the recovery model of the database.
|
1 2 3 |
SELECT name AS [Database Name], recovery_model_desc AS [Recovery Model] FROM sys.databases |
Configure a File Share using the SAMBA protocol
We’re using CentOS for the procedure. The procedure may vary based on the Linux flavor/distribution you use.
-
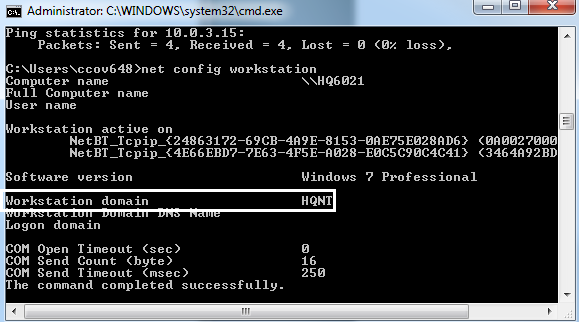
To find the workstation details, issue the net config workstation command in the cmd prompt on the SQL Server on Windows—the primary database server. In this case the workstation domain value is HQNT.

-
To Install Samba 4.6.2 run YUM (the opensource command, Yellowdog Updater Modified). YUM is used to manage the installation libraries on RHEL or CENTOS Linux distributions.
123#yum install samba samba-client samba-common
-
Edit the Samba configuration file /etc/samba/smb.conf. Before making an update or an entry, it is recommended to back up the configuration file. To back up the Samba configuration file use the cp command to create a new file
123#cp /etc/samba/smb.conf /etc/samba/smb.conf.bak
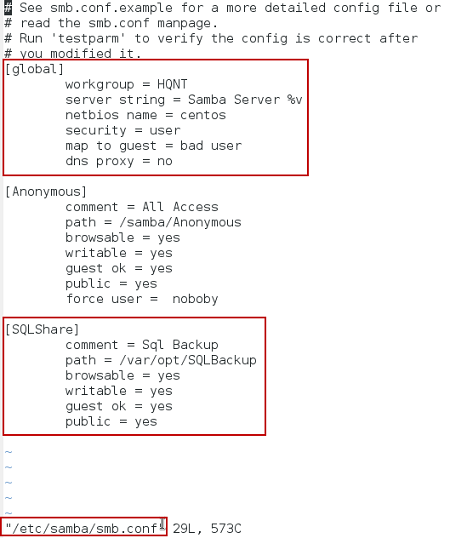
Use any editor to edit the content of /etc/samba/smb.conf. I used VI. VIM or Nano should work, too. The entire content of the file should look like the text below.
1234567891011121314151617[global]workgroup = HQNTserver string = Samba Server %vnetbios name = centossecurity = usermap to guest = bad userdns proxy = no#============================ Share Definitions ==============================[SQLShare]Comment =Sql Backuppath = /var/opt/SQLBAckup/browsable =yeswritable = yesguest ok = yespublic = yesThe content of the Samba configuration is shown below
-
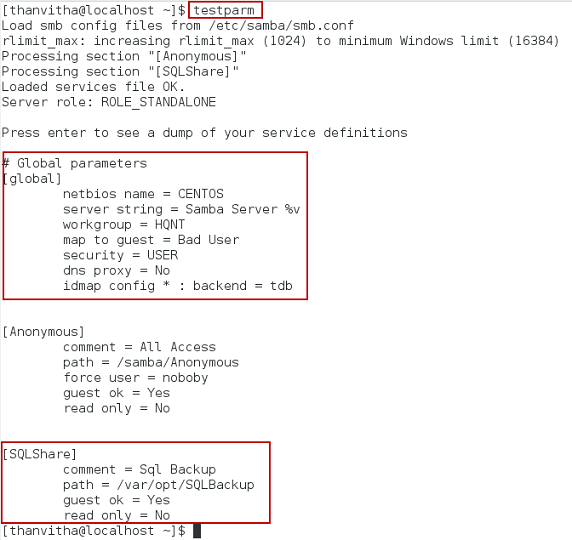
Run the testparm command to validate the configuration parameters of the Samba file. The testparm command parses the configuration file parameters and reports any syntactical issues, or the use of any unknown parameters of the configuration file.
-
Now, create a fully accessed SQLBackup share.
123456#mkdir –p /var/opt/SQLBackup#chown mssql /var/opt/sqlbackup# chgrp mssql /var/opt/sqlbackup#chmod –R 777 /var/opt/SQLBackup
-
Restart the Samba service
123#systemctl restart smb
-
Open and load the firewall configuration using firewall-cmd command
1234#firewall-cmd --permanent --zone=public --add-service=samba# firewall-cmd --reload
-
SELinux requires the files to be labeled. As we already created the directory /var/opt/SQLBackup, we can label the directory and contents using the chcon tool.
123#chcon -R -t samba_share_t /var/opt/SQLBackup/
-
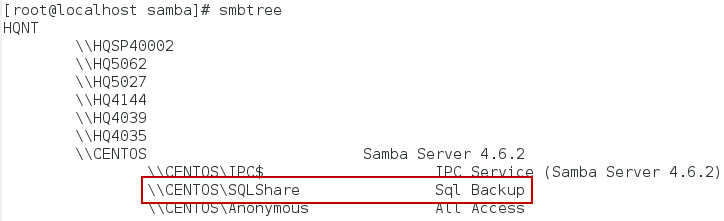
Browse the Samba file share using smbtree. It’s the Linux version of Windows Network Neighborhood. The command prints all the nodes and shares within the domain.
-
Check the Samba connection status
- Browse the share from windows machine
Now that we have Samba set up, let’s move on to the next step.
- Add the primary database by executing sp_add_log_shipping_primary_database. This step generates the backup job ID and primary ID
- Add a backup job schedule using sp_add_jobschedule
- Enable the backup job.
- The primary server and database details are passed to the stored procedure sp_add_log_shipping_secondary_primary. This stored procedure returns the secondary ID and the backup copy ID and restore job ID.
- Set the copy and restore job schedule using sp_add_jobschedule
- Add the secondary database to the instance by executing sp_add_log_shipping_secondary_database.
- On the primary server, execute sp_add_log_shipping_primary_secondary to add the required information about the new secondary database to the primary server.
- Enable the copy and restore jobs
- Stairway to SQL essentials - April 7, 2021
- A quick overview of database audit in SQL - January 28, 2021
- How to set up Azure Data Sync between Azure SQL databases and on-premises SQL Server - January 20, 2021


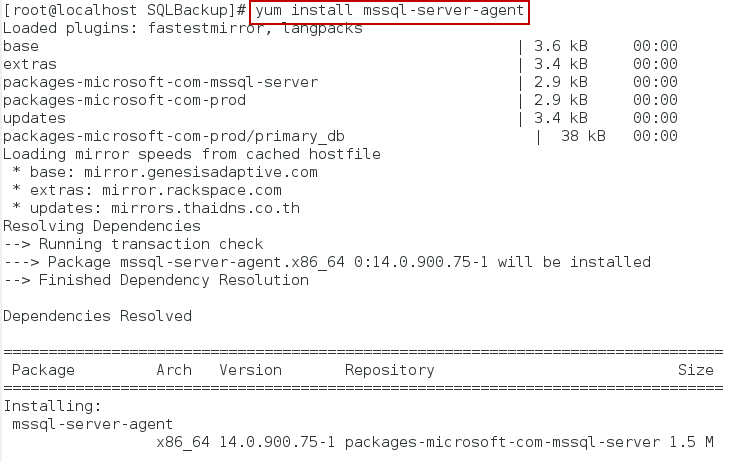
Install SQL Server Agent
The SQL Server agent jobs are the backbone of the Log Shipping architecture. The Backup Job, Copy Job, Restore Job, Alert job… all run on the Primary or the Secondary databases instances. To install the SQL Server Agent, the following commands are executed. After the installation is complete, don’t forget to restart the SQL Service.
|
1 2 3 4 |
# yum install mssql-server-agent #systemctl restart mssql-server |
Setup Log Shipping
Log shipping can be implemented using the SSMS GUI or T-SQL. I feel more comfortable using T-SQL. The sqlcmd command gives us the flexibility to execute the SQL by connecting to various versions SQL Shell with reference to the current scope of execution.
The first task is to prepare the secondary database instance to get it up and running, by initializing the secondary database. We do this by restoring a full backup of the primary database on the secondary server with no recovery option. The transaction log backup is initiated on the primary and then copied across to the secondary database. This process applies the log on the secondary instance(s) of the database.
In this demonstration, HQ6021 is the Primary Server (running on Windows) and 10.2.6.10 is a Secondary Instance (running on Linux).
Copy the below SQL and open a SQLCMD session on SSMS to execute the commands. This creates a database called SQLShackLogShipping on the Secondary instance.
The first step in configuring log shipping is to initialize the secondary database, and restore the backup of the primary database on to the secondary instance.
On the primary server,
On the secondary server,
SSMS Report
The standard Log Shipping Status report can be generated by right clicking on the Server Name in the SQL Server Management Studio Reports Standard Reports Transaction Log Shipping Status. This report should give us details which should tell us whether our setup was successful.


Wrapping Up
As we saw in this article, the high availability feature, Log Shipping, can now be configured across platforms. This article provides step by step details of the configuration to implement Log Shipping from the primary SQL Server running on Windows to the secondary SQL Server running on CentOS. The steps are not very different from configuring Log Shipping across Windows instances, except that the interface (and so some of the commands) varies. You may get a few errors, but all the errors are going to be self-explanatory. If you can fix the Log Shipping setup on Windows, you should be able to troubleshoot configuration issues on Linux as well, as the steps should be straightforward. It is also evident that SQL Administrators have to quickly adapt to the changing needs of technology.

My specialty lies in designing & implementing High availability solutions and cross-platform DB Migration. The technologies currently working on are SQL Server, PowerShell, Oracle and MongoDB.
View all posts by Prashanth Jayaram