
In an attempt decouple systems, we may modularize them. In most cases, we would need to move databases from one server to another—sometimes, even move them from Windows to Linux.
In the case of moving a database to Linux, SQL Server’s Backup and Restore feature is the recommended mode of migration; we would migrate from SQL Server on Windows to SQL Server vNext CTP 1.4 on Linux.
This topic provides step-by-step instructions for this procedure. In this tutorial, you will:
- Create a database, SQLShack
- Backup SQLShack on a Windows machine
- Transfer the backup to your Linux machine using a File Sharing Protocol, Samba. Use Samba* to setup an SMB network share between the Windows and the Linux machines.
- Restore the database using the SSMS console (sqlcmd) or GUI
Demonstration
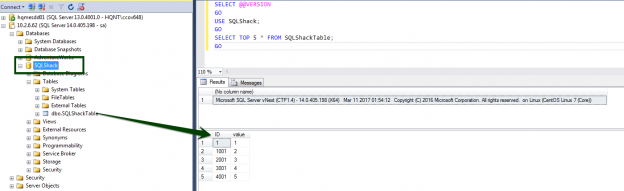
Let’s create a database, SQLShack. I’m going to switch into the SQLShack database to create a sample table to hold dummy data which is needed to demonstrate the restoration process.
|
1 2 3 4 5 6 7 8 9 10 11 12 13 14 15 16 17 18 19 20 21 22 23 24 25 26 |
-- create a new database for this example CREATE DATABASE SQLShack; GO USE SQLShack; GO -- insert some data CREATE TABLE SQLShackTable ( ID int IDENTITY(1,1000) PRIMARY KEY NOT NULL, value int ); GO CREATE PROCEDURE InsertSQLShackTable AS DECLARE @i int = 1 WHILE @i <100 BEGIN INSERT SQLShackTable (value) VALUES (@i) Set @i +=1 END GO EXECUTE InsertSQLShackTable; GO SELECT * FROM SQLShackTable; GO |
Database Backup on Windows Machine
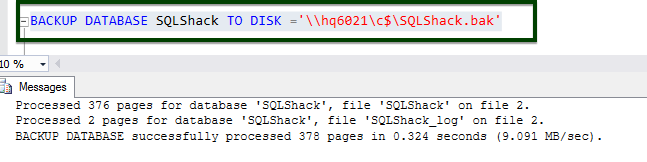
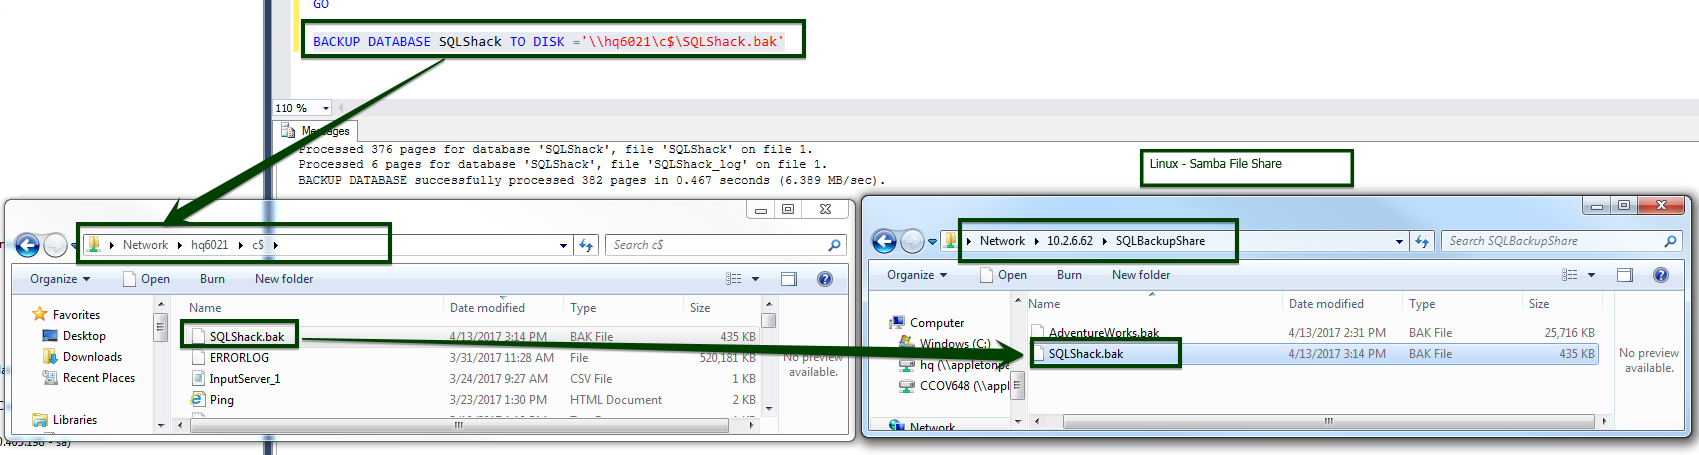
Backup the database, SQLShack, on a Windows Machine.
The following simple command creates a backup of SQLShack to a given file location
|
1 2 3 |
BACKUP DATABASE SQLShack TO DISK ='\\hq6021\c$\SQLShack.bak' |
Transfer backup file to the Linux machine
You can use Samba to create a shared folder on the Linux system and transfer files from the Windows computer to the Linux (CentOS) computer—or vice versa. This allows the files to be shared on the network through the SMB protocol. This will also allow Windows hosts to get remote access to the files using the file explorer.
Let us go through a step-by-step installation and configuration process of Samba so that we can easily share the files between computers running different operating systems.
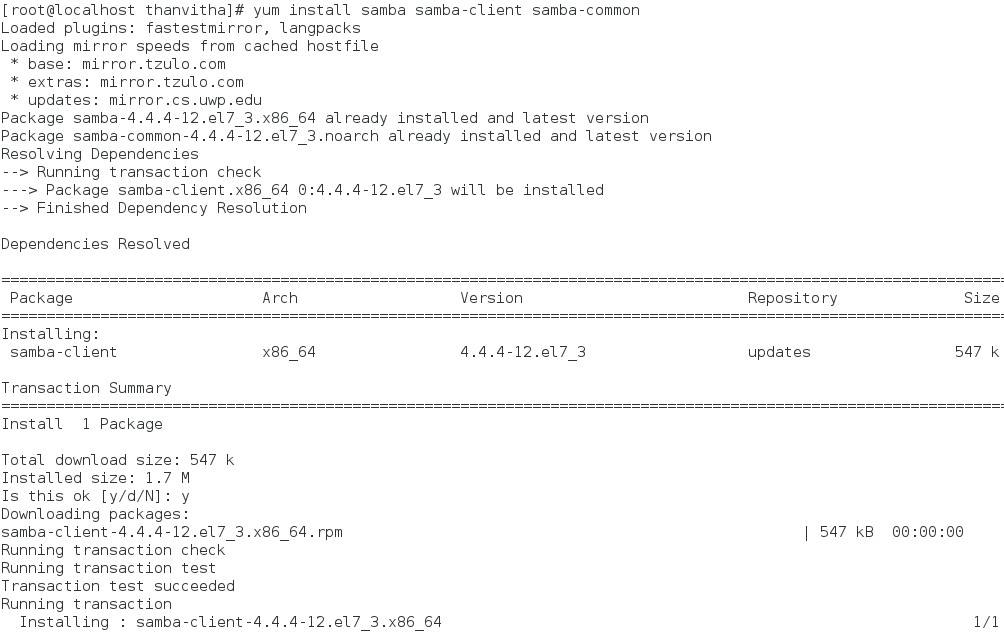
Install the Samba client and Samba common
This section provides details of the installation and configuration of Samba
[root@localhost thanvitha ]# yum install samba samba-client samba-common
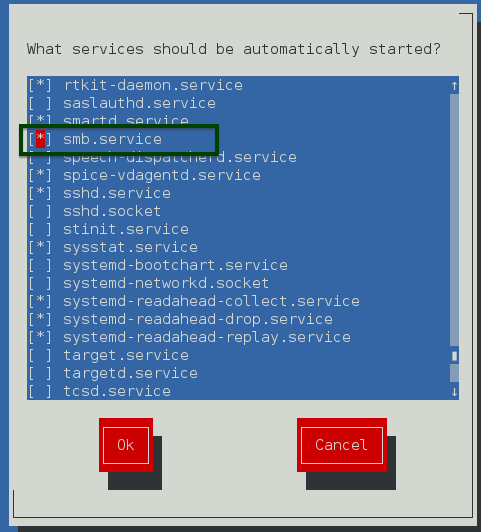
Setting the SAMBA services to start automatically
[root@localhost thanvitha ]#setup
- Select system services, hit Enter
- Enable smb.service and click Ok
Create a SQL Backup folder
-
Check for SQL backup directory at the /var/opt/ location
[root@localhost thanvitha ]#ls -l /var/opt/
The command lists down the entire directory inside the /var/opt. The output also confirms that we don’t have any SQL Backup folder under /var/opt.
-
Let’s create a folder, sqlbackup at /var/opt using the mkdir command.
# mkdir /var/opt/sqlbackups
# ls -l -
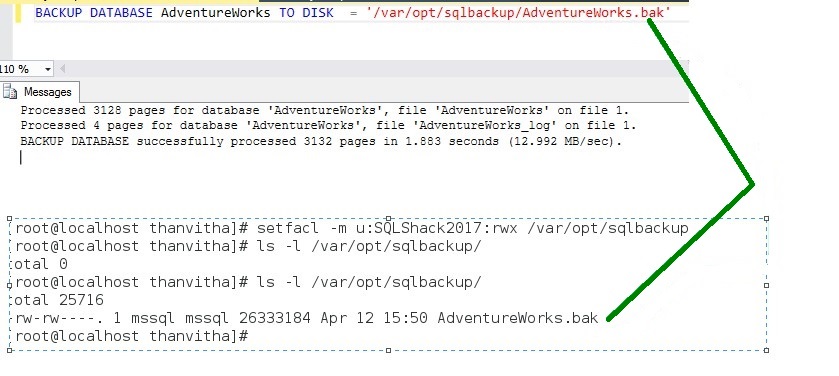
The folder thus created is owned by the root user and the group user; it can’t be accessed by a non-root user. You need to change the ownership of the folder by running the following commands:
# chown mssql /var/opt/sqlbackup
# chgrp mssql /var/opt/sqlbackup -
Execute this command to give everyone full access to /var/opt/sqlbackup:
# chmod –R 777 /var/opt/sqlbackup

-
Backup the database
123BACKUP DATABASE AdventureWorks TO DISK ='/var/opt/sqlbackup/AdventureWorks.bak'

Configure Samba
This section deals with required parameter setting in the samba configuration file
-
Edit the file /etc/samba/smb.conf
-
Before making change ensure to backup the original file as /etc/samba/smb.conf.bak
#cp /etc/samba/smb.conf /etc/samba/smb.conf.bak
-
Configure the parameters on how to access the shared folder
# vi /etc/samba/smb.conf
The following content is appended to /etc/samba/smb.conf. The exact configuration on your computer may differ. If it is, update the settings accordingly.
[SQLBAckupShare]
path = /var/opt/sqlbackup
valid users = SQLShack2017
read only = yes
browsable = yes
writable = yes
guest ok = yes
public =yes
Firewall Configuration
The CentOS 7.0 Firewall-cmd will block the samba access. To overcomethat issue we will run:
# firewall-cmd –permanent –zone=public –add-service=samba
# firewall-cmd –reload
Check the Samba service
[root@localhost ~]# systemctl restart smb.service
Next, we want to allow selinux access to the shared folder. To do that, run the command below from the /samba directory
[root@localhost opt]# chcon -Rt samba_share_t /var/opt/sqlbackup/
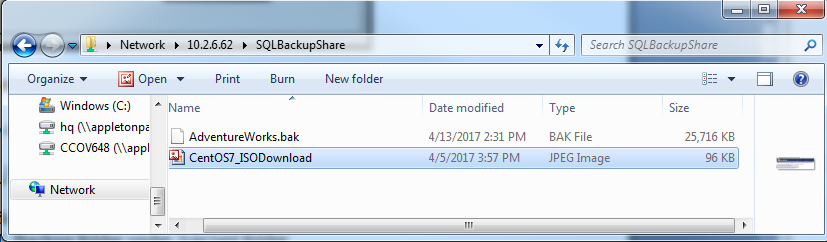
Now you can access the share created on Centos 7.0, on Windows as follows, go to the Run prompt and type \\10.2.6.62\
Now, I can copy the files and see the existing backup files:
Restore SQLShack Database
Restore the backup of database, SQLShack on the SQL Server vNext instance on the Linux machine, from SSMS on the Windows computer.
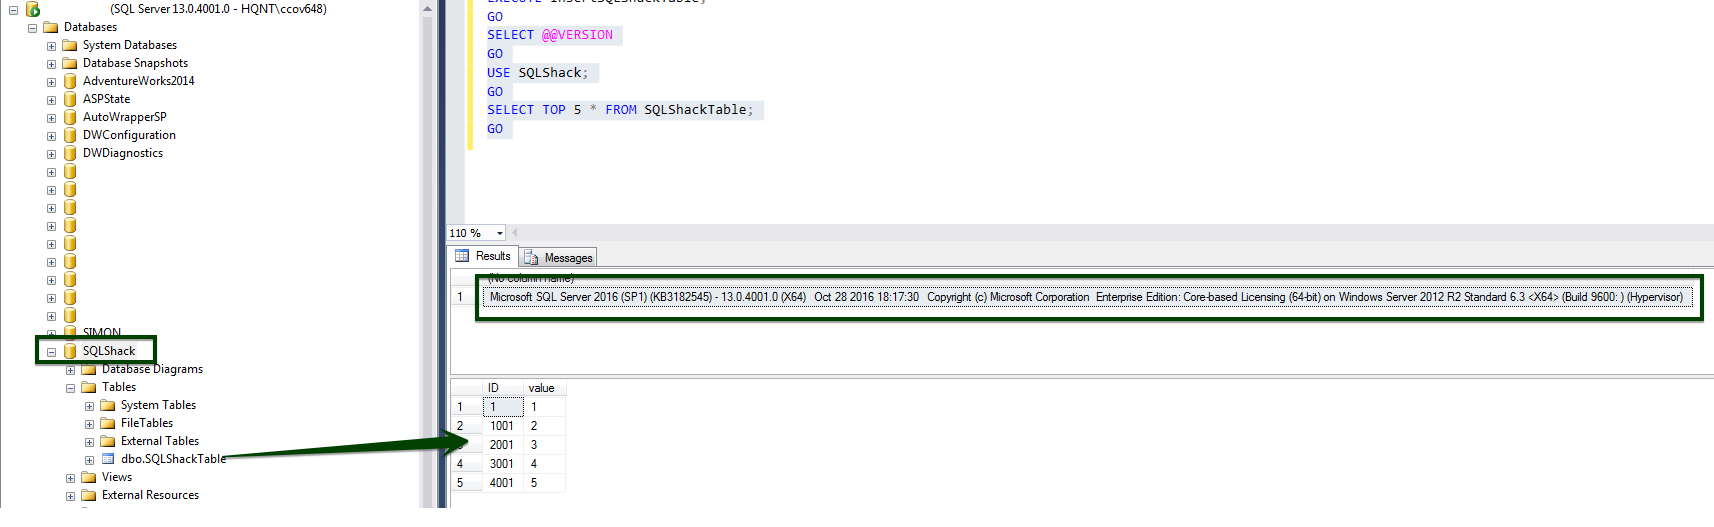
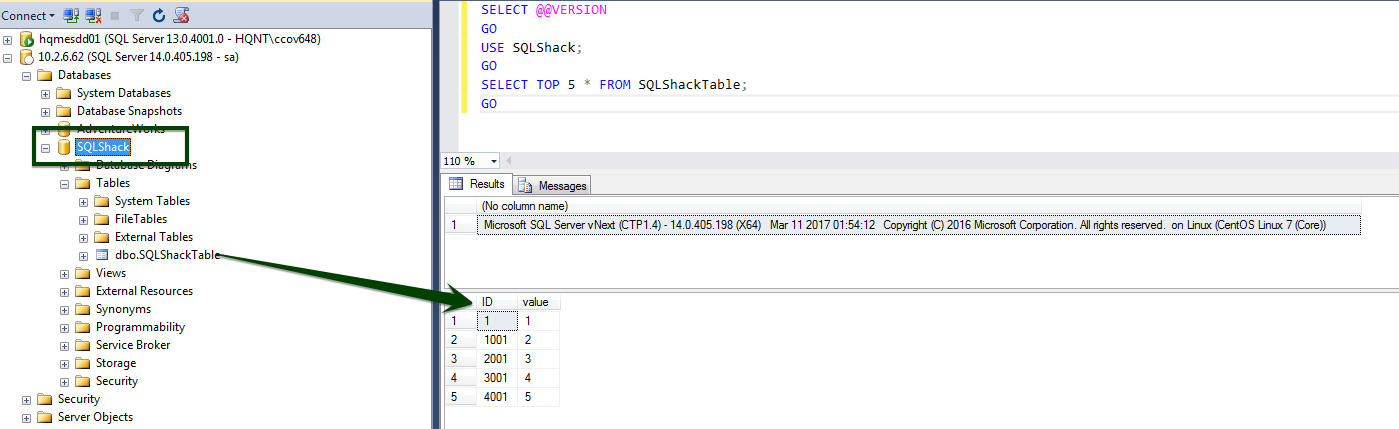
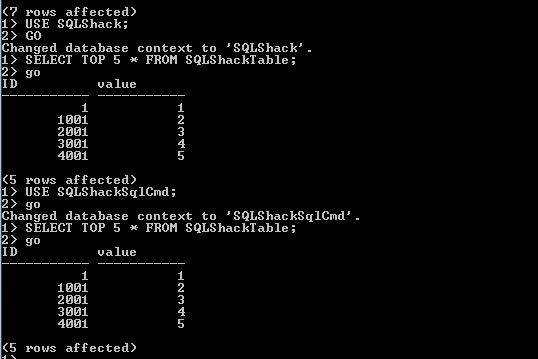
The data that you see below is from the database restored onto the Linux machine. The data, as we can see, is consistent—the restoration was successful.
-
Browse the location on Windows machine and copy the SQLShack.bak file to the Linux share using the SMB protocol:
-
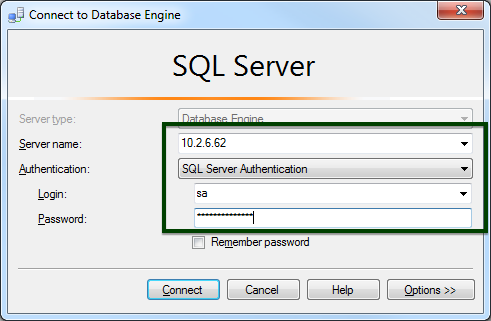
Open SQL Server Management Studio and login to the SQL instance of Linux using SQL authentication
-
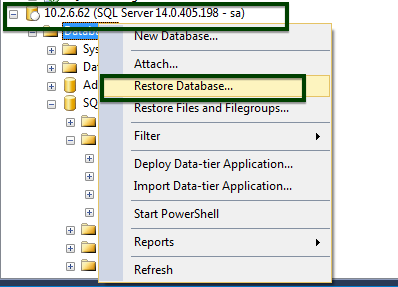
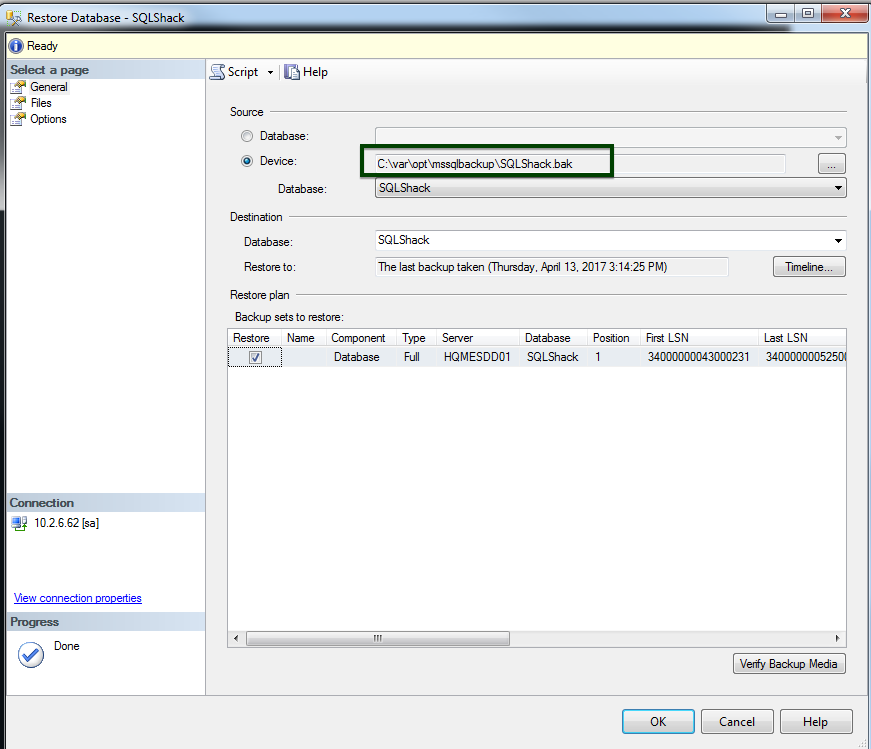
Once logged in, right click on the Databases folder and select Restore Database.
-
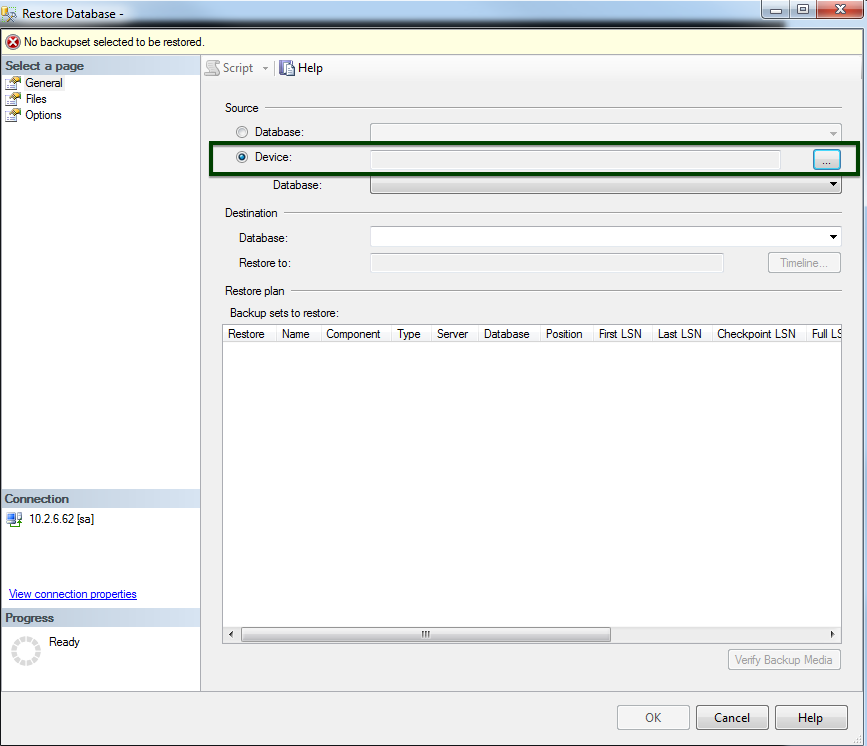
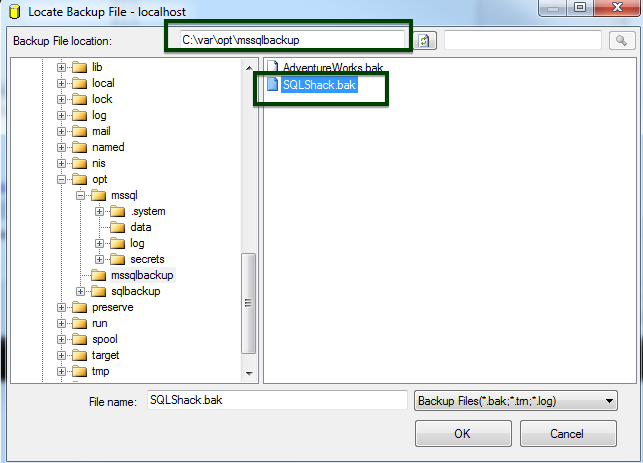
Click on the radio button against Device and browse the source folder
-
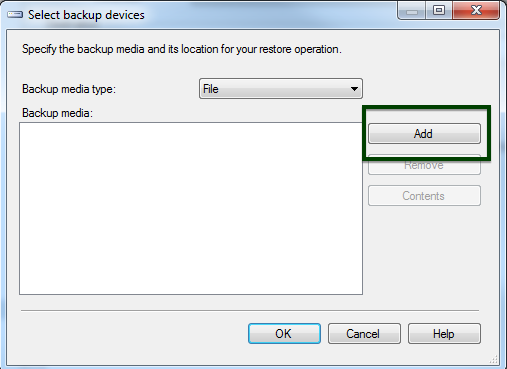
Set the backup media type to File and then click Add
-
Browse to the SQL backup (.BAK) file—in this case, SQLShack.BAK—and click OK.
-
Again, click OK.
-
Click OK to initiate the restore process
-
At this point, enough information has been entered for the database to be restored. Click OK.
-
After the restoration is successful, connect to the SQLShack database on the Linux machine to view the output.
Restore Using SQLCMD
-
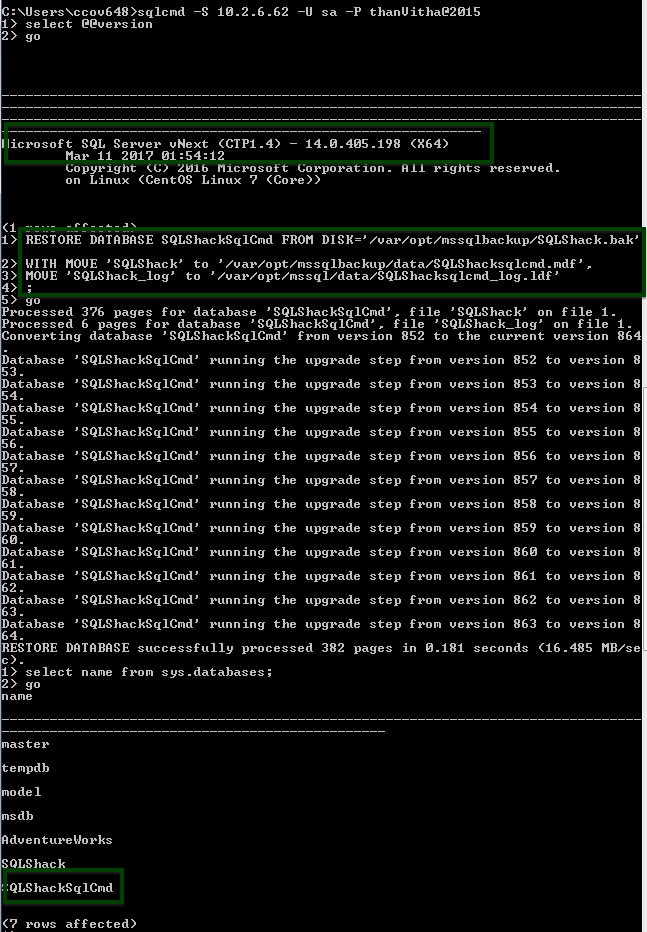
Use sqlcmd to make a database connection on the Windows Server.
-
Run the following command to make a connection.
sqlcmd -S 10.2.6.62 -U sa -P thanVitha@2015
-
Run the restore command
12345RESTORE DATABASE SQLShackSqlCmd FROM DISK='/var/opt/mssqlbackup/SQLShack.bak'WITH MOVE 'SQLShack' to '/var/opt/mssqlbackup/data/SQLShacksqlcmd.mdf'MOVE 'SQLShack_log' to '/var/opt/mssql/data/SQLShacksqlcmd_log.ldf'To restore a database to SQL Server on Linux, the source backup must be taken from SQL Server 2014 or SQL Server 2016. The backup SQL Server build number must not be greater than the restore SQL Server build number.
Data validation
As we can see that the data is there on both instances, hence we can conclude the restoration process is successful
Conclusion
It is critical to understand how SQL works on non-Windows platforms, when moving from Windows. As DBAs, we need to ensure smooth migration, to ensure effective encapsulation. This article shows that the backup and restore functionality are the same across platforms, with a few specific differences in terms of configuration. It also demonstrates the backup file transfer using the Samba protocol.
Footnote
* Samba was designed to allow computers to read and write files to a remote host over a local area network (LAN). The directories on the remote hosts made available via SMB are called shares.
References
- Back Up and Restore of SQL Server Databases
- SMB protocol
- Backup and Restore SQL Server database on Linux

My specialty lies in designing & implementing High availability solutions and cross-platform DB Migration. The technologies currently working on are SQL Server, PowerShell, Oracle and MongoDB.
View all posts by Prashanth Jayaram
- Stairway to SQL essentials - April 7, 2021
- A quick overview of database audit in SQL - January 28, 2021
- How to set up Azure Data Sync between Azure SQL databases and on-premises SQL Server - January 20, 2021