
This article is the 1st article of the Move SQL Database to different mount point series. This article focuses on creating a new partition using the fdisk command and formatting it with an ext4 file system using the mkfs command.
In my previous article, Move SQL database files in SQL Server 2019 on Linux, I have explained different ways to move the databases to another directory of Linux. In this article, I am going to cover the following topics:
- Add a new virtual disk
- Create a new partition on the disk
- Format the partition with ext4 file system
- Update the /etc/fstab file
- Mount the partition on a directory
- Create required directories on new mount point to save the database files
For the demonstration, I have created a virtual machine using Oracle VM virtual box. I have installed Ubuntu 18.04 and SQL Server 2019 on it. First, let’s create a new mount point.
Add a new virtual disk
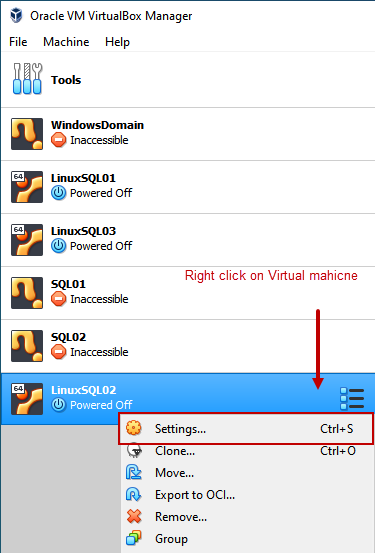
I have attached a new virtual hard disk to my existing virtual machine. To add a disk, On the VirtualBox Manager screen, right-click on Virtual Machine and select Settings.
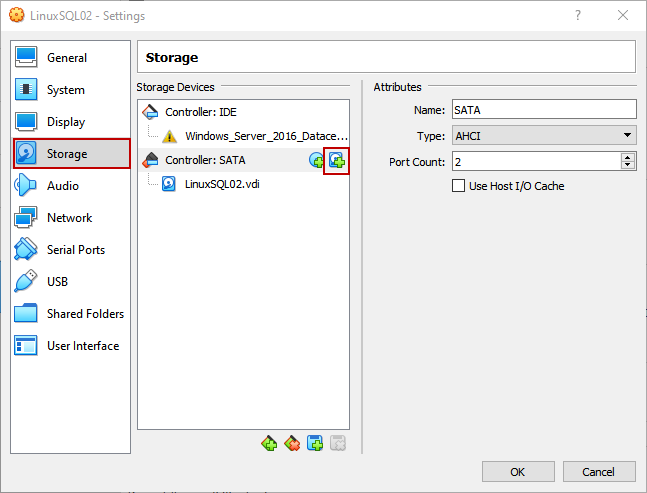
On the virtual machine settings screen, click on the Storage option. Click on Controller: SATA and click on the Hard-disk icon.
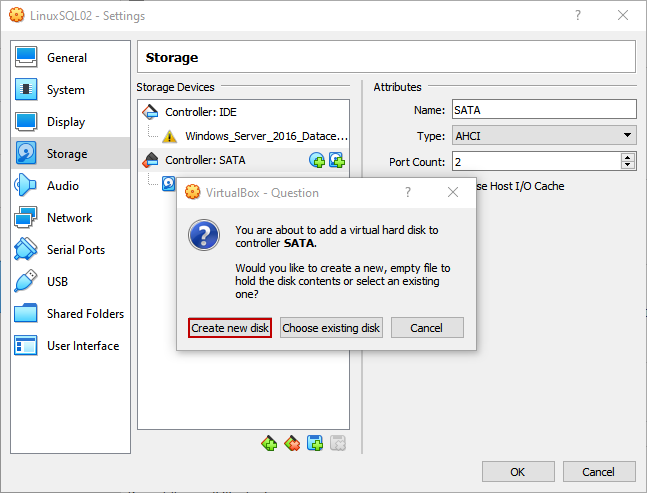
A dialog box opens that option to create a new disk or choose an existing disk. We are creating a new drive, so click on Create new disk.
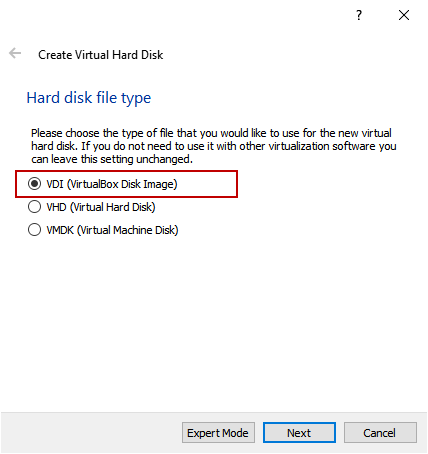
A wizard to create virtual hard disk starts. We are creating a VirtualBox Disk Image, so choose VDI (VirtualBox Disk Image) and click on Next.
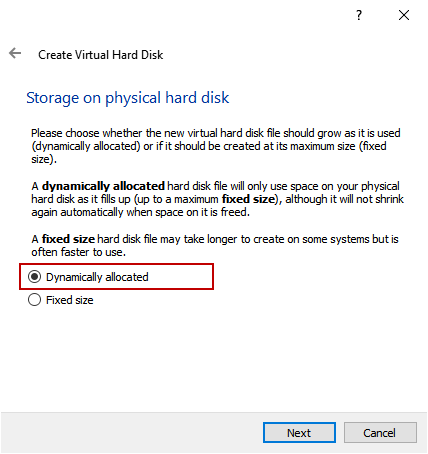
We can create two types of virtual disks
- Fixed Size
- Dynamically allocated
We will create a Dynamically allocated disk, so select Dynamically allocated and click on Next.
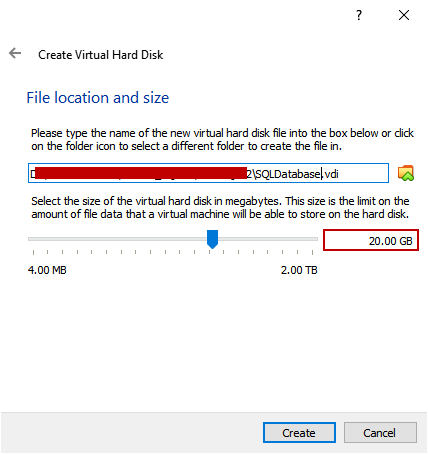
On the File location and size screen, I have specified the location to save the new *.VDI file. The name of the *.VDI file is SQLDatabase.vdi. The maximum size of the disk is set to 20 GB. Click Create.
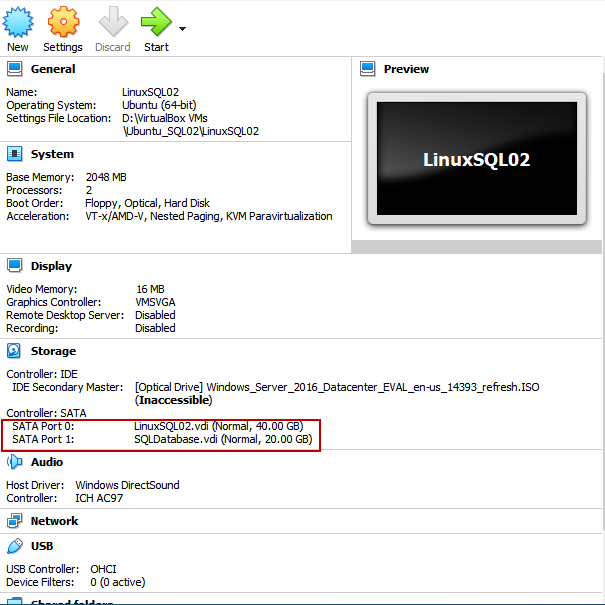
The new disk is added to the SATA controller. The new disk is visible in the storage screen of settings of the virtual machine, which indicates that the disk has been created successfully.
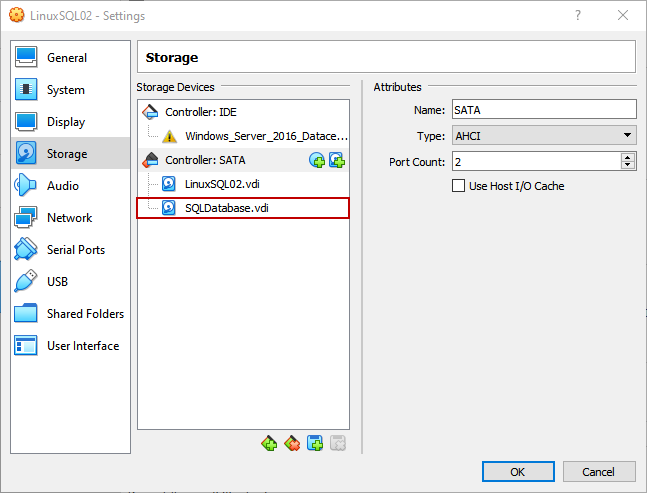
You can see the new disk in VirtualBox Manager.

Now, let us create a partition. Start the virtual machine.
Create a new partition
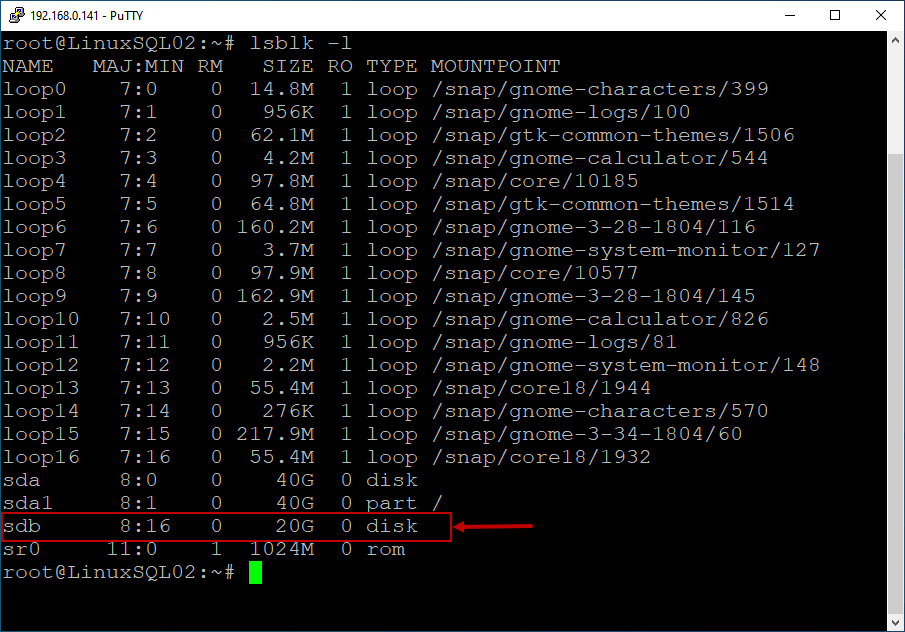
I am not explaining the process of adding a virtual drive. After adding a new hard disk, we must create a partition. First, let us view the existing block devices using the lsblk command.
The lsblk command shows the information about specific or all the block devices except RAM disks. It uses the sysfs file to collect the information of block devices. Execute the below command to view the Name of the block device, size, and mount point.
root@LinuxSQL02:~# lsblk -o NAME,SIZE,MOUNTPOINT
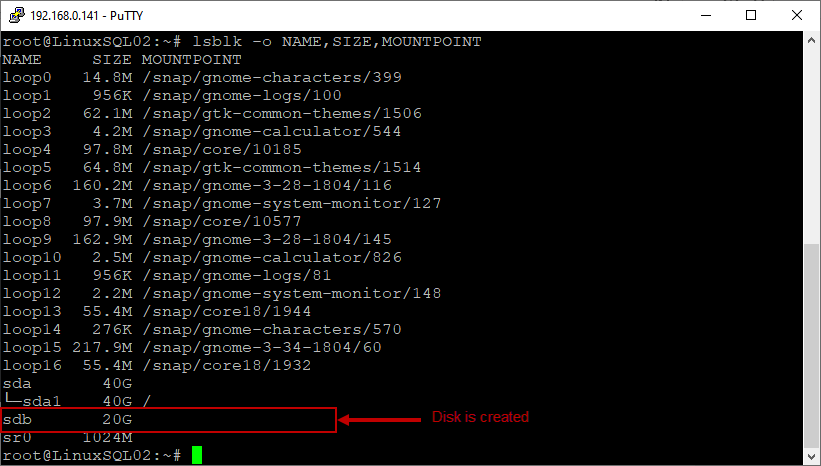
As you can see in the above screenshot, the command’s output returns a lot of information. In the list of block devices, you can see the new disk /dev/sdb. To use the disk, we must create a disk partition, then format it, and mount it on a specific directory. To create a partition, I am using the fdisk command.
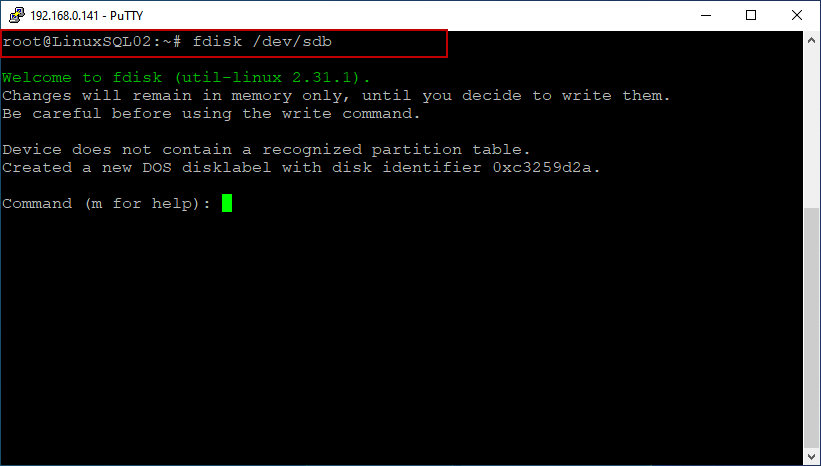
To create a new partition, we must specify the disk name in the fdisk command. To invoke it, run the below command.
root@LinuxSQL02:~# fdisk /dev/sdb
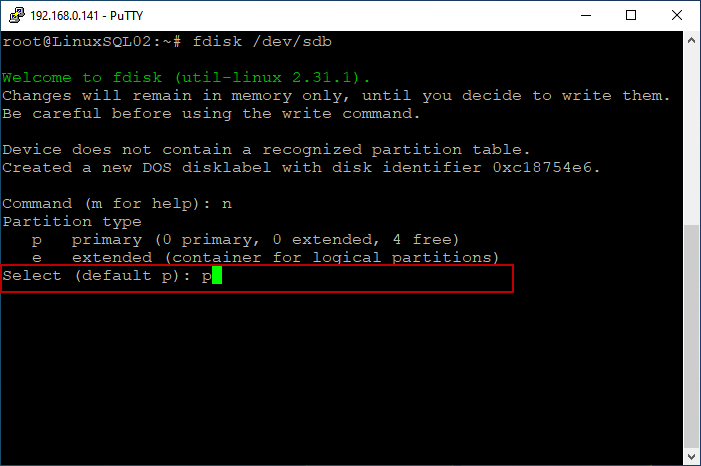
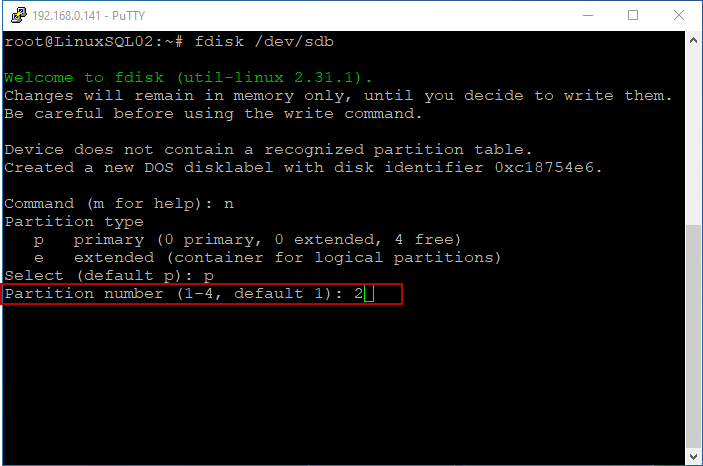
To create a new partition, enter the n option.
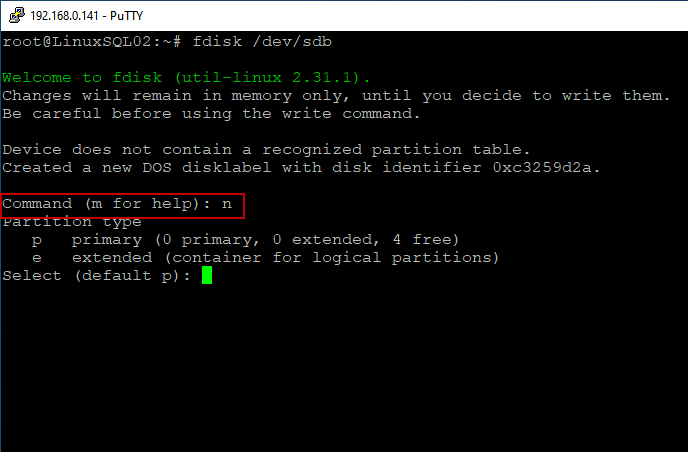
We want to create another primary partition, so enter P.
The new partition number is 2, so enter 2.
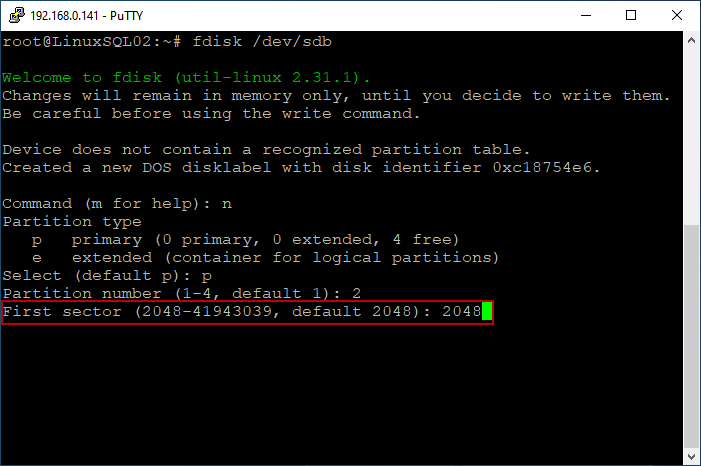
We do not want to change the first sector, so specify 2048 (default) or press the Enter key to continue to the next step.
We do not want to change the value of the last sector as well, so specify 41943039 (default) or press the Enter key to continue to the next step.
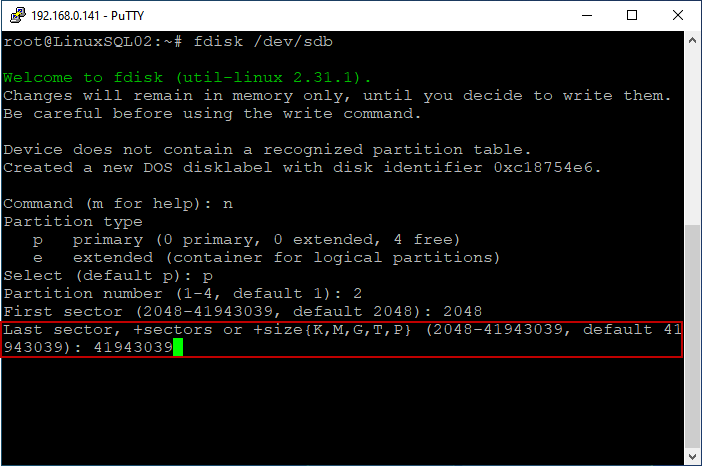
The new partition has been created successfully.

Once the partition has been created, we must format it. Press the Ctrl+C key to exit from the fdisk utility. To view the new partition, run the following command
root@LinuxSQL02:~# fdisk -l /dev/sdb
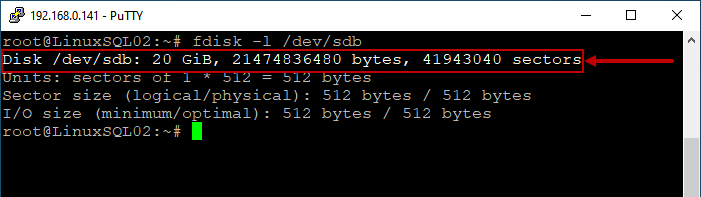
As you can see, the new partition has been created. Now let us format it as an ext4 file system. To format the partition, we will use the mkfs command.
The full name of the mkfs is Make File System. It is used to make a file system on a storage device or a partition on a hard disk. Using the mkfs command, we can create Linux compatible partitions (ext2, ext3, and ext4) and Windows compatible partition. The mkfs command creates a FAT partition that can be utilized by the windows operating system.
- Tip: The Windows operating system cannot access the Linux filesystem using native tools. If you want to use windows compatible filesystem in a Linux drive, you must format it as FAT32 filesystem. If you are using a dual boot system and want to keep one partition in common between Windows and Linux, you can create a partition and format it with FAT32 filesystem
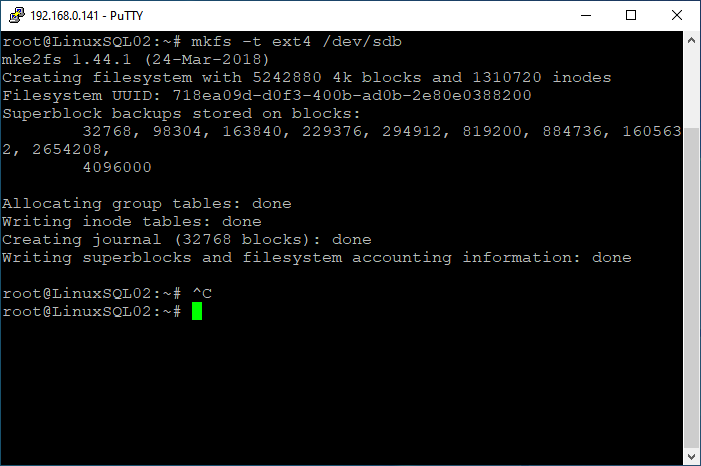
Run the below command to format the /dev/sdb partition in the ext4 filesystem.
root@LinuxSQL02:~# mkfs -t ext4 /dev/sdb
The command has been executed successfully.
Now, to view the new partition, use the lsblk -l command.
root@LinuxSQL02:~# fdisk -l /dev/sdb
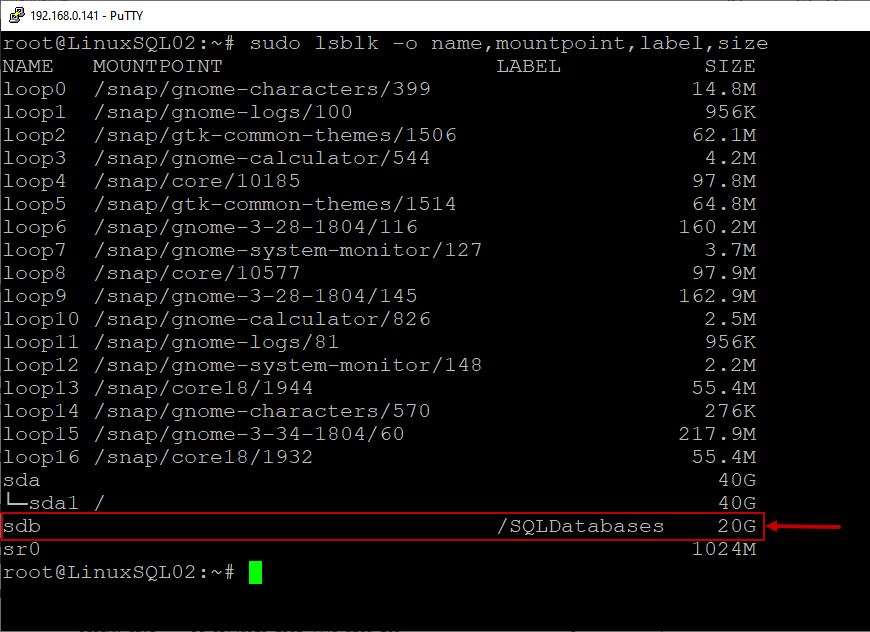
As you can see, the new partition has been created. Now, we will assign a label to the partition. To do that, we are using the e2label command. The label of the partition is SQLDatabases.
root@LinuxSQL02:~# e2label /dev/sdb /SQLDatabases

The updated label can be viewed by executing the lsblk command.
root@LinuxSQL02:~# sudo lsblk -o name,mountpoint,label,size
When we boot the machine, the operating system reads the volume and partition information from the fstab file, so we must add the details of the new partition in fstab. Open the file using VI editor.
root@LinuxSQL02:~# Vi /etc/fstab
After the file opens, to edit the file, press “I”, add the following lines.
LABEL=/SQLDatabases /SQLDatabases ext4 defaults 1 2
Screenshot of fstab file

Press Esc and then:wq to Save and close the files. Now let us mount the disk on /SQLDatabases directory.
Mount the disk
First, to mount the disk on the/SQLDatabases directory, create a directory named SQLDatabases in the root directory.
root@LinuxSQL02:~# mkdir /SQLDatabases
If required, change the ownership of the directory.
root@LinuxSQL02:~# chown nisarg /SQLDatabases
Now, to run the MOUNT command to mount the disk on /SQLDatabases directory.
root@LinuxSQL02:/# mount /dev/sdb /SQLDatabases
Run lsblk -l command to verify that the disk has been mounted or not.
root@LinuxSQL02:/# lsblk -o name,label,size,mountpoint /dev/sdb

As you can see, the disk is successfully mounted, and it is ready to use.
Create required directories in the /SQLDatabases mount point
Now, we will create directories on the new partition to save the database files. The details are the following:
|
File Type |
Database file location |
|
Primary data file location |
/SQLDatabase/Data |
|
Secondary data file location |
/SQLDatabase/Log |
|
TempDB data files location |
/SQLDatabase/TempDB |
|
Backup location |
/SQLDatabase/Backup |
I am using the mkdir command to create the directories on /SQLDatabases mount point.
Command to create the /SQLDatabases/Data directory:
root@LinuxSQL02:/# mkdir /SQLDatabases/Data
Command to create the /SQLDatabases/Log directory
root@LinuxSQL02:/# mkdir /SQLDatabases/Log
Command to create the /SQLDatabases/TempDB directory
root@LinuxSQL02:/# mkdir /SQLDatabases/TempDB
Command to create the /SQLDatabases/Backup directory
root@LinuxSQL02:/# mkdir /SQLDatabases/Backup
Once the directories have been created, we will grant the users the appropriate permissions to access the directories.
Summary
In this article, we have learned how we can add a new virtual disk to an existing virtual machine. I have also covered how we can create a new ext4 partition in Linux using fstab and mkfs utility. In my next article, I will explain how we can grant the directory level permission, move the user database and system database files to the new mount point. Additionally, I will explain how we can change the default location of the data file, log file, TempDB files, and backup files by using the configuration file named mssql-config file.
Table of contents
| Move SQL database files in SQL Server 2019 on Linux |
| Move SQL databases to a different mount point: Create a new mount point in Linux |
| Move SQL databases to a different mount point: Granting permissions and moving System and User databases |

He has expertise in database design, performance tuning, backup and recovery, HA and DR setup, database migrations and upgrades. He has completed the B.Tech from Ganpat University. He can be reached on nisargupadhyay87@outlook.com
- Different ways to identify and change compatibility levels in SQL Server - July 22, 2024
- Copy SQL Databases between Windows 10 and CentOS using SQL Server data tools - October 19, 2022
- Changing the location of FILESTREAM data files in SQL Database - October 14, 2022