

In this article, I am going to explain how we can move the SQL database files to another location in Ubuntu 18.04. For the demonstration, I have installed Ubuntu 18.04, SQL Server 2019 on Linux on my workstation. You can read SQL Server 2019 on Linux with Ubuntu to understand the step-by-step installation process of the SQL Server 2019 on Linux. We will move database files of AdventureWorks2019 and Wideworldimportors database. To move the databases, we can use any of the following methods:
- Backup and restore the database: I am going to explain this method by restoring the backup of the AdventureWorks2019 database
- Detach and Attach database method: I will explain this method using the wideworldimportors database
First, let us view the current location of the database files.
View the physical location of SQL database files
To view the physical location of the database files, run the following query:
|
1 2 3 4 5 6 7 |
use master go select database_id [Database ID] , db_name(database_id)[Database Name], name [Logical Name], physical_name [File Location] from sys.master_files where database_id>=5 |
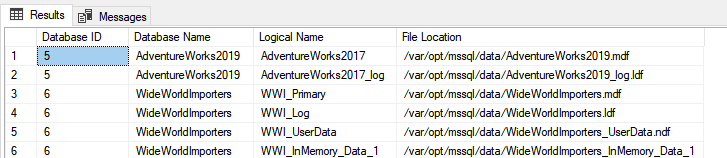
Once the file locations are determined, save the details to a notepad or word file. If you see any error, you can view the old location of the SQL database files and revert the operation.
Demo Setup
For demonstration, I am going to create a directory named MSSQL in the root directory (/ directory). I will create three directories named SQLData, SQLLog, and InMemoryData directory within /MSSQL/ directory to save the database files.
- Note: The wideworldimportors database has INMemoryOLTP filegroup. The Inmemory data will be moved in the INMemoryOLTP directory
To create the /MSSQL directory, run the following command:
root@LinuxSQL02:/# mkdir /MSSQL
Command to create /MSSQL/SQLData:
root@LinuxSQL02:/# mkdir /MSSQL/SQLData
Command to create /MSSQL/SQLLog:
root@LinuxSQL02:/# mkdir /MSSQL/SQLLog
Command to create /MSSQL/InMemoryData:
root@LinuxSQL02:/# mkdir /MSSQL/InMemoryData
The details of old and new location of Wideworldimportors database are the following.
|
Database Name |
File type |
Old Location |
New Location |
|
Wideworldimportors |
Primary Data file |
/var/opt/mssql/data |
/MSSSQL/SQLData/ |
|
Wideworldimportors |
Secondary Data file |
/var/opt/mssql/data |
/MSSSQL/SQLData/ |
|
Wideworldimportors |
In-memory OLTP filegroup |
/var/opt/mssql/data |
/MSSSQL/InMemoryData/ |
|
Wideworldimportors |
Transaction Log file |
/var/opt/mssql/data |
/MSSSQL/SQLData/ |
The details of the old and new location of the AdventureWorks2019 database are the following.
|
Database Name |
File type |
Old Location |
New Location |
|
AdventureWorks2019 |
Primary Data file |
/var/opt/mssql/data |
/MSSSQL/SQLData/ |
|
AdventureWorks2019 |
Transaction Log file |
/var/opt/mssql/data |
/MSSSQL/SQLLog/ |
Once everything is prepared, let us get started.
Backup and Restore method
I have created a directory named Backups in /var/opt/mssql/backup to save the backup of the AdventureWorks2019 database. To generate the copy-only backup of the AdventureWorks2019 database, run the below query:
Backup database [AdventureWorks2019] to disk =’/var/opt/mssql/Backup/AdventureWorks2019.bak’ with copy_only, compression
Once the backup is generated, let us move the SQL database files by restoring them.
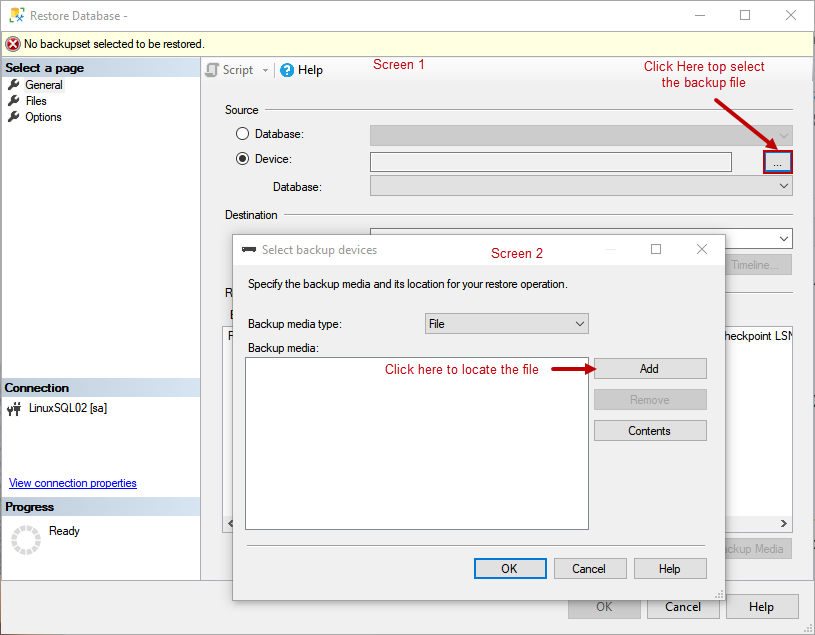
To restore the database, Open SQL Server Management Studio (SSMS) connect to the SQL Server instance Right-click on Databases and select Restore Database…

To locate the backup file, select device click on the balloon icon (Screen 1). A dialog box Select backup devices opens Click on Add (Screen 2).
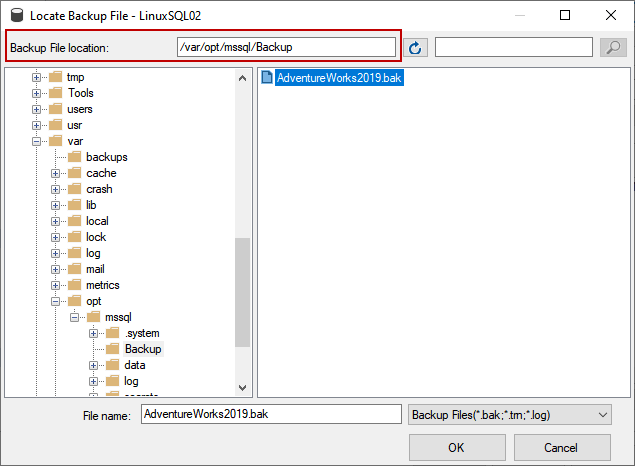
On the Locate Backup File screen, navigate to the /var/opt/Backup directory and select AdventureWorks2019 and click OK.
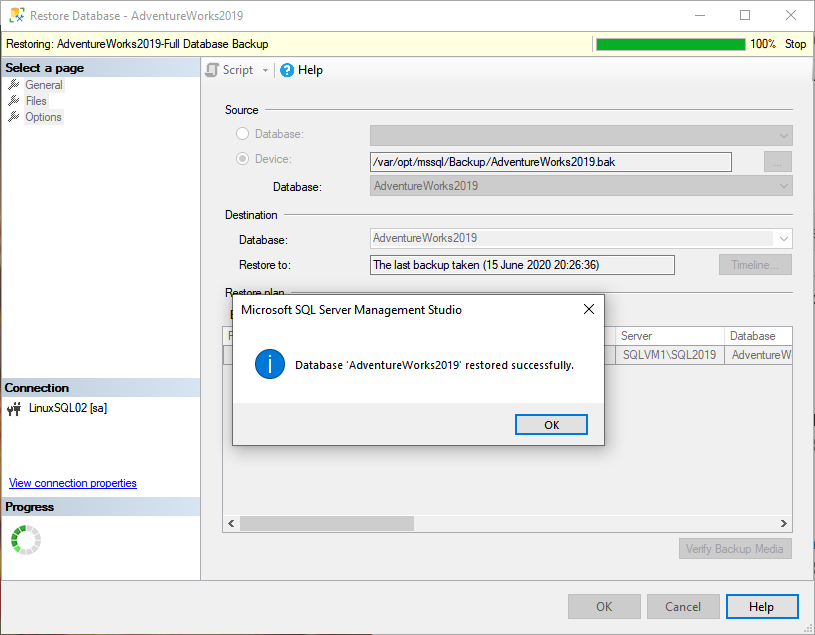
We want to move the database and log files of the AdventureWorks2019 database to /MSSQL/ directory. So, Back to Restore database screen, click on Files. In the Restore database files as section, click on the Relocate database files to folder option. This option allows us to change the destination folder of the data file and log file. Specify /MSSQL/SQLData in the data file folder and specify /MSSQL/SQLLog in the Log file folder. Click OK to restore the database.

The database is restored successfully.
Alternatively, you can run the below query to restore the database.
|
1 2 3 4 5 6 7 8 |
USE [master] GO RESTORE DATABASE [AdventureWorks2019] FROM DISK = N'/var/opt/mssql/Backup/AdventureWorks2019.bak' WITH FILE = 1, MOVE N'AdventureWorks2017' TO N'/MSSQL/SQLData/AdventureWorks2019.mdf', MOVE N'AdventureWorks2017_log' TO N'/MSSQL/SQLLog/AdventureWorks2019_log.ldf', NOUNLOAD, STATS = 5 GO |
To verify, run following query:
|
1 2 3 4 5 6 7 8 |
use master go select database_id [Database ID] , db_name(database_id)[Database Name], name [Logical Name], physical_name [File Location] from sys.master_files where db_name(database_id) = 'AdventureWorks2019' GO |

As you can see in the above image, the SQL database files have been moved to a new location. Now, let us go through the detach and attach the database to move the database files.
Detach and attach the database
We are moving the database files of the wideworldimportors database from /var/opt/mssql/data to their respective directories created in the/MSSQL/ directory.
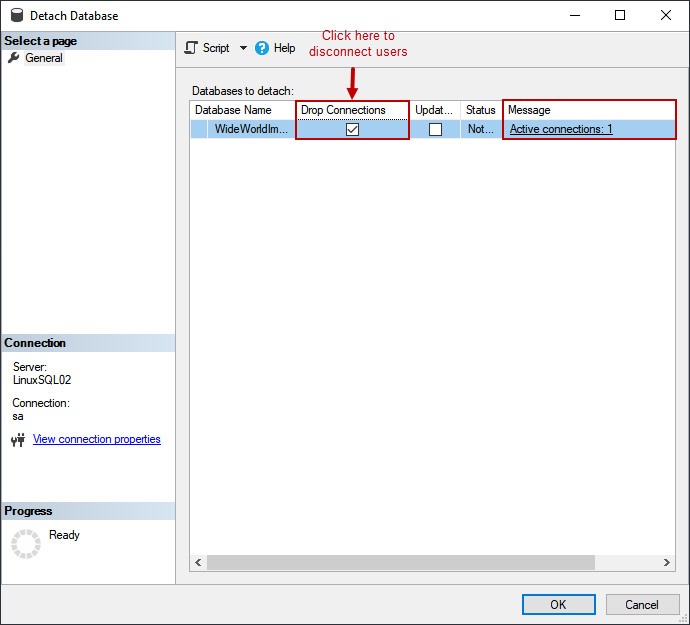
Now, first, detach the database. To do that, Open SQL Server Management Studio Connect to LinuxSQL02 Right-click on Wideworldimportors Hover on Tasks and click on Detach…
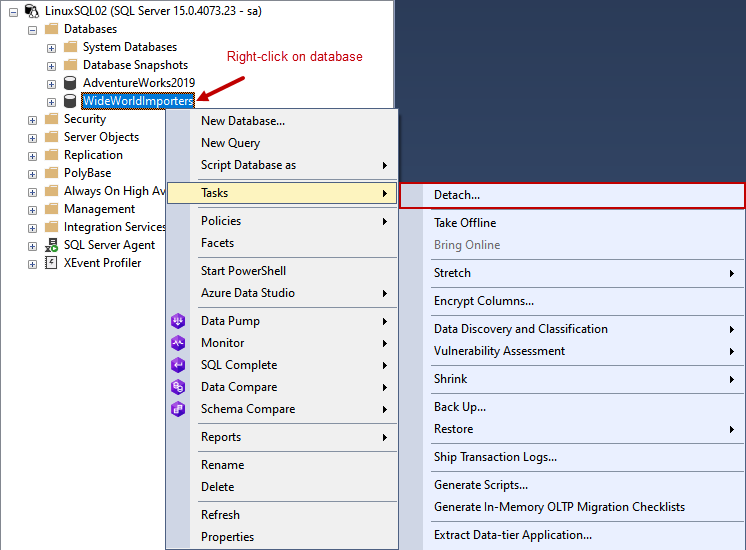
Before detaching the database, we must disconnect all the users connected to the database, so choose the Drop Connections option in the detach database dialog box and click OK to close the database.
Alternatively, you can execute the following query to drop the active connection and detach the database.
|
1 2 3 4 5 6 |
Use Master Go Alter database WideWorldImporters set single_user with rollback immediately Go Exec sp_detach_db WideWorldImporters Go |
Now, to copy the database files, we are using the cp command of Linux. The commands are the following:
To copy the data files:
/*Primary Data file*/
root@LinuxSQL02:/# cp /var/opt/mssql/data/WideWorldImporters.mdf /MSSQL/SQLData/
/*Secondary data file*/
root@LinuxSQL02:/# cp /var/opt/mssql/data/WideWorldImporters_UserData.ndf /MSSQL/SQLData/
To copy the log files:
root@LinuxSQL02:/# cp /var/opt/mssql/data/WideWorldImporters.ldf /MSSQL/SQLLog/
To copy the in-memory OLTP filegroup:
root@LinuxSQL02:/# cp -r /var/opt/mssql/data/WideWorldImporters_InMemory_Data_1/
/MSSQL/InMemoryData/
Once files are copied, make sure that the directories and files must have the read and write permission, so to assign the permission, run following command.
root@LinuxSQL02:/# chmod -R a+rwx /MSSQL/SQLData
root@LinuxSQL02:/# chmod -R a+rwx /MSSQL/SQLData
root@LinuxSQL02:/# chmod -R a+rwx /MSSQL/SQLLog
root@LinuxSQL02:/# chmod -R a+rwx /MSSQL/InMemoryData
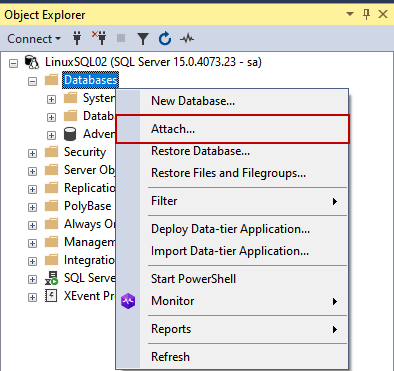
To attach the database using the SQL Server Management studio, right-click on Databases and select Attach…
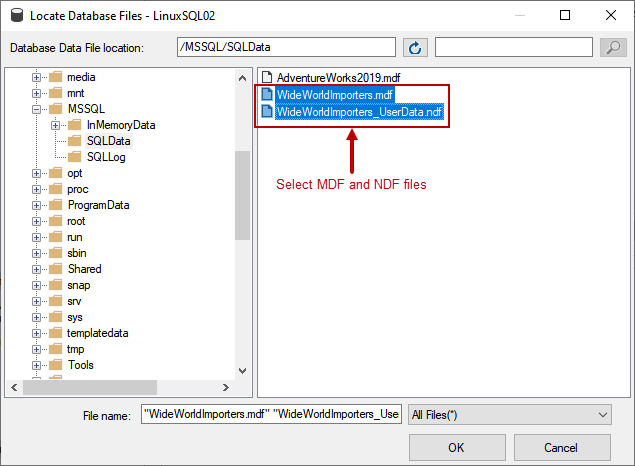
To select the database file, click on the Add button on the Attach Database dialog box. On the Locate database file dialog box, navigate to /MSSQL/SQLData directory and select wideworldimportors.mdf and wideworldimportors.ndf and click OK.
In the Attach dialog box, you can see an error “Transaction log file not found.”
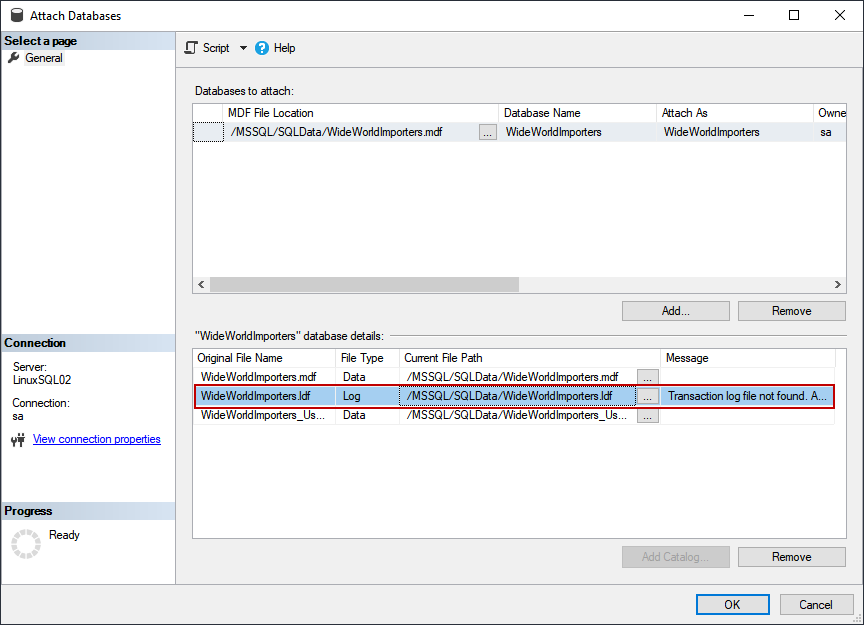
This error occurs because SQL Server tries to find the database log file in the/MSSQL/SQLData directory. We have copied to log file to /MSSQL/SQLLog directory to rectify the error, replace the value of the Current file path to /MSSQL/SQLLog/WideWorldImporters.ldf.
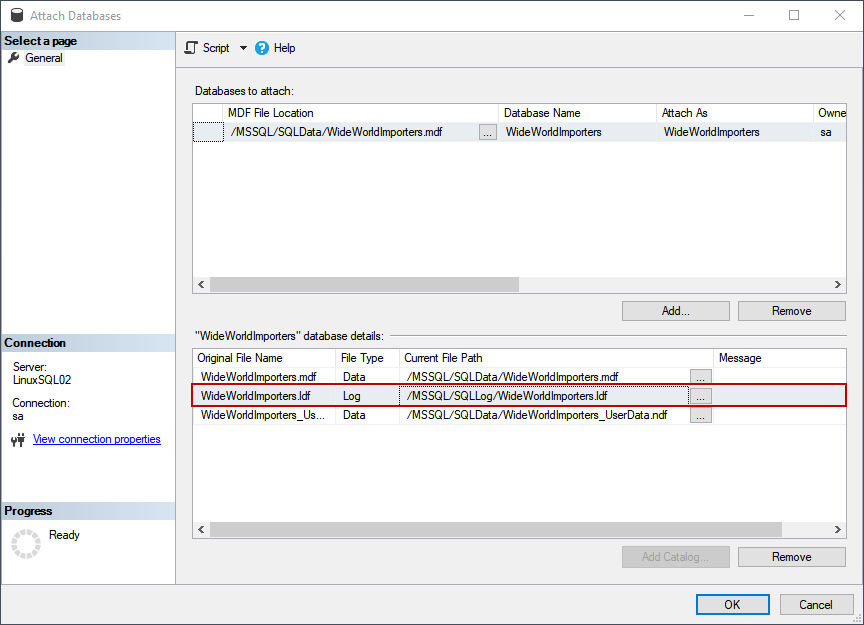
Click OK to attach the database. Alternatively, you can run the below query to attach the wideworldimportors database.
|
1 2 3 4 5 6 7 8 |
USE [master] GO CREATE DATABASE [WideWorldImporters] ON ( FILENAME = N'/MSSQL/SQLData/WideWorldImporters.mdf' ), ( FILENAME = N'/MSSQL/SQLLog/WideWorldImporters.ldf' ), ( FILENAME = N'/MSSQL/SQLData/WideWorldImporters_UserData.ndf' ) FOR ATTACH GO |
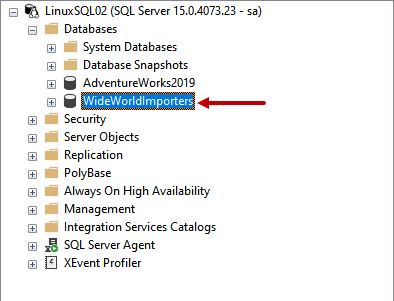
You can see the attached database in the SQL Server Management Studio.
To view the physical location of the database files, run below query.
|
1 2 3 4 5 6 7 |
use master go select database_id [Database ID] , db_name(database_id)[Database Name], name [Logical Name], physical_name [File Location] from sys.master_files where db_name(database_id) = 'WideWorldImporters' |

As you can see in the above screenshot, the primary database files, secondary database files, and transaction log files have been changed, but the location of the filegroup location of the WWI_InMemory_Data_1 has not been changed. To change the location, execute the following query:
|
1 |
ALTER DATABASE [WideWorldImporters] MODIFY FILE (NAME = N'WWI_InMemory_Data_1', FILENAME = N'/MSSQL/InMemoryData/WideWorldImporters_InMemory_Data_1/' ) |

The new location of WWI_InMemory_Data_1 will be applicable after rebooting the SQL Server services, and therefore, I am restarting the services.
root@LinuxSQL02:/# service mssql-server restart
Once services are restarted, run the below query to verify that the location has been updated properly.
|
1 2 3 4 5 6 7 |
use master go select database_id [Database ID] , db_name(database_id)[Database Name], name [Logical Name], physical_name [File Location] from sys.master_files where db_name(database_id) = 'WideWorldImporters' |

As you can see, the location of WWI_InMemory_Data_1 has been changed.
Summary
In this article, I have explained how we can copy SQL database files to another location in SQL Server 2019 on Linux.
Table of contents
| Move SQL database files in SQL Server 2019 on Linux |
| Move SQL databases to a different mount point: Create a new mount point in Linux |
| Move SQL databases to a different mount point: Granting permissions and moving System and User databases |

He has expertise in database design, performance tuning, backup and recovery, HA and DR setup, database migrations and upgrades. He has completed the B.Tech from Ganpat University. He can be reached on nisargupadhyay87@outlook.com
- Different ways to identify and change compatibility levels in SQL Server - July 22, 2024
- Copy SQL Databases between Windows 10 and CentOS using SQL Server data tools - October 19, 2022
- Changing the location of FILESTREAM data files in SQL Database - October 14, 2022