
There are multiple ways to deploy the databases in the AWS RDS SQL Server. Suppose you want to migrate your on-premises SQL Server database to AWS managed relational database service and you have a critical application and require minimal (almost zero) downtime. For this purpose, you can use the AWS Database Migration Service (AWS DMS) in a combination of SQL Server native backups.
You can use the on-premises SQL Server as a source database; however, for demonstration of the steps, I will use the SQL Server on EC2 instance.
Configuring SQL Server on EC2 instance as a source database
For the demonstration, we use the Amazon Machine Image (AMI) preconfigured with the SQL Server 2019. Log in to your AWS console and search for SQL Server 2019 AMI.
It highlights all available AMI for SQL Server 2019. I choose the Microsoft Windows Server 2019 with SQL server 2019 standard.

You can go through the remaining steps and build the SQL Server on an EC2 instance. Refer to the article for detailed steps on AWS SQLShack for detailed instructions.
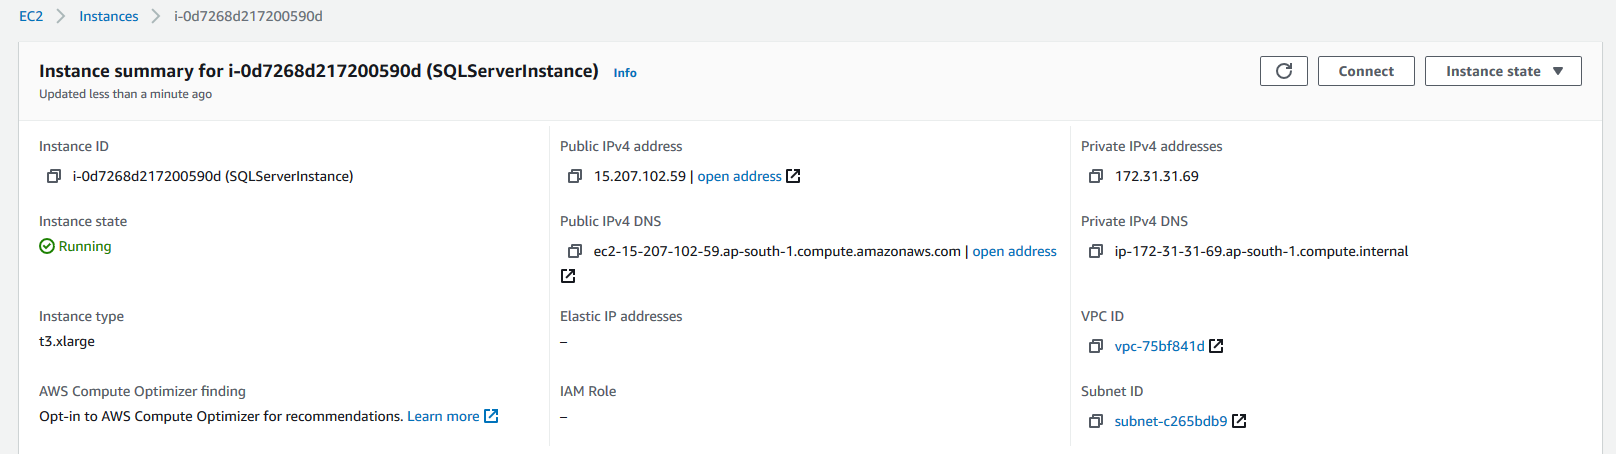
An EC2 instance is in a running state, and it takes some time to perform the 2/2 status check.

Open the EC2 instance properties, and click on Connect.
In the Connect to the instance page, click on RDP client. From here, download the remote desktop file.
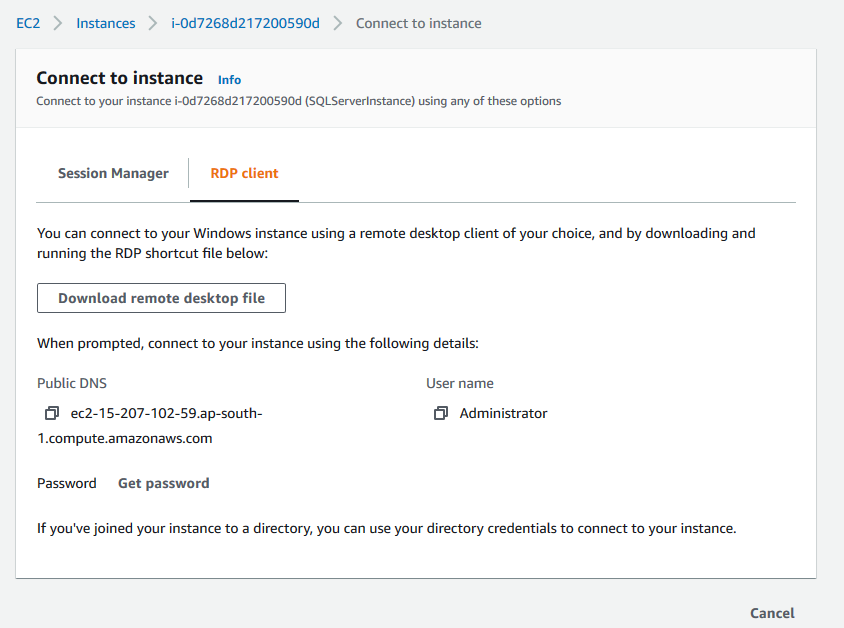
Click on Get Password, input your PEM secret key, and it displays the password on the screen. You require this password for an RDP session on the EC2 Windows server.
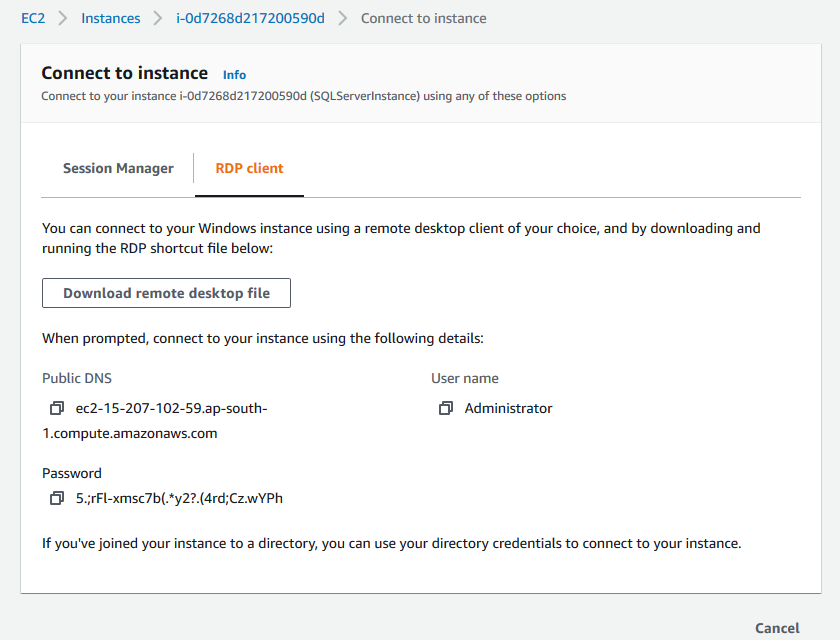
Specify your administrator password and get an RDP session, as shown below.

This EC2 instance is having preinstalled SQL Server 2019. Therefore, for a sample database, browse to Microsoft docs and download the [AdventureWorks2019.bak] file.
![download [AdventureWorks2019.bak] file](/wp-content/uploads/2021/01/download-adventureworks2019-bak-file.png)
Restore the [AdventureWorks2019] database in SQL Server on EC2 instance with the following script.
|
1 2 3 4 |
USE [master] RESTORE DATABASE [AdventureWorks2019] FROM DISK = N'C:\SQL\AdventureWorks2019.bak' WITH FILE = 1, MOVE N'AdventureWorks2017' TO N'C:\Program Files\Microsoft SQL Server\MSSQL15.MSSQLSERVER\MSSQL\DATA\AdventureWorks2019.mdf', MOVE N'AdventureWorks2017_log' TO N'C:\Program Files\Microsoft SQL Server\MSSQL15.MSSQLSERVER\MSSQL\DATA\AdventureWorks2019_log.ldf', NOUNLOAD, STATS = 5 |
![Restore the [AdventureWorks2019] database](/wp-content/uploads/2021/01/restore-the-adventureworks2019-database.png)
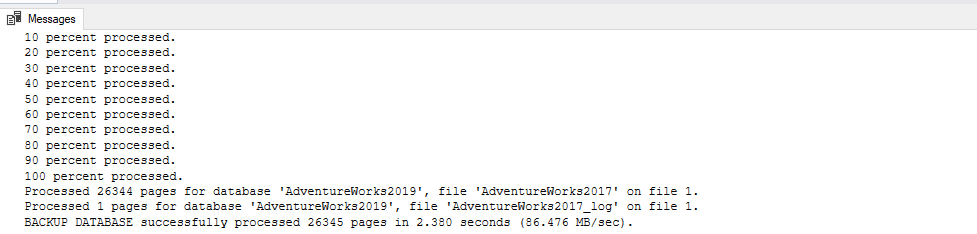
Before starting the database migration, you can take a Full database backup for the [AdventureWorks2019] database. We will restore this backup on the AWS RDS SQL Server.
|
1 2 3 4 |
BACKUP DATABASE [AdventureWorks2019] TO DISK = N'C:\Program Files\Microsoft SQL Server\MSSQL15.MSSQLSERVER\MSSQL\Backup\AdventureWorks2019.bak' WITH NOFORMAT, NOINIT, NAME = N'AdventureWorks2019-Full Database Backup', SKIP, NOREWIND, NOUNLOAD, STATS = 10 GO |
SQL Server uses the log sequence number for the transaction log records in the database. We can use this LSN in the database migration task configurations.
Execute this script on the [AdvenutreWorks2019] database and note-down the LSN value.
|
1 2 |
SELECT [Current LSN], [Begin Time], Description FROM fn_dblog(NULL, NULL) Where [Transaction Name] = 'Backup:CommitDifferentialBase' |

Restore the full database backup on the AWS RDS SQL Server
In this step, we will restore the full backup taken earlier in the AWS RDS SQL Server instance. Before you move forward, you should have the following prerequisites.
- AWS S3 bucket: Here, I use the S3 bucket [SQLShackDemo17112020]
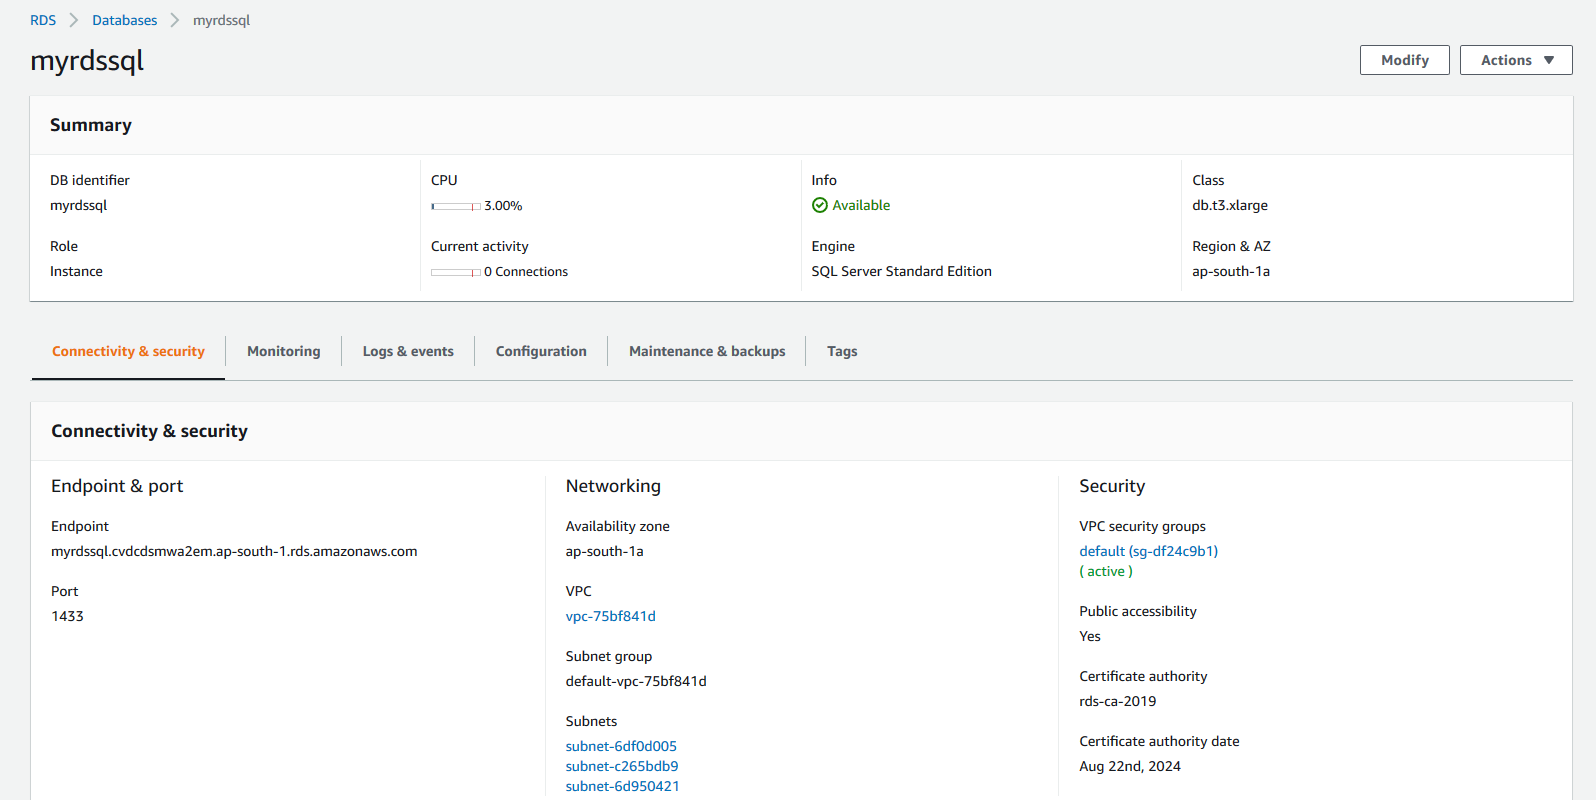
- RDS SQL Server: Here, I use the RDS instance [myrdssql] with SQL Server 2019
Both the S3 bucket and RDS instance should be in an AWS region.
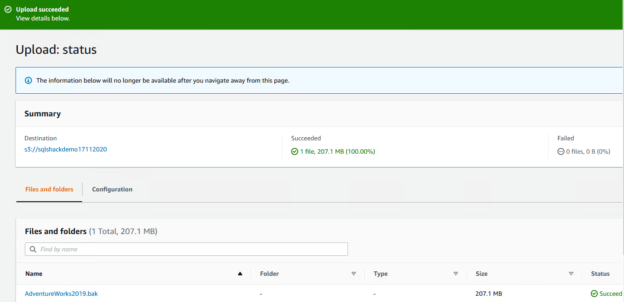
Upload the backup file in the AWS S3 bucket
Open the AWS S3 bucket [SQLShackDemo17112020] and upload the full backup of the [AdventureWorks2019] database.

Restore database backup from S3 to RDS SQL
We need to restore the backup stored from the S3 bucket to AWS RDS SQL Server. To enable the restoration, do the following tasks.
- Create an IAM policy and role to integrate S3 bucket and RDS
- Create an option group with SQLSERVER_BACKUP_RESTORE, modify the RDS instance to use the new option group
You can refer to the article, AWS RDS SQL Server migration using native backups for detailed instructions.
In the below script, specify the ARN for backup stored in AWS S3 bucket and execute on the RDS instance.
|
1 2 3 |
exec msdb.dbo.rds_restore_database @restore_db_name='AdventureWorks2019', @s3_arn_to_restore_from='arn:aws:s3:::sqlshackdemo17112020/AdventureWorks.bak'; |
It initiates a database restoration task and returns the task id.

Track the database restoration task status using the following script.
|
1 |
Exec msdb.dbo.rds_task_status @task_id=4 |
As shown below, the database restoration task is successful for the [AdventureWorks2019] database.

Creating an AWS DMS replication instance
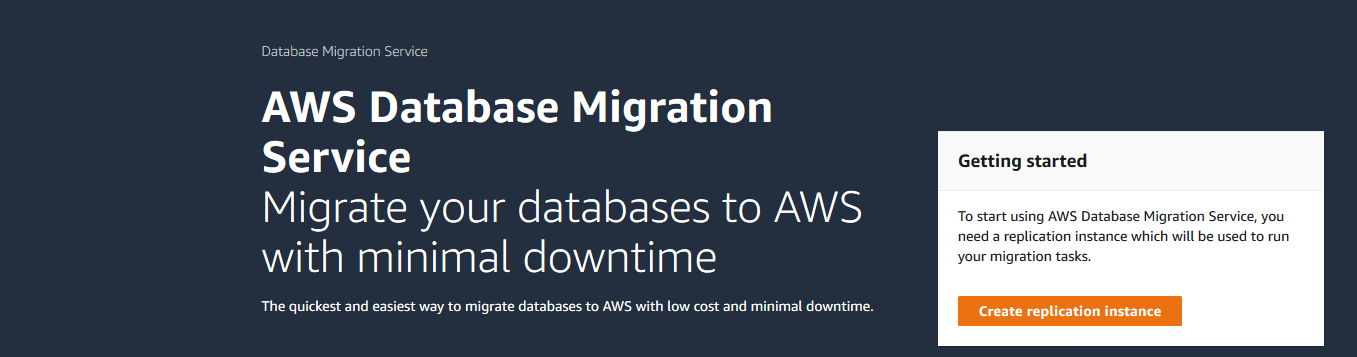
We need to configure an AWS DMS replication instance for database migration. In the AWS Web Console, launch Database Migration Service. It gives the following AWS DMS dashboard.
Click on Create replication instance. On the replication instance page, enter the following information.
- DMS instance name
- Descriptive Amazon resource name (Optional)
- Description
- Choose an instance class
- AWS DMS version: You can go with the prepopulated DMS version
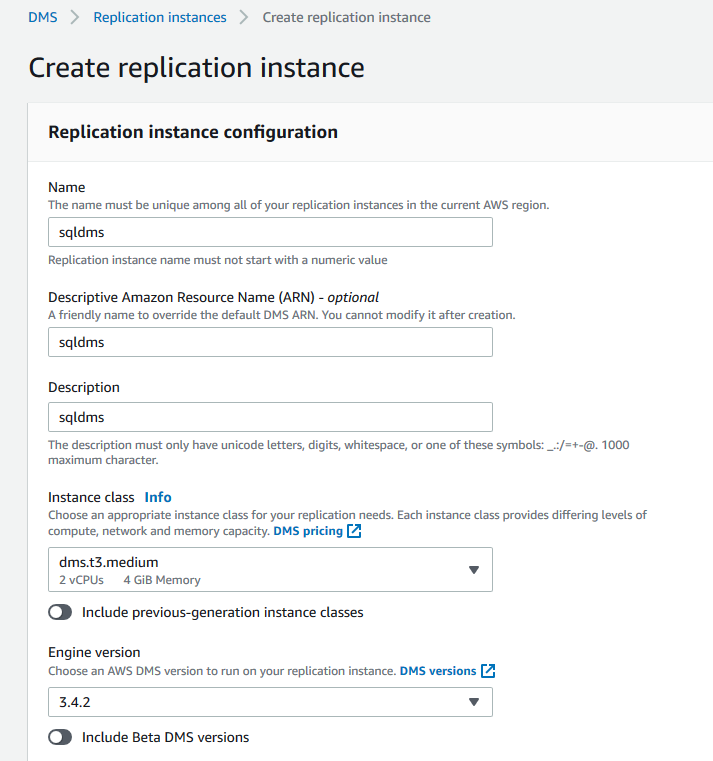
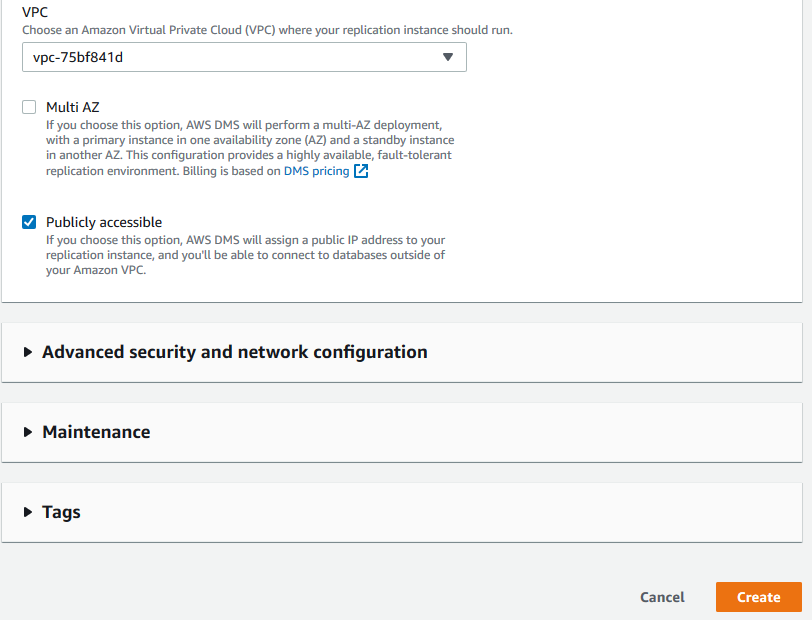
- VPC: Select the Amazon Virtual Private cloud for your replication instance
- Multi-AZ: If you want to configure the high availability for the DMS instance, choose the Multi-AZ configuration
- Publicly accessible: If you want to assign a public IP address to your AWS DMS instance, put a tick on the checkbox
We can go with the default configuration in the remaining options. Click on Create.
It creates the AWS DMS instance in a few minutes. Its status should be Available before we proceed to the next step.

Configure the Source and Target endpoints
We need endpoints for both the source (On-premise or SQL Server on EC2 instance) and Target (RDS SQL Server) for the database migration task.

In the AWS DMS, click on the Endpoints.
Source Endpoint
- Endpoint type: Source endpoint
- Endpoint identified: Give a unique name for your source endpoint
- Descriptive Amazon Resource Name( optional)
- Source engine: Choose Microsoft SQL Server
- Server name: Specify the public DNS name of your AWS EC2 instance or the FQDN of your on-premise SQL Server.
- Port: Specify the SQL Server network port. The default port is 1433.
- User name and password: Enter the credentials for connecting to SQL Server instance. It should have sysadmin permissions so that DMS can configure the replication or Change data capture(CDC) process.
- Database name: Enter the source database name that we want to migrate to the AWS RDS SQL Server.

Specify VPC for your AWS account and click on Create endpoint.
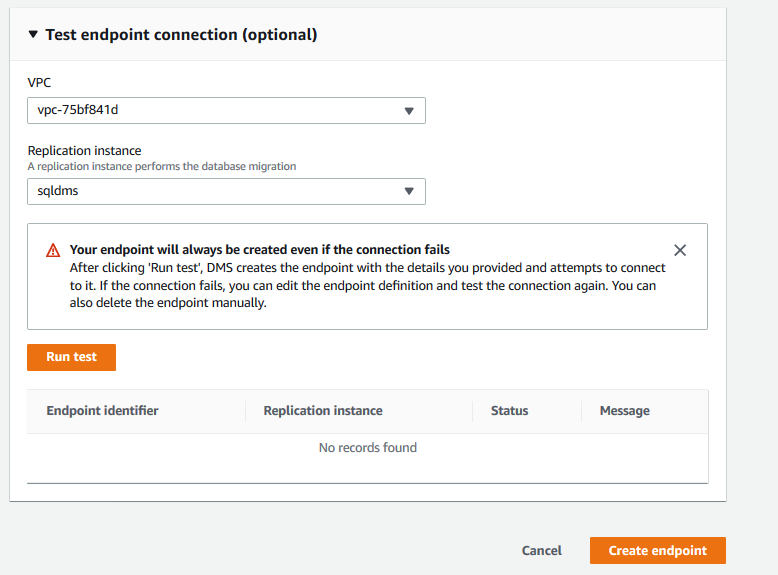
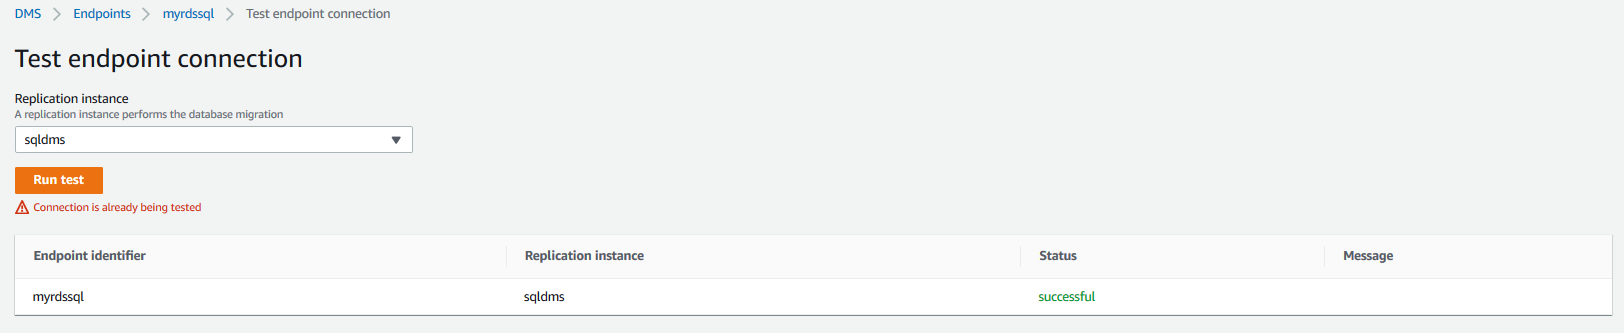
Open the source endpoint and go-to connection. Click on Test Connection; its status should be Successful, as shown below.

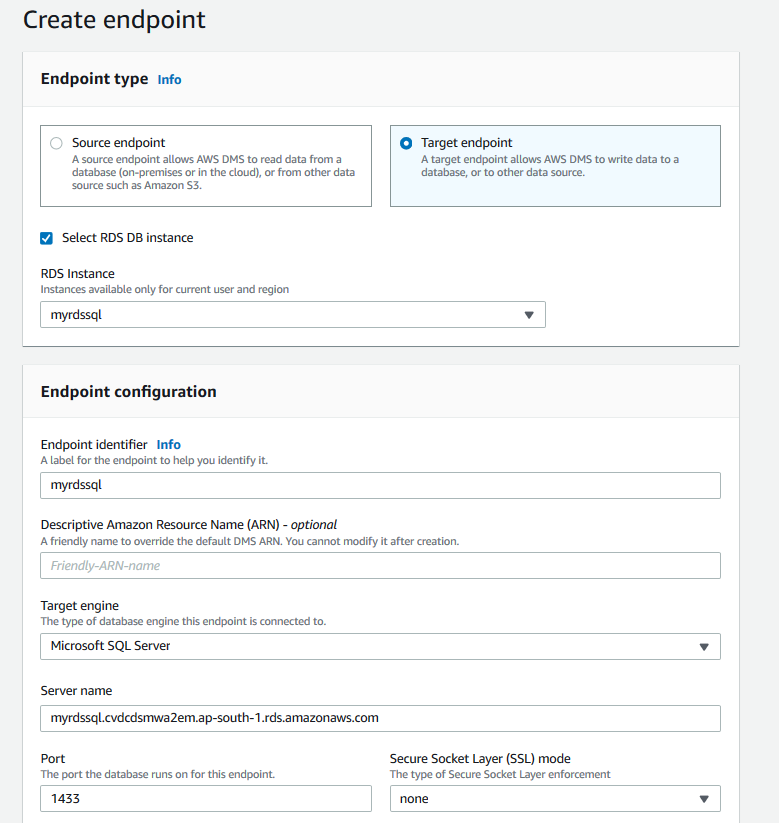
Target Endpoint
Similar to the source endpoint, we need to create the target endpoint for AWS RDS SQL Server.
- RDS instance: Put a check on Select RDS DB instance and choose your target RDS from the drop-down
The remaining configurations are similar to the source endpoint.
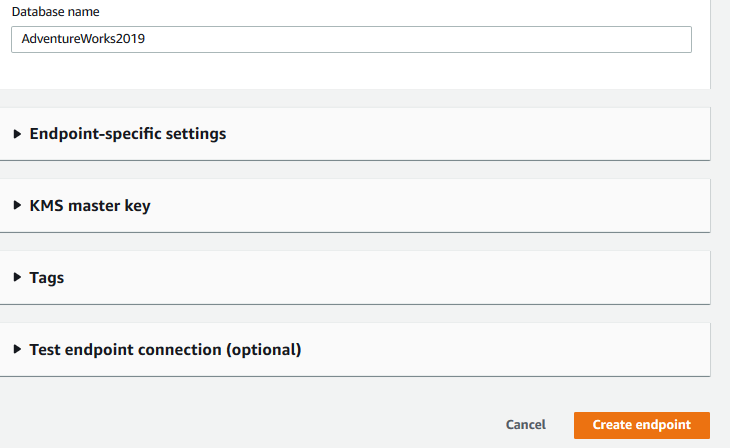
Once the target endpoint for the RDS instance is created, its test connection should be successful, as shown below.
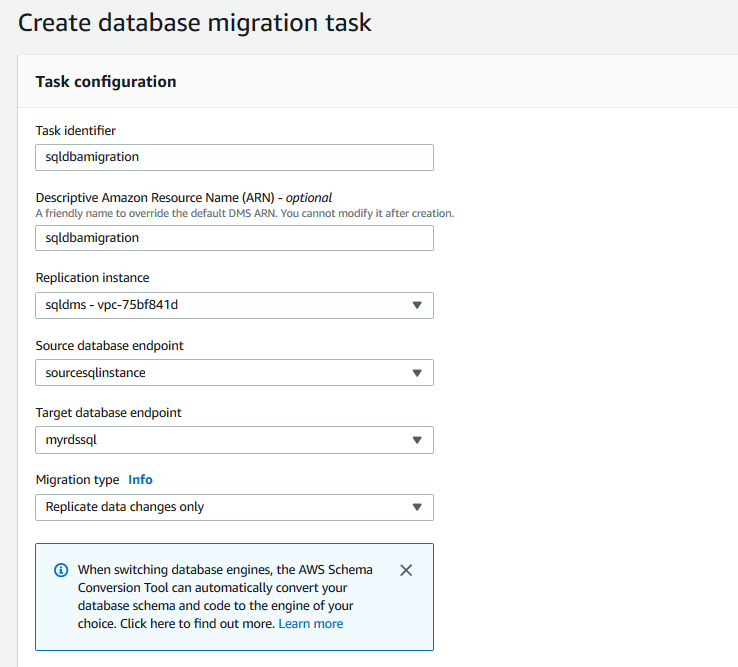
Create a database migration task
In the AWS DMS, navigate to database migration tasks. We do not have any existing DMS task. Therefore, it shows the blank screen.
Click on Create database migration task.

In the database migration task, do the following configurations.
- Task identifier: Give a unique name for the DMS task
- Descriptive Amazon Resource Name (optional)
- Replication instance: Select the DMS replication instance from the drop-down
- Source database endpoint: Choose the source database endpoint from the drop-down
- Target database endpoint: Choose the target database endpoint from the drop-down value
-
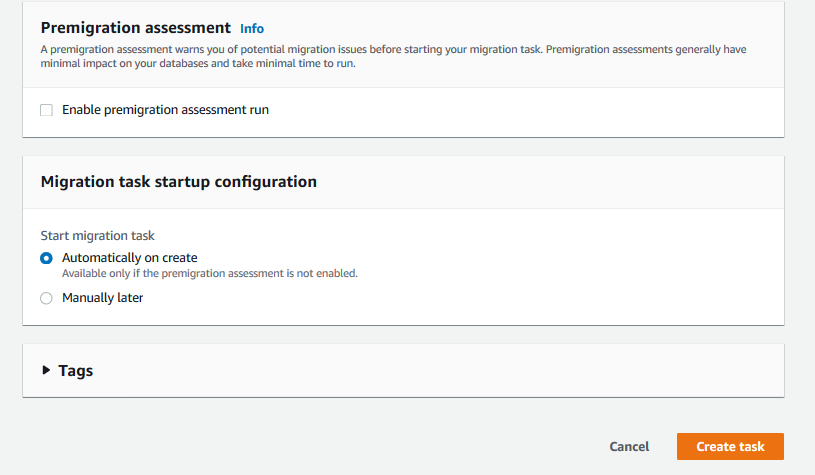
Migration type: We already restored the full backup from the source to RDS SQL Server. Therefore, choose the option – Replicate data changes only

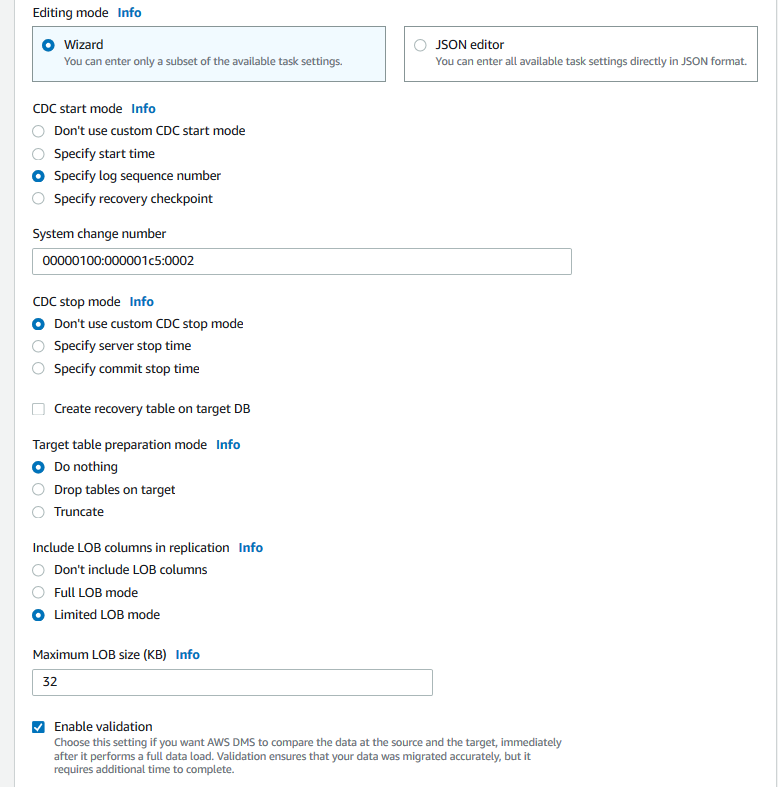
- In the CDC state mode, choose option Specify log sequence number and enter the LSN in the System change number box
- In the Target table preparation mode, choose to Do Nothing
Put a check on Enable Data Validation. Using this option, AWS DMS compares data at source and target databases. It also ensures that data migration is successful and consistent
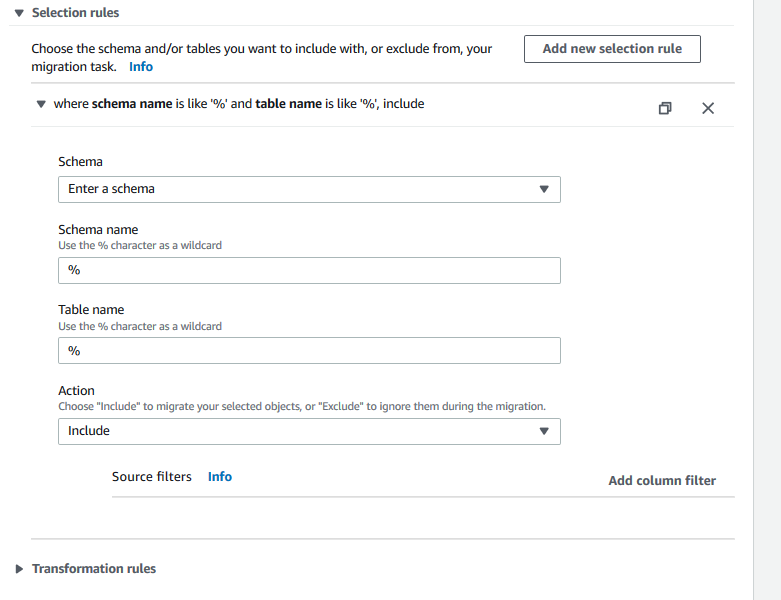
- In the Selection rules, we can filter the objects for specific schema, table or pattern. Here, we did not specify any specific schema or pattern. Therefore it replicates complete data changes
Click on the Create task button.
It starts configuration for database migration task.

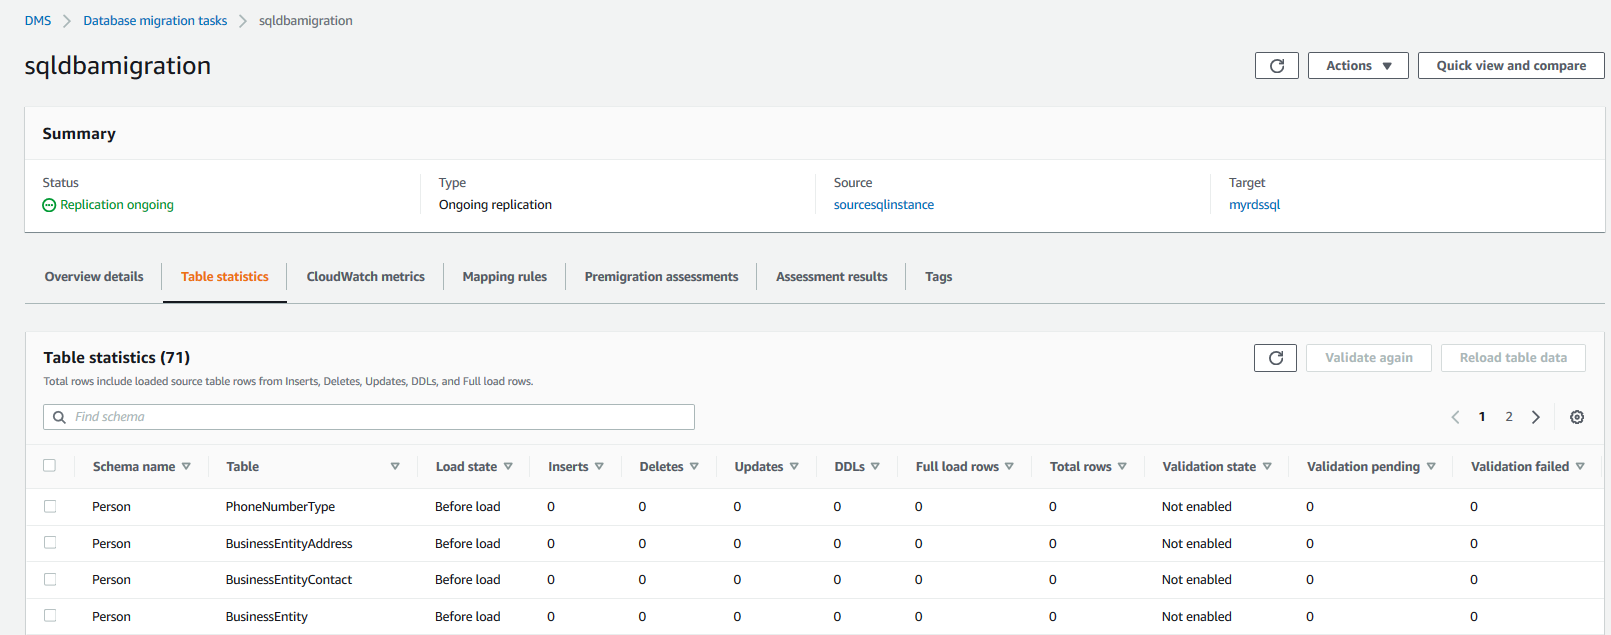
Its status changes to replication ongoing after a few minutes.

You can click on table statistics. It populates all tables. Here, you can monitor the inserts, delete, updates, DDL, total rows once the table is validated on both source and target. It takes a few minutes for populating the information depending upon your database size.
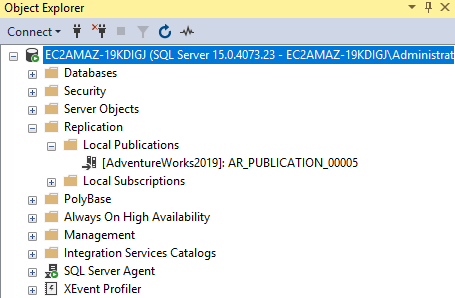
You can also go back to your source instance and view that a local publication exists. The AWS database migration service configures it for populating data between the source and destinations.
AWS DMS uses the replication and CDC for the database migrations.
- SQL Server replication for capturing data changes for tables with primary keys. AWS DMS automatically configures the replication if you provide an endpoint user with the sysadmin permissions
- Change Data Capture ( CDC) for tables without primary keys. You need to enable the MSCDC at the database level and add the tables manually
Refer to the article, Using a Microsoft SQL Server database as a source for AWS DMS for more details.
It continuously replicates the data from the source to the target AWS RDS SQL Server. You can stop data replication during the cut-off time and point your application to connect with RDS endpoints.
Conclusion
In this article, we explored the AWS database migration service for migrating a database from source on-premise or SQL Server on EC2 instance to AWS RDS SQL Server with zero downtime. It is suitable for critical databases where we cannot afford much downtime.

I am the author of the book "DP-300 Administering Relational Database on Microsoft Azure". I published more than 650 technical articles on MSSQLTips, SQLShack, Quest, CodingSight, and SeveralNines.
I am the creator of one of the biggest free online collections of articles on a single topic, with his 50-part series on SQL Server Always On Availability Groups.
Based on my contribution to the SQL Server community, I have been recognized as the prestigious Best Author of the Year continuously in 2019, 2020, and 2021 (2nd Rank) at SQLShack and the MSSQLTIPS champions award in 2020.
Personal Blog: https://www.dbblogger.com
I am always interested in new challenges so if you need consulting help, reach me at rajendra.gupta16@gmail.com
View all posts by Rajendra Gupta
- Understanding PostgreSQL SUBSTRING function - September 21, 2024
- How to install PostgreSQL on Ubuntu - July 13, 2023
- How to use the CROSSTAB function in PostgreSQL - February 17, 2023