
It is the second article in the Learn AWS CLI series. It gives you an overview of working with the AWS S3 bucket using CLI commands. We also look at a brief overview of the S3 bucket and its key components.
Prerequisites
You should meet the following prerequisites before going through exercises demonstrated in this article.
- Created an Amazon web console
- IAM user with relevant access. You can use a root account as well, but it has the highest permissions, and you should avoid using root user in a production environment
- Installed AWS CLI in either local system or AWS EC2 machine
- Configure a CLI profile using your access key, secret key, default region, and output format You can refer to the article Learn AWS CLI – An Overview of AWS CLI (AWS Command Line Interface) for more details
Overview of AWS S3 Bucket
Amazon Web Services (AWS) provide a cloud storage service to store and retrieves files. It is known as Simple Storage Service or AWS S3. You might be familiar with Dropbox or Google Drive for storing images, docs, and text files in the cloud. AWS S3 is a similar kind of service from Amazon. You can store a single file up to 5 TB with unlimited storage. It provides benefits such as flexibility, scalability, durability, Availability.
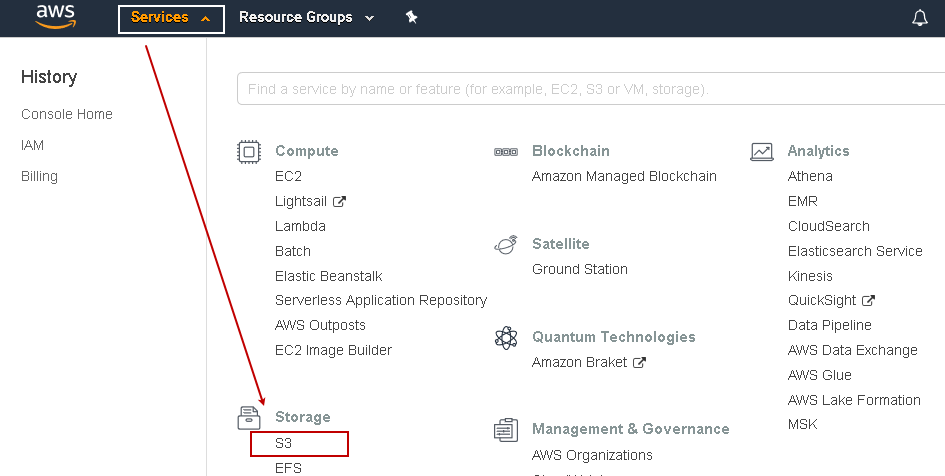
Log in to the AWS Console using either root account or IAM user and then expand Services. You can see S3 listed in the Storage group as shown below.
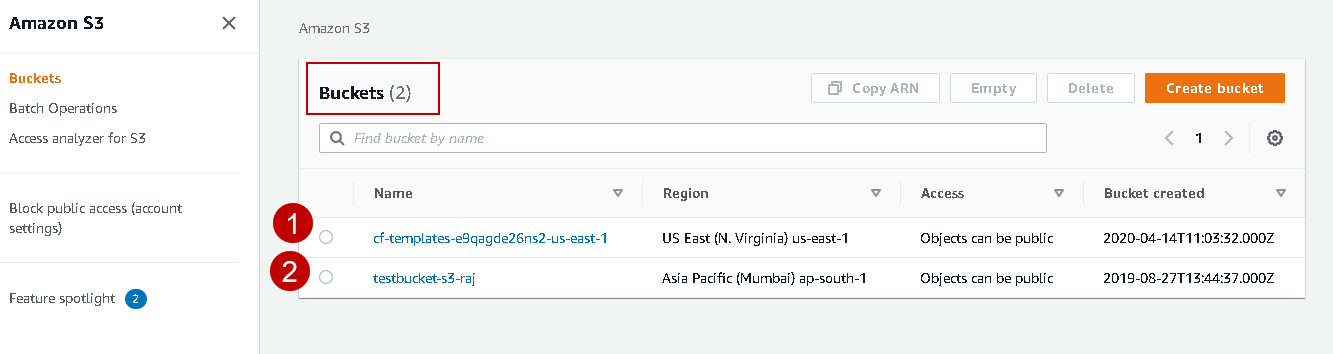
Click on S3, and it launches the S3 console. Here, you see an existing bucket (if any) and options to create a new bucket.
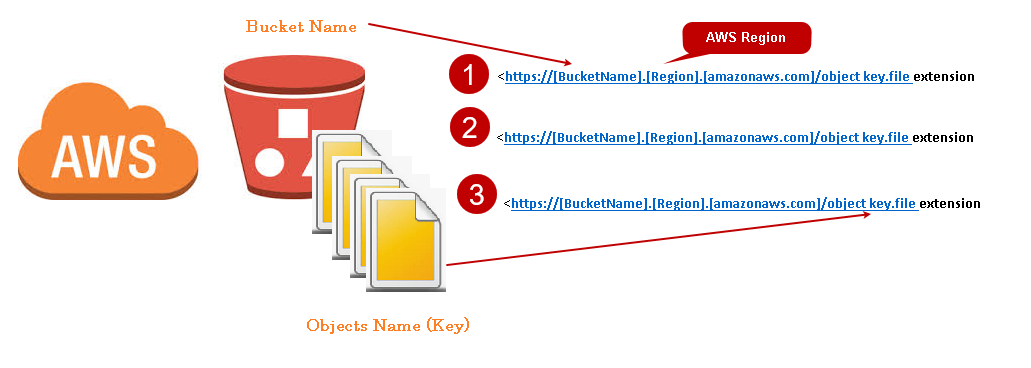
- Bucket: A bucket is a container or a folder to store the objects. We can have sub-folders in a folder. You must create a unique namespace for an S3 bucket. We cannot use the upper case or space in the bucket name. We can go through the article to view naming conventions in an S3 bucket
- Key: Each object name is a key in the S3 bucket
- Metadata: S3 bucket also stores the metadata information for a key such as a file upload timestamp, last update timestamp, version
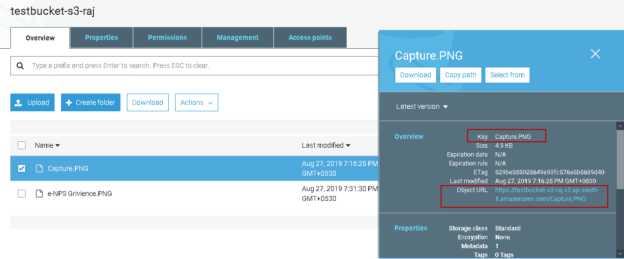
Object URL: Once we upload any object in the AWS S3 bucket, it gets a unique URL for the object. You can use this URL to access the document. This URL is in the following format:
https://[BucketName].[Region].[amazonaws.com]/object key.file_extension
In the following example, we can see Image URL in the same format.
https://testbucket-s3-raj.s3.ap-south-1.amazonaws.com/Capture.PNG
- [Bucket name] : testbucket-s3-raj
- [Region]:ap-south-1
- [Key]: Capture.PNG

You can also view the S3 bucket URL representation in the following image. Each object contains a different URL, although the basic format remains similar.
Once you upload an object in the S3 bucket, it follows Read after Write consistency. It refers to the fact that after uploading an object, it is available immediately to all users (with relevant access) to read it. However, once you remove an item, it is Eventual consistent. It takes some time to remove the item for all edge locations (cache).
AWS CLI tool command for S3 bucket
As of now, you should be familiar with an AWS CLI tool and an S3 bucket for storing objects. In this section, we use the CLI command to perform various tasks related to the S3 bucket.
Create a new AWS S3 Bucket
We use mb command in CLI to create a new S3 bucket. You should have configured the CLI profile in your environment before executing this command. We specified a default region Asia Pacific (Mumbai) ap-south-1 in the production profile.
Open a command prompt and execute the below CLI code. It creates a new S3 bucket named sqlshackdemocli in the default region.
|
1 |
aws s3 mb s3://sqlshackdemocli --profile production |
In the query output, it returns the bucket name.

Now, go back to the AWS web console and refresh the S3 buckets. You can see the new bucket in the following screenshot.
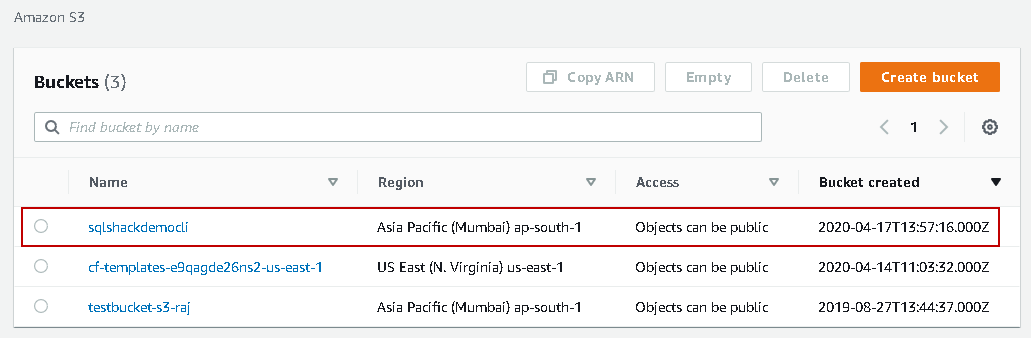
Select the S3 bucket and click on Copy ARN. It is a unique Amazon resource name. It returns following ARN- arn:aws:s3:::sqlshackdemocli for S3 bucket.
You should provide an S3 bucket name as per the AWS standards. For example, we cannot use underscore(_) in the bucket name. It gives you the following error message.

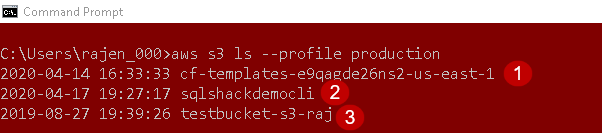
Lists all AWS S3 Buckets
We use ls command to retrieve S3 bucket names in your AWS account.
|
1 |
aws s3 ls --profile production |
As per the previous screenshot, we have three buckets in AWS. You get the bucket name along with the creation date in the output using the CLI command.
Copy a single file from the local system to cloud-based AWS S3 Buckets
Once we created an S3 bucket, we need to upload the relevant objects in it. It uses copy command (cp) to copy a file from the local directory to the S3 bucket. The following command uploads a text file into S3. It might take time to upload depending upon file size and internet bandwidth.
|
1 |
aws s3 cp C:\FS\aarti.txt s3://sqlshackdemocli |

You can open the S3 bucket and verify that the uploaded file exists in the bucket.

Copy multiple files from the local system to cloud-based AWS S3 Buckets
Suppose you want to upload multiple files in the S3. It is not feasible to execute the above command with each file name. We want a way to upload them without specifying file names.
We still use the cp command to specify a directory along with argument recursive. Here, we do not need to specify the file names.
|
1 |
aws s3 cp directory_path s3://bucket_name –recursive |
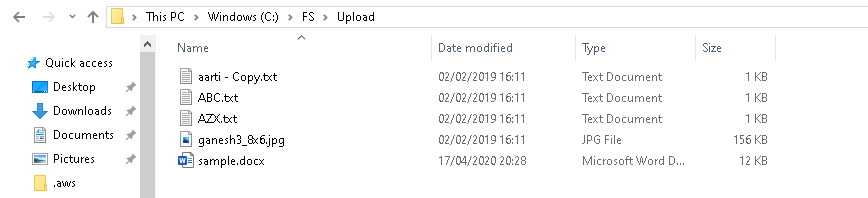
For this demo, I want to upload the following 5 files from the FS folder to the S3 bucket.
This command uploads all files available in the specified folder to the AWS S3 bucket.
|
1 |
aws s3 cp C:\FS\ s3://sqlshackdemocli - - recursive |
As you can see, it goes through each file available in the specified folder and uploads it.
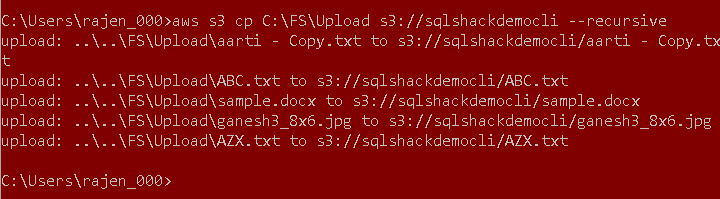
Refresh the S3 bucket and verify the uploaded files using a recursive argument.
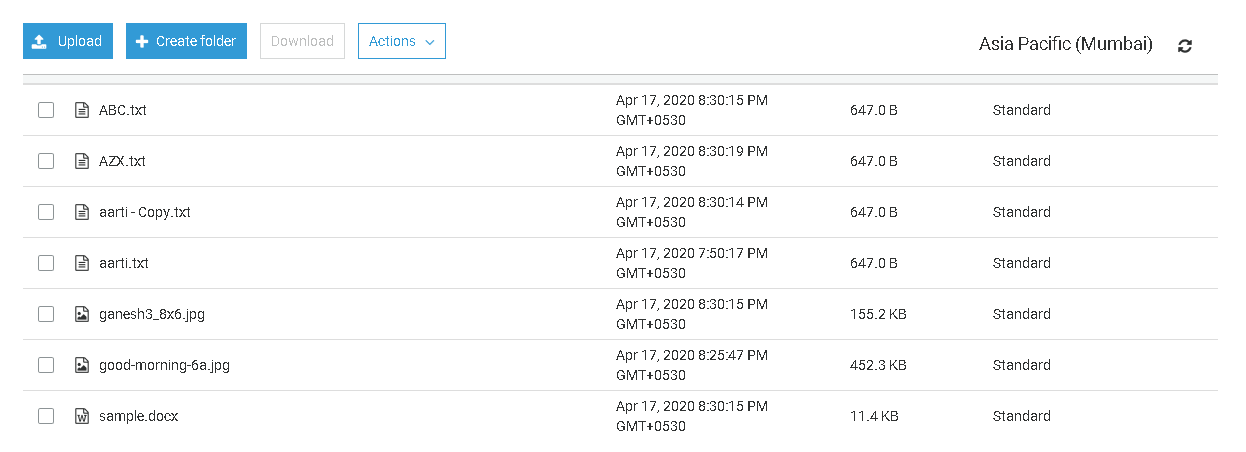
Copy multiple files from the local system and exclude specific extension files
Before we move further, select the files in the S3 bucket and delete them. Now, we have an empty bucket.
Now, suppose we do not want to upload any jpg files into the S3 bucket. We can exclude specific files as well to upload using the exclude extension.
The following command excludes *.jpg files and uploads other files. You can verify it in the following screenshot.
|
1 |
aws s3 cp C:\FS\Upload s3://sqlshackdemocli --recursive --exclude "*.jpg" |

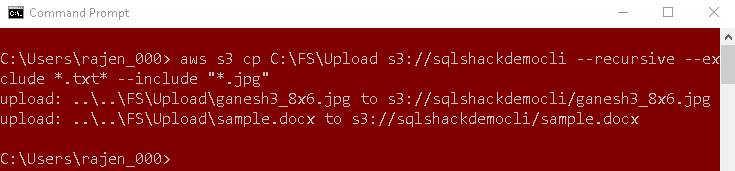
Similarly, we can use both include and exclude arguments together as well. For example, we require to exclude text files and include JPG files, use the following command.
|
1 |
aws s3 cp C:\FS\Upload s3://sqlshackdemocli --recursive --exclude *.txt* --include "*.jpg" |
Upload the files using a Comparison between specified directory and S3 bucket
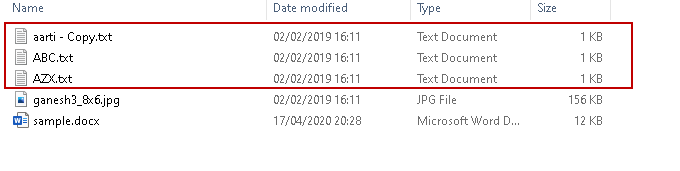
Suppose we have various files in the source folder, and a few of them are already uploaded in the S3 bucket.
Look at the following source and S3 bucket files. We do not have three files (highlighted in the Source) in the S3 bucket.
-
Source (local director)

-
S3 bucket
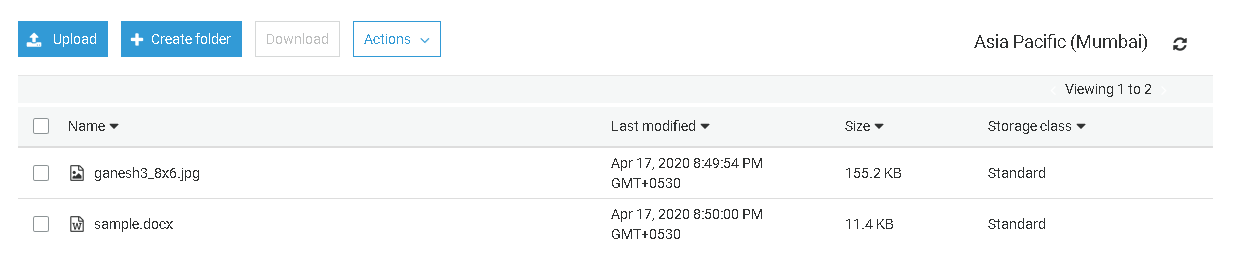
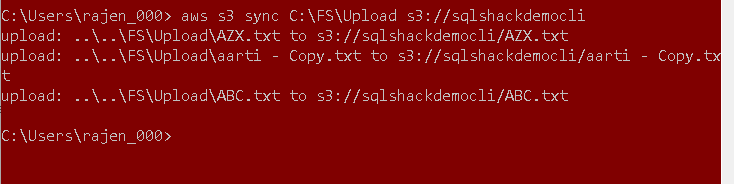
We want to upload only remaining files from source to destination. We can achieve the requirement using the sync argument.
|
1 |
aws s3 sync C:\FS\Upload s3://sqlshackdemocli |
In the output, we see it uploaded only files that are not available in the source folder.
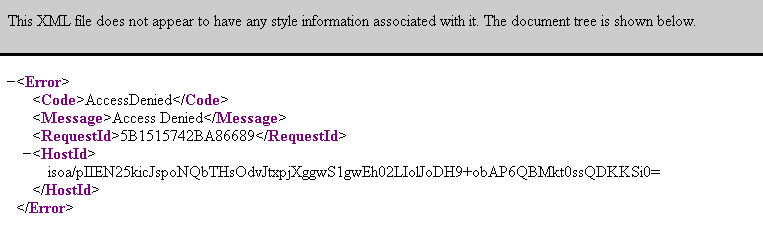
Setup Permissions to files
By default, uploaded files do not have public access. If you try to access the object URL, it gives the following error message.
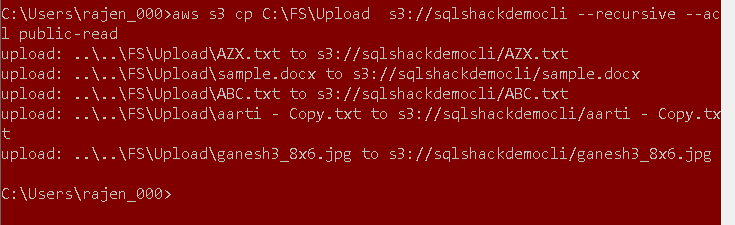
We can set permissions while copying the files as well. Specify the acl argument and set permissions to public-read.
|
1 |
aws s3 cp C:\FS\Upload s3://sqlshackdemocli --recursive --acl public-read |
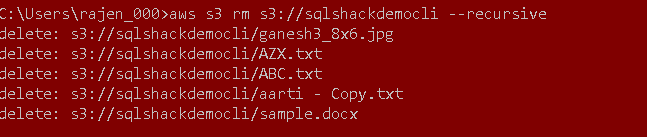
Delete all files inside the bucket
We can remove a file in a bucket using the rm command. Use a recursive argument to delete all files.
|
1 |
aws s3 rm s3://sqlshackdemocli –recursive |
It deletes the files from the S3 bucket and lists the deleted files name in the output.
Delete an AWS S3 bucket using AWS CLI
We can remove an S3 bucket using the rb command. The following command removes the S3 bucket named sqlshackdemocli.
|
1 |
aws s3 rb s3://sqlshackdemocli |
We get an error message because the bucket is not empty.

We can either remove the objects using the commands specified above or use the force argument to delete the bucket along with its content.
|
1 |
aws s3 rb s3://sqlshackdemocli –force |
It first deletes the existing files and then removes the S3 bucket as shown below.

Conclusion
In this article, we explored AWS CLI commands to perform various operations in the AWS S3 bucket. CLI makes it easy to perform tasks using simple commands and arguments. I would encourage you to explore CLI commands and perform the tasks as per your requirements. I will continue discovering more CLI commands in the upcoming articles.

I am the author of the book "DP-300 Administering Relational Database on Microsoft Azure". I published more than 650 technical articles on MSSQLTips, SQLShack, Quest, CodingSight, and SeveralNines.
I am the creator of one of the biggest free online collections of articles on a single topic, with his 50-part series on SQL Server Always On Availability Groups.
Based on my contribution to the SQL Server community, I have been recognized as the prestigious Best Author of the Year continuously in 2019, 2020, and 2021 (2nd Rank) at SQLShack and the MSSQLTIPS champions award in 2020.
Personal Blog: https://www.dbblogger.com
I am always interested in new challenges so if you need consulting help, reach me at rajendra.gupta16@gmail.com
View all posts by Rajendra Gupta
- Understanding PostgreSQL SUBSTRING function - September 21, 2024
- How to install PostgreSQL on Ubuntu - July 13, 2023
- How to use the CROSSTAB function in PostgreSQL - February 17, 2023