

Data growth has raised the stakes in the market increasing the size of SQL Server estates that DBAs are expected to manage. Because of this, fast and efficient configuration management can be very helpful. To this end, let’s delve into this article to generate a SQL Server inventory using PowerShell.
In the previous article, we discussed how to discover SQL instances automatically. In this article, we’ll build on that to see how to capture the SQL Server setting details of the database environment in CSV file. Once complete, we’ll have a script that will iterate through all of our instances and document their most important settings
Script structure
- In the first part of our inventory, we’ll list the ServerName in the input CSV file. We’re going to import the server list using the Import-CSV cmdlet.
- Next, we’re going to take a look and see what SQL Server properties are available. In this case, we’re going to pass in the name of the SQL Server.
- Next, we’ll list the SQL Server instances from browsing the SQL Server folder using the Get-ChildItem cmdlet. The output has several properties such as ComputerNamePhysicalNetBIOS, Name, DisplayName and Instance and so on. In the properties list, one of those is ComputerNamePhysicalNetBIOS. It is then assigned to a variable named $instance.
Let’s take a look at the following PowerShell code.
The SQL Server folder is traversed for the server HQDBT01 using the ForEach-Object cmdlet.
|
1 2 3 4 |
'hqdbt01'| ForEach-Object { Get-ChildItem -Path "SQLSERVER:\SQL\$_"} | Select-Object -Property ComputerNamePhysicalNetBIOS, Name, DisplayName, InstanceName |
In the output, you can see that the Server HQDBT01 is configured with two SQL Server instances. The first, default instance named HQDBT01 and the second, named instance, HQDBT01\SQL2017.

Note: The InstanceName column has a value SQL2017. This indicates that the SQL Server named instance is up and running.
In the following example, the SQL instances are discovered using the following PowerShell script. But you notice that the named instance CRM2011 has a NULL value for the instance field. This indicates that the named instance is down.
|
1 2 3 4 |
'hqdbsp17'| ForEach-Object { Get-ChildItem -Path "SQLSERVER:\SQL\$_"} | Select-Object -Property ComputerNamePhysicalNetBIOS, Name, DisplayName, InstanceName |

Note: The InstanceName column has a NULL value. This indicates that the SQL Server named instance is down and it is in not running state.
We all agree that there is chance to have multiple instances of SQL on the single machine. In this section, we’ll take a look at fetching the instance names from the aforementioned snippets. Let’s dissect the PowerShell script to understand better about selecting the SQL instance.
The following piece of code compares the DiplayName property with DEFAULT or MSSQLSERVER values. On satisfying the condition, the Name property value is assigned to a variable named $SQL. If the condition is not met, then the InstanceName property is validated for NOT NULL value and the corresponding value of the named instance is assigned to the $SQL variable. As I already mentioned in the above note, the NULL value in the InstanceName field indicates that the named instance is down. In such a case, we’ll not able to build or pull any SQL Server properties.
Note: The authentication is done at the scope of PowerShell session level with the security level of the currently running user access.
|
1 2 3 4 5 6 7 8 |
If (($_.DisplayName -eq 'DEFAULT') -or ($_.DisplayName -eq 'MSSQLSERVER')) { $SQL = $_.name } elseif ($_.InstanceName -ne $NULL) { #$SQLInstance = "$($_.ComputerNamePhysicalNetBIOS)\$($_.InstanceName)" $SQL = $_.name } |
Note: You can also see the commented line of the above code to prepare the named SQLInstance
SMO (SQLServer Management Objects)
In this section, you’ll see the working of the SMO (SQL Server Management Objects) and the SQL Provider together. It is evident that DBAs can perform or find a lot of tasks using either one of them. So far, we see that using SQL provider how we derived the SQL instance details. Now it’s time to take a look at how we can use the SQL Management Object library.
SMO Library is a .NET class library that Microsoft designed for working with SQL Server. PowerShell at the very core, treats everything as an object. In this case, the server object has a corresponding entities associated with it. Each server properties can be accessed using object instantiation. For example, a database object has certain properties and methods that can be described by object invocation process. Through the server object, we can go through the different collections such “server information”, “Security information”, “Configuration”, “Server Settings” etc:-. And as we iterate over that collection we can return individual properties of the each of the collections.
In the following example, an array of server names is fed and the generated list of the SQL Instances is iterated through to pull the details of the various collections’ SQL server settings.
|
1 2 3 4 5 6 7 8 9 10 11 12 13 14 15 16 17 |
'amwrp01','amwsrp02',’aqdbt01’| ForEach-Object { Get-ChildItem -Path "SQLSERVER:\SQL\$_"} | Select-Object -Property ComputerNamePhysicalNetBIOS, Name, DisplayName, InstanceName | %{ If (($_.DisplayName -eq 'Default') -or ($_.DisplayName -eq 'MSSQLSERVER')) { $SQL = $_.name } elseif ($_.InstanceName -ne $NULL) { #$SQLInstance = "$($_.ComputerNamePhysicalNetBIOS)\$($_.InstanceName)" $SQL = $_.name } New-Object ('Microsoft.SqlServer.Management.Smo.Server') $SQL | SELECT @{label='ServerName';expression={$_.ComputerNamePhysicalNetBIOS}}, @{label='InstanceName';expression={$_.Name}} , Edition,BuildClrVersionString,BuildNumber,ErrorLogPath,HasNullSaPassword,IsPolyBasedInstalled,IsCaseSensitive,Platform,IsFullTextInstalled,Language,MasterDBLogPath,MasterDBPath,NetName,OSVersion,PhysicalMemory,IsSingleUser,Product, VersionString,Collation,IsClustered,ProductLevel,ComputerNamePhysicalNetBIOS,ResourceLastUpdateDateTime,AuditLevel,BackupDirectory,DefaultFile,DefaultLog,LoginMode,ServiceAccount,ServiceStartMode,State,MailProfile,NamedPipesEnabled } |
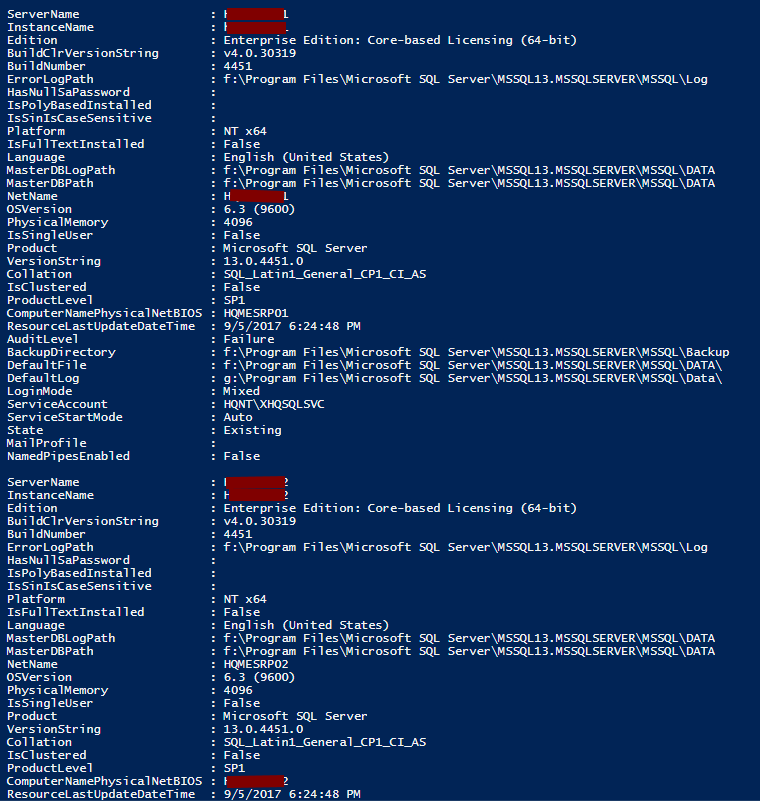
In the following example, we can see how to capture the server settings (Generate SQL Inventory) in a CSV file. For this requirement, PowerShell script requires an input file and directory to save the output file
Pre-requisites
Let us discuss in detail about the required parameters:
- User account must have the required permission to access the servers
-
InputFileName – Text File contains a list of SQL instances. For example, C:\Server.txt. The file has list of servers

For Example, the file serverlist.txt file should list all of the SQL instances like below:
asdbsp15
asdbsp17 - DirectoryToSave – this is storehouse path for the generated output file.

Let me dissect the internals of the PowerShell script further for better understanding.
I would like to divide this into five parts.
- The first, the input and output file
- The second part, listing the SQL instances by traversing the SQL Server folder using Get-Childitem and foreach-object cmdlets
- The third, an instantiation of the SMO class library
- The fourth, transforming and generating SQL Server inventory information
- and the last, writing the data to CSV file
The following are the output columns that are listed as part of the process
- ServerName
- InstanceName
- Edition
- BuildClrVersionString
- BuildNumber
- ErrorLogPath
- HasNullSaPassword
- IsPolyBasedInstalled
- IsCaseSensitive
- Platform
- IsFullTextInstalled
- Language
- MasterDBLogPath
- MasterDBPath
- NetName
- OSVersion
- PhysicalMemory
- IsSingleUser
- Product
- VersionString
- Collation
- IsClustered
- ProductLevel
- ComputerNamePhysicalNetBIOS
- ResourceLastUpdateDateTime
- AuditLevel
- BackupDirectory
- DefaultFile
- DefaultLog
- LoginMode
- ServiceAccount
- ServiceStartMode
- State
- MailProfile
- NamedPipesEnabled
Here is an image of the generated CSV file.

Summary
We started first here with enabling and customizing inventory, determining which classes contain information that may be useful for us down the road. We also enabled and customized the inventory details to understand the different characteristics of the SQL instances. I will discuss the process of building a full-fledged SQL Server inventory with data manipulation techniques using PowerShell in my next article. With this script you can fully inventory and document your SQL Server estate on demand
I hope you enjoyed reading this article. Feel free comment below for any questions.
Appendix – Script
|
1 2 3 4 5 6 7 8 9 10 11 12 13 14 15 16 17 18 19 20 21 22 23 24 25 26 27 28 29 30 31 32 33 34 35 36 37 38 39 40 41 42 43 44 45 46 47 48 49 50 51 52 53 54 55 56 57 58 59 60 61 62 63 64 65 66 67 68 69 70 71 72 73 74 75 76 77 78 79 80 81 82 83 84 85 86 87 88 89 90 91 92 93 94 95 96 97 |
<#================================= # Generated On: 1/07/2019 # Generated By: Prashanth Jayaram # Version : 1.0 # Desc : SQL Inventory Generation EXAMPLE 1 :Output CSV and no-Email #PS:\>.\SQLServerInventory.ps1 -InputFileName c:\server123.csv -DirectoryToSaveTo C:\ #================================= #> [CmdletBinding()] Param( [Parameter(Mandatory=$True,Position=1)] [string]$InputFileName, [Parameter(Mandatory=$True,Position=2)] [string]$DirectoryToSaveTo ) #Prepare output file name $Filename='SQLInventory' #delete the file if it already exists $filename = "$DirectoryToSaveTo$filename.csv" if (test-path $filename ) { rm $filename } #delete the file if it already exists #An array to hold the output values $Results=@() #import the CSV file $instance=Import-Csv $InputFileName|%{ ForEach-Object { Get-ChildItem -Path "SQLSERVER:\SQL\$($_.server)"} | Select-Object -Property ComputerNamePhysicalNetBIOS, Name, DisplayName, InstanceName } ForEach($i in $instance) { If (($i.DisplayName -eq 'Default') -or ($i.DisplayName -eq 'MSSQLSERVER')) { $SQL = $i.ComputerNamePhysicalNetBIOS } elseif ($i.InstanceName -ne $NULL) { #$SQLInstance = "$($_.ComputerNamePhysicalNetBIOS)\$($_.InstanceName)" $SQL = $i.name } $instance=New-Object ('Microsoft.SqlServer.Management.Smo.Server') $SQL | SELECT @{label='ServerName';expression={$_.ComputerNamePhysicalNetBIOS}}, @{label='InstanceName';expression={$_.Name}} , Edition,BuildClrVersionString,BuildNumber,ErrorLogPath,HasNullSaPassword,IsPolyBasedInstalled,IsSinIsCaseSensitive,Platform,IsFullTextInstalled,Language,MasterDBLogPath,MasterDBPath,NetName,OSVersion,PhysicalMemory,IsSingleUser,Product, VersionString,Collation,IsClustered,ProductLevel,ComputerNamePhysicalNetBIOS,ResourceLastUpdateDateTime,AuditLevel,BackupDirectory,DefaultFile,DefaultLog,LoginMode,ServiceAccount,ServiceStartMode,State,MailProfile,NamedPipesEnabled ForEach($i in $instance) { $Properties = @{Name=$i.InstanceName ComputerNamePhysicalNetBIOS =$i.ServerName Edition=$i.Edition BuildClrVersionString=$i.BuildClrVersionString BuildNumber=$i.BuildNumber ErrorLogPath=$i.ErrorLogPath HasNullSaPassword=$i.HasNullSaPassword IsPolyBasedInstalled=$i.IsPolyBasedInstalled IsSinIsCaseSensitive=$i.IsSinIsCaseSensitive Platform=$i.Platform IsFullTextInstalled=$i.IsFullTextInstalled Language=$i.Language MasterDBLogPath=$i.MasterDBLogPath MasterDBPath=$i.MasterDBPath NetName=$i.NetName OSVersion=$i.OSVersion PhysicalMemory=$i.PhysicalMemory IsSingleUser=$i.IsSingleUser Product=$i.Product VersionString=$i.VersionString Collation=$i.Collation IsClustered=$i.IsClustered ProductLevel=$i.ProductLevel ResourceLastUpdateDateTime=$i.ResourceLastUpdateDateTime AuditLevel=$i.AuditLevel BackupDirectory=$i.BackupDirectory DefaultFile=$i.DefaultFile DefaultLog=$i.DefaultLog LoginMode=$i.LoginMode ServiceAccount=$i.ServiceAccount ServiceStartMode=$i.ServiceStartMode State=$i.State MailProfile=$i.MailProfile NamedPipesEnabled=$i.NamedPipesEnabled } $Results += New-Object psobject -Property $properties } ####Comment the below line, if you wish to not to display an output to the console $Results ##### $Results | select Name ,ComputerNamePhysicalNetBIOS,Edition,BuildClrVersionString,BuildNumber,ErrorLogPath,HasNullSaPassword,IsPolyBasedInstalled,IsSinIsCaseSensitive,Platform,IsFullTextInstalled,Language,MasterDBLogPath,MasterDBPath,NetName,OSVersion,PhysicalMemory,IsSingleUser,Product, VersionString,Collation,IsClustered,ProductLevel,ResourceLastUpdateDateTime,AuditLevel,BackupDirectory,DefaultFile,DefaultLog,LoginMode,ServiceAccount,ServiceStartMode,State,MailProfile,NamedPipesEnabled| export-csv -Path $filename -NoTypeInformation } |

My specialty lies in designing & implementing High availability solutions and cross-platform DB Migration. The technologies currently working on are SQL Server, PowerShell, Oracle and MongoDB.
View all posts by Prashanth Jayaram
- Stairway to SQL essentials - April 7, 2021
- A quick overview of database audit in SQL - January 28, 2021
- How to set up Azure Data Sync between Azure SQL databases and on-premises SQL Server - January 20, 2021