

Introduction
PowerShell (aka Posh or just PS) is becoming more and more of a tool for operational support and some deployment scenarios. If you need to pull or place data into SQL Server, PS can be a handy way of doing it in both one-off and automated work.
There are a number of ways to connect to SQL Server via PS. In this article I wanted to go over the options that are available to you. If you have used PS for any number of months or years, you know there tends to be multiple ways of performing a task. So it goes without saying if you are building out scripts to use in production to test, test, and test…then test it one more time.
List of Options
As an overview the following is the list of options I will go over in this article:
- SQL Server PowerShell (SQLPS)
- SQL Server Management Objects (SMO)
- .NET (System.Data.SqlClient)
SQL Server PowerShell
SQLPS is a utility that was first released with SQL Server 2008, you may see this referenced in various ways. It exists as a (1) utility and (2) as a PS module. The utility and module are installed with the SQL Server Management tools from SQL Server 2008 and up. There are a few ways of connecting to SQL Server using this utility, and each one has strengths and weaknesses.
SQLPS.exe
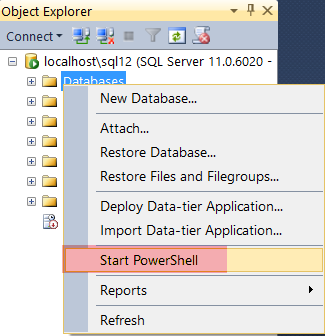
This is a utility that you should be able to open by typing it in the run prompt (Start > Run). A second option, right-click a node under Object Explorer, within SQL Server Management Studio (SSMS), and select “Start PowerShell”. The SQLPS utility’s main access point is using the provider “SQLSERVER:\” to browse SQL Server like a file directory. With that, based on the node you open SQLPS from will place you within that path of the provider. Under each “folder” you are in for the provider offers properties to read or set, and some methods to use for administration.
One thing you must remember when using this utility is the version of PS you operate under is 2.0, an obvious weakness. Example: I use on Windows 10 Operating System (OS) with PS version 5.0 and SQL Server 2012:
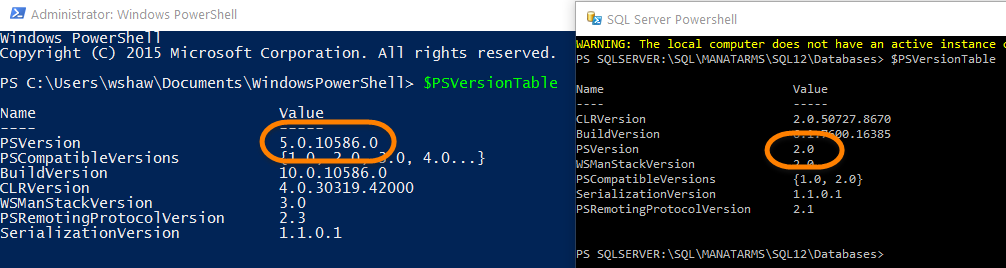
It is very important distinction to remember because a cmdlet (pronounced command-let) under version 5.0 may not show up at all in SQLPS.exe, or be missing new features that were added.
This method to accessing a SQL Server instance is for those one-liner situations, but will admit that SQLPS is rather slow to work with at times, so don’t get in too big of a rush. As an example, a common one-liner I use SQLPS utility for is when I am refreshing development environment and just want to set all the databases to SIMPLE recovery mode:
|
1 |
Get-ChildItem SQLSERVER:\SQL\LOCALHOST\SQL12\Databases | foreach { $_.RecoveryModel = “SIMPLE”; $_.Alter() } |
SQLPS Module
Importing the SQLPS module into a PS session provides the same access using the utility does, but allows you to operate in the PS version of the OS you operate under. In SQL Server 2008 and 2008 R2 you will load the SQLPS as a snap-in (Add-PSSnapin), then with SQL Server 2012 and up it is imported (Import-Module).
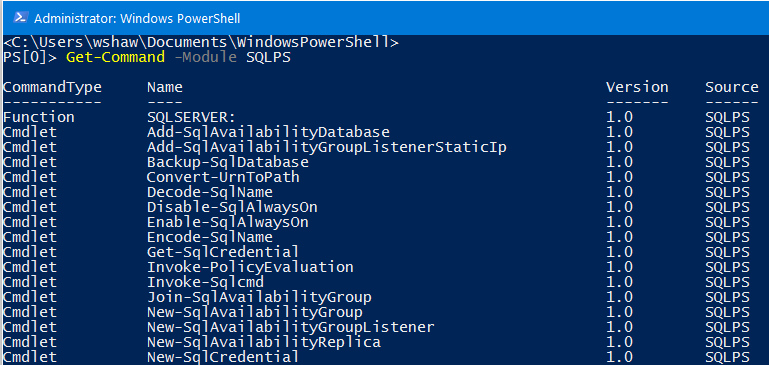
When you import the module it will load the SQLSERVER:\ provider and change your location to that path. You will also have access to the cmdlets offered in the module, which these are also accessible via the utility. You can get a list of those cmdlets using the Get-Command:
The most commonly known cmdlet out of this module is, Invoke-Sqlcmd. This is generally thought of as a PS replacement for the old sqlcmd command-line utility, that to date is still available in currently supported versions of SQL Server. You utilize this cmdlet to execute any T-SQL query that you want against one or multiple instances. The advantage you get using Invoke-Sqlcmd over the command-line utility is the power of handling output in PS. The output from the cmdlet is created as a DataTable (System.Data.DataRow is the exact type).
Just passing the full command to Get-Member will show the TypeName:

You will also see in the output that if you properly named your columns in your SELECT statement they show up as properties in that array. You can leverage the data conversions available in PS such as ConvertTo-Csv, or even ConvertTo-HTML if you needed to build an HTML report.
SQL Server Management Objects (SMO)
SMO is a pain to some, but once you learn how to research the SMO namespace in MSDN your eyes can be opened to the possibilities. SMO is most commonly seen used to perform administration task against SQL Server instance(s). You can use this to do a check of the configuration instance where you may do a comparison of the settings to your standard configuration or for audit situations. It offers some flexibility over executing the equivalent T-SQL via Invoke-Sqlcmd, if there is an option via T-SQL.
You can also execute T-SQL through SMO if you wish and there is one benefit using this method over the .NET method. The benefit you get is executing T-SQL statements that may include the “GO” batch separator. Using the .NET method errors when it hits the first “GO” in a script, because it is not true SQL syntax. This can be useful in deployments where someone may have scripted out the objects via SSMS, which will put in the “GO” statement. If you happen to have gotten a long script, or a zipped file that contains hundreds of scripts, utilizing SMO in this situation saves a good bit of headache.
Loading SMO
To use SMO the first thing that has to be done is loading the SMO assembly into your PowerShell session. You can actually do this by simply loading the full SQLPS module, as that will automatically load the assembly. The other method, and more commonly used in online articles, is to add the assembly using System.Reflection.Assembly::LoadWithPartialName(). A more proper method to load SMO, as of PS 3.0, is to use the cmdlet Add-Type.
|
1 |
Add-Type -AssemblyName "Microsoft.SqlServer.Smo,Version=11.0.0.0,Culture=neutral,PublicKeyToken=89845dcd8080cc91" |
Connecting with SMO
Once you have the assembly loaded you create an object for the SQL Server instance you want to work with:
|
1 2 |
$srv = New-Object Microsoft.SqlServer.Management.Smo.Server “localhost\sql12” $srv.Databases | select name |
Now from there you will need to work out which task you want to perform, and find the class of objects and methods that you need. It, obviously, is not the method used for quickly doing a task (at least until you get familiar with how SMO works).
.NET Framework
PS is built on top of .NET so you have access to that framework that can be used to perform work against SQL Server. This is more commonly used to work with data itself over performing administrative task. I will also tell you it takes a good bit more typing to use, so not an option for one-liners.
There is one advantage you can achieve using this process over the ones we already went over and that is, portability. You will find .NET on any Windows OS so there is no dependency on SQL Server tools being installed, at least on the machine the script is running on. The version of .NET however can be dependent on the version of the OS you run, so just ensure you test before moving your script to production.
Now there are various ways of doing this but, on average, you will see most examples create the following objects to get connected to an SQL Server instance:
- Create a connection
- Create your command (the T-SQL that will be executed)
- Create your data adapter (if you want to retrieve data)
- Create your dataset (the adapter fills this object)
Create a Connection
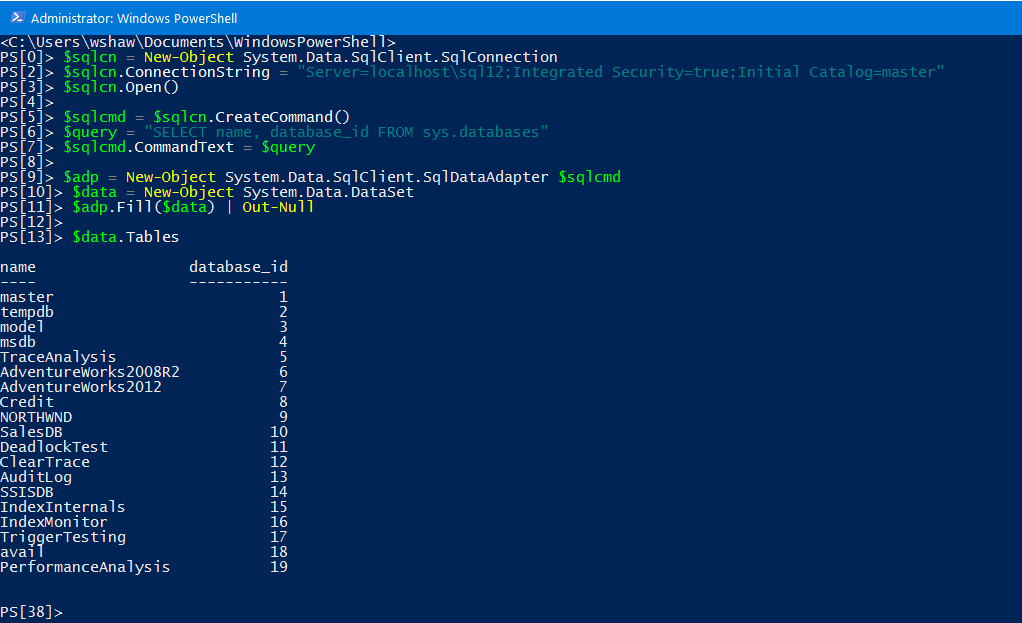
You simply create an object of System.Data.SqlClient.SqlConnection and pass the connection string that will be used to connect to the given SQL Server instance…don’t forget to open it.
|
1 2 3 |
$sqlConn = New-Object System.Data.SqlClient.SqlConnection $sqlConn.ConnectionString = “Server=localhost\sql12;Integrated Security=true;Initial Catalog=master” $sqlConn.Open() |
Create Your Command
You have a few options here because the SqlConnection actually contains a method that you can use to create your command object, or you can create a separate object all together. I have seen both options used so it is for the most part a preference.
|
1 2 3 4 5 6 |
$sqlcmd = $sqlConn.CreateCommand() <# or #> $sqlcmd = New-Object System.Data.SqlClient.SqlCommand $sqlcmd.Connection = $sqlConn $query = “SELECT name, database_id FROM sys.databases” $sqlcmd.CommandText = $query |
Create Your Data Adapter
By definition this object “represents a set of data commands and a database connection that are used to fill the DataSet”. You create the SqlDataAdapter and pass it the previous command object created, $sqlcmd.
|
1 |
$adp = New-Object System.Data.SqlClient.SqlDataAdapter $sqlcmd |
Create Your DataSet (and fill it)
This object will be the type System.Data.DataSet and as defined is simply “an in-memory cache of data”. Which this is something to take note of that the query you are running has to be loaded into memory, so the larger the dataset the more memory needed.
|
1 2 |
$data = New-Object System.Data.DataSet $adp.Fill($data) | Out-Null |
This is just my preference but when I use the “Fill” method I pipe this to Out-Null simply because this method will output the number of records it filled. If you want that output just remove the Out-Null.
Retrieving Your Data
After you do all that you are probably wondering how you output that data so you can see it? The data itself resides in a collection of tables within the Table property of your DataSet object. Now depending on the version of .NET you are working with you might actually need to specify the index of the collection (e.g. Tables[0]), but this is generally only required in older versions below .NET 4.0.
|
1 2 3 |
$data.Tables <# or #> $data.Tables[0] |
If the procedure or T-SQL script you are executing contains more than one dataset this collection will only contain the first result set returned by SQL Server.
A visual of the whole command:
The last thing you will want to remember for just proper coding practice is to close the connection once you are done. Just call the Close() method to close out your connection to the SQL Server instance.
Wrap Up
Going through the above options, I hope you have a better understanding on the options to access SQL Server via PowerShell. Which method you chose really depends on the action or processing required. You can be looking to script out a repeatable process or just need a one-liner for a one-off process.
The next article in this series:

After spending 6 years in the system and network administration world he found he enjoyed working and learning SQL Server. Since 2010 he has been involved in SQL Server.
He is passionate about PowerShell and automation around SQL Server and Windows. His experience is focused in SQL Server administration and some BI development (SSIS, SSRS).
View all posts by Shawn Melton
- Learning PowerShell and SQL Server – Introduction - April 23, 2018
- Connecting PowerShell to SQL Server – Using a Different Account - January 24, 2017
- How to secure your passwords with PowerShell - January 18, 2017