

What is SQLPower Doc?
SQL Power Doc was written by Kendal VanDyke. It is a command line PowerShell manifest consisting of several PowerShell modules that will help you build a solid foundation to Discover, Document and Diagnose SQL Server instances and Windows Operating system details. Additionally, you’ll gain some insight into what directions you can go for future exploration. It basically invokes PowerShell cmdlets and give you the necessary details front and center.SQL Power Doc Pre-requisites
- The login account must be a member of the sysadmin server role on all standalone SQL Server instances and account must have Administrator rights on the OS
- Windows PowerShell 2.0 or higher
- SQL Server modules for SMO (SQL Server Management Objects)
- SQL Server and WMI (Windows Management Instrumentation) services should be up and running
- Microsoft Excel 2007 or higher
What does SQL Power Doc do?
It gathers comprehensive details about the SQL Server instances, that it can discover itself, and their underlying Operating Systems. It includes:- Service Details—it lists all the installed SQL Server Services components
- Computer Name
- Server Name
- Service Type
- Service IP Address
- Service Port
- Status
- Process ID
- Start Date
- Start Mode
- Service Account
- Clustered
- AlwaysOn
- Executable Path
- Startup Parameters
- SQL Server overview
- Computer Name
- Server Name
- Scan Date (UTC)
- Install Date
- Startup Date
- Product Name
- Product Edition
- Level
- Platform
- Version
- Server Type
- Clustered
- Logical Processors
- Total Memory (MB)
- Instance Memory In Use (MB)
- Operating System
- System Manufacturer
- System Type
- Power Plan
- Server Properties in general
- Product
- Edition
- Level
- Version
- Platform
- Operating System
- Language
- Total Memory (MB)
- Instance Memory In Use (MB)
- Processors
- Root Directory
- Server Collation
- Is Clustered
- AlwaysOn AG Enabled
- Server Memory properties
- Server Name
- Use AWE
- Minimum Server Memory (MB)
- Maximum Server Memory (MB)
- Index Creation Memory (KB)
- Min Memory Per Query (KB)
- Set Working Set Size
- Processor properties
- Server Name
- Auto Processor Affinity Mask
- Auto IO Affinity Mask
- Processor Affinity Mask
- Processor Affinity Mask 64
- IO Affinity Mask
- IO Affinity Mask 64
- Max Worker Threads
- Boost SQL Server Priority
- Use Windows Fibers
- Security
- Server Name
- Authentication Mode
- Login Auditing
- Proxy Account Enabled
- Proxy Account
- Common Criteria Compliance Enabled
- C2 Audit Tracing Enabled
- Cross Database Ownership Chaining
- Connections
- Server Name
- Max Concurrent Connections
- Query Gov. Enabled
- Query Gov. Timeout (sec)
- Intermin/Deferred Constraint Checking Default
- Implicit Transactions Default
- Cursor Close On Commit Default
- Ansi Warnings Default
- Ansi Padding Default
- Arithmatic Abort Default
- Arithmatic Ignore Default
- Quoted Identifier Default
- No Count Default
- ANSI NULL Default On
- ANSI NULL Default Off
- Concat Null Yields Null Default
- Numeric Round Abort Default
- Xact Abort Default
- Allow Remote Admin Connections
- Allow Remote Connections
- Remote Query Timeout (sec)
- Require Distributed Transactions
- AdHoc Distributed Queries EnabledSQL Agent
- SQL Server startup/database parameters
- Server Name
- Default Index Fill Factor
- Default Backup Retention (days)
- Compress Backups
- Recovery Interval (mins)
- Default Data Path
- Default Log Path
- Default Backup Path
- SQL Server advanced configuration
- Server Name
- Enabled Contained DBs
- FILESTREAM Access Level
- Full-Text Crawl Bandwidth Max
- Full-Text Crawl Bandwidth Min
- Full-Text Crawl Range Max
- Full-Text Notify Bandwidth Max
- Full-Text Notify Bandwidth Min
- Full-Text Precompute Rank
- Full-Text Protocol Handler Timeout
- Full-Text Transform Noise Words
- Allow Triggers To Fire Others
- Blocked Process Threshold (sec)
- CLR Enabled
- Cursor Threshold
- Database Mail XPs Enabled
- Default Full-Text Language
- Default Language
- Default Trace Enabled
- Disallow Results From Triggers
- Extensible Key Management Enabled
- Full-Text Upgrade Option
- In Doubt Transaction Resolution
- Max Text Repl Size
- OLE Automation Procs Enabled
- Optimize for Ad hoc Workloads
- Replication XPs Enabled
- Scan for Startup Procs
- Server Trigger Recursion Enabled
- Show Advanced Options
- SMO & DMO XPs Enabled
- SQL Agent XPs Enabled
- SQL Mail XPs Enabled
- Two Digit Year Cutoff
- Web Assistant Procs Enabled
- xp_cmdshell Enabled
- Network Packet Size (Bytes)
- Remote Login Timeout (sec)
- Cost Threshold for Parallelism
- Locks
- Max Degree of Parallelism
- Query Wait (sec)
- Cluster configuration
- Server Name
- Clustered
- Cluster Members
- Current Owner(s)
- Shared Drives
What problems does SQL Power Doc solve?
Creating trends is an important part of administration. SQL Power Doc can help know what your environment looked like, say, the last week, or the last month. It helps with security and licensing audits. It helps you understand the configuration of your servers, without the need for any special access. SQL Power Doc also helps with troubleshooting, comparison of server and database configurations, and even creating a runbook, aka operations support handbook. SQL Power Doc even helps you see what hidden features your instances may have like Cluster configuration, File Stream objects, Proxy account, etcInstallation
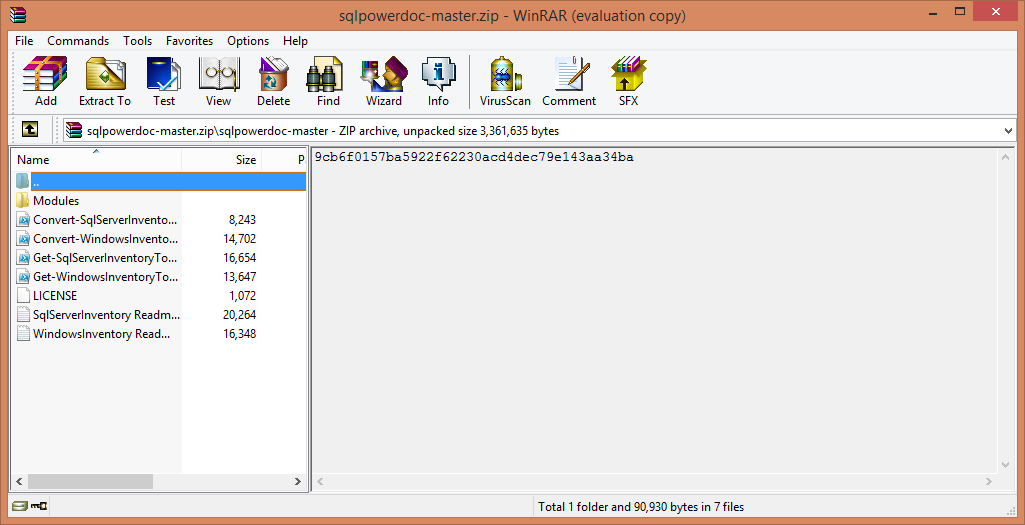
Let us see the installation steps in detail- Download the latest version of SQL Power Docs from GitHub.
 Typically, when we download the PowerShell script from the Internet, we run into the security issues. I know that the script is trusted, so I go ahead and unblock the security to allow the script to run.
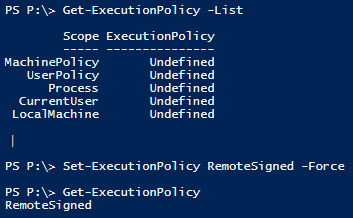
- Set the execution policy
- Open a PowerShell console in elevated mode:
- Set the execution policy to allow for remotely signed scripts
|
1 2 3 |
PS P:\> Get-ExecutionPolicy -List PS P:\> Set-ExecutionPolicy RemoteSigned –Force |
- Next, list the PSModulePath—this is where modules are discovered from, by PowerShell. The $ENV:PSModulePath variable stores the paths where modules are installed on the disk drive.
|
1 |
PS C:\ > $env:PSModulePath -split ';' |
 Note: The script module is simply a PowerShell script placed in the right location on the file system, with the right extension. If you’re familiar with the PATH environment variable, PsModulePath is very similar to that. So by calling the variable, you’ll see that it’s just a long string delimited with paths delimited using semicolons.
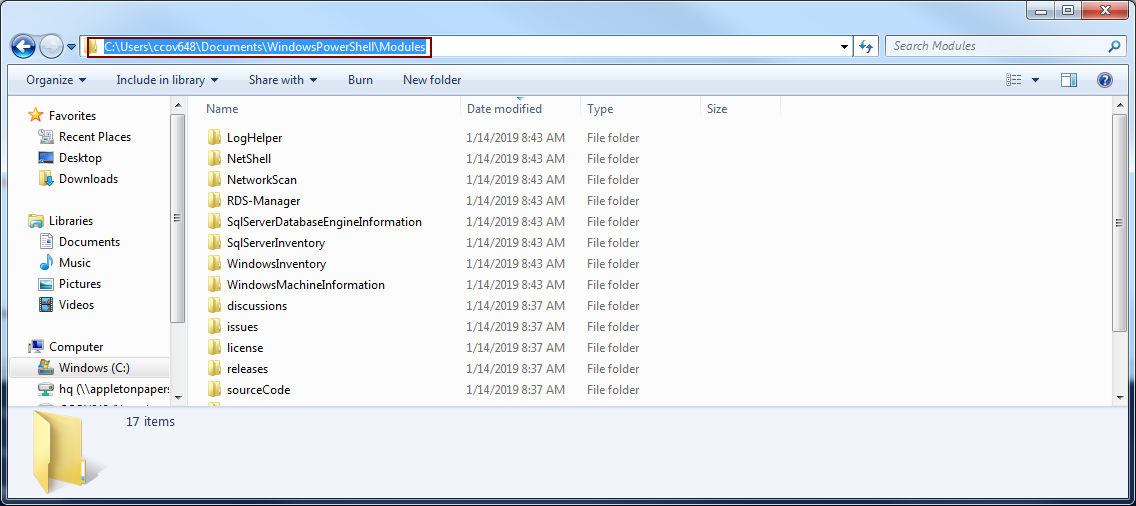
- If a modules directory is absent, then create a modules directory in your “My Documents” folder
|
1 |
PS C:\ > New-Item -type directory -path "$([Environment]::GetFolderPath([Environment+SpecialFolder]::MyDocuments))\WindowsPowerShell\Modules" |
- Make sure to keep the folder names in the zip file intact so that everything in the Modules folder is extracted into Modules folder
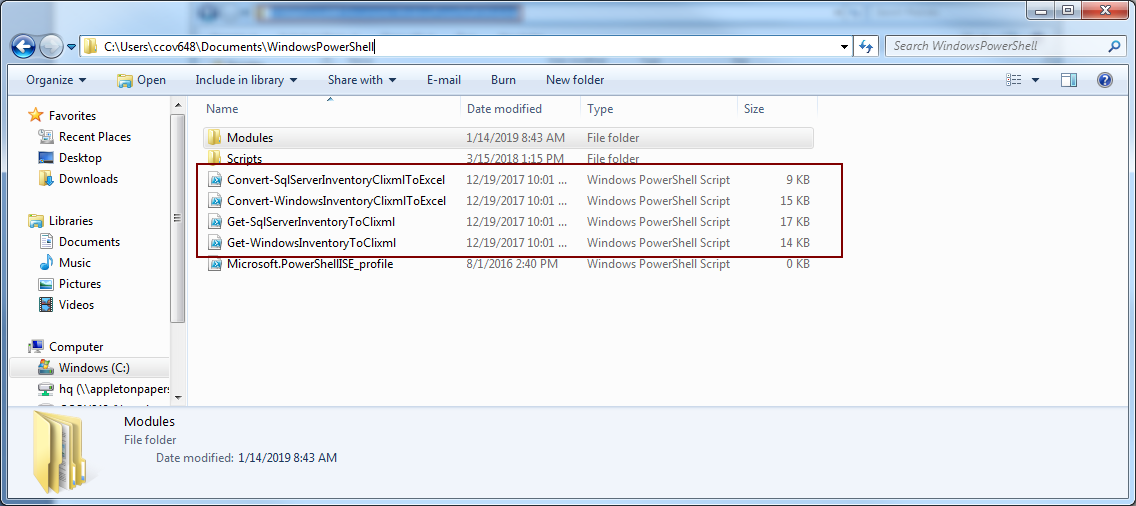
- Next, copy the *.ps1 files from SqlServerInventory folder into the WindowsPowerShell folder
PowerShell modules
I will not go into explaining modules and PowerShell manifests in this article. Let us go over everything you’ll need to know about running the script module and managing the module. (PowerShell Core users note: This module is not a PowerShell Core module, and so, you’ll need Windows PowerShell to run this.) The first step is to download the script module. This will be a quick one as you’ll simply browse the URL and download the script module. Once the module is downloaded, you then need to make it available to your session. A script module is the simplest kind of module that you can create. Literally, it’s just a PowerShell script with various functions saved with a PSM1 file extension. That’s it. It is simply a way to group functions together and to make them available to the user. It’s a special kind of PowerShell script that you can manage differently. But, why do we need to build a module? Why can’t we just continue to write scripts? Well, in some cases, you could, but once you have got into a few dozen scripts, you’ll soon realize the writing script method simply does not scale. It becomes tedious to manage them. Modules, on the other hand, give you the option of easier function management. When you group your functions in a module, you no longer have to worry about where you save that one important script. With modules, you don’t even have to worry about files in general. Simply update your module, run a single command, and it’s available to you immediately. And next is portability. With modules, you can simply give your fellow DBAs a single file placed in a predefined folder, and they can immediately get to work. Modules are also great for sharing your work with others in the community or to place in an internal repository on your internal network to share with your coworkers as well. Note: You can refer to the article PowerShell: Extending Modules for more informationHow do you run it?
In this section, you’ll see how to run the PowerShell script to discover the SQL Server and document SQL Server inventory. The output is an XML file. Note: In this step, the PowerShell script is executed to discover SQL Servers on the network, collect information about them, and write the results as a Gzip-compressed XML file Open a PowerShell console window|
1 2 3 |
PS P:\> ($ENV:PSModulePATH -split ';')[0] C:\Users\ccov648\Documents\WindowsPowerShell\Modules |
|
1 |
PS P:\> Set-Location ($ENV:PSModulePATH -split ';')[0] |
|
1 |
PS C:\Users\ccov648\Documents\WindowsPowerShell\Modules>.\Get-SqlServerInventoryToClixml.ps1 -Computername hqdbsp18,hqdbsp17 LoggingPreference Standard |
Output
The following output shows: the script collects an inventory by scanning hqdbsp18, hqdbsp17 for SQL Server instances. It includes the named instances as well. Note: By default, it uses Windows Authentication to connect to the instance. It means, the user account of the current session scope account will be used to connect to all the instances.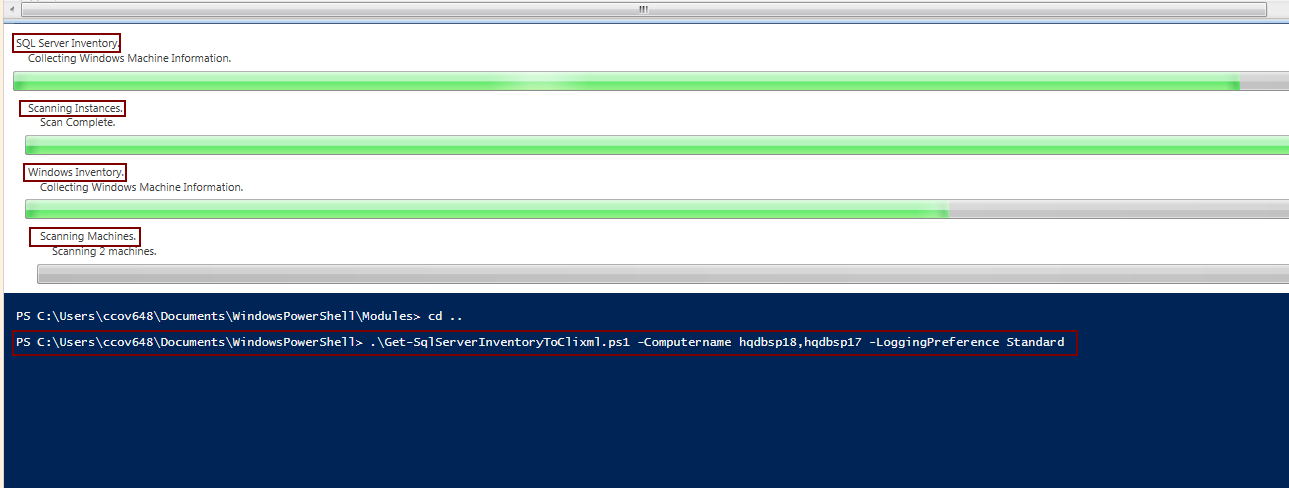 By default, the output file will be written to your “My Documents” folder.
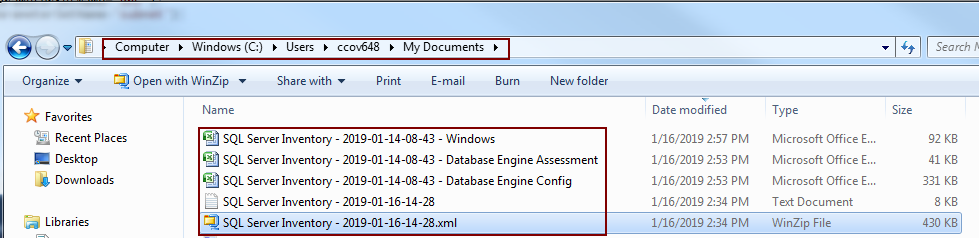
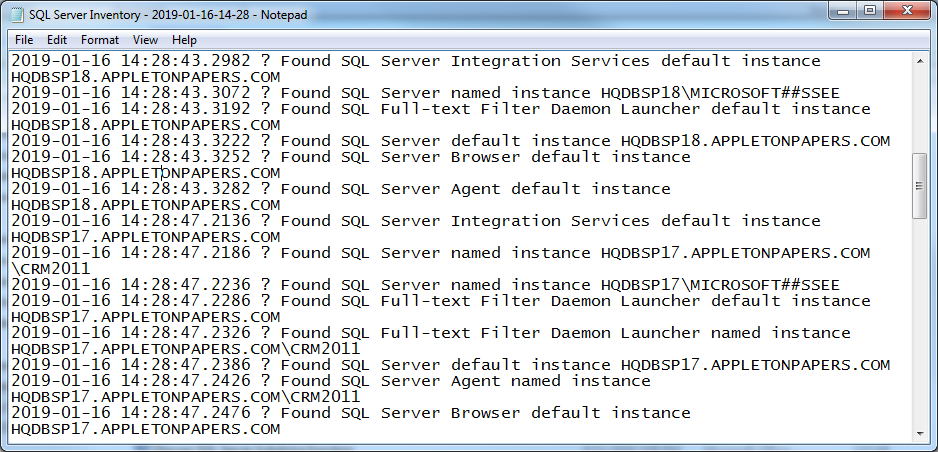
 A text document is used for all the standard logging.
 As I already mentioned, the output is a compressed XML file. At this stage, your data gathering is complete. You will want to generate the output as an Excel workbook.
|
1 |
PS C:\Users\ccov648\Documents\WindowsPowerShell> .\Convert-SqlServerInventoryClixmlToExcel.ps1 -FromPath "C:\Users\ccov648\Documents\SQL Server Inventory - 2019-01-14-08-43.xml.gz" -ColorTheme Blue -ColorScheme Dark |
 The above call writes the XML tags into the Excel files for the Database Engine and Windows Operating System information that are contained in ” C:\Users\ccov648\Documents\SQL Server Inventory – 2019-01-14-08-43.xml.gz”.
 Here, you’ll see that server input is fed from the input file. You can see that computername parameter is read using the Get-Content cmdlet.
|
1 |
PS C:\Users\ccov648\Documents\WindowsPowerShell>Get-Content c:\Server_test.txt |
 Run the PowerShell script
|
1 |
PS C:\Users\ccov648\Documents\WindowsPowerShell> .\Get-SqlServerInventoryToClixml.ps1 -Computername (Get-Content C:\server_test.txt) -LoggingPreference Standard |
 You can see that the script took 6 minutes to gather SQL Server and Operating system details. The execution time started at 8:55 and it got ended at 9:01. The execution time may vary, if you have named instance installed on the target machines.
Summary
SQL Power Doc works well with most of the versions of SQL Server starting from SQL Server 2000 through 2017. You learnt how easily configuration information can be gathered using SQL Power Doc, and how it helps identify mis-configurations that can affect performance and stability. For example, it is that easy to check XP_CMDSHELL properties; SQL Server services configuration account details; CLR enabled or not etc:-. I will talk about this more in my next article. The report is generated in two steps: at the first step, the XML file is generated and in the second, the Excel file. If you’re still having problems using SQL Power Doc, please post your feedback (https://sqlpowerdoc.codeplex.com/discussions) or reach out to @SQLDBA on Twitter or Blog address: http://www.kendalvandyke.com/ I will discuss more about this SQL Power Doc in my next article.
I’m a Database technologist having 11+ years of rich, hands-on experience on Database technologies. I am Microsoft Certified Professional and backed with a Degree in Master of Computer Application.
My specialty lies in designing & implementing High availability solutions and cross-platform DB Migration. The technologies currently working on are SQL Server, PowerShell, Oracle and MongoDB.
View all posts by Prashanth Jayaram
My specialty lies in designing & implementing High availability solutions and cross-platform DB Migration. The technologies currently working on are SQL Server, PowerShell, Oracle and MongoDB.
View all posts by Prashanth Jayaram
Latest posts by Prashanth Jayaram (see all)
- Stairway to SQL essentials - April 7, 2021
- A quick overview of database audit in SQL - January 28, 2021
- How to set up Azure Data Sync between Azure SQL databases and on-premises SQL Server - January 20, 2021