Introduction
Microsoft SQL Server 2016 provides faster transactions and queries, deeper insights on any device, advanced analytics, new security technology, and new hybrid cloud scenarios. Along with these features, comes the new installation setup. Although it is similar to the installation of SQL Server 2014 and other older versions, there are few notable differences:
System requirements have changed
SQL Server Management Studio has its own installation process, separated from installation of other services
New features have been added, with their respective setup options
System Requirements
There are several hardware and software requirements that should be taken into consideration before installing new SQL Server 2016:
64 bit processor, with at least 1.4 GHz clock speed. Older 32 bit processors are not supported by the SQL Server 2016.
At least 512 MB of system memory is required, but be aware that some of the features require much more.
As for the hard drive – at least 6 GB of free space is required, and it heavily depends on additional features that could be installed. Detailed information on disk space requirements for each feature could be found here.
FAT32 filesystem is supported, but it is strongly recommended to avoid it, and use an NTFS formatted drives instead. FAT32 filesystems proved to be less secure then NTFS systems when using SQL Server 2016.
Setup cannot be performed on Read-only, mapped or compressed drives.
Installing SQL Server 2016 on domain controllers is not recommended, since it can cause security conflicts.
Component Requirements Minimal Recommended Processor Speed 1.4 GHz on x64 Processor 2 GHz or faster System Memory (RAM) 512 MB 1024 MB Hard Disk Space 6 GB 8 GB or more Operating System Windows 8, Windows Server 2012 Windows 8 or later Systems that are currently supported for SQL Server 2016 installation are:
Windows 8 and 8.1 (All 64 bit editions)
Windows 10 (All 64 bit editions)
Windows Server 2012 and 2012 R2
Older systems like Windows 7 and Windows Server 2008 are not supported by SQL Server 2016.
Installation types
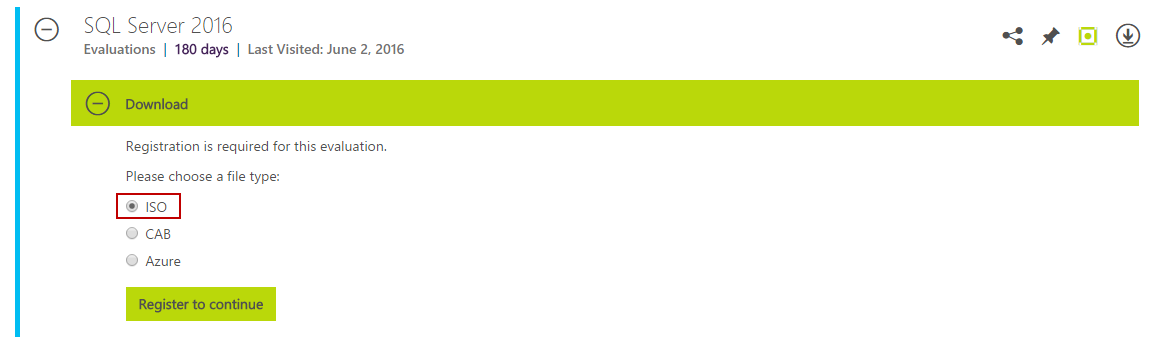
There are four ways to install Microsoft SQL Server 2016. The easiest way to perform it is to use the installation wizard. There is also an option to install the program using Command Prompt, Configuration File or SysPrep. No matter which installation type is chosen, the installation files need to be downloaded from Microsoft’s website first. In order to get the download link, either create new Microsoft account, or sign in with the existing one. Choose the file type that will be used for the installation: ISO, CAB, or Azure file. For this demonstration, the ISO file will be used.

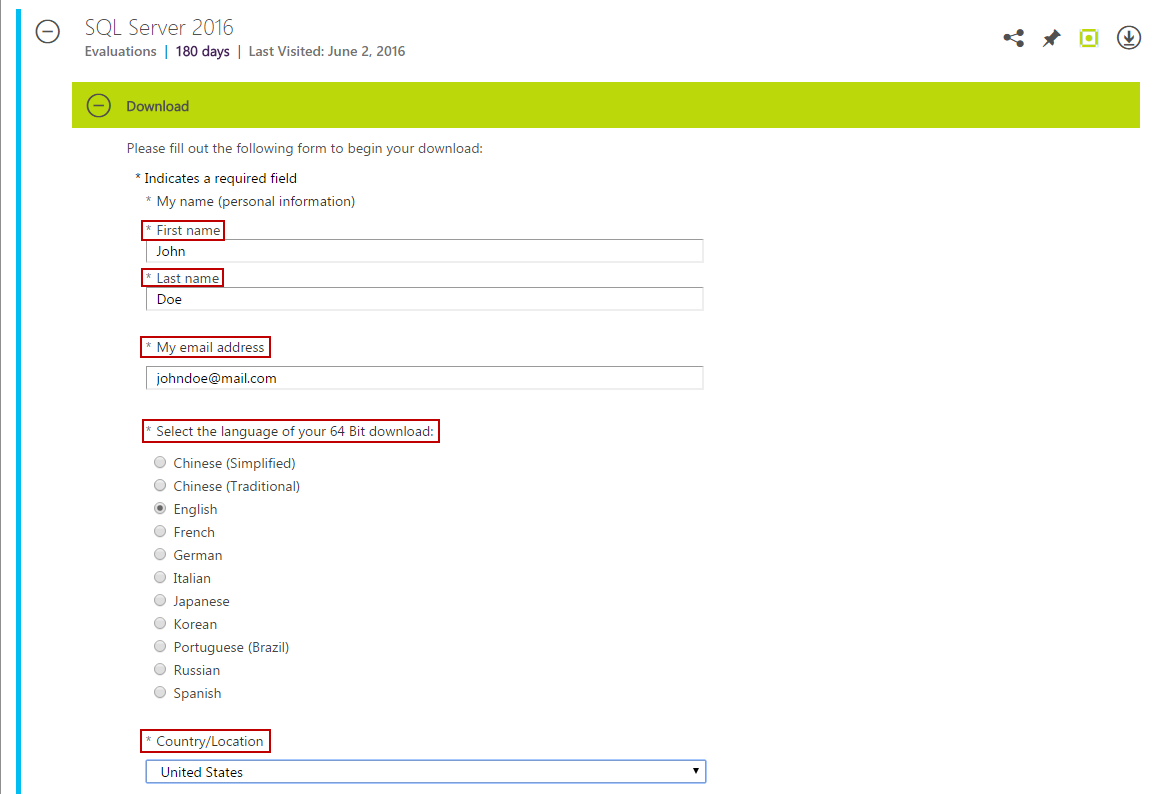
After clicking on “Register to continue” button, additional information is required: name, email address, language, and country. There are some more fields that can be filled, but only the fields marked with * are necessary in order to access the download link. Click the Continue button, and download the file to the hard drive.
Installation process
Burn or mount the downloaded ISO image (SQLServer2016-x64-ENU.iso), and start the installation process.
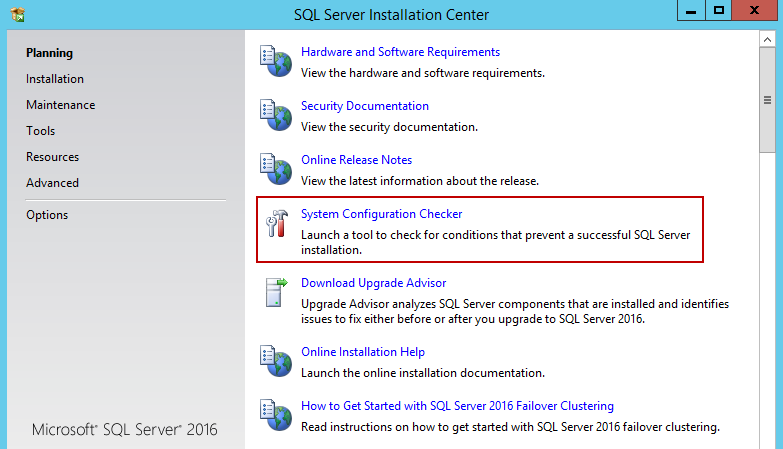
Starting the Autorun, or running the Setup.exe will initiate the SQL Server Installation Center. First tab that opens by default is Planning. Many useful links that are found here, lead to pages with more info on the product and installation instructions.
It is always a good idea to run System Configuration Checker. It only takes a minute or two to complete, and can save you from possible issues in the future. If the system passes all the tests in System Configuration Checker, proceed to the next step.
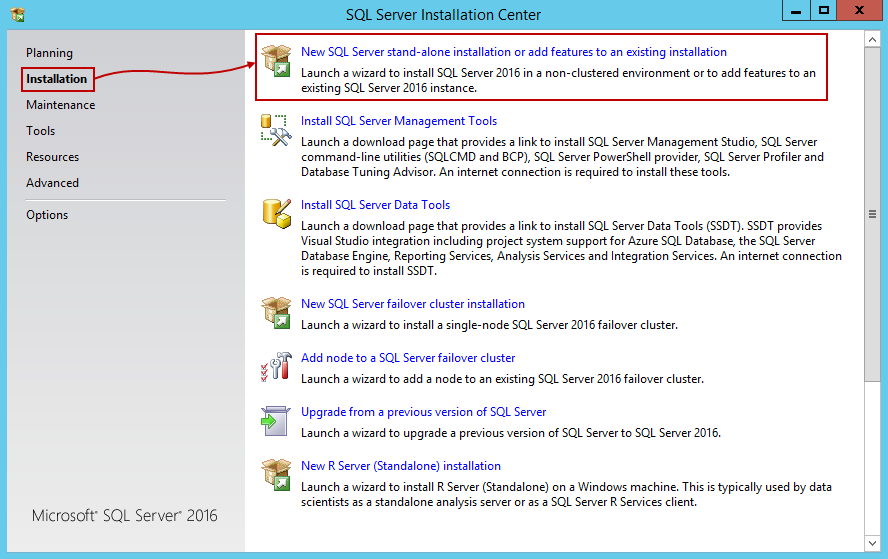
Clicking on the Installation tab in the upper left corner displays the standard installation options. It is noticeable that the options for SQL Server Services and SQL Server Management Tools stand separated, which was not the case in previous versions of SQL Server. To start the installation, click on New SQL Server Stand-alone installation or add features to an existing installation.
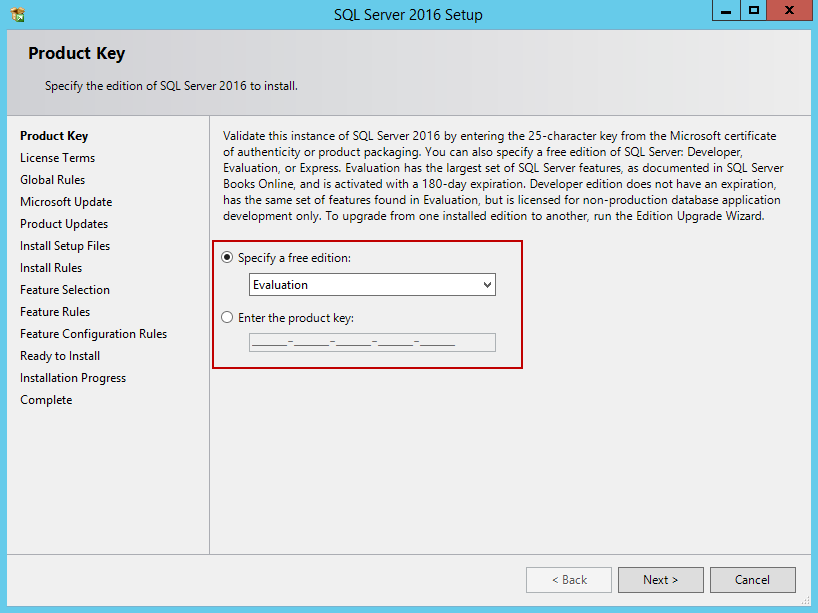
Choose which SQL Server 2016 version to install. The Evaluation version gives access to all of the SQL Server 2016 features, as well as trial license limited to 180 days. Other versions can be chosen as well – but they require the activation key to be entered in the field beneath. In this example, the Evaluation version is used. Click Next to proceed.
Read and accept License Terms. Check the box in front of I accept the license terms, and click Next.
In this step, set the options for Microsoft Automatic Updates. Check the box to enable automatic updates, or leave it unchecked if you prefer to install them manually. Click Next.
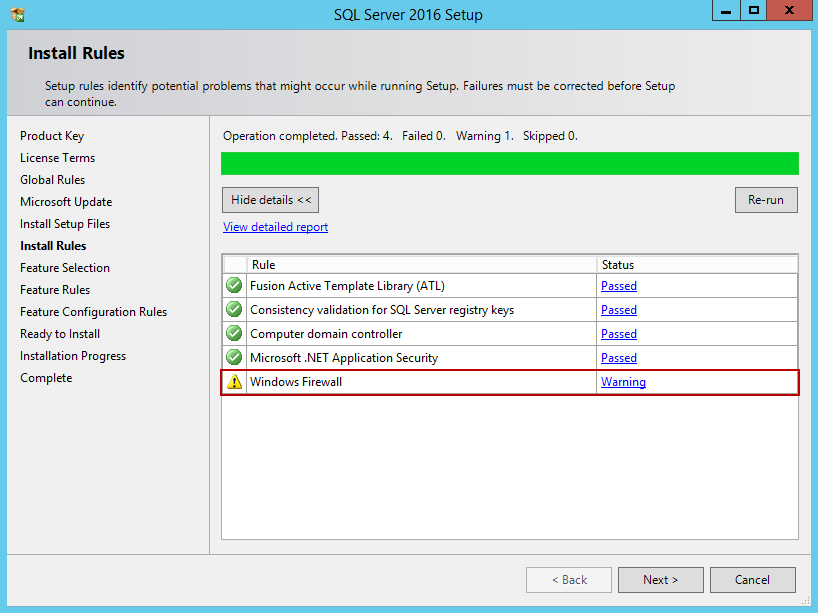
Wait for the Install Setup File and Install Rules to complete. It is possible to get the Windows Firewall warning after Install Rules check is completed. The warning occurs if port 1433 is closed by the Windows Firewall. The warning can be ignored at the moment, but the 1433 port will have to be configured later. There is also an option to specify another port(s) that will be used by SQL Server instance. Detailed instructions on how to configure Windows Firewall to enable Database Engine Access can be found here.
On a Setup Role, choose to install All Features with defaults, or perform custom installation with features that you specify. In this example, the custom installation is chosen.
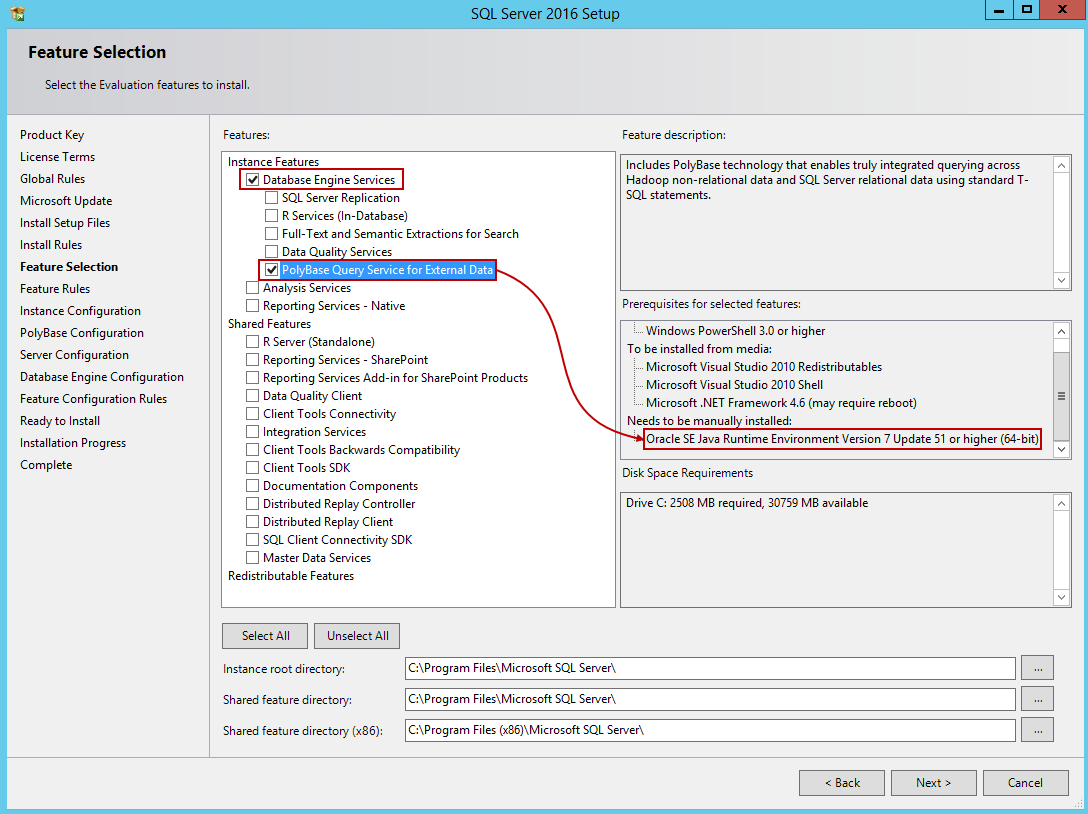
In the Feature Selection step, select the features of the SQL Server that need to be installed. You can check the description for each feature on the upper right, as well as prerequisites for all selected features in the box bellow. On the lower right, the Disk Space Requirements are displayed. In comparison to older versions of SQL Server, it is noticeable that Management Tools feature (which installs SQL Server Management Studio) is missing, but it can be installed separately later. For the instance to work, it is only necessary to install Database Engine Services. The latest SQL Server 2016 feature, PolyBase Query Service for External Data, can also be installed, but be aware of additional requirements. At least 4 GB of RAM is required to use this feature, and the installation of Java Runtime Environment 7 Update 51 in the next step will be required. If needed, set Instant root directory and Shared feature directory paths manually on the bottom of the menu. When finished with the selection, click Next.
If PolyBase Query Service is chosen in the previous step, the wizard will display the warning about failed test for Java Runtime Environment. Just click on the failed link on the right, and it should open the JRE download page.
-
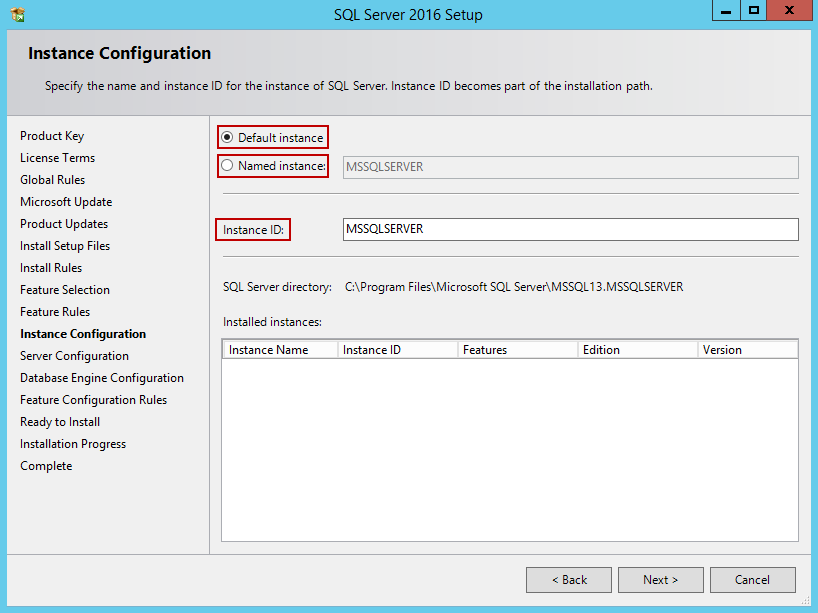
In the Instance Configuration step, choose the default, or named instance, and specify the Instance ID. Click Next to proceed.
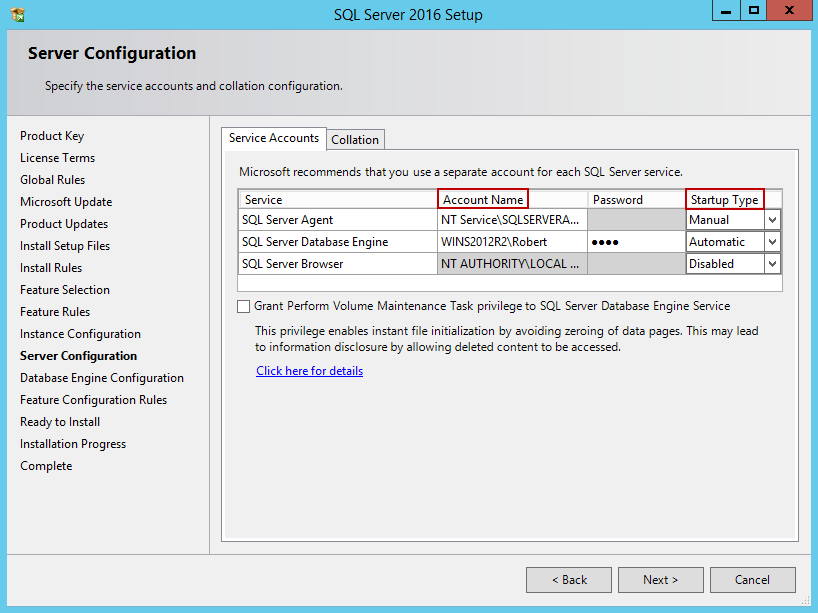
In Server configuration step, specify the accounts that can start SQL Server services. Set the startup options for any of these services to Manual, Automatic, or Disabled. Click Next when done.
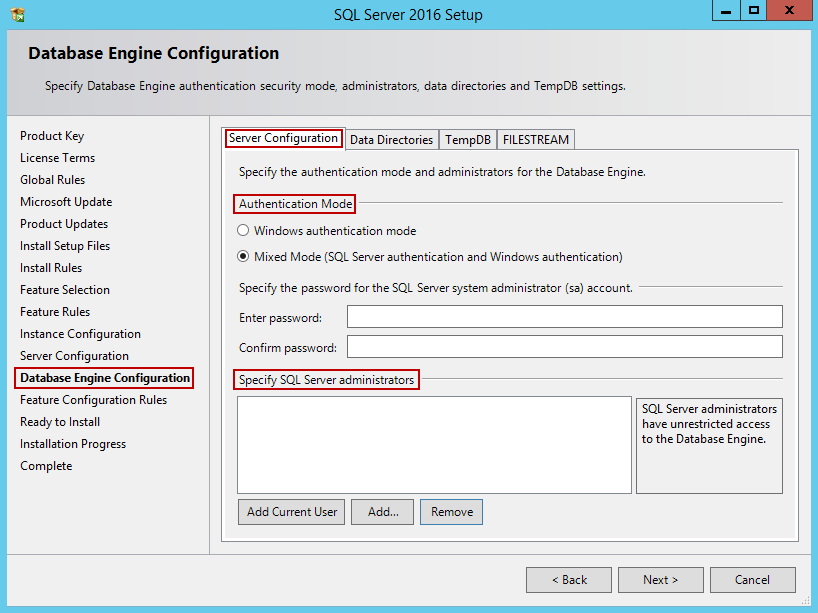
In Database Engine Configuration, under Server Configuration tab, specify the authentication mode and Administrator account(s) for the server. As in earlier versions, Windows Authentication mode and Mixed Authentication mode are available.
After checking Feature Configuration Rules, the wizard proceeds to Ready to Install step. All of the settings that are specified earlier, can be reviewed here. Check the settings one last time, and click Install to start the installation.
Wait for the installation to finish. The process may take some time, depending on hardware specifications.
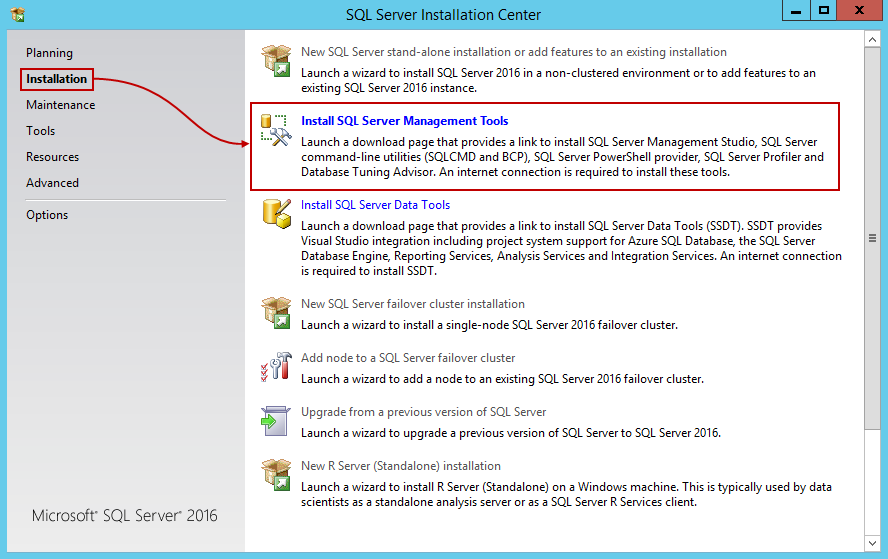
Optionally, install SQL Server Management Studio, so you could easily manage your databases. Start the autorun or setup.exe again, and under the settings tab, choose Install SQL Server Management Tools. This will open the download page for the latest version of SSMS. Click on the download link, and save the installation to the hard drive.
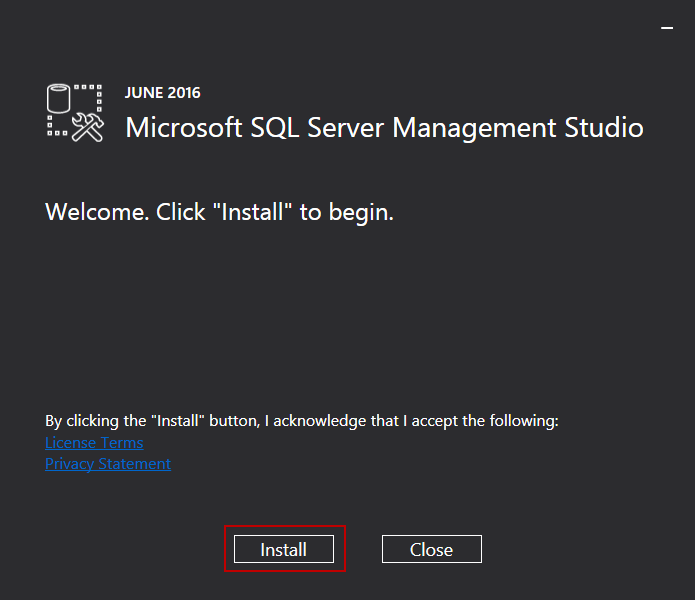
Once the download completes, run the file to start SSMS setup. Just click on the Install button, and the installation should complete without any further setup options. Depending on the system, the computer restart might be required.
Views Robert is a SQL Server and IT enthusiast with many years of experience as a computer repair technician.
He has a great passion for new technologies, science, video games, and medieval history. He also likes reading, writing, and learning new languages.
Robert is currently working for ApexSQL LLC as Software Sales Engineer where he specializes database backups and indexes.
View all posts by Robert SelesLatest posts by Robert Seles (see all)- Multiple methods for scheduling a SQL Server backup automatically - July 17, 2018
- Ola Hallengren’s SQL Server Maintenance Solution – Index and statistics maintenance - January 23, 2018
- Ola Hallengren’s SQL Server Maintenance Solution – Database integrity check - January 10, 2018
© Quest Software Inc. ALL RIGHTS RESERVED. | GDPR | Terms of Use | Privacy