
This article explores the process of JSON data import in the SQL Server table using T-SQL and SSIS.
Introduction
Java Script Object Notation is an accessible data exchange format. Many applications support JSON format data nowadays. We can use JSON data for unstructured data such as log files and NoSQL databases. SQL Server also supports JSON format data import and export for exchanging data with different data sources and applications.
We can use SQL Server FOR XML PATH or FOR XML Auto clause in the SQL Server query, and it retrieves the results into the JSON format. We have explored this in the article How to import/export JSON data using SQL Server 2016.
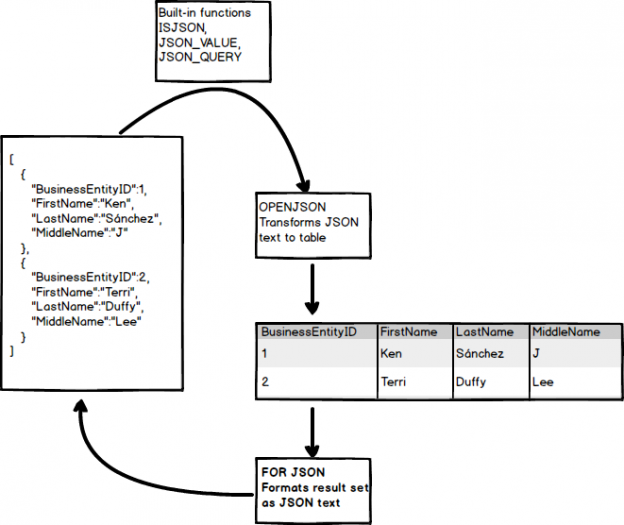
In the following image, we can see built-in functions for converting text into JSON and vice-versa:
Azure Data Studio JSON format output
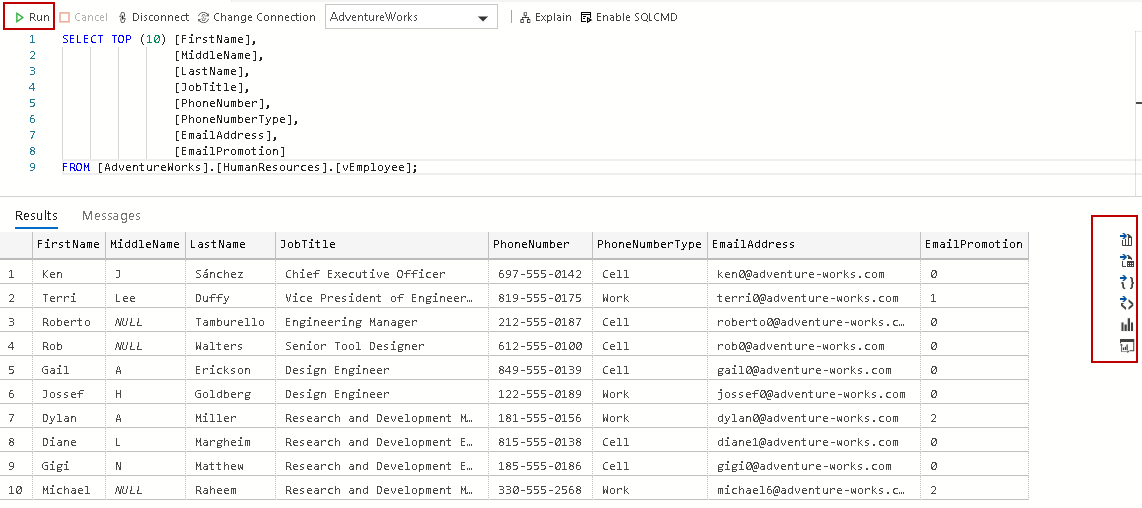
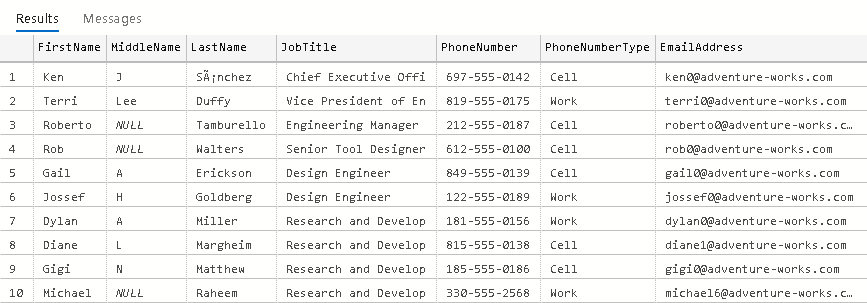
We can also save results in JSON format without specifying any parameter in Azure Data Studio. Let’s execute a query in the AdventureWorks sample database in Azure Data Studio:
|
1 2 3 4 5 6 7 8 9 |
SELECT TOP (10) [FirstName], [MiddleName], [LastName], [JobTitle], [PhoneNumber], [PhoneNumberType], [EmailAddress], [EmailPromotion] FROM [AdventureWorks].[HumanResources].[vEmployee]; |
We get the output in the tabular format as shown below:
In the above screenshot, we have following output formats:
- Save as CSV
- Save as Excel
- Save as JSON
- Save as XML
- Chart
- Visualizer
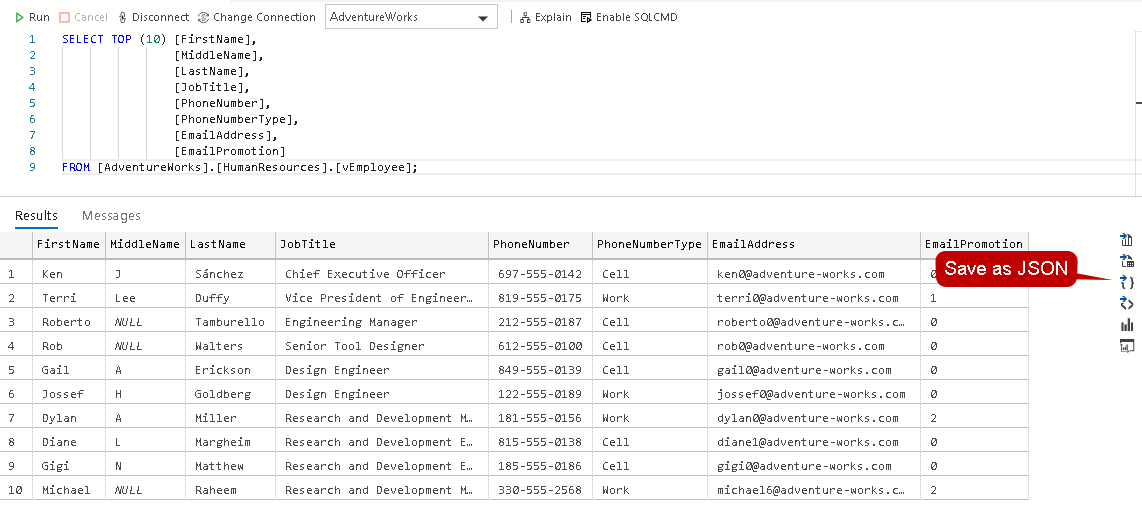
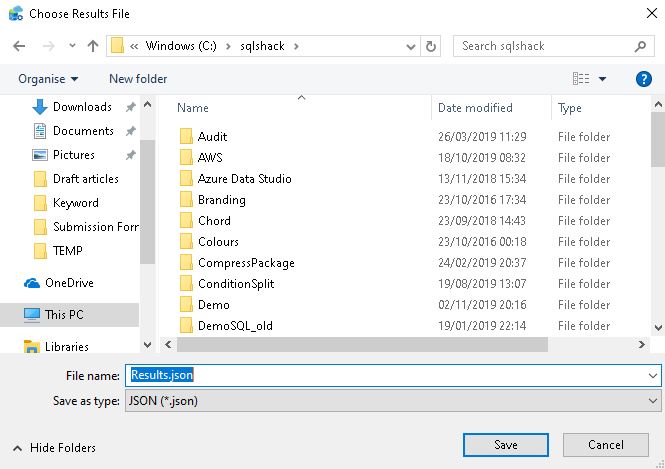
Click on Save as JSON, and it asks you for specifying the directory and file name for JSON file:
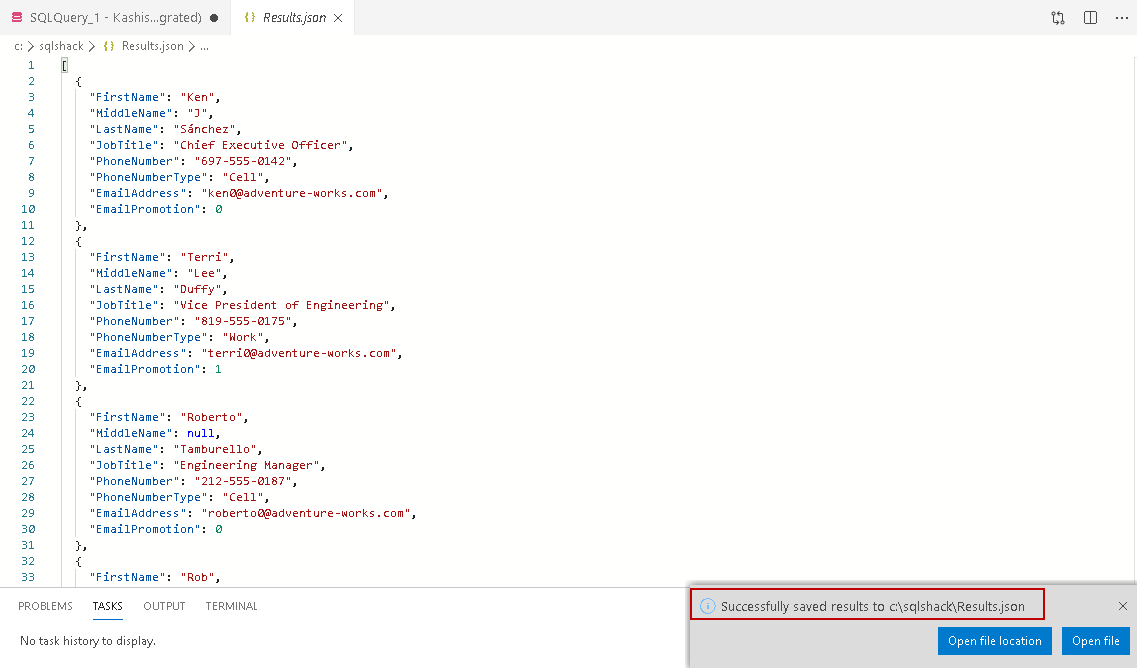
Click on Save, and it shows the JSON format output:
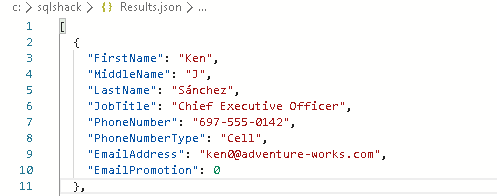
Let’s focus on a single row output. In the output, we can see key-value pair for each:
Now, we will take the opposite approach.
JSON data import in SQL Server
We require JSON data import into the SQL Server table from the .json file created earlier.
Step 1: Import file using OPENROWSET
The first step is to load the JSON file content in a table. We can use the table value function OPENROWSET for reading data from a file and return a table in the output. This table contains a single column and loads entire file data into it.
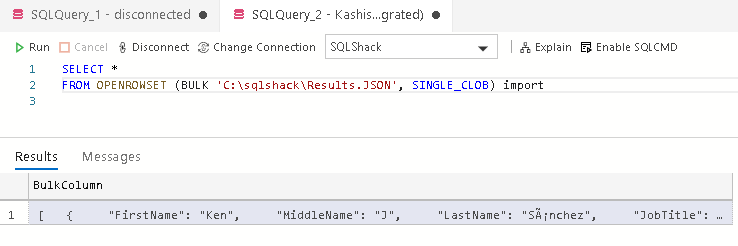
Specify the complete file path in the OPENROWSET function:
|
1 2 |
SELECT * FROM OPENROWSET (BULK 'C:\sqlshack\Results.JSON', SINGLE_CLOB) as import |
It returns the JSON file output and contains the column BulkColumn as shown below:
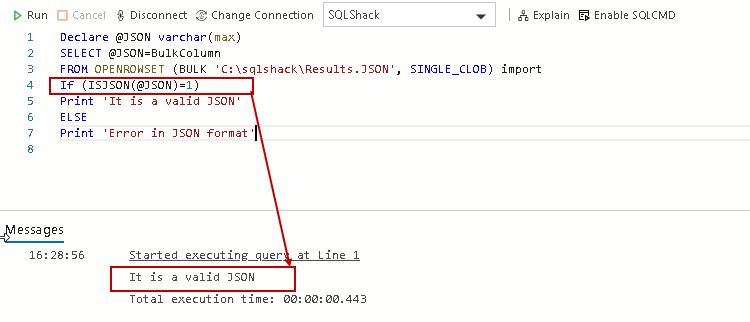
Starting from SQL Server 2016, we have a function ISJSON for validating the JSON format. It checks the JSON stored in the @JSON having data type Varchar(max).
In the following query, the @JSON variable reads the BulkColumn from the imported file, and further, we pass this variable into the function ISJSON() for checking the syntax. It returns value 1 if JSON is a valid structure:
|
1 2 3 4 5 6 7 |
Declare @JSON varchar(max) SELECT @JSON=BulkColumn FROM OPENROWSET (BULK 'C:\sqlshack\Results.JSON', SINGLE_CLOB) import If (ISJSON(@JSON)=1) Print 'It is a valid JSON' ELSE Print 'Error in JSON format' |
In the following screenshot, verify that the JSON structure is valid:
Step 2: Convert JSON output from the variable into SQL Server tables
We use OPENJSON() function for converting the JSON output from a variable into a tabular format. We get the output in different rows and columns, and later, it can be inserted into SQL Server tables.
Let’s run the following command without specifying any additional parameter. By default, it returns all key-value pairs at the first level in the output:
|
1 2 3 4 5 |
Declare @JSON varchar(max) SELECT @JSON=BulkColumn FROM OPENROWSET (BULK 'C:\sqlshack\Results.JSON', SINGLE_CLOB) import SELECT * FROM OPENJSON (@JSON) |
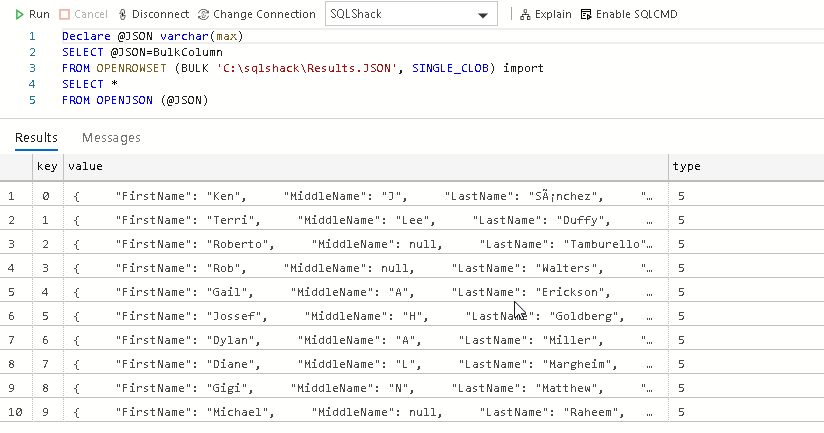
In this output, we can see the following columns:
- Key: We can consider it as a row number in a table. In JSON format, it is a combination of key-value pair enclosed in the curly brackets {}
- Value: It is the property value. In this case, we can see it is a combination of the column name and its value
- Type: It is the type of object such as String, Boolean, number, array or object
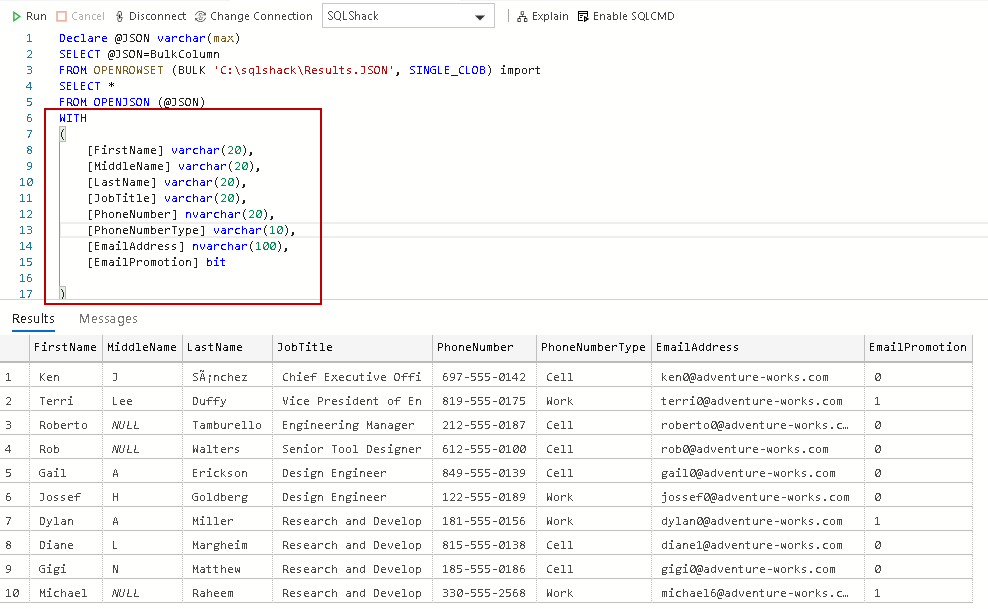
We want the output like a query output in a tabular format. We can use the WITH clause in the above query along with the column definition. It is like defining a table with appropriate column names and their data types. Once we use a WITH clause, OPENJSON reads the JSON object array and converts the individual value as per specified data type and prints in the output.
In the following query, we specified all output columns with appropriate data types:
|
1 2 3 4 5 6 7 8 9 10 11 12 13 14 15 16 17 |
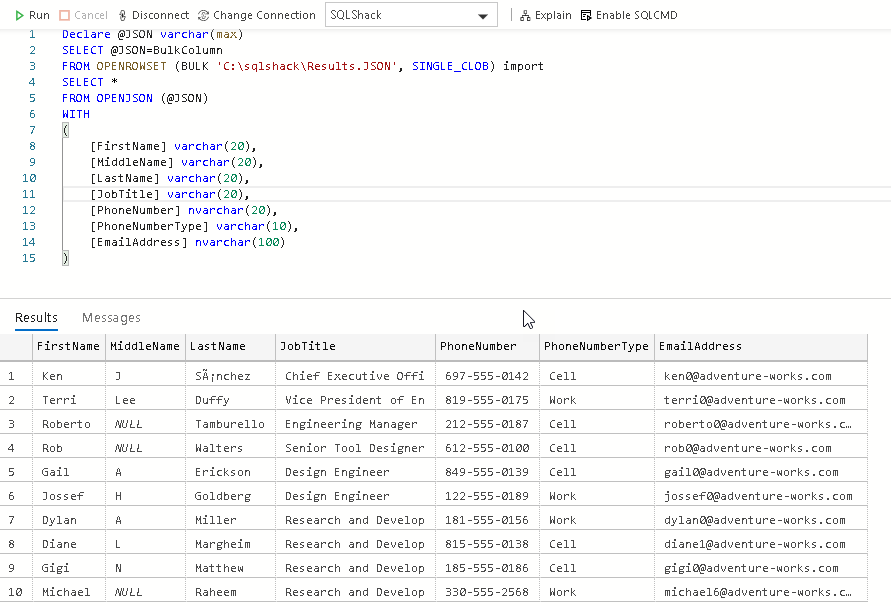
Declare @JSON varchar(max) SELECT @JSON=BulkColumn FROM OPENROWSET (BULK 'C:\sqlshack\Results.JSON', SINGLE_CLOB) import SELECT * FROM OPENJSON (@JSON) WITH ( [FirstName] varchar(20), [MiddleName] varchar(20), [LastName] varchar(20), [JobTitle] varchar(20), [PhoneNumber] nvarchar(20), [PhoneNumberType] varchar(10), [EmailAddress] nvarchar(100), [EmailPromotion] bit ) |
In this output, we get the results similar to query output we get earlier in this article:
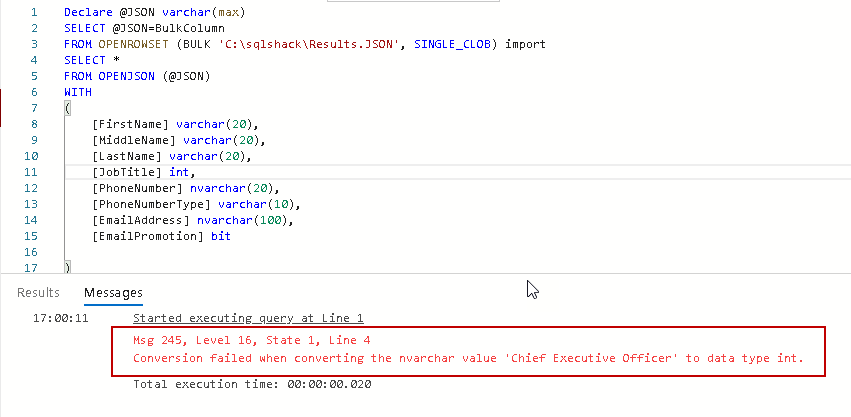
Ideally, we should specify the similar data type that we use in the table else it might cause issues due to data type conversion errors:
We can skip any columns as well in the WITH clause. For example, let’s say we do not want EmailPromotion column in the output; however, it is available in the JSON file. If we do not specify any data type in the WITH clause, SQL Server removes this column from the output:
|
1 2 3 4 5 6 7 8 9 10 11 12 13 14 15 |
Declare @JSON varchar(max) SELECT @JSON=BulkColumn FROM OPENROWSET (BULK 'C:\sqlshack\Results.JSON', SINGLE_CLOB) import SELECT * FROM OPENJSON (@JSON) WITH ( [FirstName] varchar(20), [MiddleName] varchar(20), [LastName] varchar(20), [JobTitle] varchar(20), [PhoneNumber] nvarchar(20), [PhoneNumberType] varchar(10), [EmailAddress] nvarchar(100) ) |
In this output, we do not see the EmailPromotion column even if it is available in the JSON:
View actual execution plan for JSON data import
In SSMS, click on Actual Execution Plan and execute the previous SQL statement. It gives the following plan:
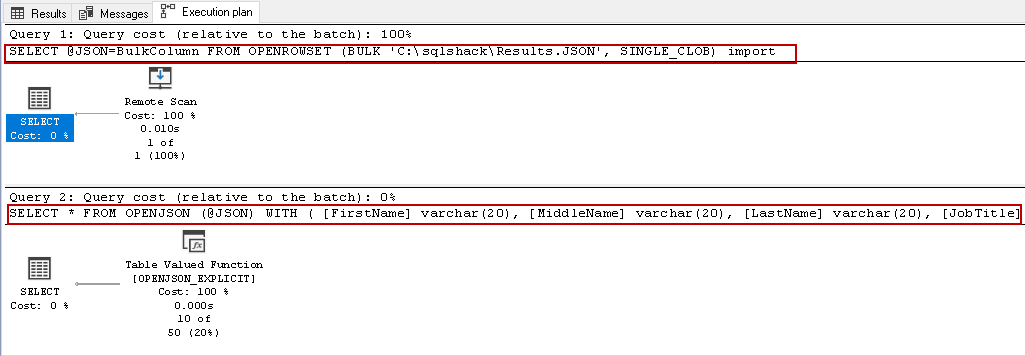
In this plan, we can note that it uses a table-valued function for OPENJSON. Let’s hover the cursor over it and view the details:
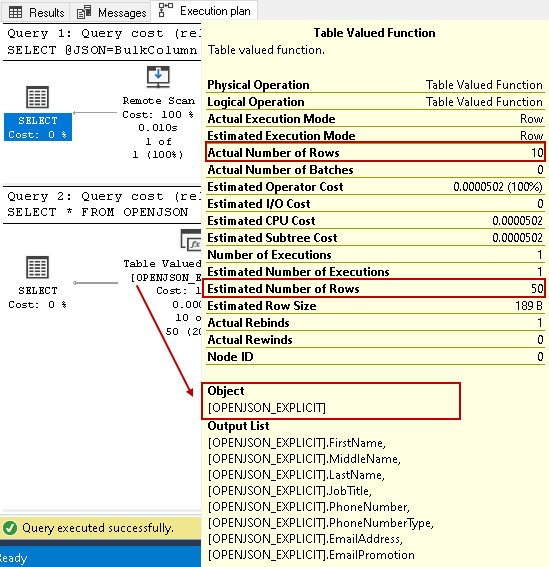
In the above execution plan, note the following:
- It uses object [OPENJSON_EXPLICIT] for fetching the columns and their values
- We see a difference between the estimated number of rows (50) and an actual number of rows (10) as query optimizer unable to estimates the correct number of rows for JSON input
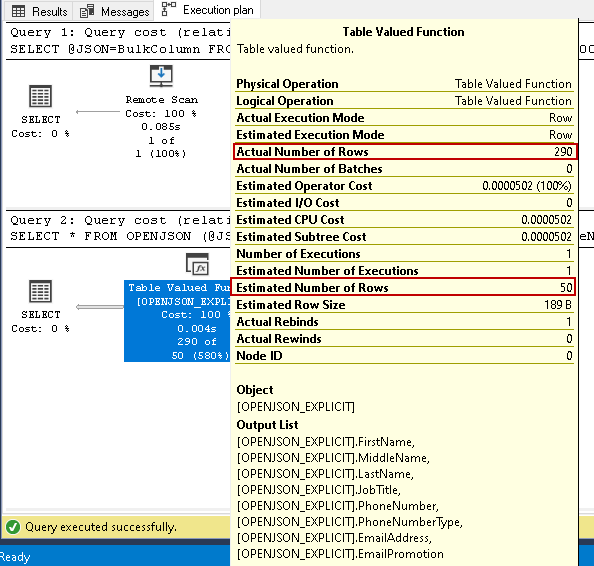
Let’s import another JSON file having 290 records and view the actual execution plan. In this execution plan also, it estimates the number of rows 50 in comparison with the actual 290 rows. It seems SQL Server uses a fixed estimate of 50 rows for JSON data import:
Import JSON file data into the SQL Server table
We can use the similar t-SQL described earlier for inserting data in an existing table. We can also create a table using the SQL SELECT INTO statement similar to a relational DB table. The following query, imports data from results.json, creates a JSON table automatically using SQL SELECT INTO statement and inserts data into it:
|
1 2 3 4 5 6 7 8 9 10 11 12 13 14 15 |
Declare @JSON varchar(max) SELECT @JSON=BulkColumn FROM OPENROWSET (BULK 'C:\sqlshack\Results.JSON', SINGLE_CLOB) import SELECT * INTO JSONTable FROM OPENJSON (@JSON) WITH ( [FirstName] varchar(20), [MiddleName] varchar(20), [LastName] varchar(20), [JobTitle] varchar(20), [PhoneNumber] nvarchar(20), [PhoneNumberType] varchar(10), [EmailAddress] nvarchar(100) ) |
We can verify the records using the following SELECT statement:
|
1 |
Select * from JSONTable |
SSIS package for importing JSON data into SQL Server table
We can use SQL Server integration package for inserting JSON into the SQL Server table as well. You should have basic knowledge of SSIS packages. If you are not much aware of it, I would recommend reading SQLShack articles.
I am using Visual Studio 2019 with SSDT package in this article.
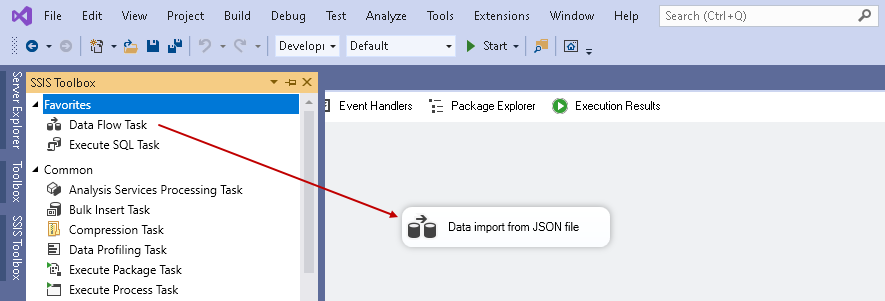
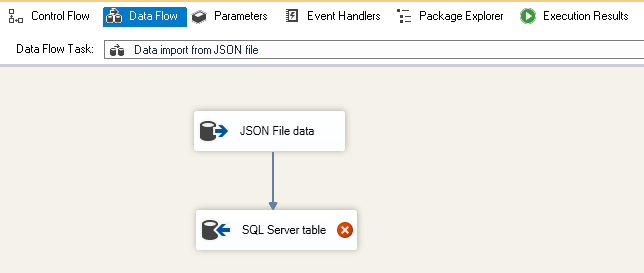
Open Visual Studio 2019 and create a new integration service project in a suitable directory. In this package, drag Data Flow Task in the control flow task and rename it to Data import from the JSON file:
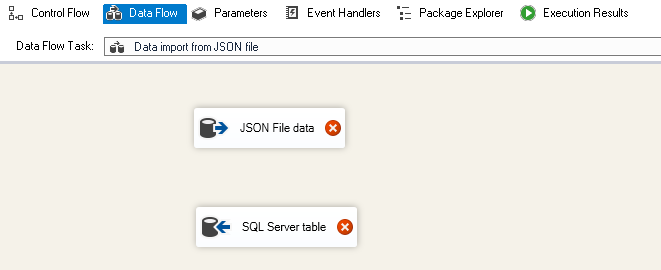
Double-click on this data import from the JSON file task and it moves the package in the data flow tab. In the data flow tab, drag the OLE DB Source and OLE DB destination as shown below:

Rename the source and destination as per below:
- OLE DB Source -> JSON File data
- OLE DB Destination -> SQL Server table
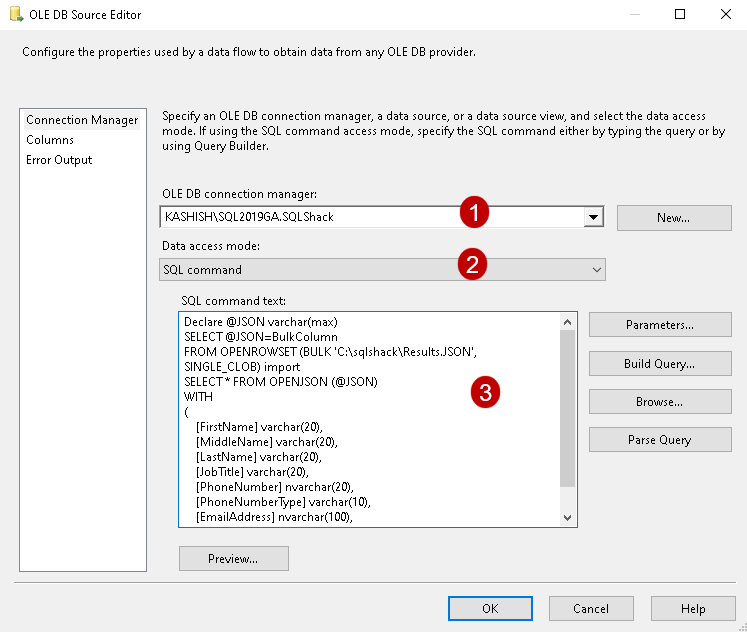
Double-click on the JSON file data and in the OLE DB source editor, do the following tasks:
- OLE DB connection Manager: Specify SQL Server instance details in the connection manager
- Data access mode: We will use the SQL query specified above section. From the drop-down menu, select the data access mode as SQL Command
SQL Command Text: In this section, paste the query we specified earlier for JSON data import. Let me paste the query again for easiness
123456789101112131415Declare @JSON varchar(max)SELECT @JSON=BulkColumnFROM OPENROWSET (BULK 'C:\sqlshack\Results.JSON', SINGLE_CLOB) importSELECT * FROM OPENJSON (@JSON)WITH([FirstName] varchar(20),[MiddleName] varchar(20),[LastName] varchar(20),[JobTitle] varchar(20),[PhoneNumber] nvarchar(20),[PhoneNumberType] varchar(10),[EmailAddress] nvarchar(100),[EmailPromotion] bit)
Click on Columns and verify the source columns that we want to populate in the destination table:
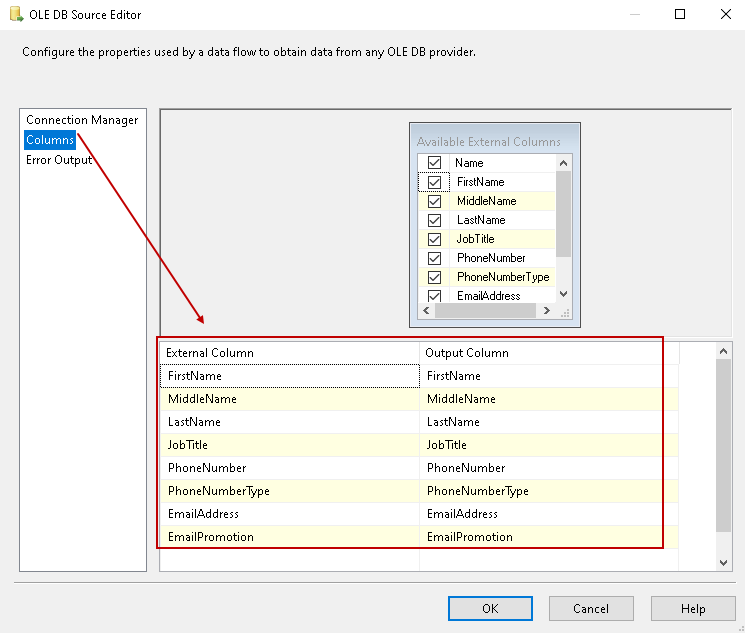
Click OK, and our configuration for OLE DB source is complete:
Now configure SQL Server table for the destination table in the SQL instance:
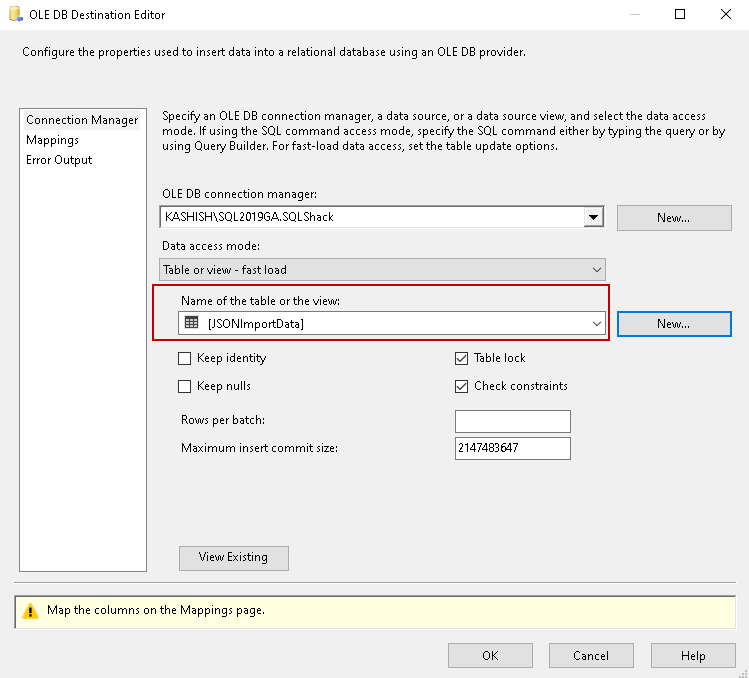
Click on Mappings and verify the source, destination column mappings:

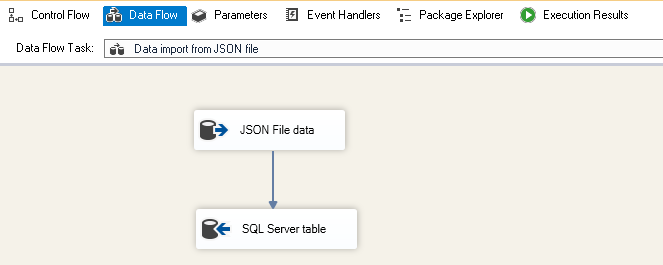
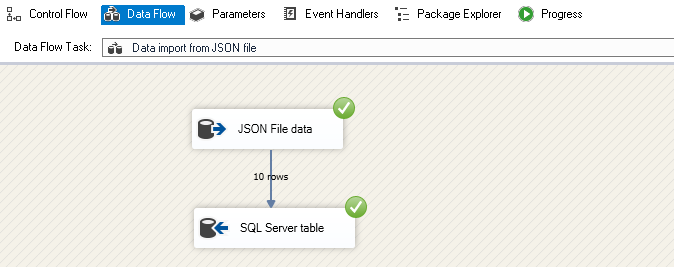
Click OK, and our SSIS package configuration is complete. You do not see any error icon on any task:
Click on Start. It quickly processes the JSON file and inserts data into the SQL table. From the output, we see it transferred 10 rows from the JSON file to SQL table:
Now, view the records using a SELECT statement:

Conclusion
In this article, we explored importing JSON file into SQL Server tables using OPENROWSET and OPENJSON function. We also used an SSIS package for JSON data import. You should practice this as per your data requirements.

I am the author of the book "DP-300 Administering Relational Database on Microsoft Azure". I published more than 650 technical articles on MSSQLTips, SQLShack, Quest, CodingSight, and SeveralNines.
I am the creator of one of the biggest free online collections of articles on a single topic, with his 50-part series on SQL Server Always On Availability Groups.
Based on my contribution to the SQL Server community, I have been recognized as the prestigious Best Author of the Year continuously in 2019, 2020, and 2021 (2nd Rank) at SQLShack and the MSSQLTIPS champions award in 2020.
Personal Blog: https://www.dbblogger.com
I am always interested in new challenges so if you need consulting help, reach me at rajendra.gupta16@gmail.com
View all posts by Rajendra Gupta
- Understanding PostgreSQL SUBSTRING function - September 21, 2024
- How to install PostgreSQL on Ubuntu - July 13, 2023
- How to use the CROSSTAB function in PostgreSQL - February 17, 2023