
In this 5th article of the Source Control series, we will explore the concept of branches in a Git source control and GitHub repositories.
Introduction
We covered the followings topics for source control in the previous articles (ToC at the bottom):
- What are Git and a GitHub repository?
- We covered Git integrations in the Azure Data Studio and Visual Studio Code
- We initialized a Git repository and synchronized with the remote repository GitHub while making bi-directional changes
- Understand the Git timeline and its components – Staging area, Working tree, and a repository
- Useful Git commands
- Clone repository from GitHub
Branches in Git Source Control
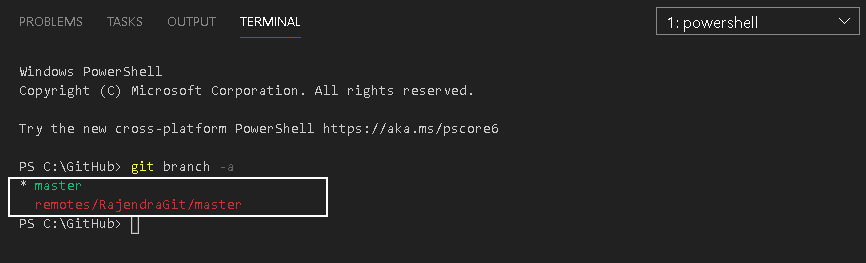
As you know, Git source control takes a project snapshot once we commit the project. You can view the Git timeline to see the different stages and rollbacks to the earlier version in case of any requirement. By default, Git uses the master branch and stores all changes in that branch. We can verify the existing branches using the git branch -a command, as shown below.
Here, we see a Git branch (master) and its corresponding remote repository in GitHub (remotes/RajendraGit/master)
For the master branch, it uses an Asterix(*) to show that we are currently in this specified branch.
You might think:
- Why we require different branches in Git?
- What is the benefit of using different branches in Git?
Let’s understand the branches using an example.

We can consider a Git branch similar to a tree branch. In a tree, the branch connects to the trunk. We might have different branches in a tree. In the tree, we might get a new branch, or any existing branch might fall off. The branch is part of the tree, but if it is fall off, the tree does not get any impact; however, if you cut the tree trunk, then the branches do not have any existence.
Similarly, suppose you are a developer and support a critical application. Multiple developers might work on different items, but they might share similar code. Another developer may change the similar section in the code that might affect your code functionality. If all developers work in the master branch, someone changes might ripple out everyone changes, and there might be many conflicts.
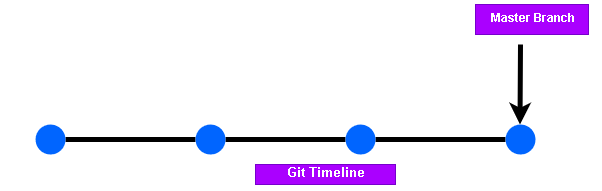
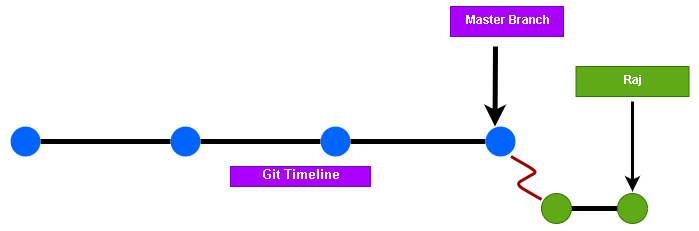
Now, Git source control resolves these issues using different branches. In the below image, we have a Git timeline that shows multiple commits in a time frame. Currently, we have a master branch, and the arrow shows the last commit in this branch.
Now, two developers Raj and Vishav, get the requirement to work on the code for your application. It might need to modify the existing SQL procedures or add new objects as well. For this, you create a new branch in the Git. These users can work on their branches independently.
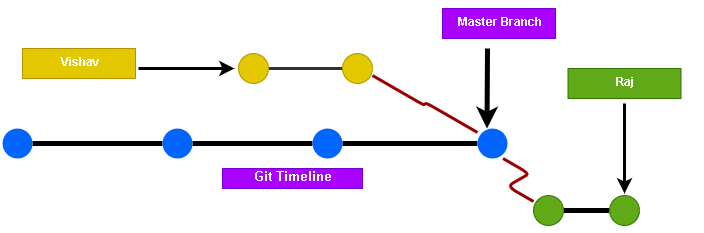
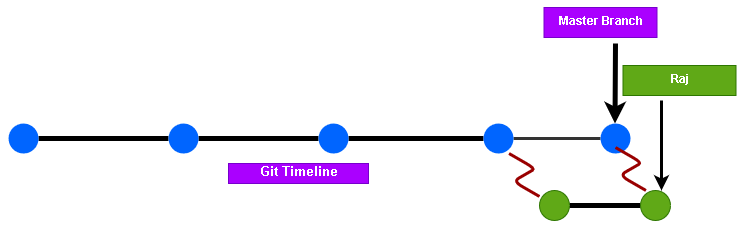
If you make any changes to an existing stored procedure, it does not affect other uses that might be working on a similar procedure. Suppose, later on, the client scrap out the requirement on which Vishav is working. You can easily cut off the branch from Git without affecting the master and other branches.
Later on, Raj finishes the development, and you require to reflect your changes in the master branch. You can push your changes in the master branch whenever required.
Git source control branch gives freedom to the developers to work independently on their modules and merge them into the master branch whenever required. It is a straightforward process and does not require many steps to achieve flexibility. We can create different branches for different teams, modules, functionalities.
Create a new branch in the Git Source Control
Earlier, we saw both local and remote repositories using the Git command. It showed the master branch in my local repository. You can query the git branch to view local branches in Git.

Now, I create a new branch to play around with the queries without affecting the original code. Execute the git branch command along with the branch name. Here, we create a new branch Raj in the Git repository.
Creating a new branch does not change the Asterix to that branch. As we can see, still master is our current branch.

Switch a branch in Git Source Control
To work in a specific Git branch, we need to switch to a particular branch. We use the Git Checkout command for this purpose.
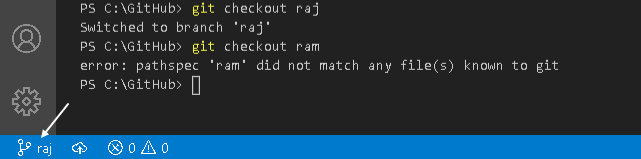
The below command switch to the existing branch raj.
>git checkout raj

If the branch does not exist, you get the following error message.

In the status bar, you can see the branch name to which you are connected.
Earlier, we created a new branch and switched to the new branch. In Git, we can use an argument -b to create and switch the branch at run time. For example, in the above image, we saw that branch ram does not exist. We can use the following command to create this branch and switch at the same time.
>Git checkout -b ram

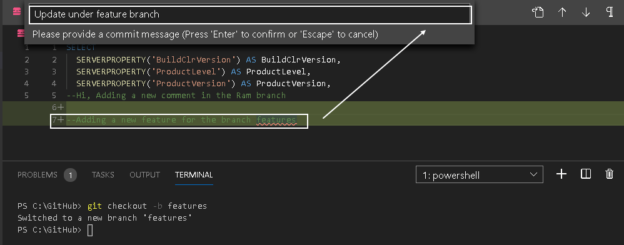
Change scripts in a user branch for Git Source Control
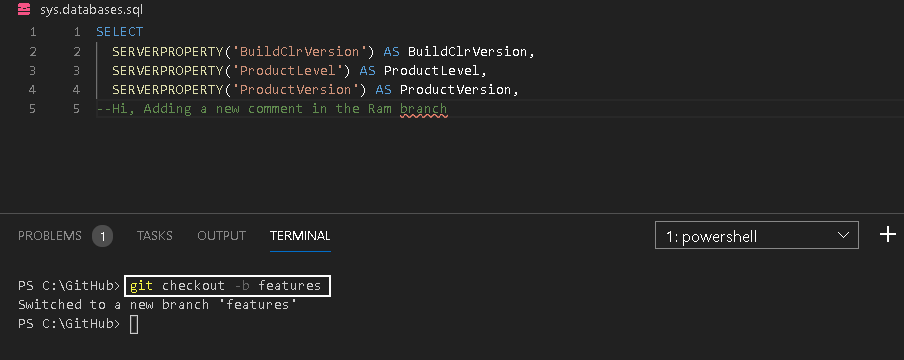
We have created multiple git branches in this article. Let’s make changes in the script in a user branch. We use the ram branch in this example.
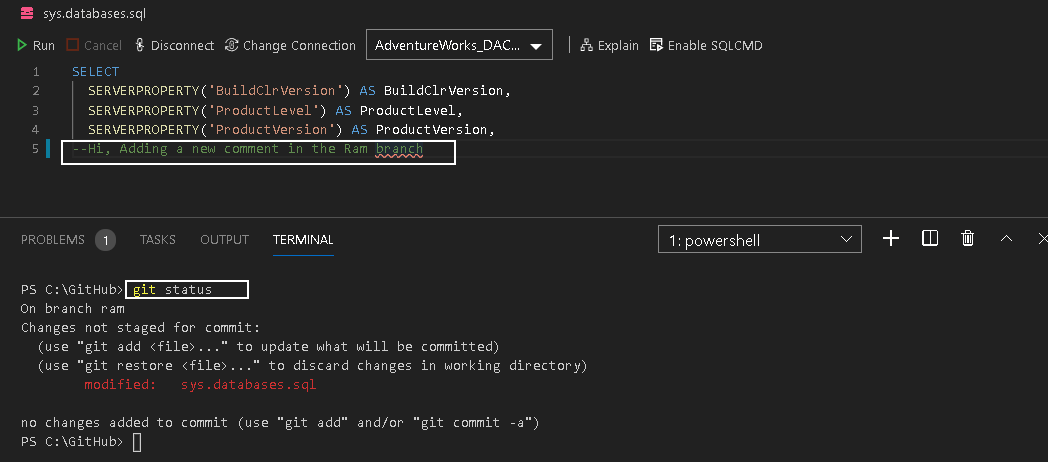
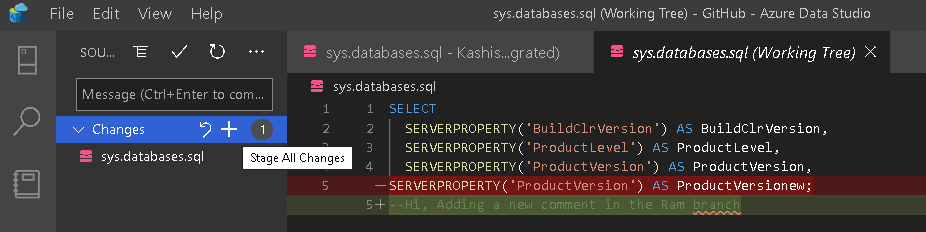
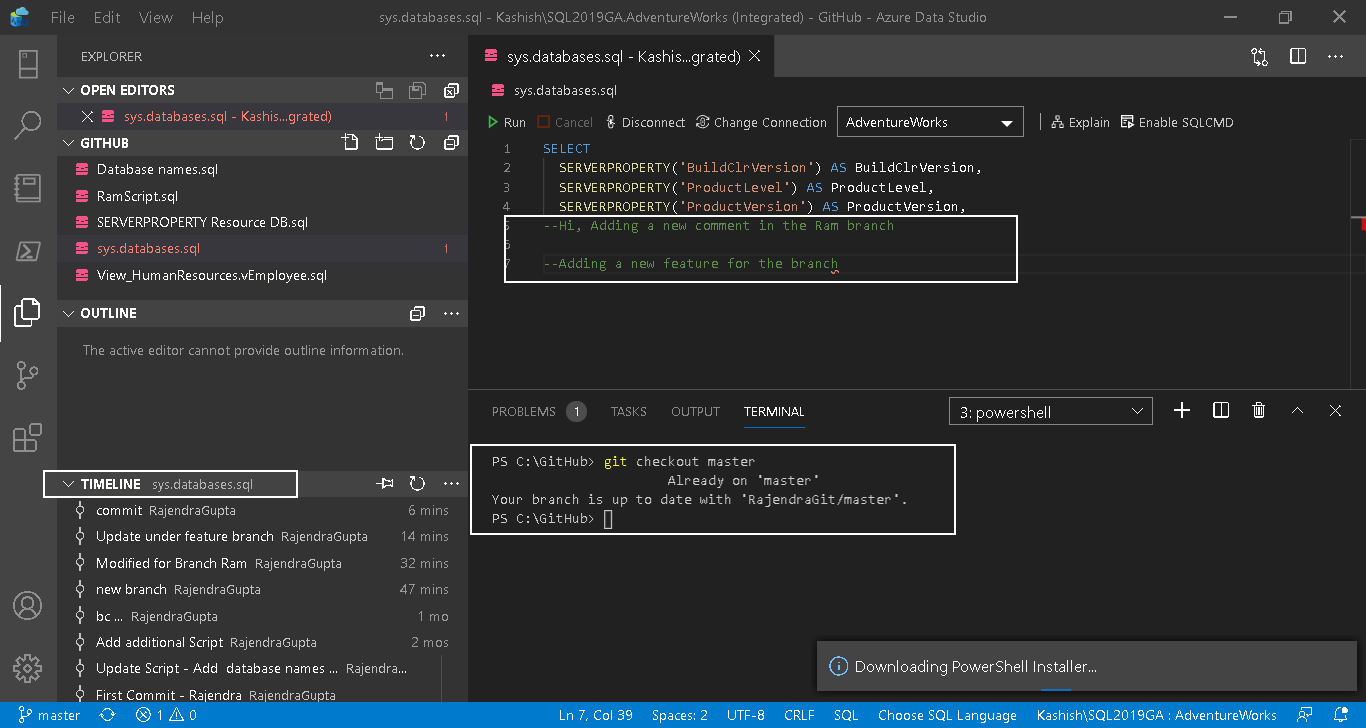
Open a script in the Git repository and make changes while you are on the branch Ram. I added a new comment in the file, as shown below.
You can run the git status command to see that changes are not staged yet for the commit.
Navigate to the Source control icon and stage your changes. You can go through Working with Git components in Azure Data Studio to understand Git components.
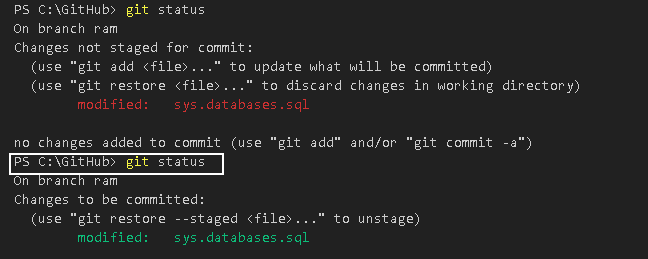
Now, if we rerun the git status command, it shows changes in the staged area but waiting for the commit.
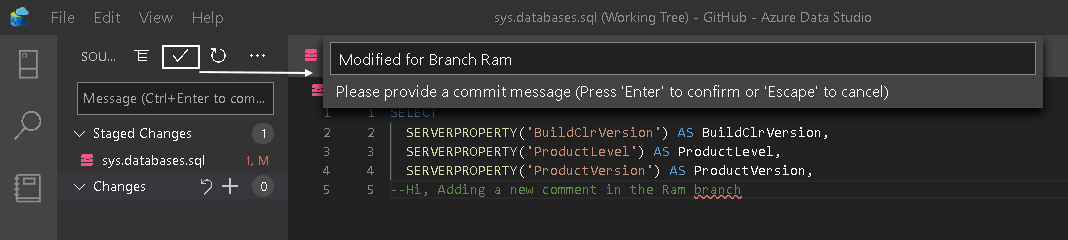
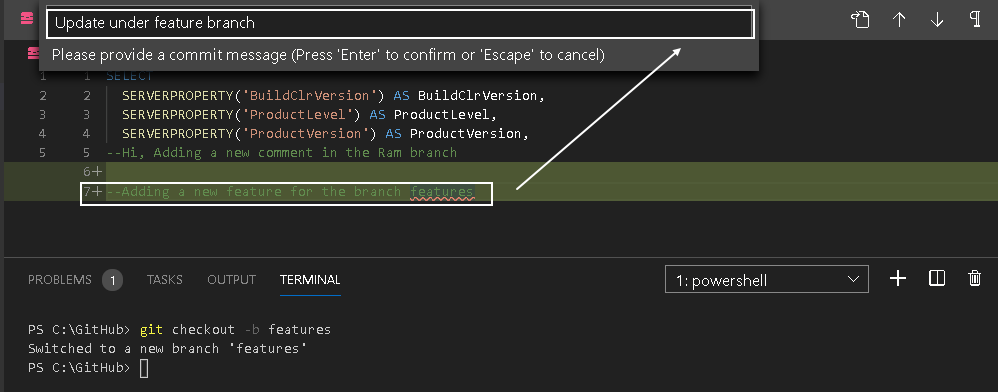
Commit the changes in the branch Ram. Specify a commit message to reflect your changes.
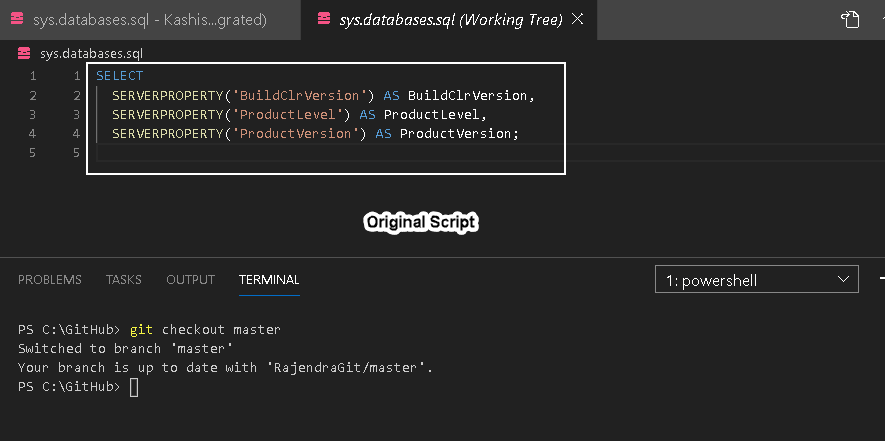
At this point, let’s switch to the master branch. We want to know do these changes in the script also reflects in the master branch. Once we switch to the master branch, the editor shows you the original script.
It is the benefit of creating and working in a Git branch. Your developers might change scripts multiple times, but it does not reflect in the original master branch until they explicitly ask Git to do so.
Now, switch back to the branch Ram and create a new branch while we are on that branch. If we create a new branch in the context of an existing branch, it gets a snapshot from the existing branch. For example, we made changes in the branch ram. These changes are not reflecting in the master branch.
Now, once we created another branch feature, it also gets the changes committed in the branch Ram.
Make the changes in the new branch feature and commit it.
In the earlier branch ram, the changes done in the branch feature does not reflect. It shows the branches are independent of each other.

Merge the changes from the user branch to the master in Git Source Control
Suppose we are done wit modifying scripts in the feature branch. We want to publish these changes in the master branch.
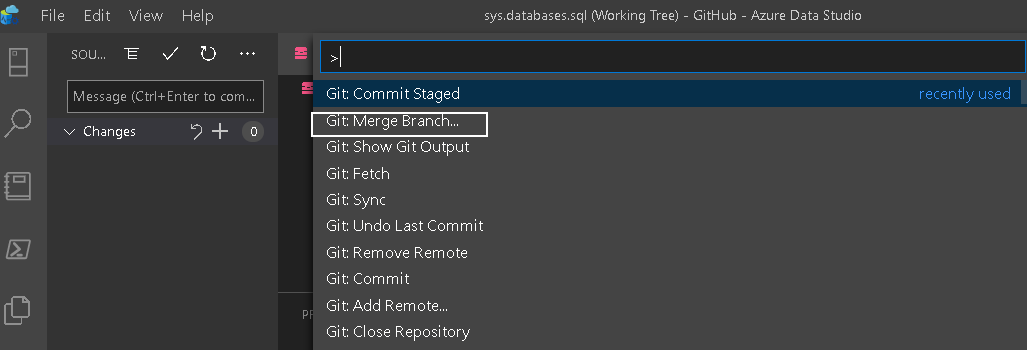
In the Azure Data Studio command palette, click on the Git Merge branch.
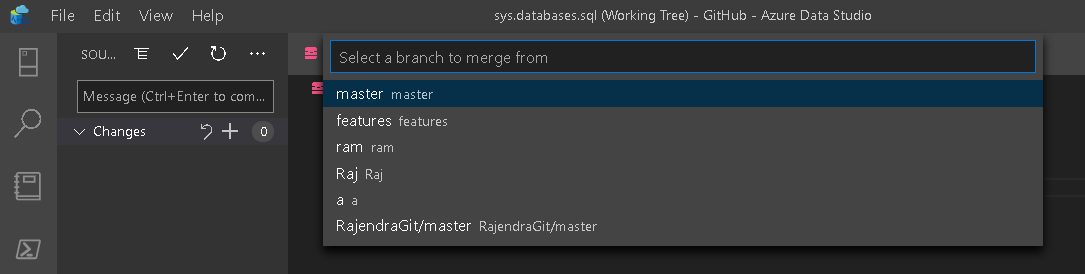
Select the branch from the drop-down, and it is the branch in which we want to merge your code in the master branch.
It merges the changes. You can see the modified script in the master branch. It also retains the commit history in the timeline of the master branch.
Remove a branch in Git Source Control
If we do not require a branch for further work, it is good to remove it. If you create many branches, it might be difficult for you to manage those. To remove a Git branch, we run the following command.
>Git branch -D features

If there are any unmerged changes in your branch, you can specify -f flag to forcefully remove it; however, you should either commit or discard your branch changes before deleting it.
Conclusion
In this article, we explored Git Source Control branches and its importance to manage your code in case multiple developers work on a different area, and you do not want the changes in the master copy until the deployment completes.
Table of contents

I am the author of the book "DP-300 Administering Relational Database on Microsoft Azure". I published more than 650 technical articles on MSSQLTips, SQLShack, Quest, CodingSight, and SeveralNines.
I am the creator of one of the biggest free online collections of articles on a single topic, with his 50-part series on SQL Server Always On Availability Groups.
Based on my contribution to the SQL Server community, I have been recognized as the prestigious Best Author of the Year continuously in 2019, 2020, and 2021 (2nd Rank) at SQLShack and the MSSQLTIPS champions award in 2020.
Personal Blog: https://www.dbblogger.com
I am always interested in new challenges so if you need consulting help, reach me at rajendra.gupta16@gmail.com
View all posts by Rajendra Gupta
- Understanding PostgreSQL SUBSTRING function - September 21, 2024
- How to install PostgreSQL on Ubuntu - July 13, 2023
- How to use the CROSSTAB function in PostgreSQL - February 17, 2023