
Basic extraction of the SQL Server database data is usually achieved by querying the databases and creating stored procedure to automate the extraction process. Unfortunately, extracting the information in this way will not yield high-end reports, and only basic table-shaped reports are available when extracting the information via SQL Server Management Studio or similar tools. In order to create high-end reports that will include additional projections of the data, such are graphs, lists, charts… SQL Server offers powerful reporting options within the SQL Server Reporting service.
To start with the report creation, we are going to use Microsoft Visual Studio in order to define data sources for the reports and configure reports architecture.
Start Microsoft Visual Studio and click on the ‘New project’

In the newly opened “New project” dialog, expand the “Business Intelligence” node and select the “Reporting Services” in the project pane on the left side. Then, in the central pane select the “Report Server Project”. Finally, in the bottom part of the dialog, specify project and solution names and click on the “OK” button to complete this task
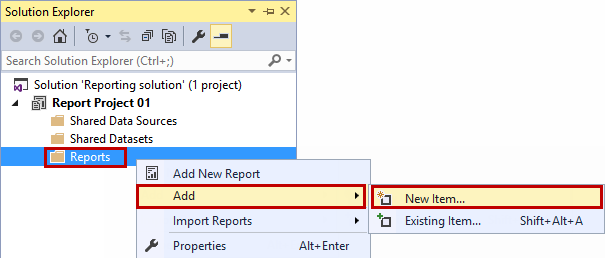
Now that we’ve created both the Solution and the Project within it, we can start creating reports. To do so, go to the “Solution Explorer”, bring up the context menu with right mouse click on the “Reports” and navigate to “Add” > “New Item…”
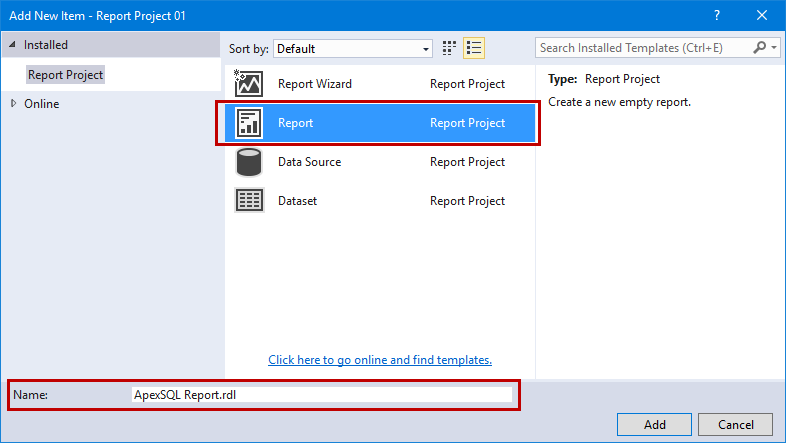
The “Add New Item” dialog will appear, and we should opt for the “Report” project and provide the desired name, and click “Add” to complete this task.
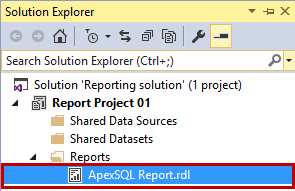
With this, our report will appear in the “Solution Explorer” pane, so we can access it by double clicking on it in order to continue with the report design
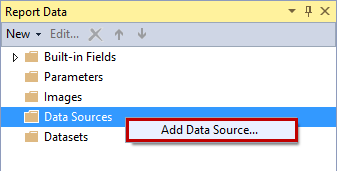
First step that needs to be completed when designing a report is to specify the data source for the report. To do so, in the “Report Data” pane bring up the context menu and click on the “Add Data Source…” option.
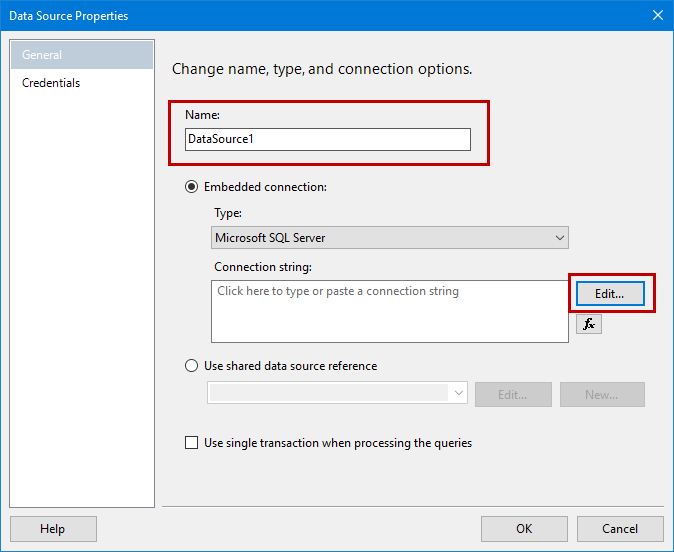
The “Data Source Properties” dialog will be brought up, and the user should specify the name for this data source, and click on the “Edit” SQL Server connection button
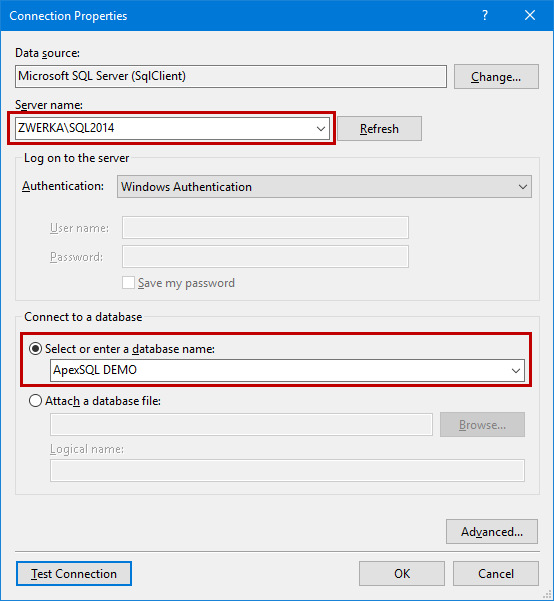
In the “Connection Properties” dialog, choose the SQL Server, choose authentication method and provide valid credentials, and choose a database that holds the stored procedure(s) that will be used as the source for these reports
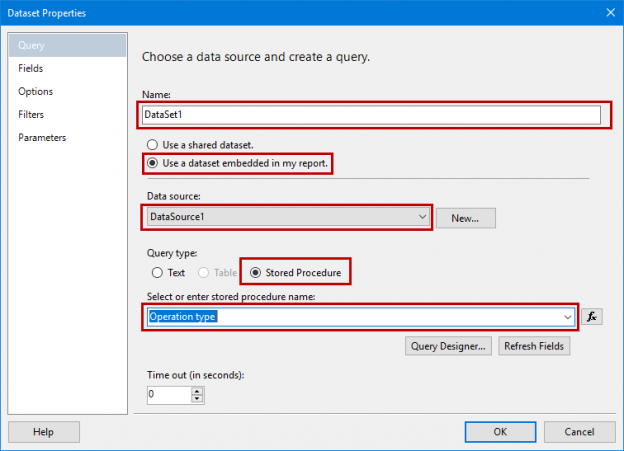
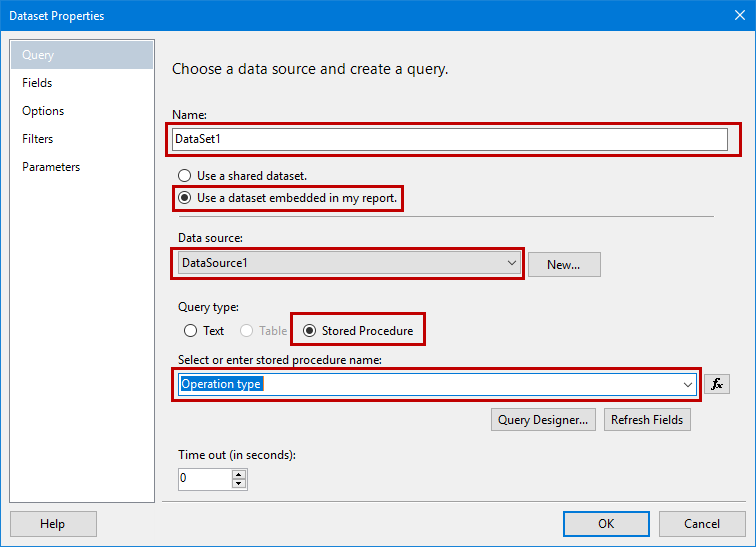
Now that the data sources have been set, the next step in order is to specify the data sets. As was the case with the data source creation, bring up the context menu by clicking on the “Datasets” and select the “Add Dataset…” option. In the “Dataset Properties” dialog, provide the dataset name and opt for the “Use a dataset embedded in my report option” by clicking on the appropriate radio-button. Then, choose the data source we’ve just created, and opt for the “Stored Procedure” as the Query type. Finally, select the Stored Procedure from the drop-menu and click “OK” to complete this step. Note: to further fine-tune the dataset, configure the various options in the “Fields”, “Options” and other tabs of the “Dataset Properties” dialog.
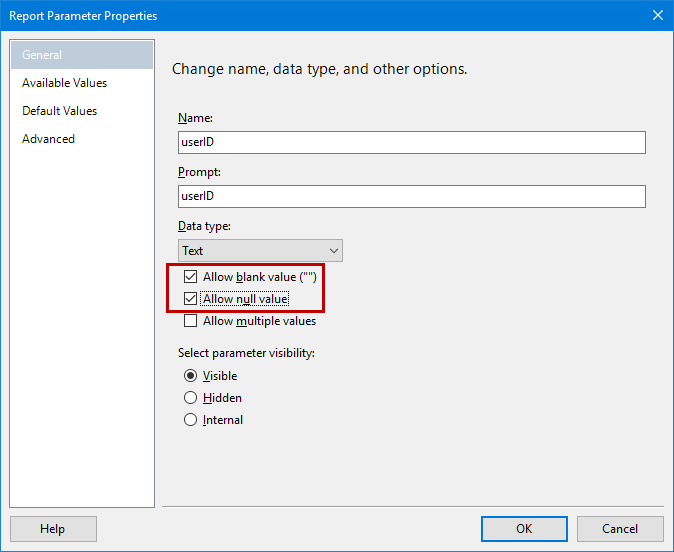
If the stored procedure that is being used contains any parameters that will allow users to run the report with specific input (e.g. specific user, ID, time-frame…), the parameters also need to be configured in the report data. In the “Report data” pane, under the “Parameters” node, right click on the parameter that was discovered in the provided stored procedure and choose “Parameter Properties” option. In this dialog, we can use various options to configure specific parameters, but the most important step that needs to be performed here is to check the “Allow Nulls” and “Allow blank values” checkboxes so that the report can be run “open-ended”.
With this, we have all resources required for the report creation, so we can now configure the report output. Now that we are back in the report designer, we can see that the report field is currently empty. First, let’s add the desired report item from the toolbox (accessed from the “View” pane in the main ribbon or called with Ctrl+Alt+X shortcut) – simply drag the desired report items from the toolbox to the report surface – e.g. table. Now, drag the data sets from the Datasets list to the table columns (user will need to add/remove columns to match the number of datasets). Same should be done for any other added items (charts, matrix, lists…)
Now that we’ve added the values, the report can be previewed or exported to any of the available formats by clicking on the “Preview” or “Export” buttons. Of course, the only remaining task is to save the report (as .rdl file) which can be used to run the report whenever it is needed or to forward it to other users so they can quickly generate reports and deploy them to available reporting environment.


References
- SQL Server Reporting Services (SSRS): Create, deploy, and manage mobile and paginated reports
- SQL Server Reporting Services
- Charts (Report Builder and SSRS)

He is a passionate and competitive gamer and experienced fisherman with a keen eye for perfection and high standards and expectations for anything he invests his time into
View all posts by Nesha Maric
- Various techniques to audit SQL Server databases - July 5, 2018
- Reading the transaction log in SQL Server – from hacks to solutions - July 3, 2018
- Creating reports based on existing stored procedures with SQL Server Reporting Services - November 10, 2016