
This is the third article in a series of learning the CREATE VIEW SQL statement. So far, I’d say that we’re comfortable and familiar with the syntax, and we’ve learned how to create and modify views. In this part, we’ll continue to work on views using the sample database and data that we created so far.
To briefly summarize the series, in the first part about Creating views in SQL Server, the idea was to get familiar with the CREATE VIEW SQL syntax, all the different things we can do with views, and creating a really basic view.
In the second part about Modifying views in SQL Server, we upped the difficulty a little bit and created a more complex view with aggregates in it. Furthermore, we got familiar with the ALTER VIEW statement used to change the output by changing the definition and structure of a query.
Introduction
Although this article can be read independently from the first two, it’s highly advisable to head over and read the previous two parts to get the full picture and because it will be easier to follow along.
Now it’s time to start using Data Manipulation Language (DML) that is used to manipulate data itself and see how we can insert data into a table through a view.
However, before we actually insert data through a view, let’s see how we can rename a view. I also want to show you one neat thing that we can do WITH CHECK OPTION which is a part of the CREATE VIEW SQL syntax. This option can be useful when inserting data through a view which you’ll see later in this article.
Renaming views
Views are renamed using the sp_rename system stored procedure. By definition, this SP is used for changing the name of a user-created object in the current database. Having said that, changing any part of an object name, including views, can break scripts and dependencies, which is why it’s not recommended to use this statement to rename views or any other user-created object. The smart thing to do would be to drop the object and re-create it with the new name using the CREATE VIEW SQL statement.
Renaming views using a third-party software solution
If you want to play it safe, I’d suggest a third-party software solution for safely renaming SQL objects. I, personally, use SQL Server Management Studio and Visual Studio add-ins for SQL Server called ApexSQL Search and ApexSQL Refactor. Both add-ins have a feature called Safe rename that renames tables, procedures, views, functions, and columns without breaking dependencies.
For detailed information about renaming SQL objects using this feature, see the following articles:
- How to rename database objects in a SQL Server database safely – Part 1
- How to rename database objects in a SQL Server safely – Part 2
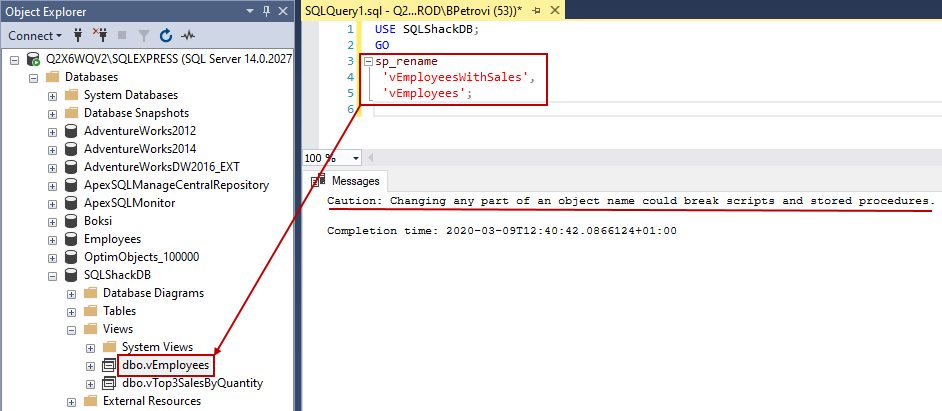
This is a series about using T-SQL, so we’re going to do it using the stored procedure mentioned above. Make sure that you’re are connected to the SQLShackDB database or specify the database name in the USE statement to avoid getting errors from SQL Server. The example below changes the database context to the SQLShackDB database and changes the view’s name:
|
1 2 3 4 5 |
USE SQLShackDB; GO sp_rename 'vEmployeesWithSales', 'vEmployees'; |
If we head over to Object Explorer and refresh the Views folder, we should see that the name changed to vEmployees. There’s also a warning from SQL Server about changing any part of an object name that I’ve mentioned earlier:
Now, let’s completely change the definition of the view by executing the code from below:
|
1 2 3 4 5 6 7 |
USE SQLShackDB; GO ALTER VIEW vEmployees AS SELECT * FROM Employees; GO |
We could have just dropped the view and use the CREATE VIEW SQL statement to re-create it with the new definition, but we can’t break script and dependencies with this simple view, so it’s safe to just rename it using the stored procedure.
I can’t help but notice the name of the view underlined in red. We’ve all seen this at some point. This indicates an error in SSMS, in this particular case about an invalid object name, but it’s not:
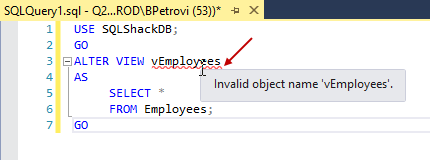
This is coming from SSMS’s IntelliSense. We just changed the name of the view and the metadata has not been updated yet. The same would have happened to the CREATE VIEW SQL statement. Right after the creation of an object, when queried, it’s very likely for the view as the source to be underlined in red until the cache is refreshed. An easy way to fix this, although it’s not an actual error (the above script can be executed without throwing an error), is to refresh the IntelliSense’s cache manually.
In SSMS, go to Edit on the main menu. Expand the Intellisense options and select Refresh Local Cache as shown below:
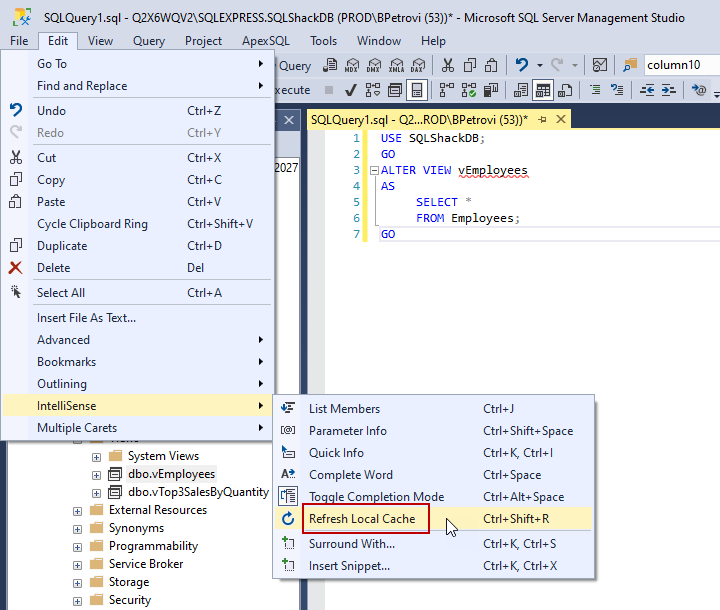
As soon as we refresh the cache, metadata is up-to-date (sometimes it takes a couple of seconds), and Intellisense removes the red squiggles line.
So, let’s move on and execute the ALTER VIEW statement to change also the definition of the view to a simple SELECT statement that retrieves all the columns from the Employees table:
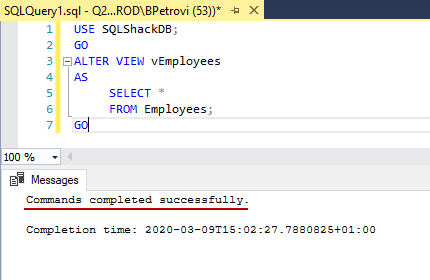
So, if we query the vEmployees view now, it should return all columns from the Employees table as shown below:
|
1 2 3 4 |
USE SQLShackDB; GO SELECT * FROM vEmployees; |

Data modifications through views
Finally, let’s see how we can do data modifications through the vEmployees view. This is a very neat thing that we can do. Just think about it. We started with the CREATE VIEW SQL statement, we then created a very simple view, and now we’re going to use that view to insert a record into our Employees table.
Let’s say that we need to insert an employee through our view. The below code is just an example of inserting data through a view using the SELECT statement:
|
1 2 3 4 5 6 7 8 9 10 11 12 |
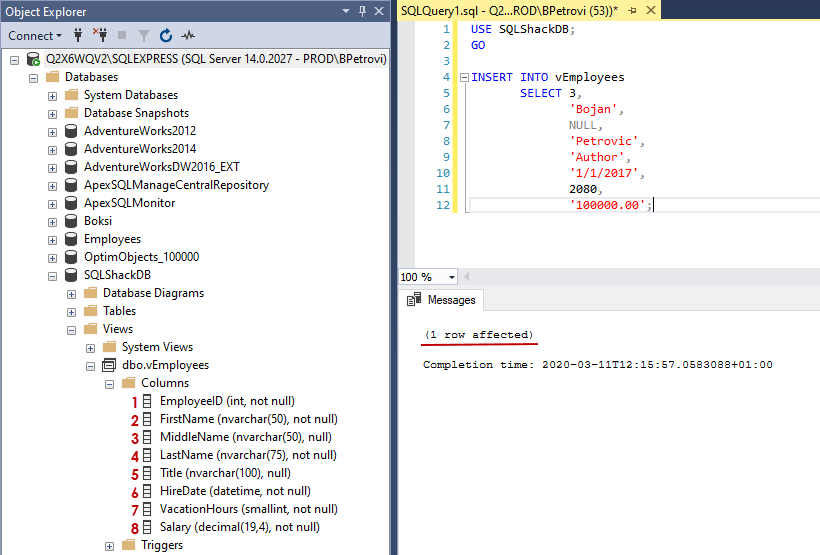
USE SQLShackDB; GO INSERT INTO vEmployees SELECT 3, 'Bojan', NULL, 'Petrovic', 'Author', '1/1/2017', 2080, '100000.00'; |
To explain the INSERT INTO statement, I’m simply using SELECT after the name of our view, which is a very simple way to insert data into tables as we’re inserting new data based on the result of the SELECT statement.
The vEmployees view has 8 columns. I like to expand the Columns folder of the view in Object Explorer just to see which columns cannot be a nullable value and also because it’s easier to write the SELECT statement and match all values one-by-one. After executing the above script, we should have a “1 row affected” message returned meaning that the new record went into the table successfully:
How, if we check the content of the Employees table, we should see the newly inserted record as shown below:
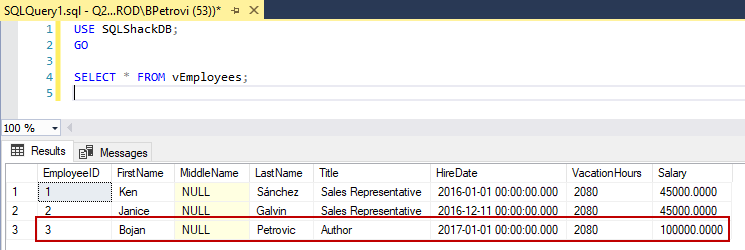
As can be seen, we can do data modifications through views. Pretty cool, right? Now, let’s take our journey a bit further and see how we can use WITH CHECK OPTION, which is a part of the CREATE VIEW SQL syntax.
Using WITH CHECK OPTION in views
Let’s see how the WITH CHECK OPTION comes into play. We are going to use the same ALTER VIEW statement from the beginning of this article to add this option to our view or you could just drop it and use the CREATE VIEW SQL statement to re-create it with a new definition. It’s totally up to you. Whatever you prefer is fine:
|
1 2 3 4 5 6 7 8 9 10 11 12 |
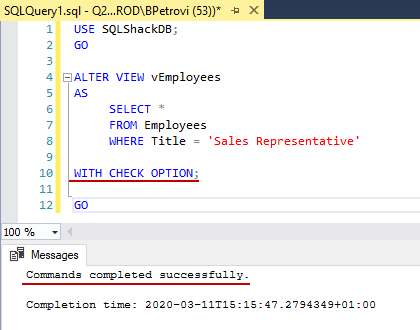
USE SQLShackDB; GO ALTER VIEW vEmployees AS SELECT * FROM Employees WHERE Title = 'Sales Representative' WITH CHECK OPTION; GO |
As you can see, we also added a WHERE clause. Once executed, we should get the message that command executed successfully, which means that the view now has a new definition including the WITH CHECK OPTION:
So, what the WITH CHECK OPTION does in SQL Server is easily explained in the following use case. Let’s say that we want to insert another record using the script from the previous example with only EmployeeID changed to 4:
|
1 2 3 4 5 6 7 8 9 10 11 12 |
USE SQLShackDB; GO INSERT INTO vEmployees SELECT 4, 'Bojan', NULL, 'Petrovic', 'Author', '1/1/2017', 2080, '100000.00'; |
Let’s execute this command and see what happens. You’ll see a message that the statement has been terminated as shown below:
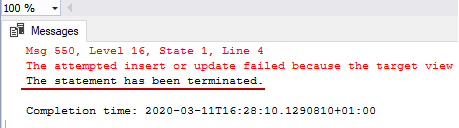
Here’s the full SQL Server return message that cannot be seen in the shot above:
The attempted insert or update failed because the target view either specifies WITH CHECK OPTION or spans a view that specifies WITH CHECK OPTION and one or more rows resulting from the operation did not qualify under the CHECK OPTION constraint.
What this SQL Server error message means is that any inserted data through our view should follow the condition in the WHERE clause. In this particular case, only records with condition Title = ‘Sales Representative’ met would have been updated or inserted.
So, if we change the above script and put Sales Representative instead of Author for the Title column, re-execute the script, it will work just fine. Now, if we query the Employees table, it should return two identical records:
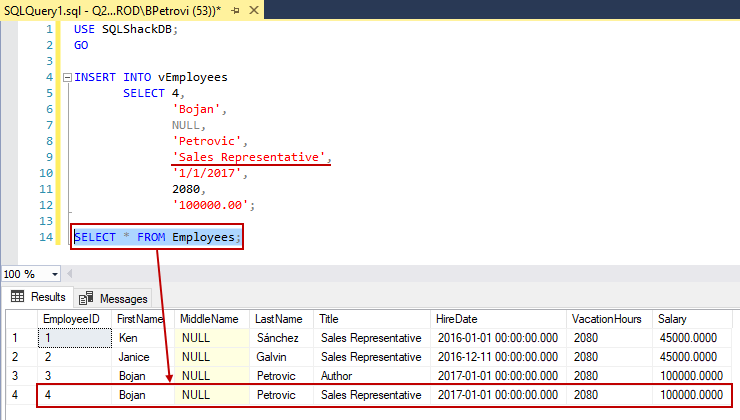
Bear in mind that if we query the vEmployees view, it should return only the Sales Representative record because of the condition in the WHERE clause.
So far, in learning the CREATE VIEW SQL statement, we also mentioned a few cool and useful tricks, and if you ask me, that’s just some really useful things to know about view.
Deleting views
If you ask me, deleting is the simplest thing you can do in SQL Server. Now that I’ve mentioned dropping and re-creating views using the CREATE VIEW SQL statement a few times, let’s just quickly go over it and see the syntax.
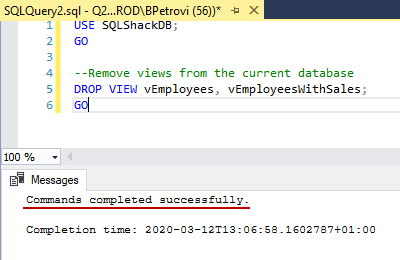
All we need to do is write the DROP VIEW statement that is used for deleting one or more views from the current database. When you need to drop multiple views, just specify all names of the views to remove separated by a comma. In our case, we got two:
|
1 2 3 4 5 6 |
USE SQLShackDB; GO --Remove views from the current database DROP VIEW vEmployees, vEmployeesWithSales; GO |
Once executed, the definition and other information about the views are deleted from the system catalog:
Conclusion
In this third part of learning the CREATE VIEW SQL statement, we saw how we can do data modifications through views. In doing so, we also learned a few cool and useful tricks that we can do with views using the WITH CHECK OPTION. We also saw how to rename and delete views from the current database. In the next article, we will take a look at indexed views and how to work with them. We will learn the SCHEMABINDING used to bind the view to the schema of the underlying table.
I hope this article has been informative for you and I thank you for reading it. Stay tuned for the next one…
Table of contents
| CREATE VIEW SQL: Creating views in SQL Server |
| CREATE VIEW SQL: Modifying views in SQL Server |
| CREATE VIEW SQL: Inserting data through views in SQL Server |
| CREATE VIEW SQL: Working with indexed views in SQL Server |

He has written extensively on both the SQL Shack and the ApexSQL Solution Center, on topics ranging from client technologies like 4K resolution and theming, error handling to index strategies, and performance monitoring.
Bojan works at ApexSQL in Nis, Serbia as an integral part of the team focusing on designing, developing, and testing the next generation of database tools including MySQL and SQL Server, and both stand-alone tools and integrations into Visual Studio, SSMS, and VSCode.
See more about Bojan at LinkedIn
View all posts by Bojan Petrovic
- Visual Studio Code for MySQL and MariaDB development - August 13, 2020
- SQL UPDATE syntax explained - July 10, 2020
- CREATE VIEW SQL: Working with indexed views in SQL Server - March 24, 2020