
Depending on our design and security, we can create functions or use built-in tools to control our Azure costs. In some contexts, we may look at the overall cost of what tools we’re using, which the Azure portal conveniently shows. Applying what we’ve looked at on the organization and development level, we can organize resources on their design (or ad hoc, as we’ll see) along with creating scripts that control our scale for situations where we may want higher or lower scale. We’ll look at both of these scenarios and how they can help us in both organization and development contexts.
Scenarios in Practice
We’ll design example scripts for the below scenarios relating to Azure costs that I’ve seen both on the development and organizational level:
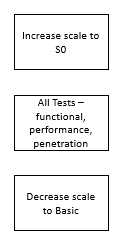
- Developers scale up a resource for a test (functional, performance, or penetration) and complete the test, but forget to scale down the resource when complete. For this, we’ll look at wrapping scripts that increase scale for testing by using a step in our testing which increases scale (if necessary), then decreases it when the testing is finished and validated
- We create Azure resources managed by teams and organized by the teams and the applications the teams are developing. In addition to handling changes or multiple teams (or applications), we look at organizing what we currently have by these teams through adding or updating details and look at getting these tags in the portal
Scaling for Testing
In environments where we run tests in our Azure resources that involve functional, security and performance, developers may increase the scale of resources to validate their tests quickly and move forward with development. We can rely on developers increasing and decreasing scale, but this is error prone and allows for forgetfulness that may result in high Azure costs. A superior approach is to add steps to our testing to increase scale before the tests are run and decrease scale after the tests are run.
For the sake of our example, we’ll assume that all our testing includes functional, penetration (security) and performance. In the below steps, we’ll increase the scale of our Azure SQL database prior to running unit tests to S0 from the Basic Tier and following the tests, we’ll decrease the scale to Basic. This technique can be adapted regardless of our tiers, such as scaling from S2 to S3 and scaling back down to S2 or any other scales.
To reduce Azure costs, we may only need higher scale before testing like we see the increase in scale prior to the test and decrease following the test in the above image.
The below code will require the AzureRM module (in the first line we install this and this installation can be done in a separate script window). If our execution policy is set to restricted, we’ll need to set this to unrestricted (see in the below script) – this part of the script is not required if we’re already set at unrestricted. After we’re done installing the AzureRM module, we will import the profile module and login to our testing account – we will do this according to our Azure authentication setup (credentialed, MFA, certificate, etc). At the end of the script, we set our execution policy back to restricted – in general, this is good practice.
|
1 2 3 4 5 6 7 8 9 10 11 12 13 14 15 16 17 18 19 |
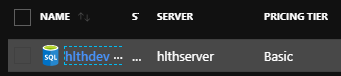
### Run in another script window - required module Install-Module -Name AzureRM -AllowClobber ###admin execution needed ### Notice that once we're finished, we restrict this Set-ExecutionPolicy unrestricted Import-Module AzureRM.profile Login-AzureRmAccount Set-AzureRmSqlDatabase -ResourceGroupName "ourResourceGroup" ` -ServerName "hlthserver" ` -DatabaseName "hlthdev" ` -Edition "Standard" ` -RequestedServiceObjectiveName "S0" Set-ExecutionPolicy restricted |

We increase Azure costs temporarily for testing.
As we see, we scale up our Basic Azure SQL database to the lowest Standard tier – S0 in this case – which will increase our Azure cost, but also increase resources for our testing, such as functional, performance and penetration testing. Depending on the intensity of our testing, we may scale to a higher version, especially if this reduces the time of testing and allows us to develop faster. We can take this same script following our validation and reverse it by scaling down to Basic again. For instance, the below code reverses our increased scale after our testing has completed.
|
1 2 3 4 5 6 7 8 9 10 11 12 13 |
Set-ExecutionPolicy unrestricted Import-Module AzureRM.profile Login-AzureRmAccount Set-AzureRmSqlDatabase -ResourceGroupName "ourResourceGroup" ` -ServerName "hlthserver" ` -DatabaseName "hlthdev" ` -Edition "Basic" Set-ExecutionPolicy restricted |
Following our test, we’ve reduced our scale to save on Azure costs.
It’s possible that we want to use the same scale in our tests or in a few tests only, if we demarcate our tests by their purpose (like performance tests or penetration testing, both of which can be resource intensive). Likewise, we may run functional tests frequently, whereas other testing, like penetration testing, we may run less frequent.
In both time-based use and testing, these are two areas where we can use scale to our advantage in the cloud – both involve periods of time where we expect to see users (clients or developers) to use significant resources. Outside of these periods, we should keep our scale to its lowest required state to reduce Azure costs.
Organization Through Azure Tagging
One feature that we can use in Azure involves tags. Let’s consider a scenario where we have five teams (Team One through Five) that own assets in Azure in the form of development responsibility and testing. These teams develop the assets, test them, and improve based on the feedback from testing. In design of the assets, we want our Azure assets to be organized by team so that we can identify Azure costs, but this is not always the case, so we’ll look at developing a script that we can use to update existing assets with our team organization.
As we’ll see, we can update an Azure resource by using tags that operate with a key-value format. In our example, we’ll use two keys – team and application partition (apppartition in the script). The value of the team will be Team 2 and the apppartition will be ETL-ETH. The reason that we do this from an organization standpoint is that it’s possible an application has multiple teams working on it, though the asset may be different. For monitoring Azure costs, we may track parts of an application separately (database versus application) – though in this example, we’ll keep it in the same tag. Think of an example where we have a database team working on an Azure SQL database and an application team working on an App Service for the same application. Depending on how our organization works, we want to be flexible with how we tag our resources – though as we’ll see, we can update these resources with scripts.
|
1 2 3 4 5 6 7 8 9 10 11 12 |
Set-ExecutionPolicy unrestricted Import-Module AzureRM.profile Login-AzureRmAccount Select-AzureRmSubscription "ourSubscriptionName" | Out-Null $addtags = (Get-AzureRmResource -ResourceName "hlthserver/hlthdev" -ResourceGroupName "ourResourceGroup") Set-AzureRmResource -ResourceId $addtags.ResourceId -Tag @{ team="Team 2"; apppartition="ETL-ETH"} -Force Set-ExecutionPolicy restricted |
![]()
To organize for tracking Azure costs by team and application, we utilize the tagging feature by updating resources even after they’re created.
What about multiple values for the same key? Suppose that we wanted our Azure SQL Database to have Team 2 and Team 4? In the below script, we use both of these values in the team key.
|
1 2 3 4 5 6 7 8 9 10 11 12 |
Set-ExecutionPolicy unrestricted Import-Module AzureRM.profile Login-AzureRmAccount Select-AzureRmSubscription "ourSubscriptionName" | Out-Null $addtags = (Get-AzureRmResource -ResourceName "hlthserver/hlthdev" -ResourceGroupName "ourResourceGroup") Set-AzureRmResource -ResourceId $addtags.ResourceId -Tag @{ team="Team 2, Team 4"; apppartition="ETL-ETH"} -Force Set-ExecutionPolicy restricted |
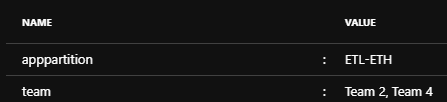
We’ve updated our team key to show the two teams instead of one.
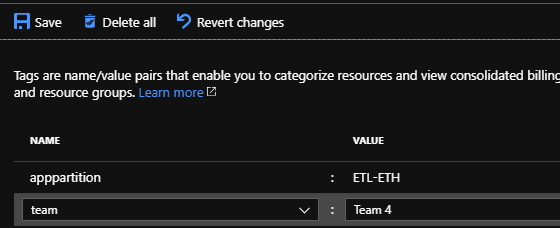
With tagging, we can also use the Azure portal to add a tag to a resource, which we’ll do for our preproduction database as seen in the below image (click save):

We can also add tags without scripts by selecting the tag option under the Azure asset.
Now, when we go to the Azure portal’s home and look under tags, we can filter by the tags that have Team 4 – and as we see, two tags have this – one is a shared tag, the other is the individual tag.
![]()
Tracking teams in tags to organize Azure costs.
For tracking Azure costs, these examples help show why organization matters in situations where we may have multiple applications and teams. We should still expect some organization to change in time – such as the change of an application being shared by two teams from one team, so it’s helpful to know that we can update these tags to match our organization. For some organizations, such as startups, we may have very few assets or only one team and we can tag as necessary – if necessary. We also have the alternative in these smaller situations to group our assets by subscription – such as different subscriptions for different applications. As we have more assets, tags offer us a feature that we can use to organize our development.
Conclusion
As we’ve seen, we can use some automation techniques to limit a range of possible issues related to Azure costs growing. In some cases, if we increase the scale of a resource for a temporary purpose, we have the option to immediately scale the same resource down when the temporary purpose completes. Testing provides a great example of this and we could also apply this same logic in scenarios where we expect a large amount of traffic over a time period. For organization of teams, we can use Azure’s tagging feature – and as we see, we can use this feature with shared teams or individual teams. Even if we don’t use it initially, we can add these tags ad hoc with scripts to organize our resources to find weaknesses for improvement.
Table of contents

He has spent a decade working in FinTech, along with a few years in BioTech and Energy Tech.He hosts the West Texas SQL Server Users' Group, as well as teaches courses and writes articles on SQL Server, ETL, and PowerShell.
In his free time, he is a contributor to the decentralized financial industry.
View all posts by Timothy Smith
- Data Masking or Altering Behavioral Information - June 26, 2020
- Security Testing with extreme data volume ranges - June 19, 2020
- SQL Server performance tuning – RESOURCE_SEMAPHORE waits - June 16, 2020