
In this article, we will explore taking backups of native SQL databases into the AWS S3 bucket.
Introduction
Database backups are critical for database availability in case of any accidents. You might require these backups in case of any instance crash scenario, data deletion in the production environment. As it is essential to define your backup policy, it is also equally important to store these backups in a safe and secure place. Usually, database professionals take backup locally on the disk. Later, it is backed up by 3rd party tools for long term retention.
We can store the SQL database backups on the cloud storage such as Azure storage point, AWS Simple storage service(S3). In this article, we will explore the automatic process to take the SQL database backup and upload it into the AWS S3 bucketbucket.
Prerequisites
- A running SQL instance of 2016 or later
- You should create an AWS account to work with Amazon cloud resources. Create a free-tier account for learning purposes
Install required PowerShell Modules
In this article, we use PowerShell scripts to work with AWS resources. It requires Pscx and AWSPowerShell modules.
PSCX module in Windows PowerShell
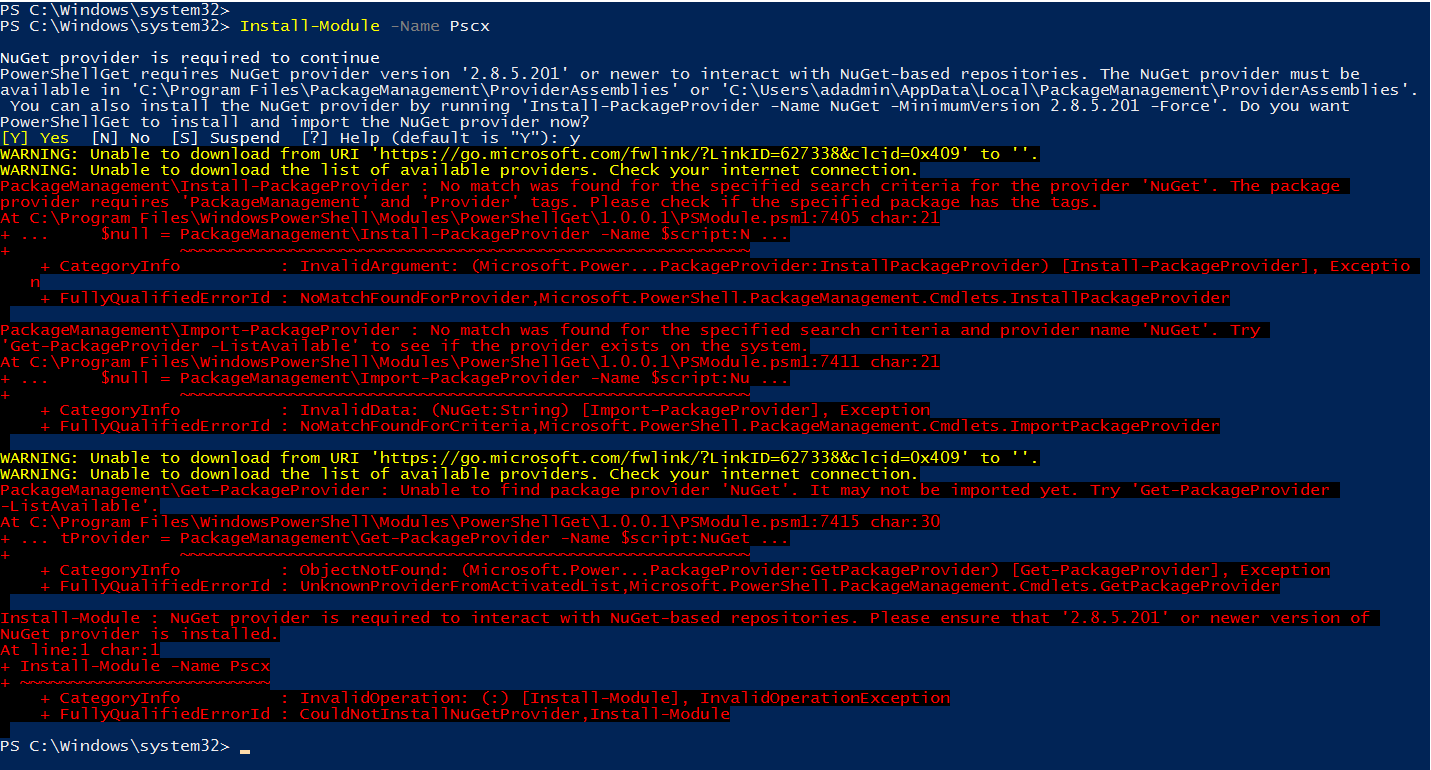
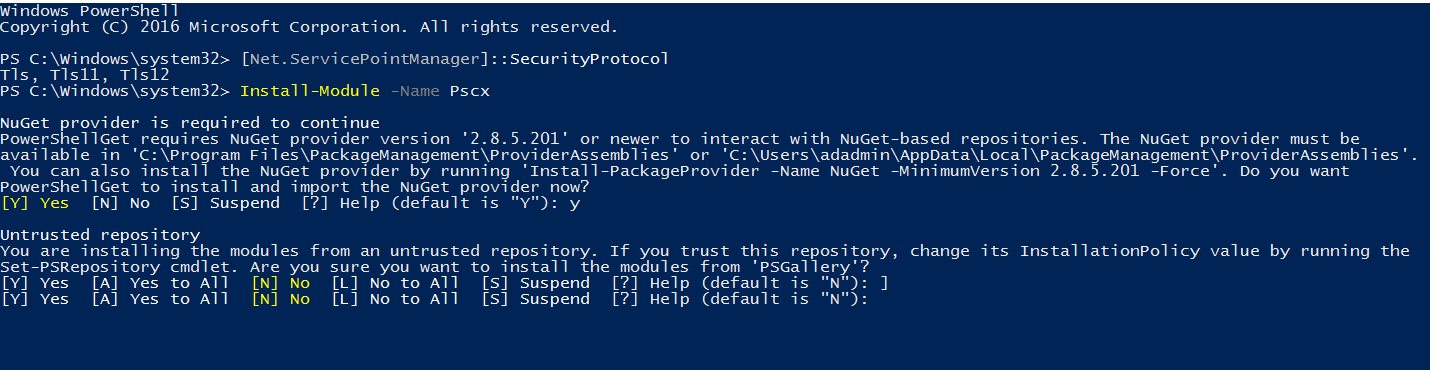
PowerShell Community Extensions(PSCX) is a collection of useful Cmdlets. It provides cmdlets such as Write-Zip to create a compressed file. Open the administrative Windows PowerShell and run the following command to download, install the latest version of it.
>Install-Module -Name Pscx
In my Windows Server 2016 server, I got the following error messages. It tried to install the required NuGet provider but complains about the internet connection.
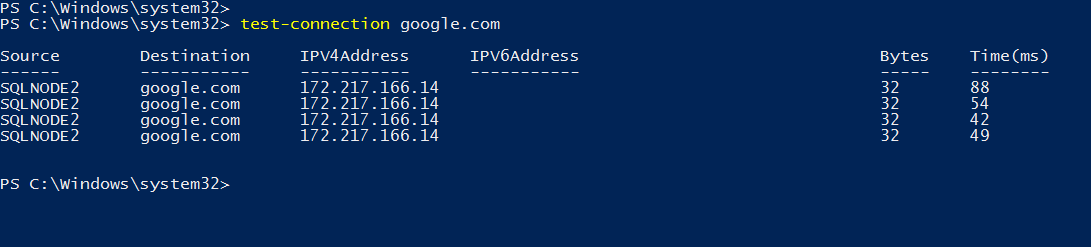
I verified the internet connectivity using the test-connection cmdlet. Here, it checks the ping response from my server to google.com.
To fix this issue, we use the following steps:
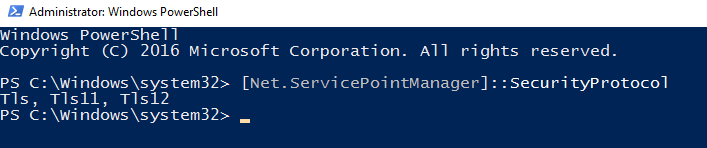
Verify PowerShell version: Run the command Get-Host | Select-Object Version, and it returns PowerShell version as 5.1.15393.693. The PowerShell version 5.1 enables SSL3.0 and TLS1.0 for secure HTTP connections

We can verify the security protocol using the command [Net.ServicePointManager]::SecurityProtocol
We need to enable strong cryptography for TLS1.1 and 1.2. for this purpose, run the following scripts in PowerShell:
12>Set-ItemProperty -Path 'HKLM:\SOFTWARE\Wow6432Node\Microsoft\.NetFramework\v4.0.30319' -Name 'SchUseStrongCrypto' -Value '1' -Type DWord>Set-ItemProperty -Path 'HKLM:\SOFTWARE\Microsoft\.NetFramework\v4.0.30319' -Name 'SchUseStrongCrypto' -Value '1' -Type DWordRestart Windows PowerShell and verify security protocols


Now, you can install the PSCX module, as shown below:
It downloads and installs the package.
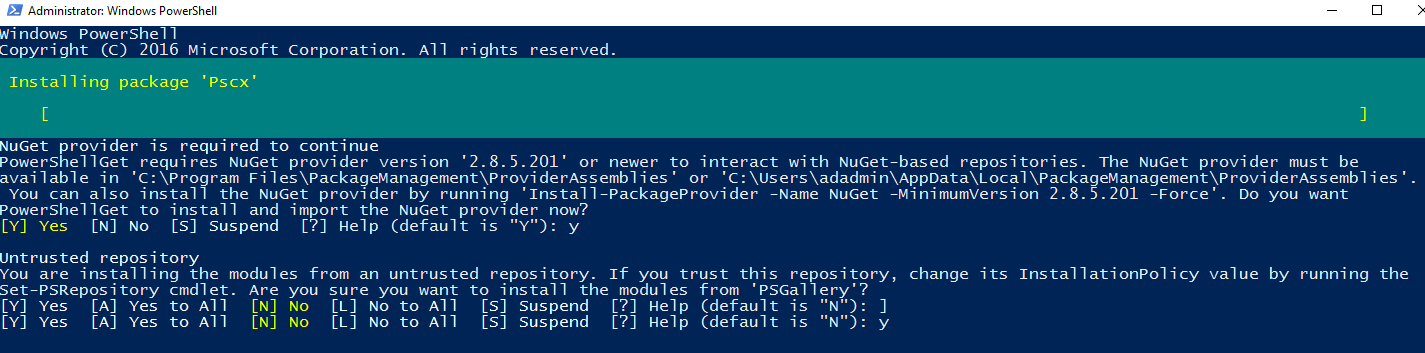
You get the package installation progress.

- Note: For more information about possible issues with downloading the NuGet provider for PowerShell, please read this article: Unable to install NuGet provider for PowerShell
- You use the AWS Tools for Windows MSI installer. Download the MSI file and select the AWS PowerShell module for installation
- We can use the PowerShell Install-package command
- $server: Specify the SQL instance details in it. For a local instance, we can specify dot(.)
- $backuppath: In the script, SQL Server takes the backup in the local directory, creates a ZIP file and uploads it into the AWS S3 bucket
- $s3bucket: Specify the AWS S3 bucket we created earlier
- $region: Specify the AWS region for the S3 bucket. We created the bucket in the Asia Pacific ( Mumbai) region, and its region code is ap-south-1. You can refer to AWS documentation for reference
- $timestamp: It stores the current timestamp in the format of MMddyyyyHHmmSS
- $filename: We require the backup file in the format of databasename-timestamp.bak
- $zipfilename: It also uses the same file name as of the backup file, but it has an extension ZIP
- $filepath: It gives the complete path for the backup file. It joins the backup path and the file name. It is similar to specify the backup file name in the SQL query(C:\SQL\MyNewDB.bak’
- $zipfilepath: It also generates the file path similar to the $filepath variable
- StoredCredentials: Specify the credential profile name, we created earlier
- File: Specify the variable that holds the ZIP file path
- Region: Specify the variable that has the value for the S3 bucket region
- Understanding PostgreSQL SUBSTRING function - September 21, 2024
- How to install PostgreSQL on Ubuntu - July 13, 2023
- How to use the CROSSTAB function in PostgreSQL - February 17, 2023
Install the AWS PowerShell Module
We also require an AWS PowerShell module to work with the AWS S3 bucket. You can install it in two ways.
We can directly install the AWS PowerShell module using the following command.
|
1 |
>Install-Package -Name AWSPowerShell |

It downloads the required package from the internet and installs it as shown below. Here, it installed version 4.1.1.0

Create an AWS S3 bucket
AWS provides an AWS S3 bucket bucket for object storage. It is like a container that can store any extension, and we can store unlimited files in this bucket. AWS charges you only for the consumed storage.
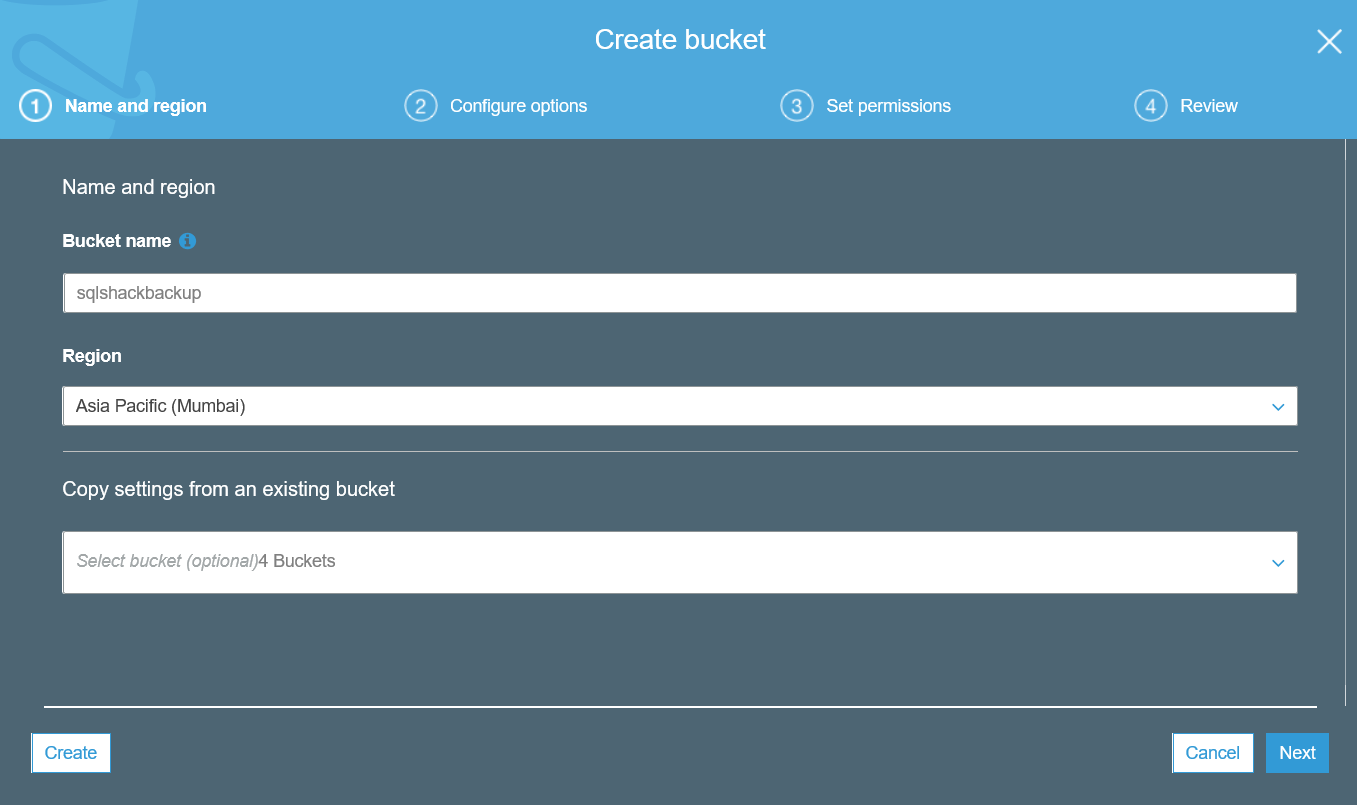
Login to your AWS web console account and navigate to Services -> S3-> Create bucket.
In the create bucket, specify a DNS compliant unique bucket name and choose the region. You need to create the resources in the closest region for your SQL instances to avoid high latency in backup storage.
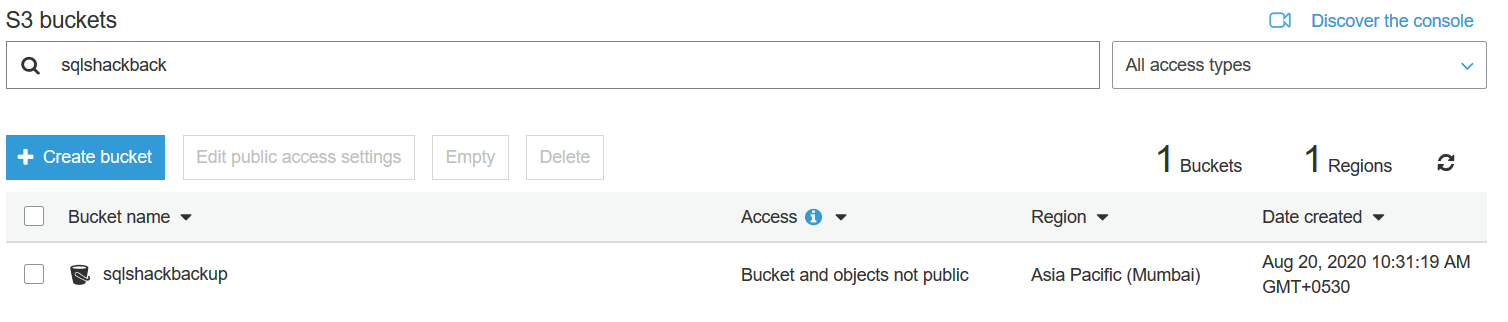
It created the [SQLShackBackup] AWS S3 bucket bucket in the Mumbai region as shown below:
Create IAM credentials for DB backup
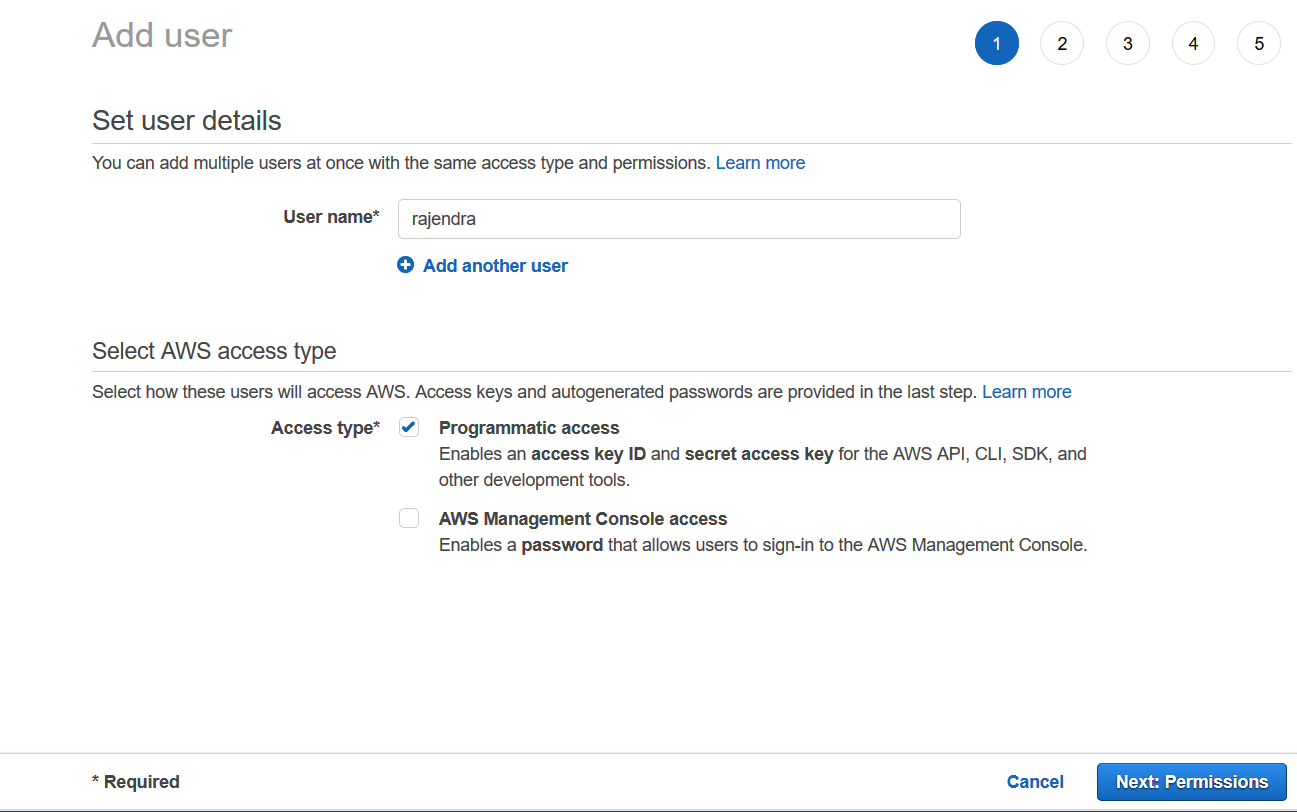
In this step, we create an IAM user to access the AWS S3 bucket and upload the backups from the SQL instance. Navigate to IAM -> Add user.

In the IAM user, specify a unique user name and gives access to connect programmatically.
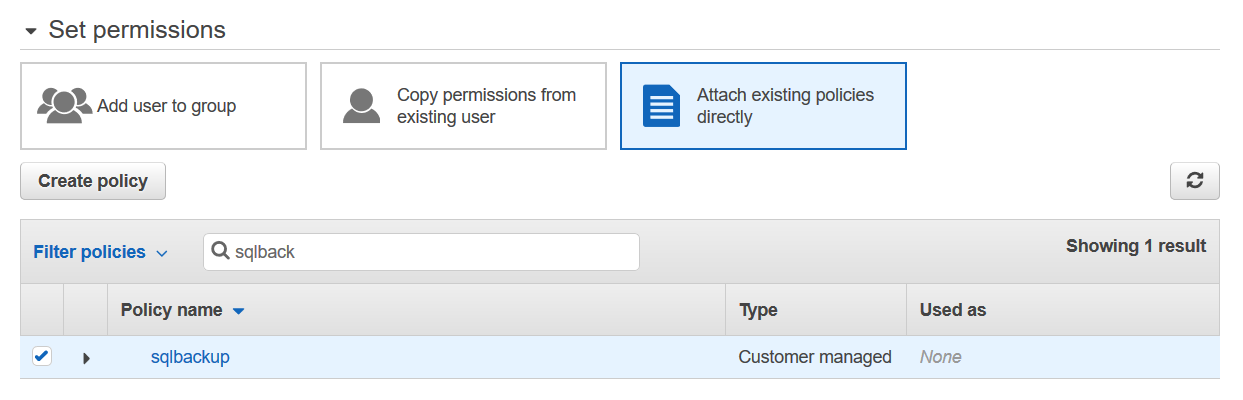
In the next step, we need to assign permissions to access an S3 bucket. You can use an existing IAM policy or create a new policy.
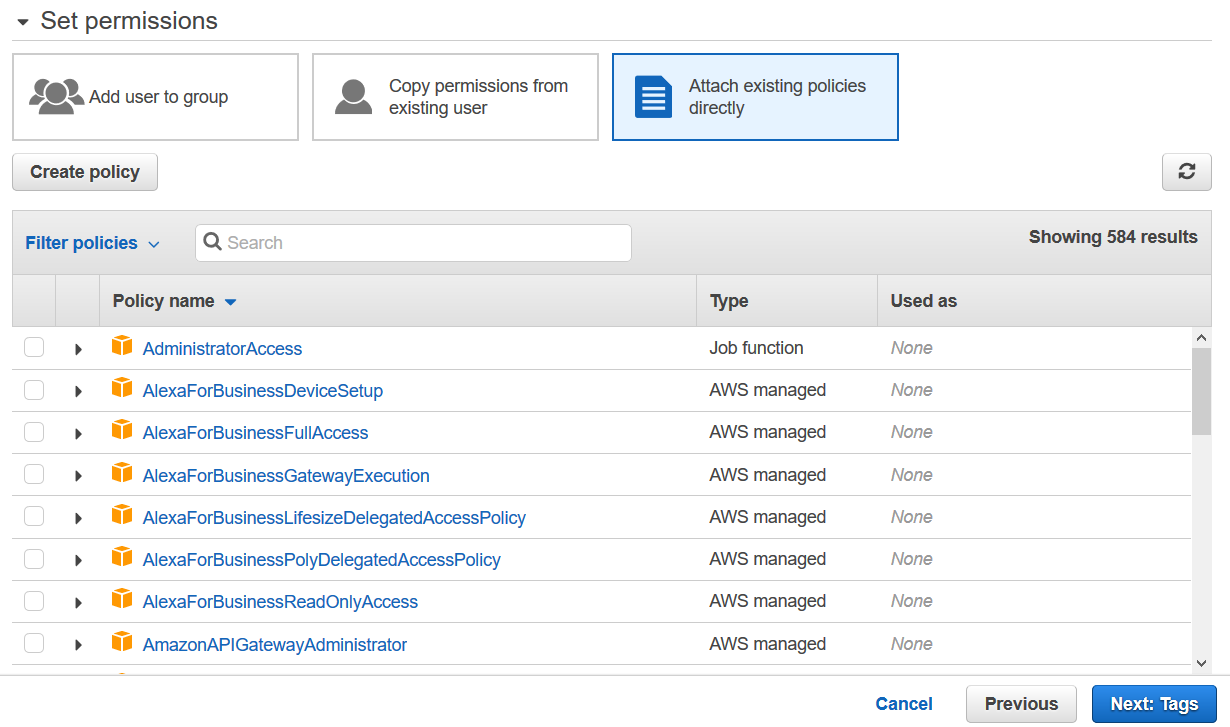
In my AWS account, I already have the policy to read and write the objects in the S3 bucket. Search the policy and attach it to the IAM user.
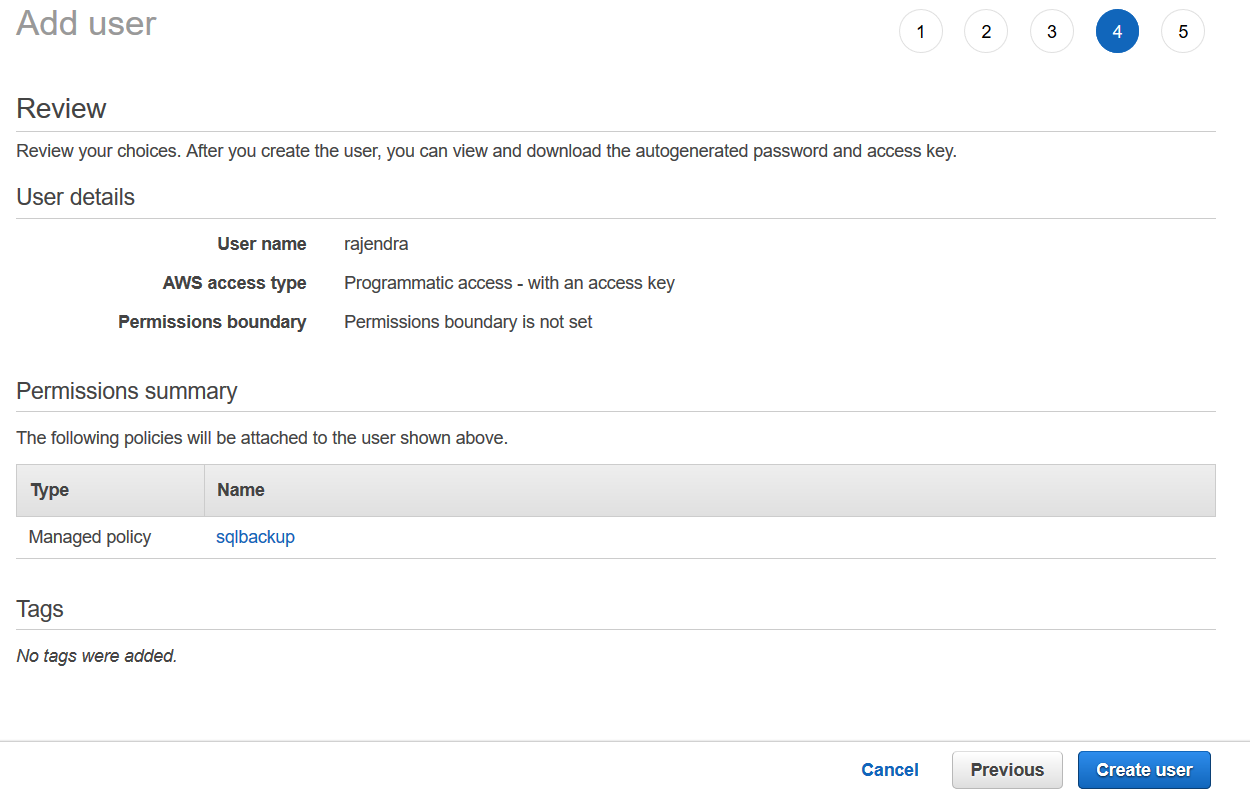
It creates the IAM user and gives you an access key, secret key.
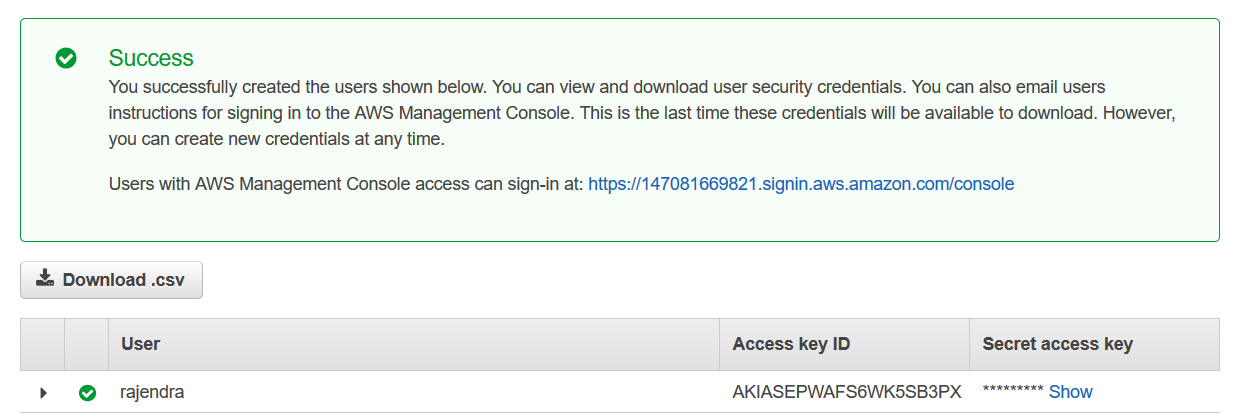
You should note down both access key id and secret access key. We use these keys in the PowerShell scripts to connect with the S3 bucket. It is the first and last time you get these keys, so download and store them securely.
Set AWS credentials
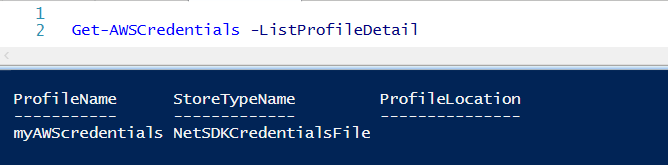
We can use the Set-AWSCredentials to store the AWS credentials on the local machine profile. It creates an encrypted file that is shared with the AWS PowerShell module. You get the flexibility to call the profile instead of putting the access key information in the script.
In the below script, we specified the access key and secret access key of the IAM user and stored these credentials as [myAWScredentials].
|
1 |
>Set-AWSCredentials -AccessKey AKIASEPWAFS6WK5SB3PX -SecretKey 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 -StoreAs myAWScredentials |
You can check the existing profiles using the Get-AWSCredentials cmdlet.
PowerShell Script to take SQL database backup and upload into the S3 bucket
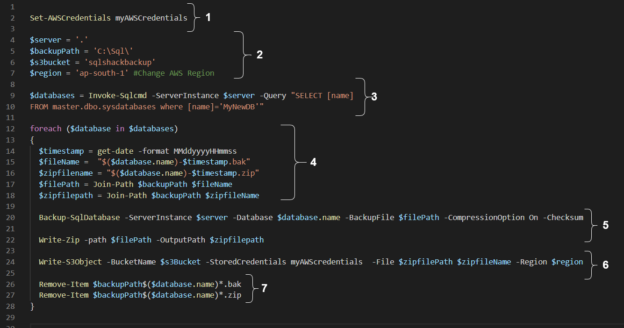
In the attached PowerShell script, you need to make changes as per your environment. To understand the script, I divided it into multiple parts, as shown below.
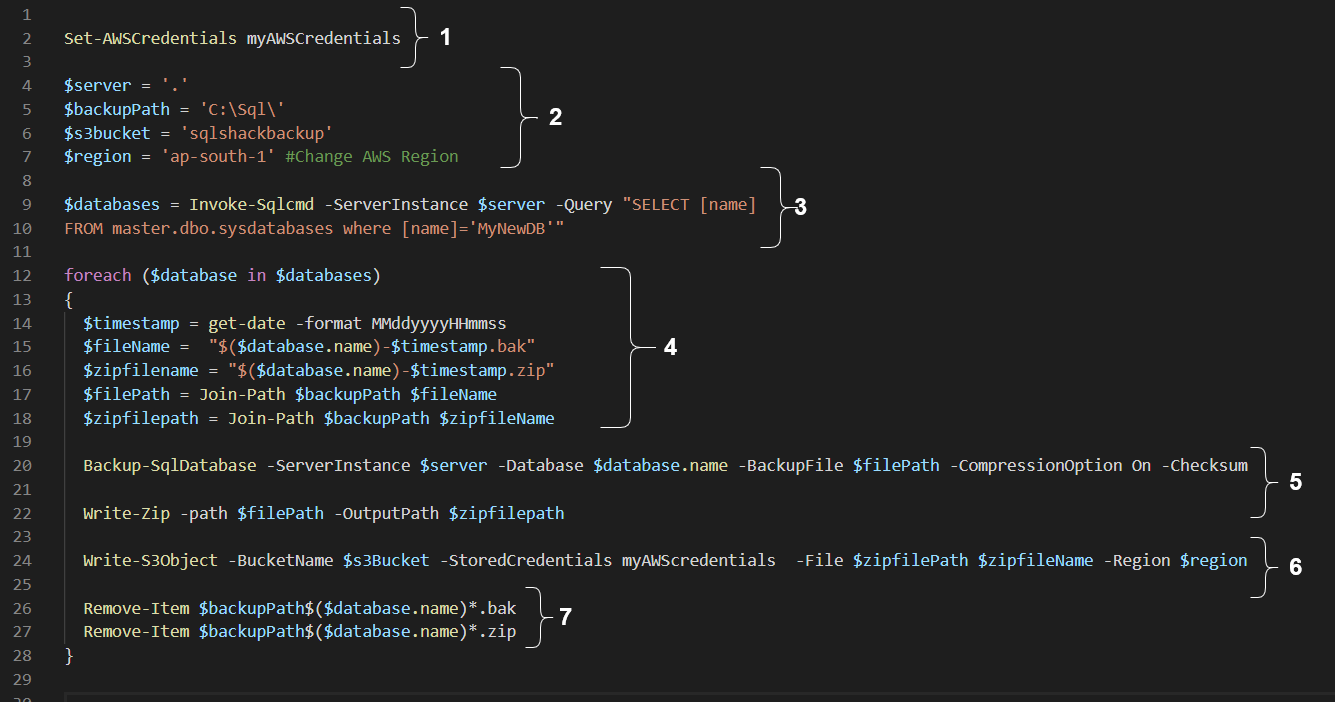
Part 1: Load the stored credential into PowerShell
Earlier, we stored the access and secret key in the [myAWScredentials] profile. We use the parameter -StoredCredentials to load these credentials to interact with the AWS resources in the script.
|
1 |
Set-AWSCredentials myAWSCredentials |
Part 2: Define variables and their values
We need a few variables in the script.
|
1 2 3 4 |
$server = '.' $backupPath = 'C:\Sql\' $s3bucket = 'sqlshackbackup' $region = 'ap-south-1' |
Part 3: Get SQL database lists using the SQL query
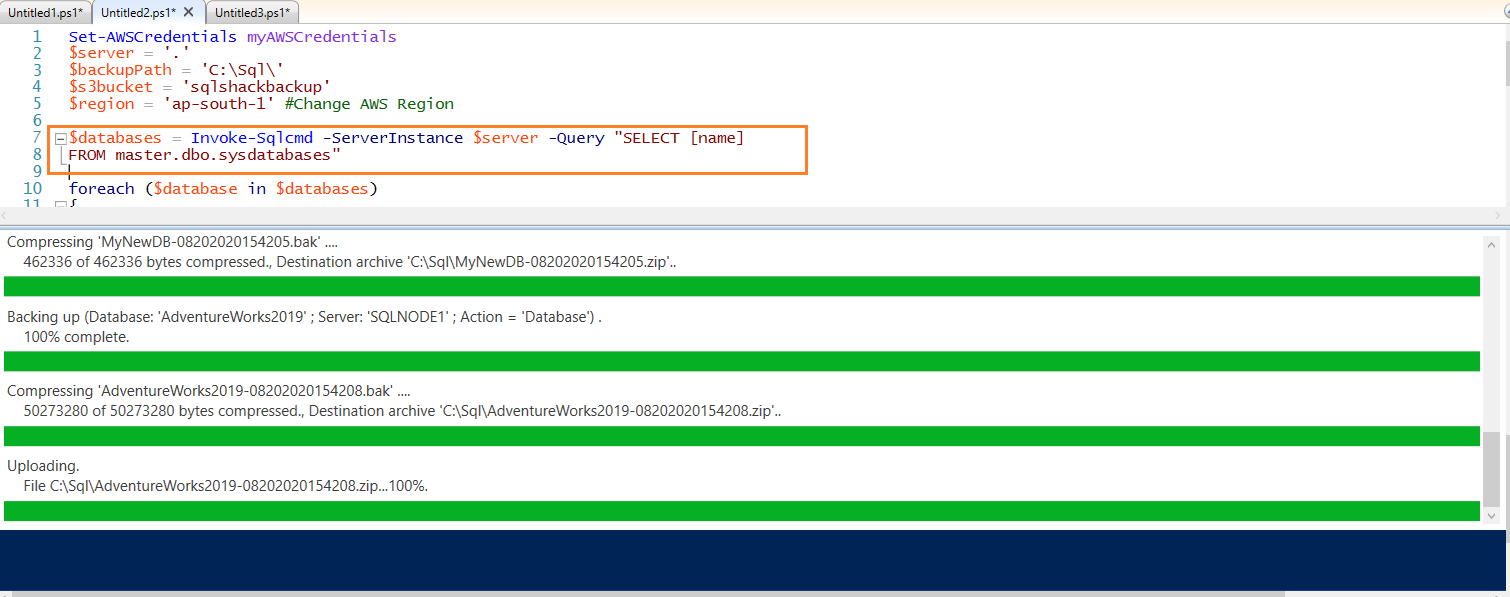
In this part, we pull the database name for which we need the backup in the S3 bucket. We use the SQL script and call it using the Invoke-SQLCMD module. It stores the SQL database name in the $database variable.
Currently, we specified a database name [MyNewDB] for the backup. Later, we will loop through multiple databases as well.
|
1 2 |
$databases = Invoke-Sqlcmd -ServerInstance $server -Query "SELECT [name] FROM master.dbo.sysdatabases where [name]='MyNewDB'" |
Part 4: Traverse through each value in the $database variable
In this part, we start a for each loop to go through each SQL database name stored in the $databases variable. Currently, we have only one database in the $databases variable, so the loop runs once.
|
1 2 3 4 5 6 7 |
foreach ($database in $databases) { $timestamp = get-date -format MMddyyyyHHmmss $fileName = "$($database.name)-$timestamp.bak" $zipfilename = "$($database.name)-$timestamp.zip" $filePath = Join-Path $backupPath $fileName $zipfilepath = Join-Path $backupPath $zipfileName |
We also specify the SQL database backup file and its compressed ZIP.
Part 5: Take a full database backup using Backup-SqlDatabase cmdlet
In this part, we use the Backup-SqlDatabase cmdlet for taking a full database backup. In this command, we use the variables to input instance name, SQL database name, file path. We also specified the backup compression( -CompressionOption On) and CheckSum for backup validations. Further, it creates a ZIP file in the specified directory.
|
1 2 |
Backup-SqlDatabase -ServerInstance $server -Database $database.name -BackupFile $filePath -CompressionOption On -Checksum Write-Zip -path $filePath -OutputPath $zipfilepath |
Part 6: Upload the backup ZIP file in the AWS S3 bucket
To upload the ZIP file in the AWS S3 bucket, we use the Write-S3Object cmdlet. In this command, we use the following arguments.
|
1 |
Write-S3Object -BucketName $s3Bucket -StoredCredentials myAWScredentials -File $zipfilePath -Region $region |
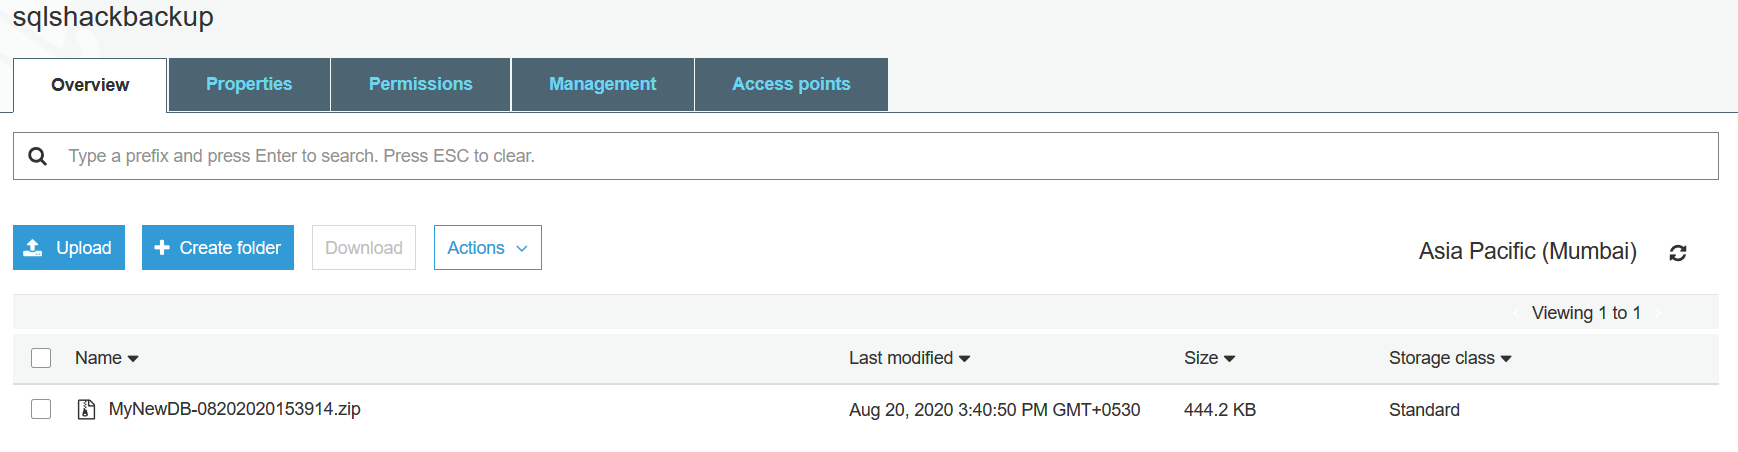
We are ready to take the SQL database backup of [MyNewDB] into the AWS S3 bucket. Execute the script, and it shows progress for each step- backup, compressed file, upload into S3 bucket.

Once the upload is successful, it gives the following output.

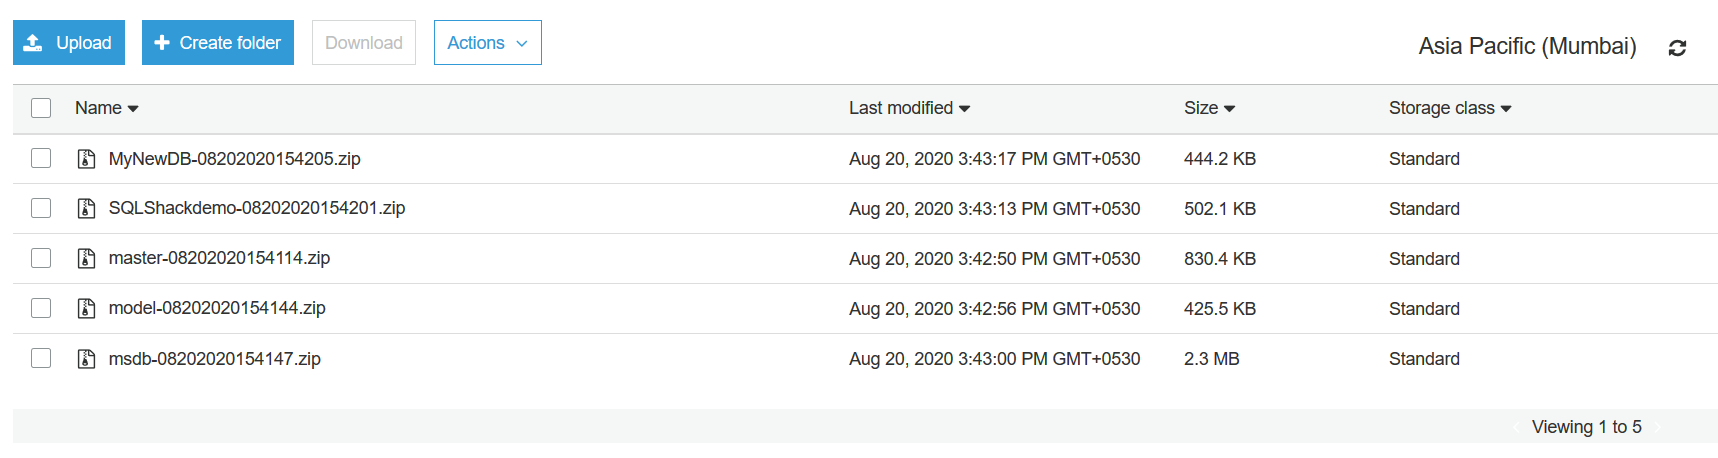
It uploads the file in the background so it may take some time to reflect in the S3 bucket. Refresh the S3 bucket, and you can see the uploaded backup file.
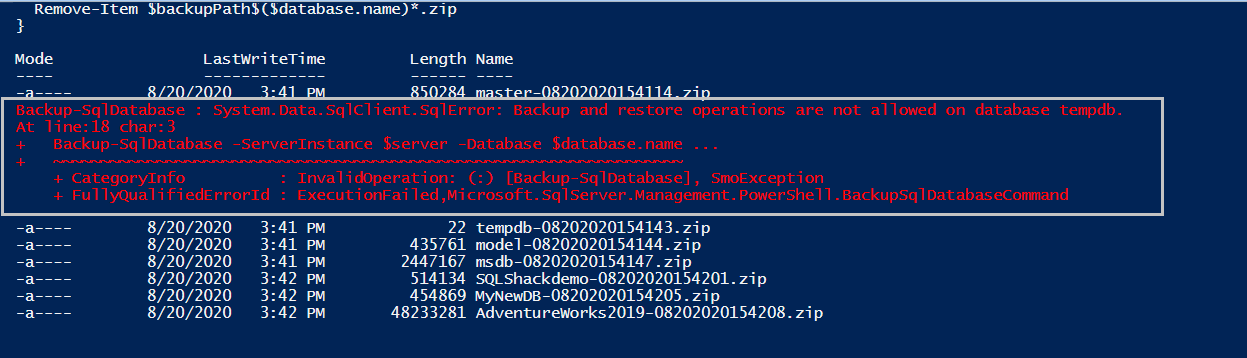
Earlier, we took backup for a single database. Let’s remove the where clause from the select statement. It stores all database names in the $databases variable.
Execute the script to start the database backups for all databases sequentially.
In the output, you can see all database backup file names. Here, you get the error for the [TempDB] database because we cannot take a backup for the TempDB database. To skip this error, you can put a where clause to exclude the TempDB database in the select variable.
Verify the backup files in the S3 bucket,
Conclusion
In this article, we automated the process to take SQL database backup and upload it into the AWS S3 bucket. You can define retention policy in the S3 bucket to automatically remove or archive the backups to avoid cost for old backup files.

I am the author of the book "DP-300 Administering Relational Database on Microsoft Azure". I published more than 650 technical articles on MSSQLTips, SQLShack, Quest, CodingSight, and SeveralNines.
I am the creator of one of the biggest free online collections of articles on a single topic, with his 50-part series on SQL Server Always On Availability Groups.
Based on my contribution to the SQL Server community, I have been recognized as the prestigious Best Author of the Year continuously in 2019, 2020, and 2021 (2nd Rank) at SQLShack and the MSSQLTIPS champions award in 2020.
Personal Blog: https://www.dbblogger.com
I am always interested in new challenges so if you need consulting help, reach me at rajendra.gupta16@gmail.com
View all posts by Rajendra Gupta