We will explore Lookup Transformation in SSIS in this article for incremental data loading in SQL Server.
In my previous articles, SSIS Multicast Transformation overview and SSIS Conditional Split Transformation overview, we explored the Multicast and Conditional Split Transformations in SSIS. To begin with, let me introduce these transformations.
- SSIS Multicast: It creates logical copies of the source data for multiple destinations
- SSIS Conditional Split: It splits the source data into multiple destinations as per the specified conditions
Let’s go ahead and see Lookup Transformation in action.
The Real-world Example
Before we start understanding Lookup Transformation in SSIS, let’s understand the situation in which it can be useful.
Suppose you have a dbo.books table and it contains the following entry. In this table, the BookID column is an identity column with the primary key.
|
[BookID] |
[Book Title] |
[Book Price] |
|
1 |
SQL World |
560 |
|
2 |
Oracle overview |
780 |
|
3 |
Explore SSIS |
458 |
|
4 |
Data Visualization |
679 |
|
5 |
SQL Components |
353 |
|
6 |
High Availability |
781 |
We want to copy the contents of this table to another destination table dbo.bookshistory, and we have the following conditions.
Condition 1: Insert all records if it does not present in the destination
If the destination table (dbo.bookshistory) table does not contain the records similar to the source table (dbo.books), the SSIS package should copy the contents.
If you execute the SSIS package, the destination table should contain the following records.
|
[BookID] |
[Book Title] |
[Book Price] |
|
1 |
SQL World |
560 |
|
2 |
Oracle overview |
780 |
|
3 |
Explore SSIS |
458 |
|
4 |
Data Visualization |
679 |
|
5 |
SQL Components |
353 |
|
6 |
High Availability |
781 |
Condition 2: Insert only new records in the destination table
If there is already a book entry in the destination table and a new entry is made into the source table, the SSIS package should only insert the new record into the destination table. It should not insert duplicate records in the destination table
The source table gets a new entry in the dbo.books table. In the following table, we inserted BookID 7.
|
[BookID] |
[Book Title] |
[Book Price] |
|
1 |
SQL World |
560 |
|
2 |
Oracle overview |
780 |
|
3 |
Explore SSIS |
458 |
|
4 |
Data Visualization |
679 |
|
5 |
SQL Components |
353 |
|
6 |
High Availability |
781 |
|
7 |
The role of DBA |
872 |
The destination table contains the previous 6 rows. Now, once we execute the SSIS package, it should only insert BookID 7 in the destination table.
|
[BookID] |
[Book Title] |
[Book Price] |
|
7 |
The role of DBA |
872 |
Condition 3: Update relevant records in the destination table
If there is any change in the existing data in the source table, it should also get updated in the destination table.
Suppose the price of a book changes. In this condition, we want to update the specific row as well in the destination. SSIS package should not update remaining unchanged rows in the destination. In the following table, the price of BookID reduces to 510.
|
[BookID] |
[Book Title] |
[Book Price] |
|
1 |
SQL World |
510 |
|
2 |
Oracle overview |
780 |
|
3 |
Explore SSIS |
458 |
|
4 |
Data Visualization |
679 |
|
5 |
SQL Components |
353 |
|
6 |
High Availability |
781 |
|
7 |
The role of DBA |
872 |
You execute the SSIS package, and it should perform the update only for BookID 1.
|
[BookID] |
[Book Title] |
[Book Price] |
|
1 |
SQL World |
510 |
We can use the T-SQL code for specific conditions, but it is a complicated task. We need to write up code to perform data comparisons and then further insert and update accordingly.
Could we use the SSIS package in this case? How do we meet the requirement?
Use of Lookup Transformation in SSIS
The Lookup Transformation in SSIS is a powerful and useful SSIS transformation to compare the source and destination data. It filters out the matched and unmatched data in the specified destinations.
Let’s create the source table and insert data into it with the following queries.
|
1 2 3 4 5 6 7 8 9 10 11 12 13 14 15 |
Create table dbo.books ( BookID int primary key clustered, [Book Title] NVARCHAR(100), [Book Price] money ) Insert into dbo.books values (1,'SQL World',560), (2,'Oracle overview',780), (3,'Explore SSIS',458), (4,'Data Visualization',679), (5,'SQL Components',353), (6,'High Availability',781) |
We create the following destination table as well but do not insert any data using the T-SQL query.
|
1 2 3 4 5 6 |
Create table dbo.bookshistory ( BookID int primary key clustered, [Book Title] nvarchar(100), [Book Price] money ) |
Create an SSIS package for Lookup Transformation in SSIS for Condition 1
Use the following steps to create an SSIS package.
- Open SQL Server Data Tools and create a new integration project
-
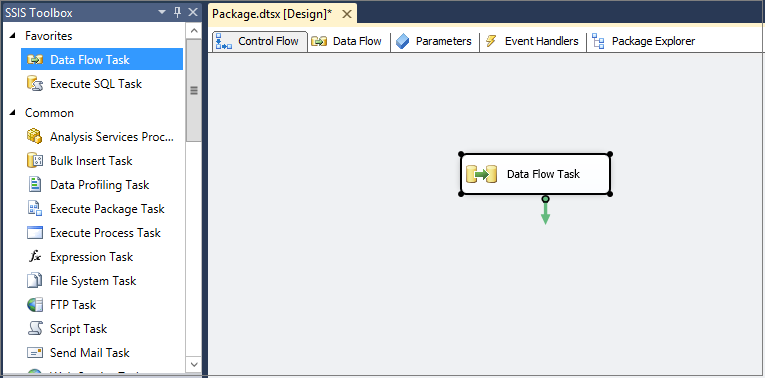
Drag a Data Flow Task from the SSIS toolbox to the Control Flow

-
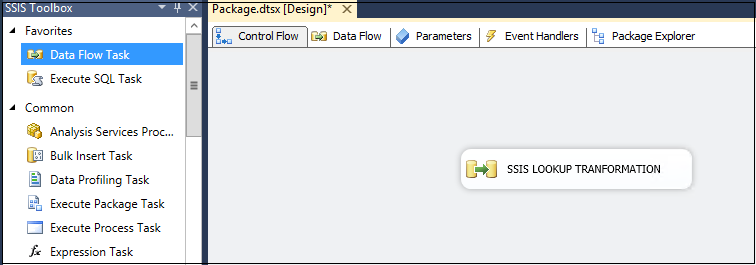
Right-click on Data Flow Task and rename it to SSIS LOOKUP TRANSFORMATION

-
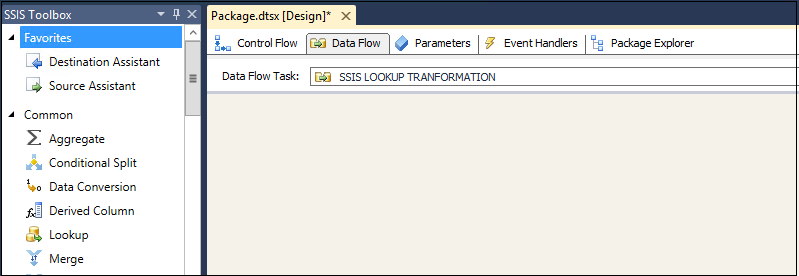
Double click on this task, and it moves to the Data Flow tab

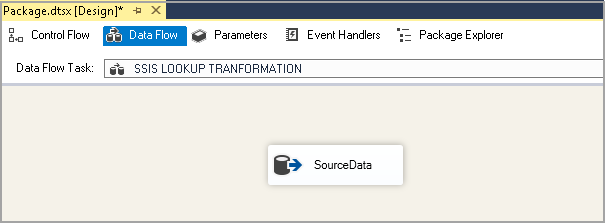
Drag an OLE DB Source in Data Flow Task and configure it to provide the OLE DB connection manager and name of the table or view, in our case, it is table books.
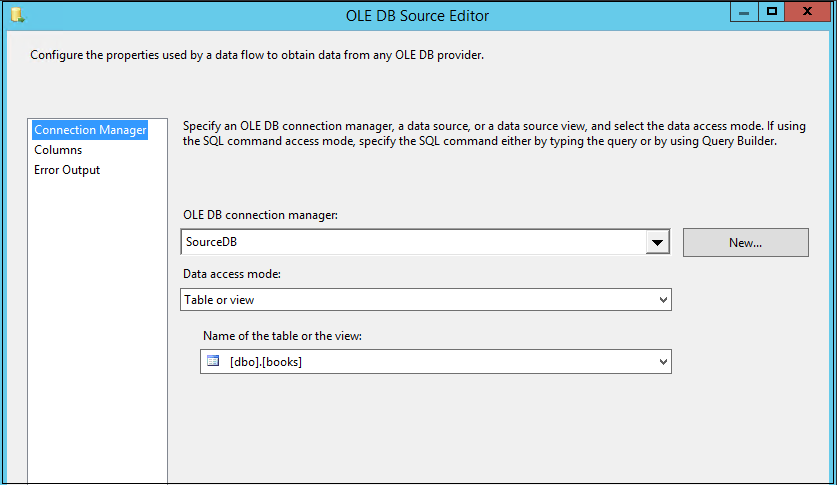
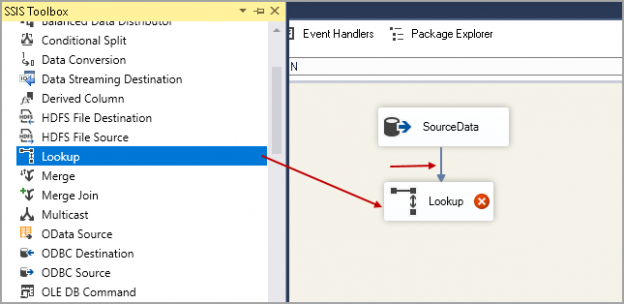
After the configuration, rename the OLE DB Source to SourceData as shown in the following image.
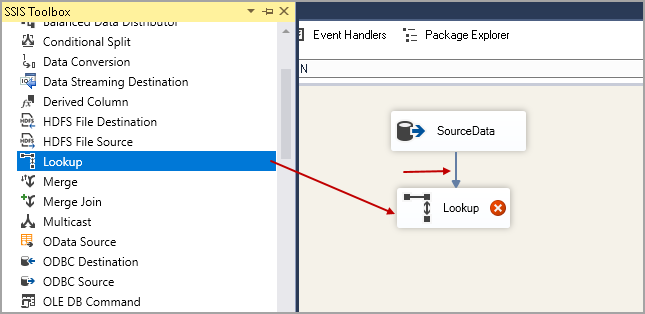
Now, add a Lookup task in the control flow and join the SourceData task with this Lookup task using a green arrow.
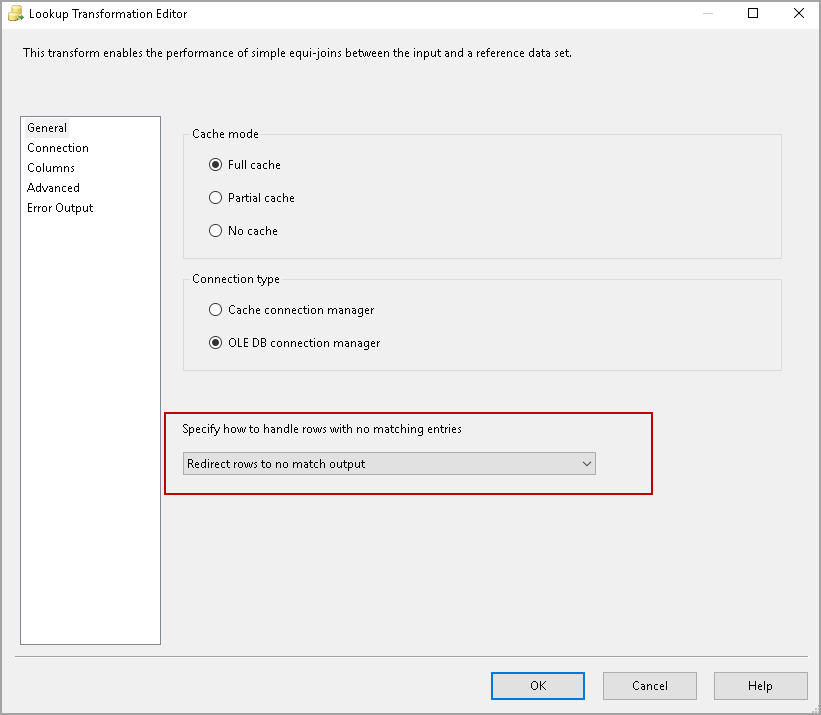
To configure the Lookup task, double click on it, and it opens the following Lookup Transformation Editor.
In Lookup Transformation Editor, We specify the connection manager and cache type. These details are outside the scope of this article and for now we will go with the default values of these.

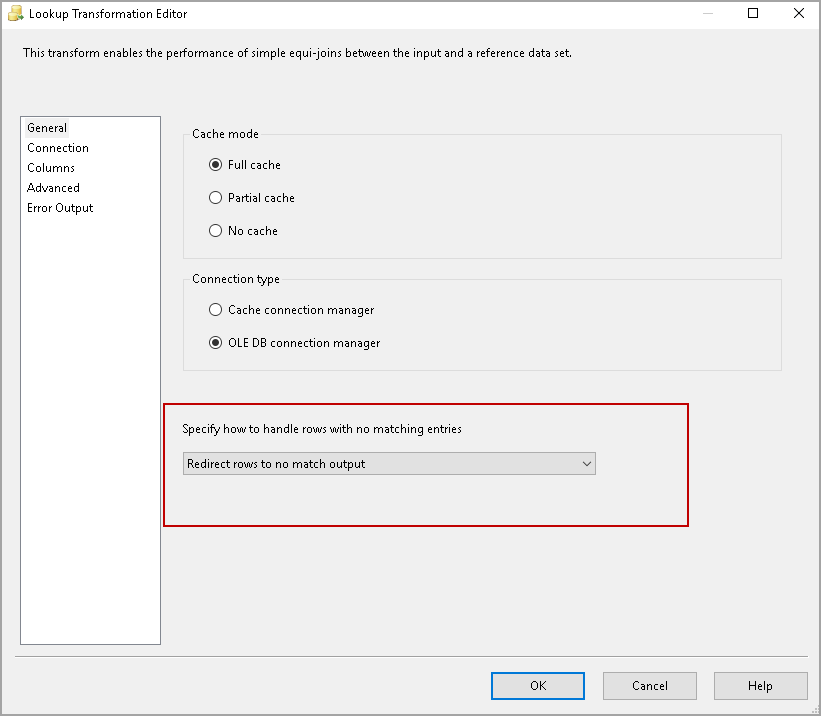
In the drop-down of Specify how to handle rows with no matching entries, select the following option
- Redirect rows to no match output
In condition 1 mentioned above, we want the rows from source to destination table only if the destination table does not have it already. This Redirect rows to no match output compare both the tables and if it finds any difference then only it forwards the rows to the destination table.
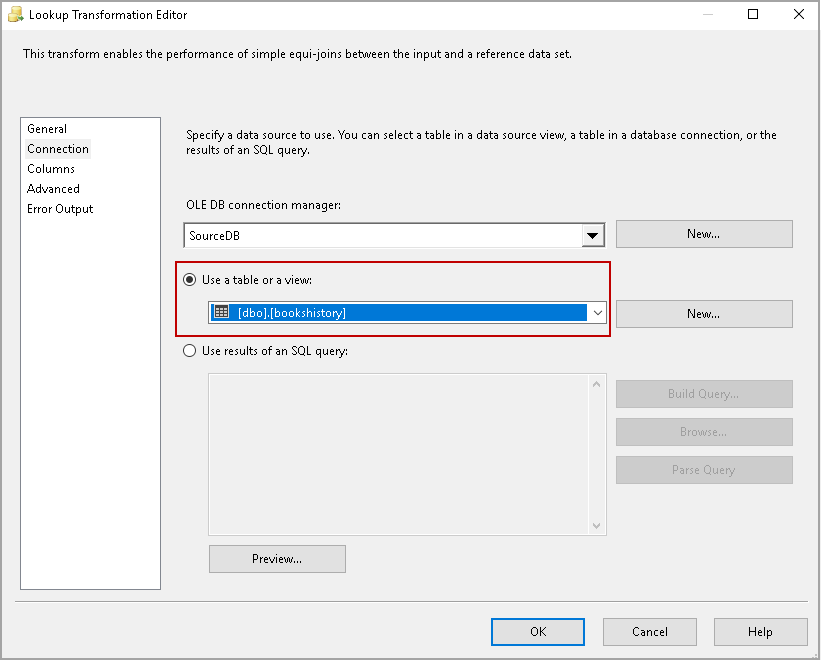
Click on Connections and specify the destination table from the drop-down. We have both the source and destination tables in the same database. You can create a separate connection here as well.
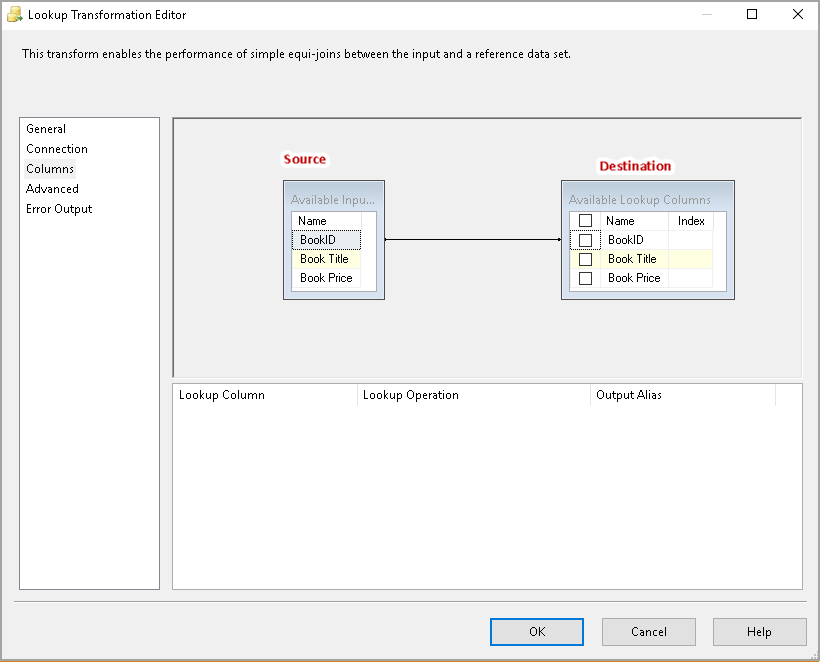
Click on the Columns, and it shows the source and destination table. We want to compare the BookID columns on both tables. Drag on the BookID column from the source and move it to the destination BookID column. It draws an arrow, as shown in the following image.
Click OK. The Red Cross icon on Lookup does not show after the configuration.
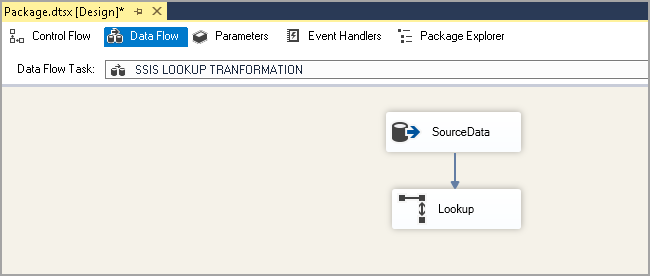
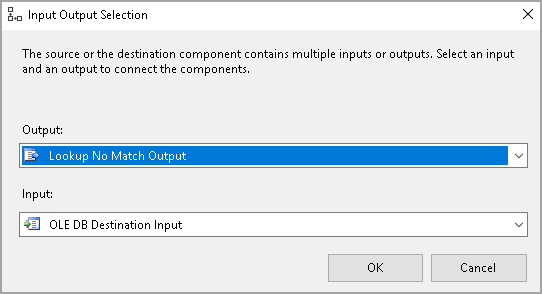
Add an OLE DB destination from the SSIS Toolbox. Join the Lookup task with the OLE DB destination, and it opens the following Input-Output selection.
Select the following values.
- Output: Lookup No Match Output
- Input: OLE DB Destination Input
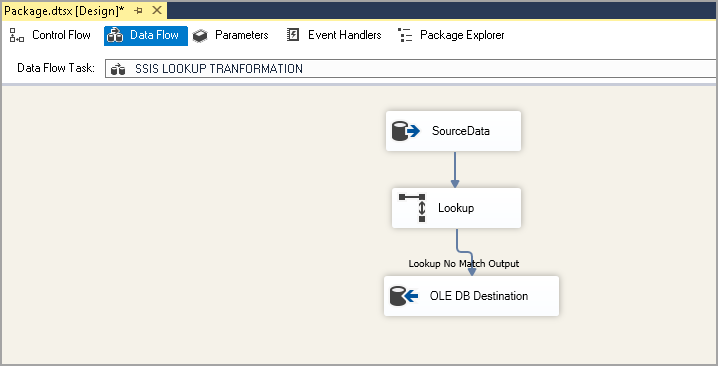
Click OK and configure the destination table in the OLE DB Destination.
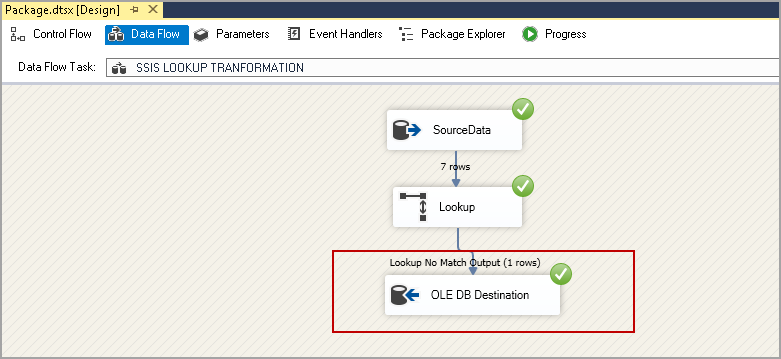
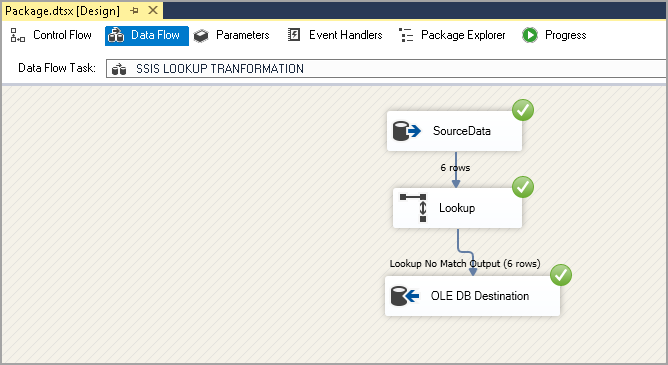
Look at the arrow between Lookup and destination, and it shows Looking No Match Output.
Click on START to execute the package. In the following screenshot, we can see that it transferred 6 rows from the source to the destination because the destination table was empty before the package execution.
It transferred all unmatched rows (6 rows) to the destination table.
Create an SSIS package for Lookup Transformation in SSIS for Condition 2
Let’s add another record in the destination table (as specified in condition 2) using Lookup Transformation in SSIS.
|
1 2 |
Insert into dbo.books values (7,'The role of DBA',872) |
At this point, we have BookID 7 in the source table, but it is not available in the destination table.
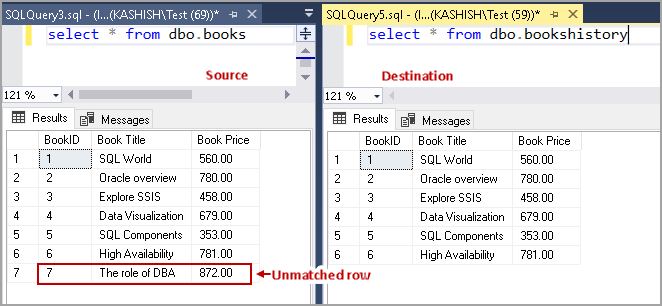
Let’s rerun the package and see how it works.
In the following screenshot, observe the following.
- The source table has seven rows
-
Lookup transformation checks both tables and finds a new record in the destination, and it only inserts the new record in the destination table. It satisfies our condition 2

Create an SSIS package for Lookup Transformation in SSIS for Condition 3
We used the SSIS Lookup for conditions 1 and 2. Suppose we update a record in the source table and we want to update that record in the destination table as well.
Execute the following query to update the price of BookID 1 to 510.
|
1 2 3 4 |
UPDATE dbo.books SET [Book Price] = 510 WHERE BookID = 1; |
To add an update task, drag an OLE DB Command task and join the Lookup transformation in SSIS for Lookup Match Output.
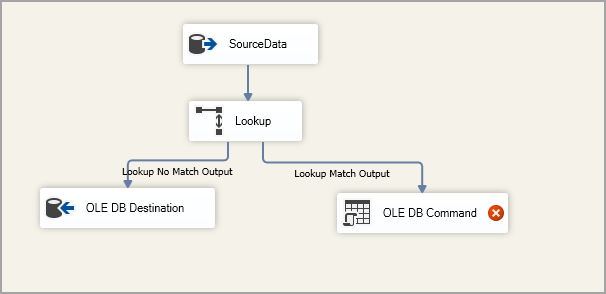
Rename the OLE Command task as Update Records.
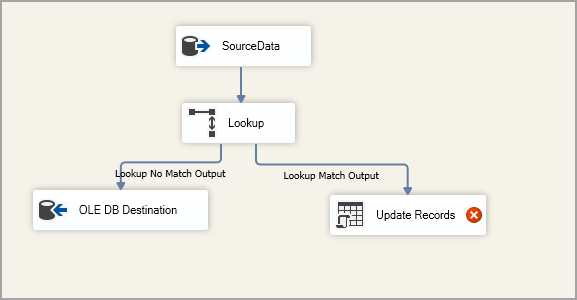
Use the following query to create a stored procedure that updates the record in the destination table.
|
1 2 3 4 5 6 7 8 9 10 11 12 |
USE [SQLShackDemo]; GO CREATE PROCEDURE Update_bookshistory @BookID INT, @booktitle NVARCHAR(50), @Bookprice MONEY AS UPDATE [dbo].[bookshistory] SET [Book Title] = @booktitle, [Book Price] = @Bookprice WHERE [BookID] = @BookID; GO |
Double click on Update Records, and it opens the Advanced Editor.
In the Connection Manager, select the connection from the drop-down.
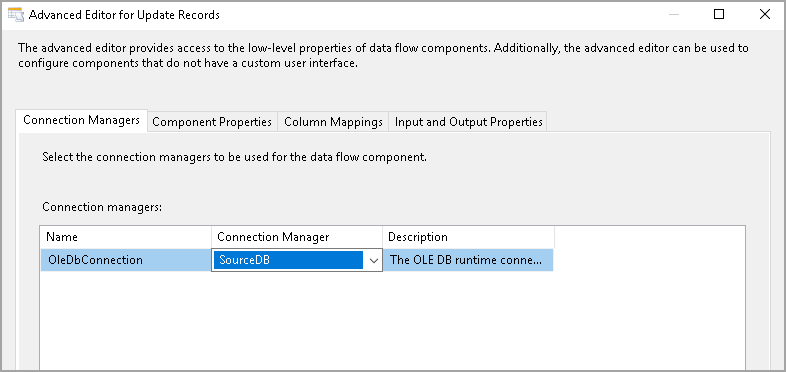
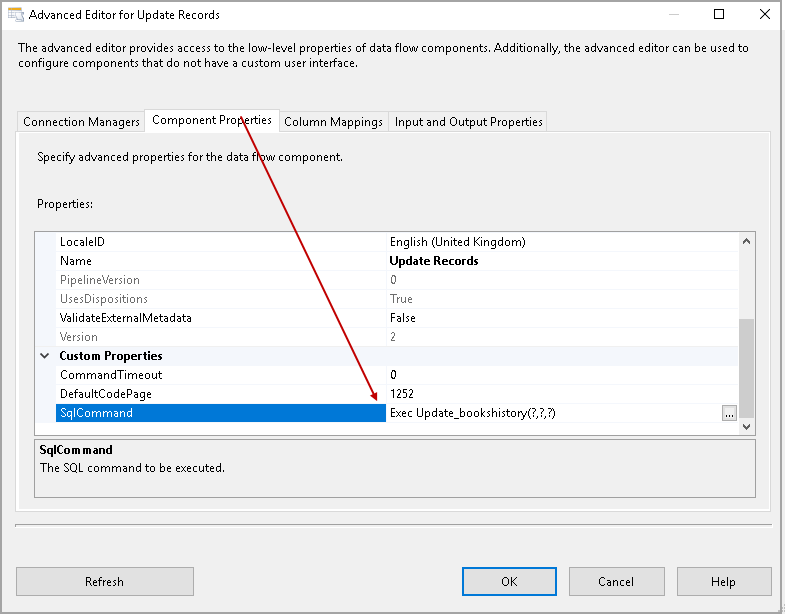
In the Component Properties, add the following SQL command
Exec Update_bookhistory (?,?,?)
We use the question mark (?) for the parameters.
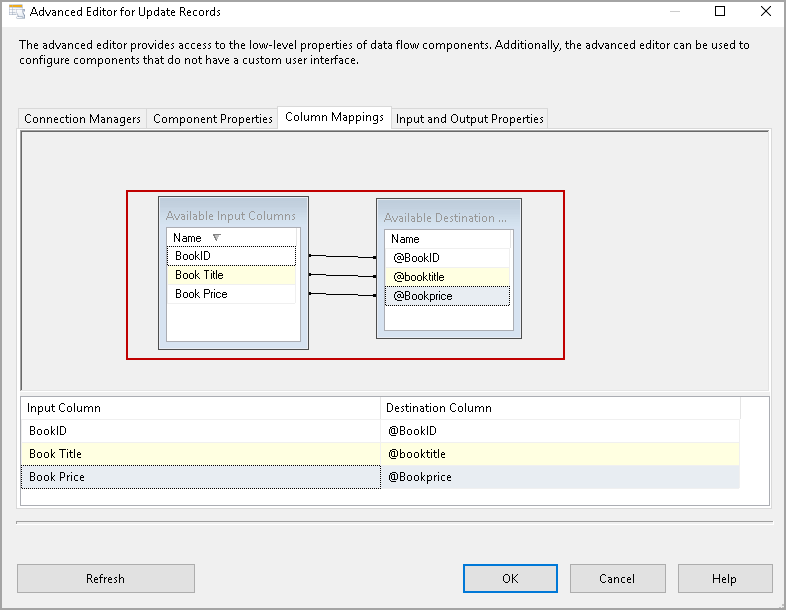
In the next tab, Column Mappings, map the input and destination column. We require to map the columns as per defined in the stored procedure. For example, my first parameter is @BookID, and it maps with the [BookID].
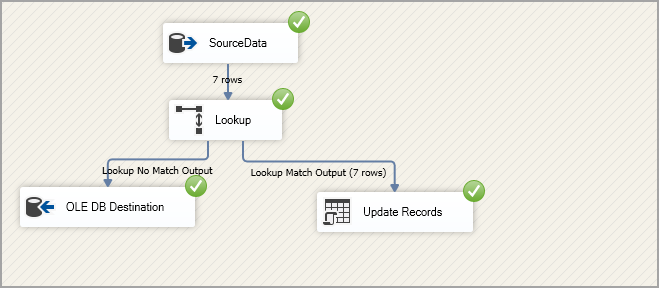
Click Ok, and you can see following the SSIS package.

Execute the SSIS package, and we see that it updates all the seven records present in the destination table.
In the following screenshot, we can verify that the update flows successfully from the source to the destination table.
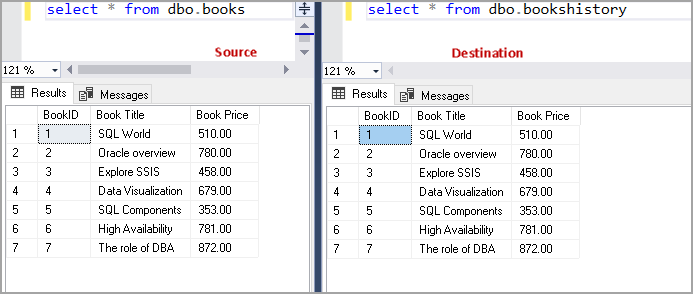
Create an SSIS package for Lookup Transformation in SSIS for Condition 3 to update only relevant rows
We updated a single record in the source table, and it should update only that particular record. It updated all the records and that we might not want to update all records, especially if the numbers of records are enormous in the source table.
Let’s modify the SSIS package to update only the required row in the destination table.
Add another Lookup task in the Control flow and join it with the Lookup for the Lookup Match Output.
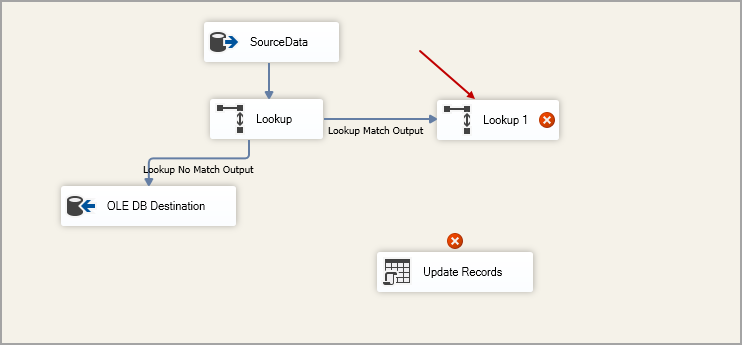
Right-click on the Lookup1 and choose Redirect rows to no match output in the Specify how to handle rows with no matching rows.
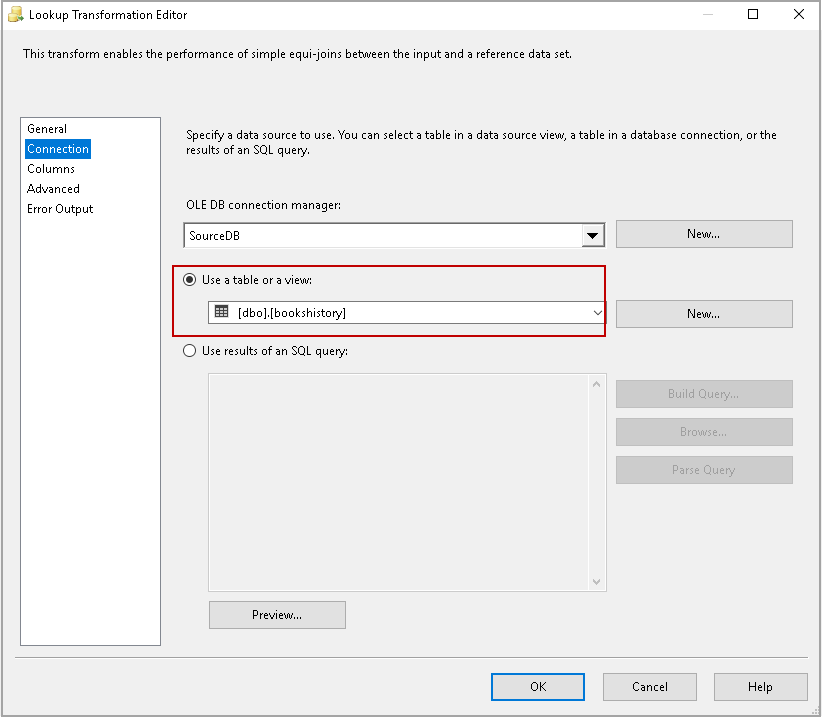
In the Connection tab, use the destination table from the drop-down list.
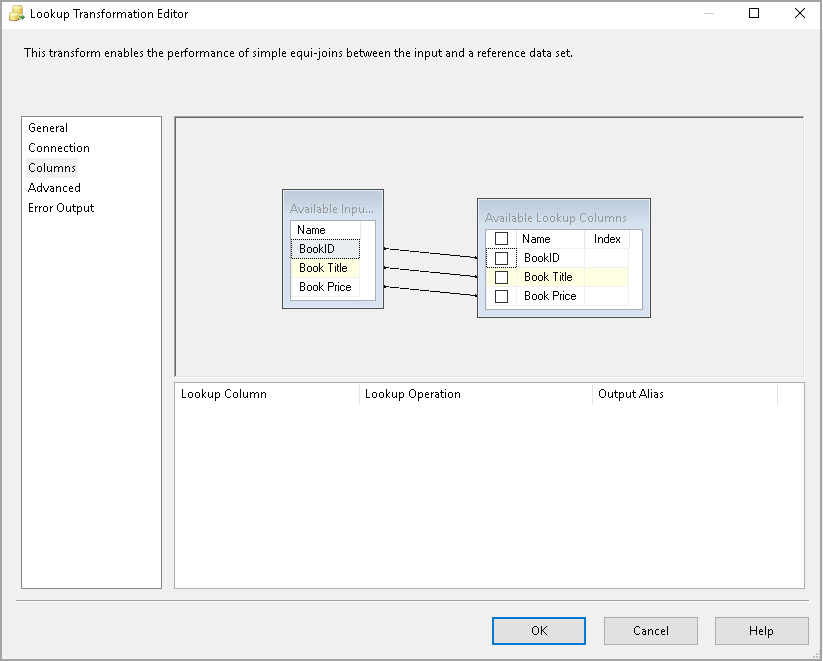
In the mapping, create the mapping for the input and Lookup column. You can right-click on the mapping screen and create Relationships for all columns similar to the following.
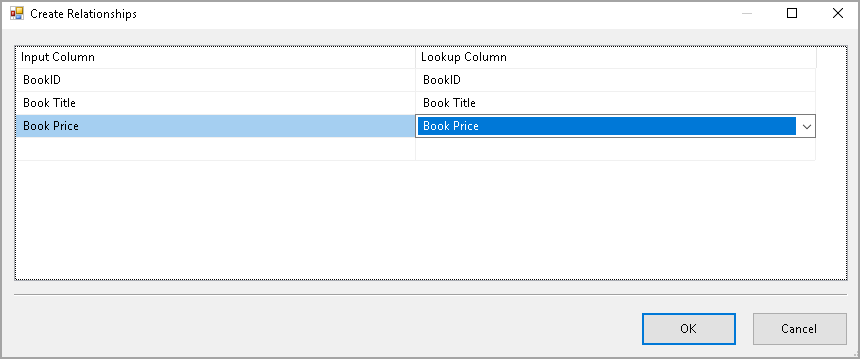
After the mapping is done, you can see the following screen in the Lookup Transformation Editor.
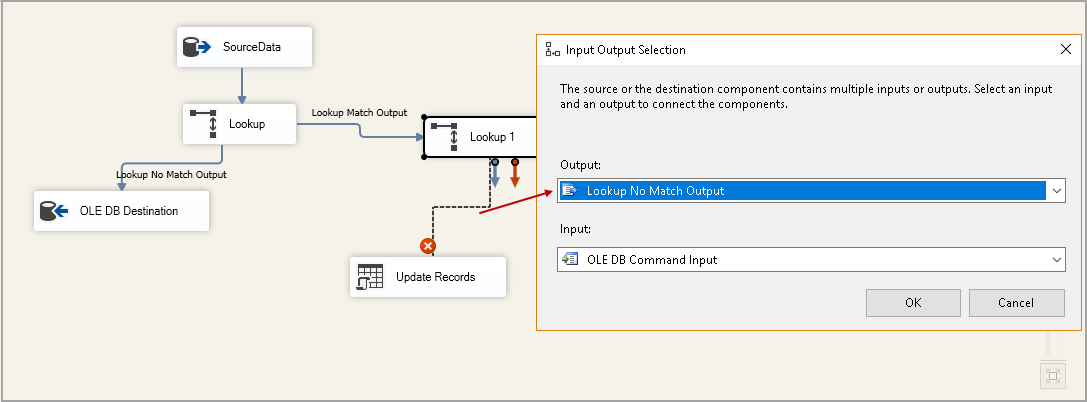
In the next step, join the Lookup1 with the Update Records we configured earlier.
Once we try to join both the tasks, it opens the Input-Output selection.
- Output: Lookup No Match Output
- Input: OLE DB Command Input
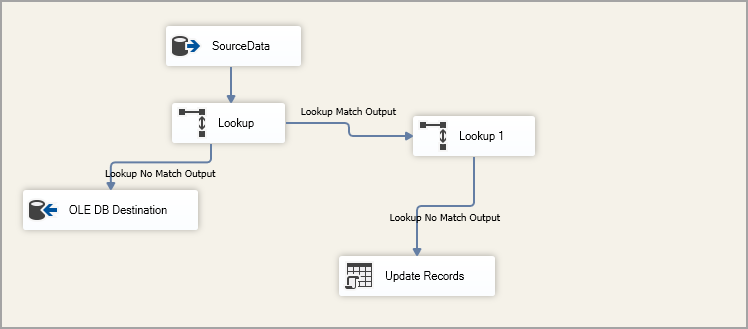
Click Ok, and we see the following configured SSIS package.
Execute the following update statement to change the book price for the [BookID] 1. This command updates a single record in the source table.
|
1 2 3 4 |
UPDATE dbo.books SET [Book Price] = 390 WHERE BookID = 1; |
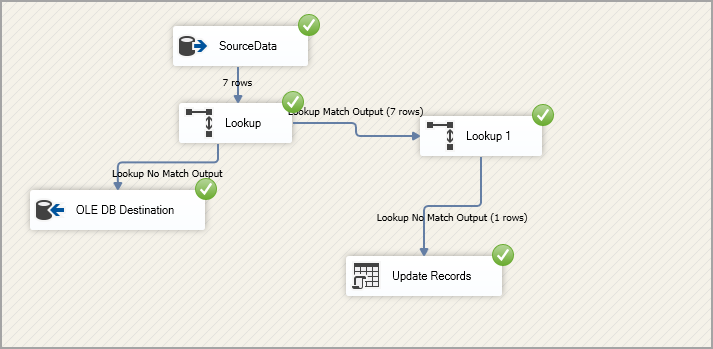
Our SSIS package should also update one record only in the destination table. Execute the package. In the following screenshot, note down the following.
- It does not insert any row in the destination table because we did not insert any new row in the source table
- It updates only a single row in the destination table. It is in line with the updates we performed earlier
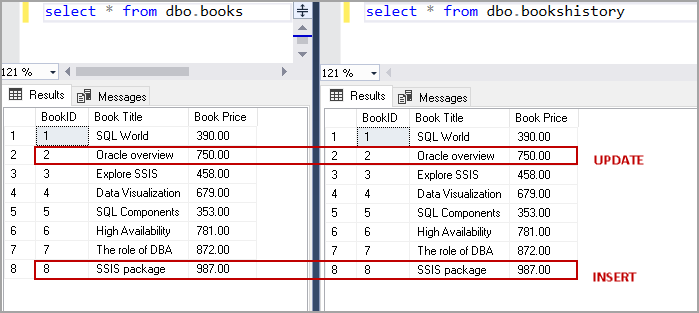
Let’s execute the following queries to insert a new record and update an existing record as well.
|
1 2 3 4 5 6 7 |
UPDATE dbo.books SET [Book Price] = 750 WHERE BookID = 2; go Insert into dbo.books values (8,'SSIS package',987) |
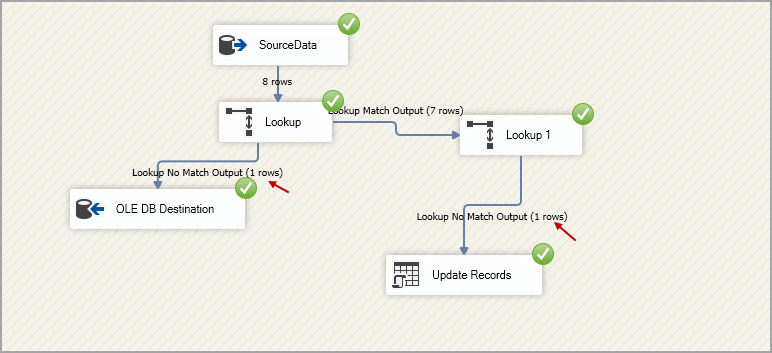
Re-execute the SSIS package, and you can see it inserted 1 row in the destination table and updated a single row as well.
Query both the source and destination tables, and verify the results. We see both the updates and inserted rows in the destination table.
Conclusion
In this article, we covered Lookup Transformation in SSIS for incremental loading of data in the destination tables. It is a nice feature transformation in the SSIS, and you should know of it.
- Understanding PostgreSQL SUBSTRING function - September 21, 2024
- How to install PostgreSQL on Ubuntu - July 13, 2023
- How to use the CROSSTAB function in PostgreSQL - February 17, 2023

