
There are many new features in SQL Server 2016, but the one we will focus on in this post is:
- Always encrypted
A feature many companies and developers have been waiting, is now finally being implemented in SQL Server. The feature is called Always Encrypted, the main purpose of this feature is to secure your data. Your data will only be visible to the ones logged into an application consuming the data, and will never be transferred from application to database unencrypted.
This will finally make sure that leaks of personal data should be a thing of the past, as only the application is able to consume the data, not even a DBA sitting at the server and using SQL Server Management Studio will be able to consume data.
The way Microsoft have implemented this always encrypted feature, is to let all the data in the tables be encrypted. The application that needs to look at data will have to use the new Enhanced ADO.net library, which will give your application the methods to de/encrypt data.
This way, the only way to insert data into a table, which contains encrypted columns, is to use parameterized insert statements from your application. It is not even possible to insert data from SQL Server Management Studio, if we try, the statement will fail.
This way we ensure that only the persons using the application will be looking at un-encrypted data, thus reducing the number of people with a direct access to sensitive data.
So how to get started with this feature?
First we need to have a few things sorted out, we need the following created on a database that is to contain encrypted tables and columns.
- A self-signed certificate, that is our Column Master Key (CMKD) on your machine.
- A Column Encryption Key (CEK)
- A Column Master Key Definition in the database, storing information about CMKD location.
The CMKD is used to protect the CEK, and the CEK is the encryption key that protects your sensitive data from falling in the wrong hands.
Create Column Master Key Definition by SQL Server Management Studio
First generate your CMKD on the database your working on, here we are on a database called AlwaysEncryptedDemo.
- Navigate to the Security node
- Open Always Encrypted Keys
- Right click on “Column Master Key Definition”
Click on “New Column Master Key Definition”
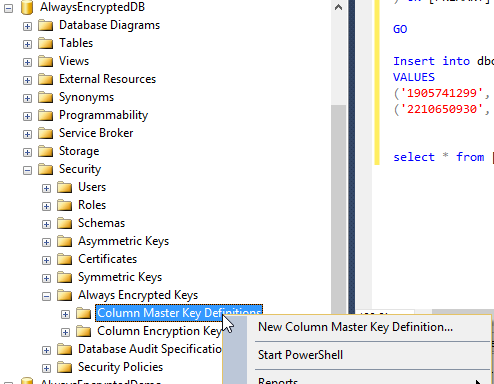
Figure 1- First create a Master Key Definition- In the next window, click “Generate self-signed Certificate”
- Type in a Name for your Key (here “CMDK_01”)
- Select if the certificate should be stored in local store under either Current User or Local Machine
Click OK
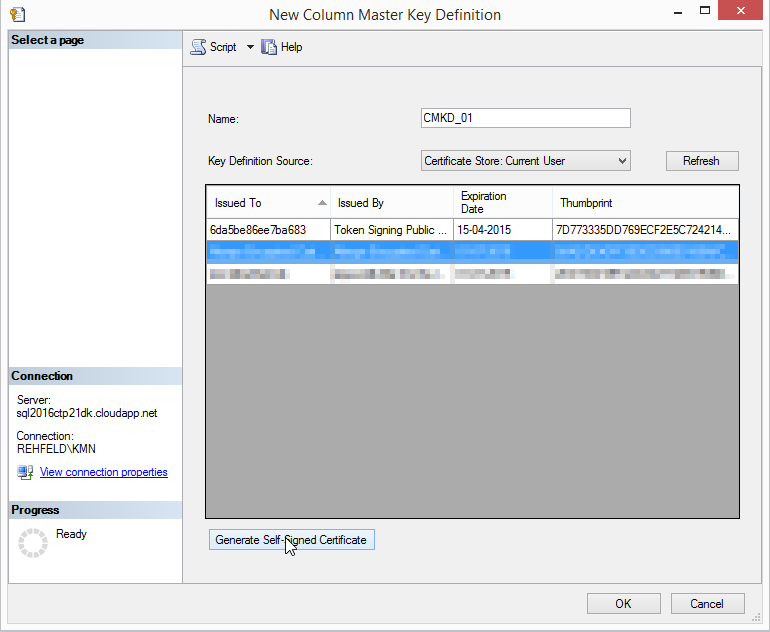
Figure 2- Generate a self signing certificate
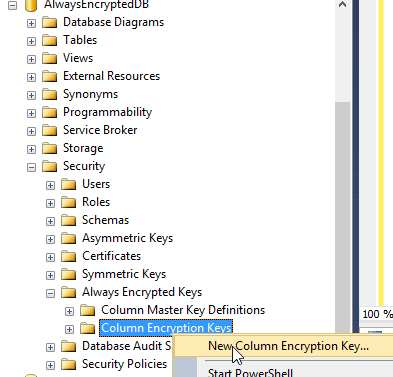
Create Column Encryption Key by SQL Server Management Studio
Now that we have the CMDK created and ready to secure our column encryption keys, let us move forward and create a Column Encryption Key.
- Navigate to the Security node
- Open Always Encrypted Keys
- Right click on “Column Encryption Key”
Click on “New Column Encryption Key”
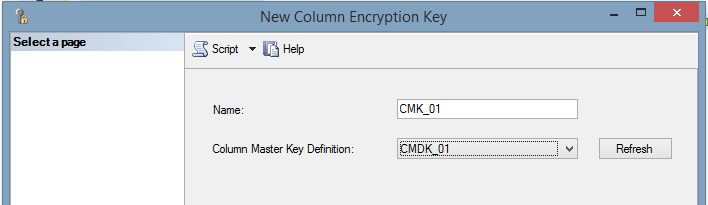
- On the next window, Type a name your Key (here “CMK_01”)
- Now select the Column Master Key Definition to be used for securing the key.
- Click OK
By now, you will be ready to create tables, where columns that you need to be encrypted can be this by using the encryption key just created. Later we will look at the table creation and how it can be enforced on tables already in your database.
Create Column Master Key Definition by Script
You could do it in SQL Server Management Studio, given you know the values.
|
1 2 3 4 5 6 7 8 9 10 11 12 13 |
-- To create the CMKD in T-sql here is the script. USE [AlwaysEncryptedDemo] /****** Object: ColumnMasterKeyDefinition [AlwaysEncryptedDemo] Script Date: 29-06-2015 12:29:26 ******/ CREATE COLUMN MASTER KEY DEFINITION [CMDK_01] WITH ( KEY_STORE_PROVIDER_NAME = N'MSSQL_CERTIFICATE_STORE', KEY_PATH = N'CurrentUser/My/7D773335DD769ECF2E5C724214EB3AF63CD3A764' ) GO |
Create Column Encryption Key by Script
When a CMDK is created you could create the CEK by script as well, just like the script underneath here.
|
1 2 3 4 5 6 7 8 9 10 11 12 13 14 |
-- To create the CEK in T-sql here is the script. USE [AlwaysEncryptedDemo] /****** Object: ColumnEncryptionKey [AlwaysEncryptedColumnKey_1] Script Date: 29-06-2015 12:30:28 ******/ CREATE COLUMN ENCRYPTION KEY [CEK_01] WITH VALUES ( COLUMN MASTER KEY DEFINITION = [CMDK_01], ALGORITHM = 'RSA_OAEP', ENCRYPTED_VALUE = 0x016E008000630075007200720065006E00740075007300650072002F006D0079002F00370064003700370033003300330035006400640037003600390065006300660032006500350063003700320034003200310034006500620033006100660036003300630064003300610037003600340003DBA109D9421EC475D7CFB7B0A0B7C177C660FD66AA5A155C82E1AC02023BAC2872BB225E062DCBCC1810B2756895FAF66E26E89181D327157196D483978817010A7B7D51D85B184470B98C357BFCDFE99BA63873D6548D1D8E4918BF5AB685BC4BA13B56B9DB0A3550231E5D05FEAE151B61280FE55F5FAB2056CCF4628592551B43851B150109FE25B1EB64D53B56CEDFD40F7F05A935B9AD874774906A6889523F8E5B0667B7C45C0C61D61C45D0C6F66F878033E95886CC4CA331D7A7E7A1117D5021A8F443323F0B70D4E304712EA45542649D414A6F6B44178B685E5CCA5417D55A12165ECCE3771C3892858B838D531DADCB6E925978F3C29B0810D3 ) GO |
Creating a table with encrypted columns
Now it is time for some table creation, and there are a few things to remember when doing that. The syntax for table creation is just like an ordinary table creation, we just need to add some options to the columns that we need encrypted.
Underneath, here is an example of a plain simple table with no encryption defined.
|
1 2 3 4 5 6 7 8 9 10 11 12 |
-- Ordinary table creation. USE [AlwaysEncryptedDemo] CREATE TABLE [dbo].[Client] ( [AlwaysEcryptedID] [int] IDENTITY(1,1) NOT NULL, [SocialSecurityNo] nvarchar(50) NOT NULL, [FirstName] nvarchar(50), [LastName] nvarchar(50) ) ON [PRIMARY] |
Should we create the same table, and decide to add encryption to the SocialSecurityNumber, the script we needed to execute would be this one.
|
1 2 3 4 5 6 7 8 9 10 11 12 13 |
-- Table creation, with encryption on SosialSecurityNumber USE [AlwaysEncryptedDemo] CREATE TABLE [dbo].[Client] ( [AlwaysEcryptedID] [int] IDENTITY(1,1) NOT NULL, [SocialSecurityNo] nvarchar(50) COLLATE Latin1_General_BIN2 ENCRYPTED WITH (ENCRYPTION_TYPE = DETERMINISTIC, ALGORITHM='AEAD_AES_256_CBC_HMAC_SHA_256', COLUMN_ENCRYPTION_KEY=AlwaysEncryptedColumnKey_1), [FirstName] nvarchar(50), [LastName] nvarchar(50) ) ON [PRIMARY] |
As the script shows above, the extra option is
|
1 2 3 4 5 |
ENCRYPTED WITH (Encryption_Type = [Deterministic or Randomized) , ALGORITHM = ['AEAD_AES_256_CBC_HMAC_SHA_256’] , COLUMN_ENCRYPTION_KEY = [One of your CEK] |
The difference between Deterministic and Randomized encryption, is that Deterministic always return the same encrypted value for the same text values, while randomized will generate a unique encrypted value even for the same string value.
This gives us the possibility to group, and do filtering on encrypted columns in our table. Just be aware that this might open a weak spot – as it will be possible to guess the values in the encrypted column by scrutinizing the patterns and values in the encryption key.
To exemplify:
An attribute is set to be encrypted Deterministic, and the value in the attribute Fullname is “Kenneth Michael Nielsen”
If the encrypted value is set to:
“0x012154786C89F6457EB7144115E8775A2DB64DE00CB4DA7C93AB6F14C3419C79CDA17D6C24BA14509019C7EA2A072F759AC749B6E20F758681F29FE2B740F2AF1D” then every record with “Kenneth Michael Nielsen” in the attribute Fullname would have the same encrypted value.
Had we instead used Randomized encryption, the encrypted values would be entirely randomized and we would not be able to determine any patterns.
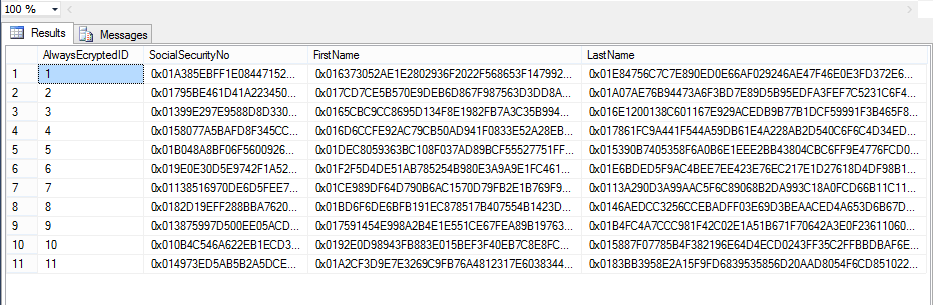
Viewing data in SSMS
What would it look like for the DBA that take a sneak peek at the data in a table with always encryption enabled, as it says, data is always encrypted and even the DBA, is not able to make any sense of the data.
The DBA, would see something like this if he/she made a
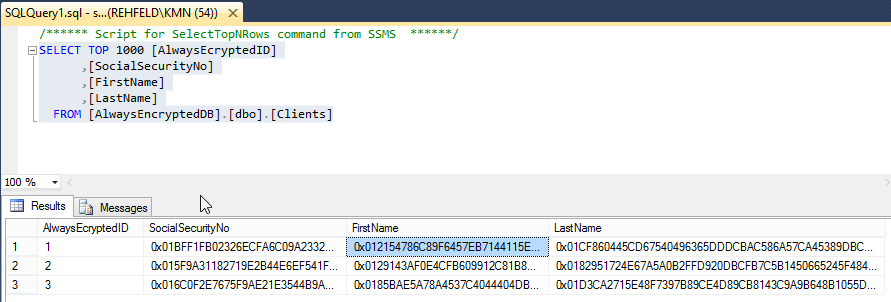
This way, we can ensure that only the end-users that is granted access to the data is the one actually working with the data, and not having a data leak with 1000 of records holding sensitive data.
Encrypting a table already in you database
In the scenario where you have a table in place in an already running database and you decide to implement always encryption on some attributes – we need to take the existing data and encrypt it. There are a few ways to do this, let me list a few of them:
- Create a new instance of a table, with the appropriate settings to encrypt attributes
- Let the end-user application read from the old table, and write all new entries in the new.
- Create a new instance of a table, with the appropriate settings to encrypt attributes.
- Import all the old records into this new table during a service window
- Roll out a new end-user application to read/write to a new table.
- Create a new instance of the table, with the appropriate settings to encrypt attributes.
- Export all data from the existing table to CSV file.
- Import the CSV file into a new table.
I will walk you through scenario 3, where we have our new table we created earlier, dbo.Client and I have a list of records from our old table without encryption that we import into the table dbo.Client.
Content of CSV file
| SocialSecurityNo | FirstName | LastName |
| 13546876151 | Peter | Doe |
| 13546876152 | jens | Doe |
| 13546876153 | hanne | Doe |
| 13546876154 | lotte | Doe |
| 13546876155 | pia | Doe |
| 13546876156 | jane | Doe |
| 13546876157 | rolf | Doe |
| 13546876158 | steve | Doe |
| 13546876159 | martin | Doe |
| 13546876160 | John | Doe |
| 13546876161 | Edwin | Doe |
- Right click the database AlwaysEncryptedDemo
- Select Task
Select Import Data
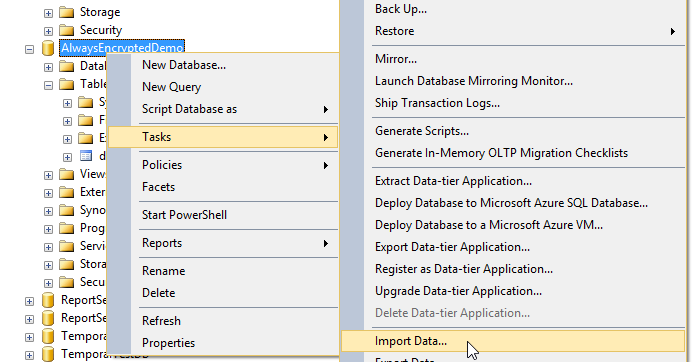
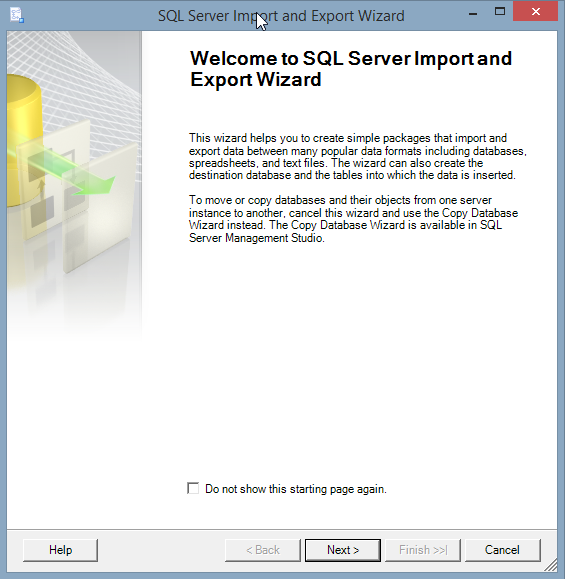
Figure 3- Select Import DataOn the “Welcome to SQL Server import and export wizard” click Next
- Then select Flat File Source in Data source.
Browse to your file AlwaysEncrypted.csv
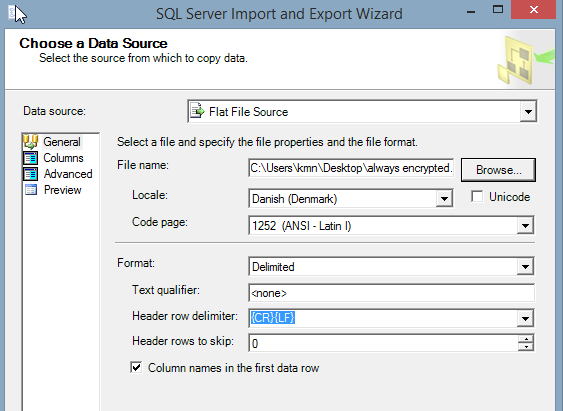
Click Columns and it should look like this
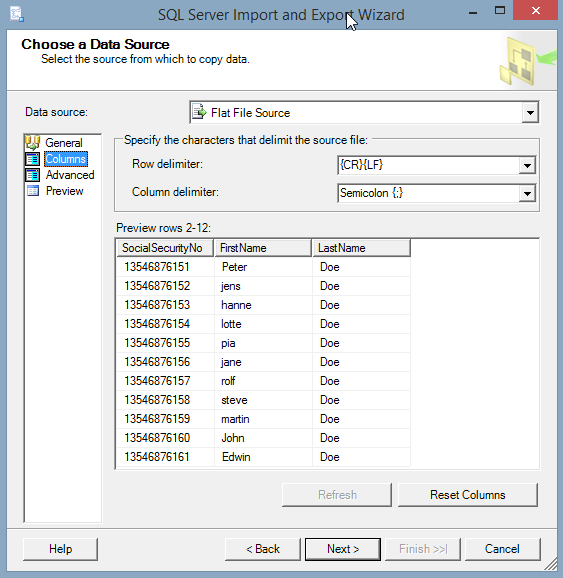
- Now click Next
- In the Destination drop-down select “.net Framework Data Provider for SQL Server”
- In connection string write your connection string
Server=myServerAddress;Database=myDataBase;Trusted_Connection=True;
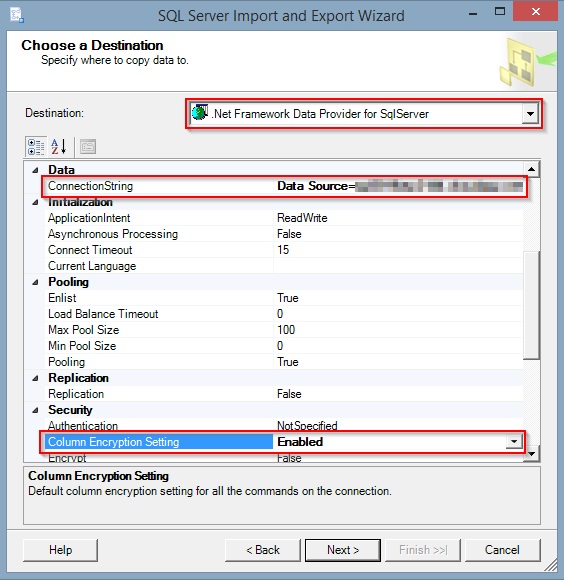
- Then set Column Encryption Setting to Enabled, and you are ready to import non encrypted data into you table with column encryption.
Click Next
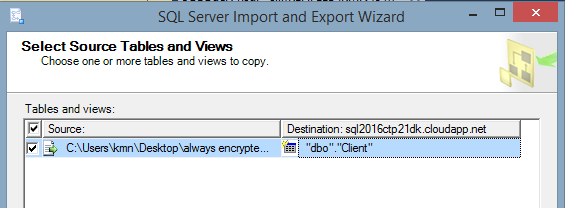
- In the source and destination, select the newly created table in destination – here dbo.client
- Click Next
- Most like there will be warnings on the next window, just take the appropriate actions to either fail or ignore potential errors.
- Click next
- You can now save the import package as a SQL Server Integration Package, or run it immediately – choose the later
- Click next
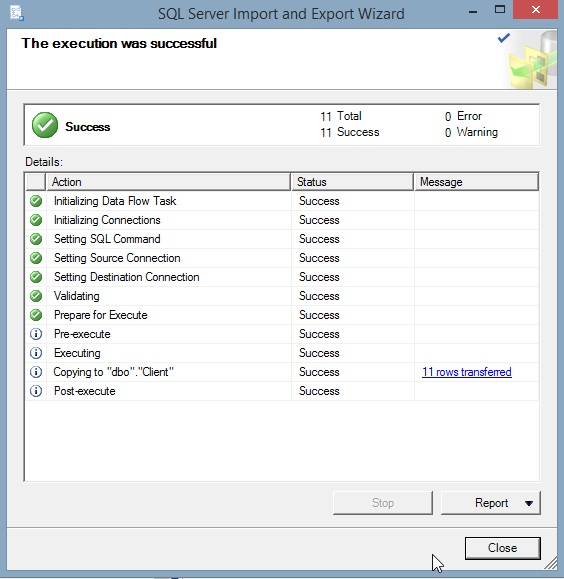
- A summary appears and you should click Finish
The last window should be this and we can now do a select from our dbo.client table and visually confirm that the data have been imported and encrypted.
|
1 2 3 4 5 6 7 8 9 10 |
-- SELECT From encrypted table USE [AlwaysEncryptedDemo] SELECT TOP 1000 [AlwaysEcryptedID] ,[SocialSecurityNo] ,[FirstName] ,[LastName] FROM [AlwaysEncryptedDemo].[dbo].[Client] |
If we run the SQL statement above we should get a result like this one.
Conclusion
In this brief walkthrough of Always Encrypted, we have covered how to:
- Create Column Master Key Definition
- Create Column Encryption Key
- Create tables to hold encrypted values
- Encrypt data already in your database
In short, it is an easy feature to implement, and it should give the data-owner some peace of mind – knowing that only a handful of people (intended to manipulate data) is, in fact, the only ones able.
I hope this has given you a good introduction to the subject and, hopefully, you will take it to your own test SQL server and have a go at it. The issue with working with the encrypted data from the end-user application is a whole other topic, and a topic I will catch up on later.
He really likes to advise the customers to take the right decisions, but also maintains a high technical knowledge, so he can act as both architect and developer.
Over the last years, he has become a highly-rated international speaker at various SQL events. Organizing the Danish SQLSaturday and member of the board in SQLSUG.dk
View all posts by Kenneth M. Nielsen
- Using SQL Server 2016 CTP3 in Azure - November 6, 2015
- New Features in SQL Server 2016 – Dynamic Data Masking - July 23, 2015
- New Features in SQL Server 2016 – Always encrypted - July 8, 2015