
This article will describe Azure blob storage, its features along with its uses in SQL Server. I have explored the basics of Azure storage in my last article, “Getting started with Azure Storage”, I would recommend you read this article to learn various storage options available in Microsoft Azure. The blob storage is one of the storage options offered under Azure storage discussed in this article.
Azure blob storage
Azure blob storage is a Microsoft cloud offering to store an enormous amount of unstructured data that may come in form of images, text, files, videos, or a mix of all these types. It is also used as underline storage for Azure data lake analytics solutions and managed disk subsystems for Azure virtual machines.
Let’s understand a blob first. What is a blob? A blob is a short form of a Binary Large Object. Examples of binary large objects are images, videos, pdf files, documents, text files, etc. Azure blob storage is a solution to store these types of objects in the cloud environment at a massive scale and later can access them with optimal performance. There are multiple ways to access files stored in blob storage. We can access them from anywhere using HTTP or HTTPS. Applications can use Azure REST API, Azure PowerShell, Azure CLI, and Azure storage client libraries to access data stored in blob storage.
Let’s understand the structure of Azure blob storage where actual blobs are stored. I have shown you step by step process to create a storage account in my last article which is also attached in the first paragraph of this article. I would recommend you visit that article to understand the process of storage account creation.
First, we create a storage account then we create a container inside the storage account which we also call it blob container, and finally, we upload blob objects inside the newly created container. The storage account works as a box in which all Azure storage services can be stored. It provides a unique namespace for our data in the Azure cloud. The container is like a logical directory structure to manage and maintain all stored blob objects.
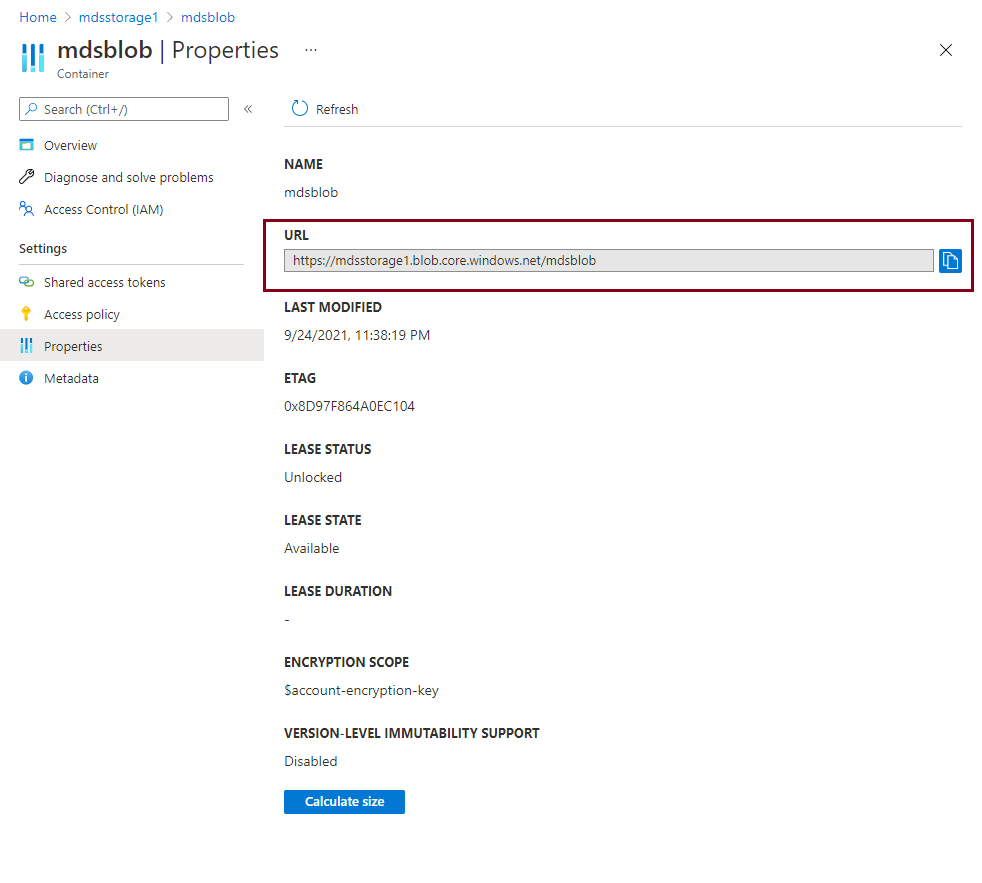
We can access blob objects stored in the container using unique endpoint addresses. The Azure blob storage endpoint address uses a specific template that can be read as http://StorageAccountName.blob.core.windows.net, where StorageAccountName is the name of the storage account. The name of our storage account is mdsstorage1 so in this case, it will be http://mdsstorage1.blob.core.windows.net and once you will create the container then the container endpoint will be http://StorageAccountName.blob.core.windows.net\ContainerName. Have a look at the last screenshot of this article to understand the URL of our newly created container. You can see our container URL is showing as https://mdsstorage1.blob.core.windows.net/mdsblob here, the name of the storage account is mdsstorage1 and the name of the container is mdsblob.
Below are the high-level steps to create blob storage to save any file directly to the cloud.
- Login to Azure portal
- Identify a storage account where you want to create blob storage. If you don’t have any storage account, read the above-attached article to create one.
- Create a Container
- Upload or Download the blob data
Once you will create blob storage then you can move your data to this newly created blob using any of the multiple solutions like Azcopy, Azure Data Factory, Azure Data box, and Azure import-export service.
Now, let’s discuss some of the Azure storage properties which are very critical in terms of cost, performance and accessibility. Azure storage uses a property called Access tier to control storage accessibility, its performance, and cost. The access tier can be chosen based on the requirement of data accessibility. Let’s discuss various access tiers of blob storage.
Access tiers
There are various types and nature of data we store in Azure storage. All types of blob data have different accessibility requirements. Sometimes data accessibility reduces over time whereas accessibility remains the same for some types of blob data. There is no point to pay the same price for data that is rarely being accessed or not accessed at all or accessibility has reduced drastically over time. Azure provides Access Tiers property to address such scenarios to optimize the cost on blobs that has less accessibility.
There are 3 types of access tiers in blob storage accounts in case you are using standard GPv2 storage accounts. Premium storage accounts do not allow to change access tiers as it has only one access tier which is used for all premium storage accounts.
- Hot tier – You should use the hot tier if you need frequent data accessibility (read, write operations) with low latency. Most of the transactional workload uses this tier to get optimal performance. This tier will charge you the highest for storage cost and lowest for access cost among all 3 tiers.
- Cool tier – This tier is suitable for infrequent data access requirements. It also gives good performance and durability. The pricing for this tier is lower than the hot tier for storage cost and higher than the hot tier for access cost. This tier is ideal for backups or documents which are not used frequently. The minimum retention to store data in this tier is 30 days.
- Archive tier – This tier will be priced lowest for storage cost and highest for access cost among all 3 access tiers. This is suitable for blob data which you use occasionally like long-term backup retentions, any data which you want to preserve and will not use for a longer time. The data stored in this tier is in offline mode and cannot be read and modified. You need to rehydrate the data if you want to use it. The rehydration process may time a lot of time to serve you the actual data, so the performance is very low in this tier. You can store data in achieve tier starting from 180 days onwards.
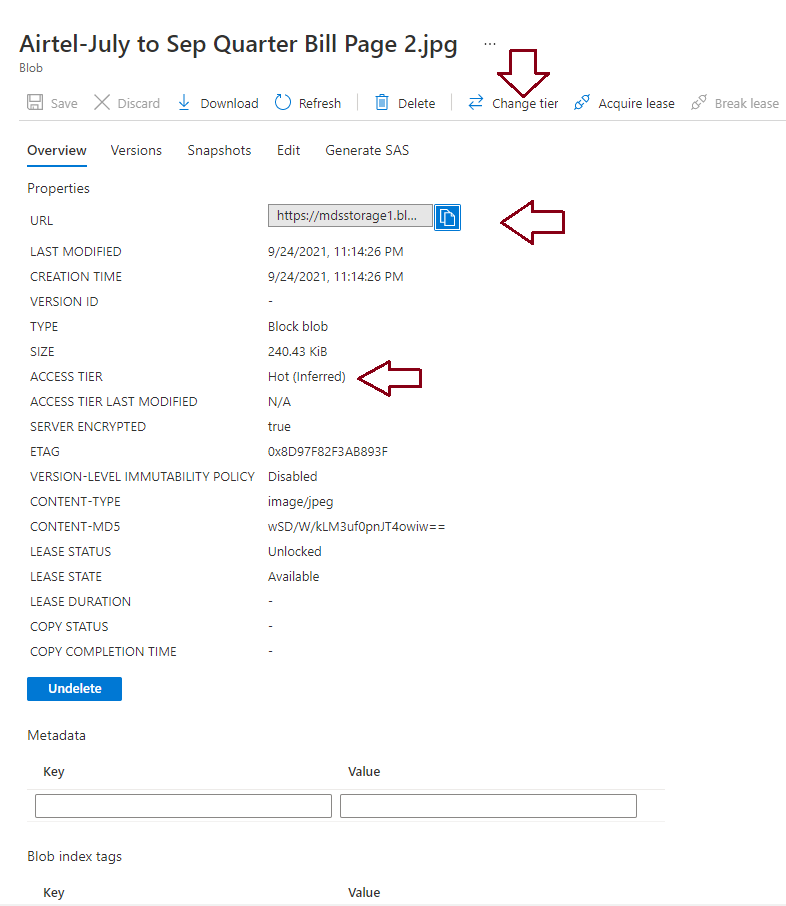
We can set an access tier while creating the storage account, we can also change it later after its creation. We have only 2 options Hot and Cool access tiers at the account level whereas the Archive access tier can be set only at blob or object level which I have demonstrated in the second last image of this article. If you upload any blob to a container, it inherits the access tier from its respective storage account in case you explicitly do not change it during upload. Later we can change the access tier of any object or blob as per our requirement. Changing the access tier from hot to cold to achieve will charge you for reading and write operations.
Azure Blob Types
There are 3 formats in which data is stored in Azure blob storage. We can choose blob type as per while uploading or creating any blob data to the storage account. I have shown how to select a blob type in step 9 of the section “Create an Azure Blob Storage”.
- Block blob – As its name suggests, block blob stores data in the form of blocks. One block blob can store only 50000 blocks with the size of each block blob up to 4000 MB. The size of each block can be different from the other blocks in the same block blob. Each block is assigned with a unique block id. The block blobs are suitable for a large amount of data that needs frequent accessibility with optimal performance like video or audio streaming websites.
- Append blob – Append blob also stores data in form of blocks. It also has limitations to store 50000 locks per blob but the per blob size in Append blob is lower than block blob i.e. 4 MB. The append block adds a new data block at the end of the existing blob data. The block id assigned to each block is not exposed in this type of blob. This is suitable for data where you need to append data on existing blobs.
- Page blob – Data stored in page blob in the form of 512-byte pages and not in the form of blocks. The page blob is suitable for creating disk subsystems for Azure virtual machines on top of Azure blob storage in premium storage account types where we can run transactional workloads that require frequent read and write access. The maximum size of a page blob is 8TB. This blob type supports only the hot access tier and not cool or archive access tiers.
Azure blob storage uses for SQL Server workload
We can use Azure blob storage for SQL Server workloads as well. The most popular use of this storage is in SQL Server database backups. SQL Server supports using it as destination storage to save its backup files using backup to URL, or file snapshot backups for database files.
- Backup to URL – This is one of the popular approaches to run SQL Server backups to Azure blob storage. This is the manual approach in which we pass blob storage URL as the destination in SQL Server backup script or jobs to store backup files in blob storage. We can use block blob or page blob as blob type to store database backup files. Although, block blob is preferred as blob type to store SQL Server backup files.
- Host databases in Azure blob storage – We can host SQL Server databases in blob storage to take the benefits of file snapshot backups. Although this is not a very popular approach to host databases in blob storage, if you want to use file snapshot backup then you must host database files in blob storage.
- File snapshot backups – The file snapshot backups are used to take snapshots of database files stored in Azure blob storage. This type of backup is used to quickly backup and restore the databases. It supports full and transaction log backup to recover any data in point in time recovery.
- SQL Server Managed backups – SQL Server managed backups are automated backup process for SQL Server databases that handles backup schedules, execution and maintain the backup as per defined retention policy. The best part is SQL Server runs backups in the managed backup model only when your system has a low workload. You just need to define backup retention and storage location and the rest of all activities will be taken care of by managed backup feature. SQL Server Managed Backup also uses Azure blob storage to store all backup files. Backups can be configured at both levels, database and instance level of SQL Server.
- Database restores – All backups we are running to store backup files in Azure blob storage can also be directly restored to the SQL Server instances. You don’t need to copy any files to a local drive to restore them on SQL Server instance.
Azure blob storage offers various benefits of using it for SQL Server backups:
- You can manage storage costs for your backups by choosing appropriate access tiers
- You need to manage any underline hardware for backups.
- It is easy to use. You don’t need any type of disk backup.
- You don’t need to worry about space issues. You will have unlimited space to use.
- Better data protection by leveraging encryption and various storage level redundancies. You can access data from anywhere by choosing appropriate storage redundancy.
Create an Azure BLOB Storage
Here, I will show you how to create Azure blob storage using the Azure portal.
- Log in to the Azure portal.
- Identify a storage account where you want to create Azure blob storage in case you already have storage accounts. If you don’t have any storage account, read the above-attached article to create one.
- Type “Storage Accounts” from the search console and click on this option once it will appear in the search dropdown. You can choose your identified storage accounts from this page or you can click on the +Create option to proceed with new storage account creation as I have explained in my last article which is also attached in this article in 1st para.
-
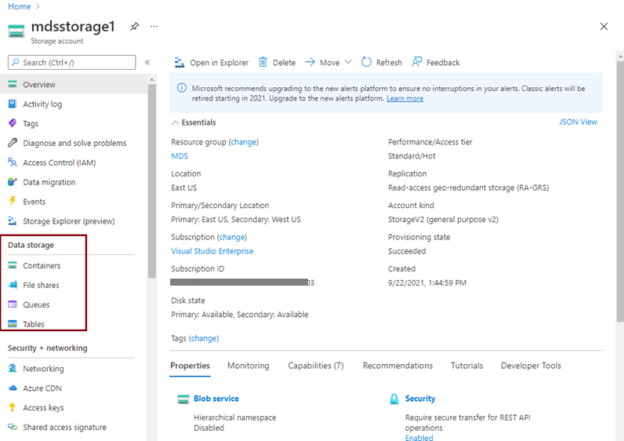
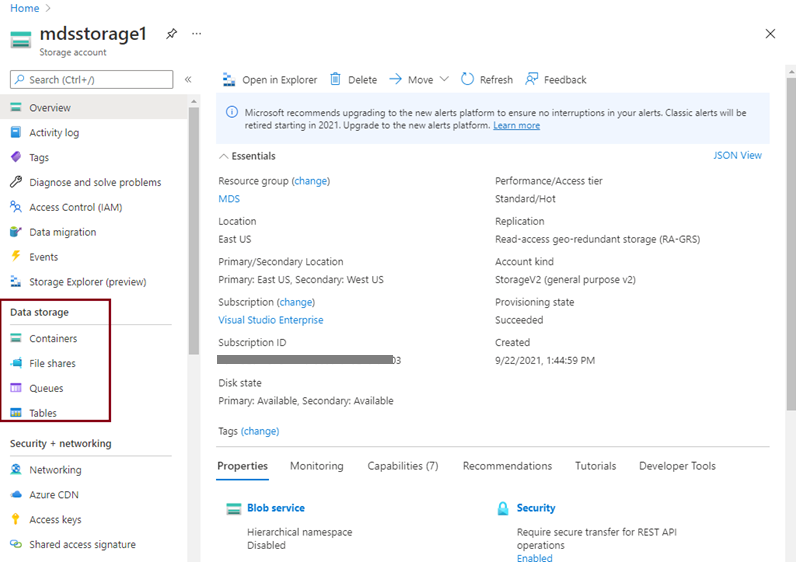
I have already created a storage account mdsstorage1 as shown in the below screen. As I have described above, we need to create a container in a storage account as part of Azure blob storage creation. I have highlighted all types of Azure storage that we can create in this storage account. Click at Containers given under Data storage option from left side pane, you will get containers view in the right-side pane.

-
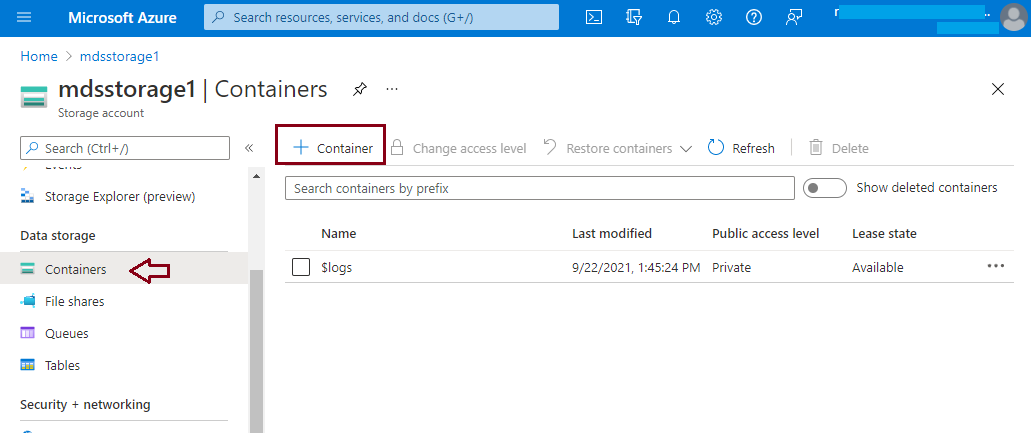
Click at the + Container option showing in the dark red rectangle to create a container where you can store your blobs. There is no upper cap on the number of containers per storage account.
-
Once you will click on the + Container option to create a new container, another window will appear to enter its name and choose its access level. You can choose the access level depending on your need for this container’s data accessibility. I have left this option with default settings.
-
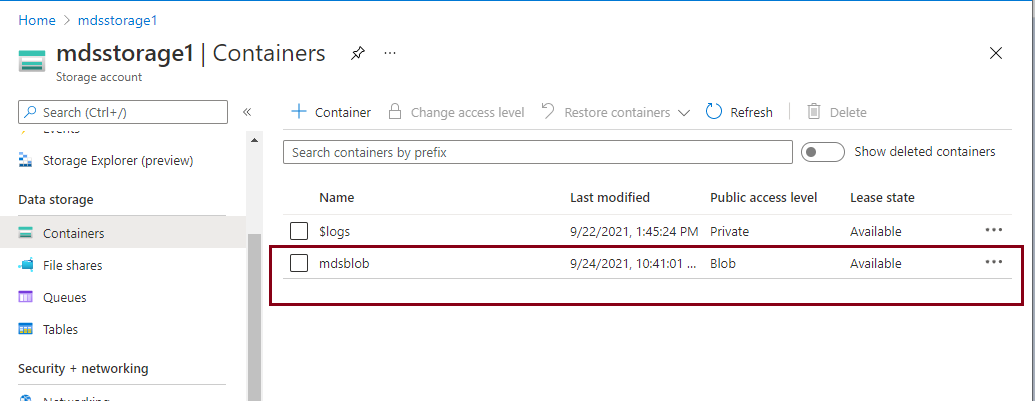
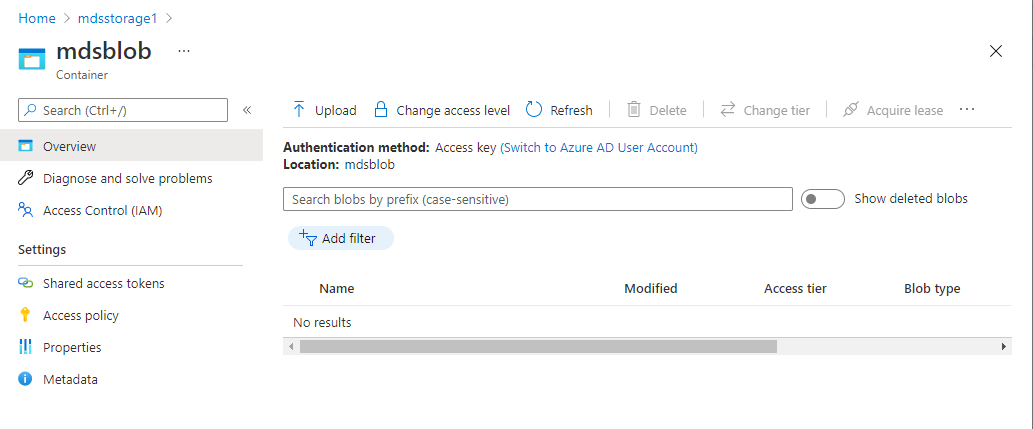
Your Azure blob container will be created once you hit the Create button of the above image as shown in the below image. You can use three dots given in the rectangle for the below newly created container to get multiple options to modify this container property, access policy, and its access level.
-
Click on this option to enter inside the container where we will be uploading all our blob data. You just need to click on the Upload button, and it will allow you to browse the location where you have stored the data.
-
Once you will click on the Upload button, the below screen will come to choose the object which you want to upload along with its options which you can modify as per your wish. You can see its access tier and blob type as well in the below screen, you can click on these options to choose the appropriate blob type and access tiers.
-
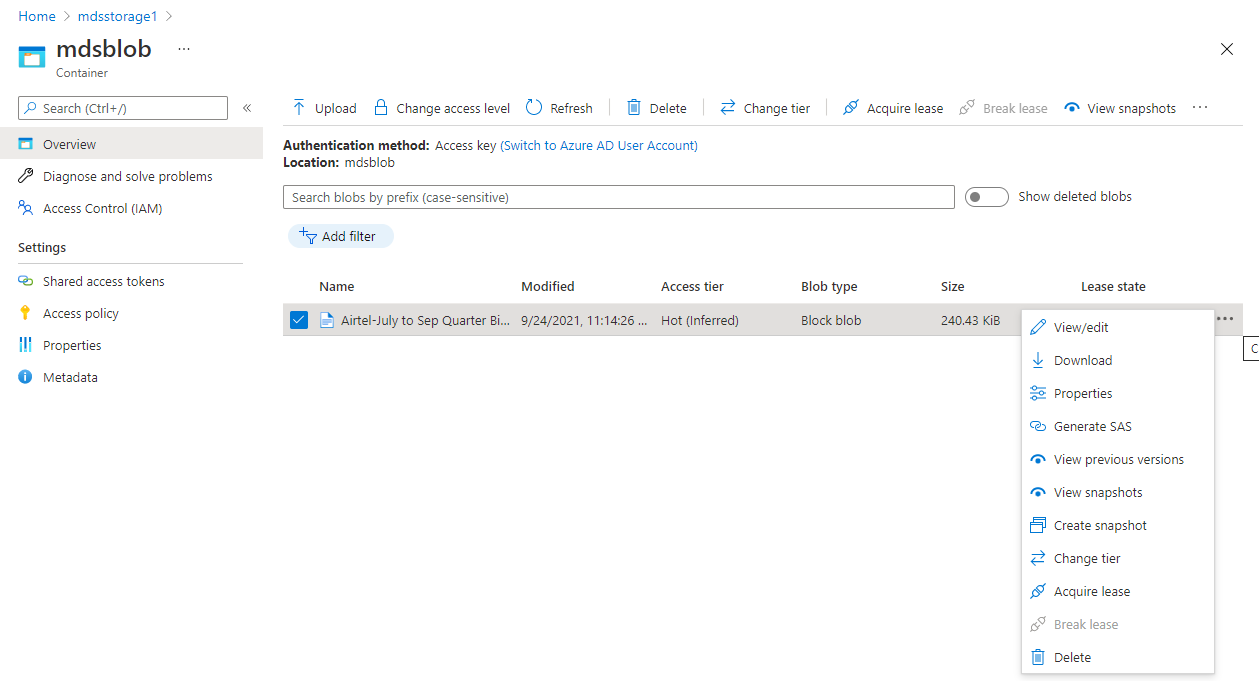
The above file has been uploaded on this container and can be accessed using the appropriate access policy. You can also see its properties and modify details by accessing the three dots given for this file in the last column. If you want to download this file then also you can click on three dots and hit the download option from the dropdown menu.
We can access this uploaded document directly using its URL. Click on the Properties option shown in the above image to display all properties of this file. You can see a dark red arrow showing beside its URL. You can copy that link and use it to access this file.
-
I have shown you how to create Azure blob storage and how to upload and access that file. You can also get the link to this container by accessing the Properties tab given under the Settings option in the left side pane of the above image. Here you will get all properties along with the URL of this container which can be used to access this data.


Conclusion
Azure blob storage is a cost-effective solution to store massive amounts of unstructured data in the cloud environment. It also offers various access tiers to manage store costs based on data accessibility. The blob storage is also used for SQL Server workloads to store database files or its backup files.

He loves to talk and write about database technologies. He has lead and delivered many projects from designing to deployments on Migrations to the cloud, heterogeneous migrations, Database consolidations, upgrades, heterogeneous replication, HA / DR solutions, automation, and major performance tuning projects.
You can also find him on LinkedIn
View all posts by Manvendra Singh
- Configure backup storage redundancy for Azure Cosmos DB account - May 15, 2024
- Difference between SQL SELECT UNIQUE and SELECT DISTINCT - January 16, 2024
- How to do a group by clause - April 12, 2023