

This article explores the SQL Server Schema Compare extension in the Azure Data Studio.
Introduction
We might have different copies of a database in different environments such as production, QA, development, etc. Sometimes we get a requirement to compare these databases for metadata such as tables, views, stored procedures, indexes and share the report with development teams. It helps to synchronize these databases and test the development codes.
You might think of using third-party tools such as Redgate SQL Compare, Apex SQL compare. We might use complex stored procedures for these schema comparisons.
Overview of Azure Data Studio
Azure Data Studio is a cross-platform tool with many useful extensions to make the DBA and developer life more comfortable. We have covered many such useful features in previous articles. Azure Data Studio provides SQL Server Schema Compare extension for comparison of .dacpac files and databases. It also provides an option to apply any difference from source to a target database.
Before we proceed with this article, you can go ahead and download the November release of Azure Data Studio for the appropriate OS from the link.
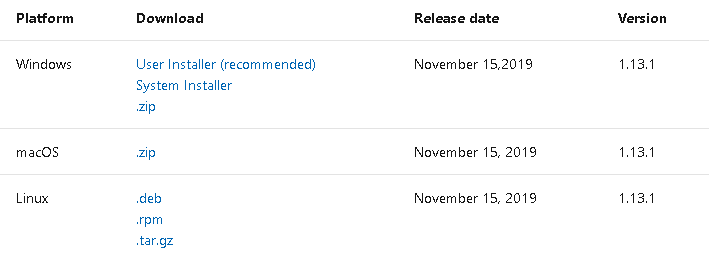
If you have previous versions of Azure Data Studio installed on your system, I would recommend you upgrade it to November release because it contains the General Availability of Schema Compare and SQL Server .dacpac extensions.
Test environment setup
For the demonstration in this article, let’s create two sample databases with the following script:
-
Create [SourceDB] and [TargetDB] in SQL instance
12345USE Master;CREATE DATABASE SourceDB;GOCREATE DATABASE TargetDB;GO -
Create a SQL table and stored procedure in both [SourceDB] and [TargetDB]
12345678910111213CREATE TABLE Employee(id INT IDENTITY,EmpName VARCHAR(50));GOCREATE PROC USP_EmpName(@EmpID INT)ASBEGINSELECT EmpNameFROM EmployeeWHERE id = @EmpID;END;GO
Install SQL Server Schema Compare extension
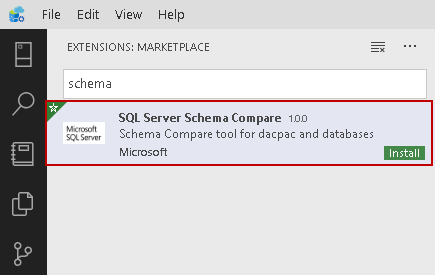
Search for Schema Compare extension in the Marketplace. You can see a white star in the upper left corner of extension that shows it is a recommended extension by Azure Data Studio:
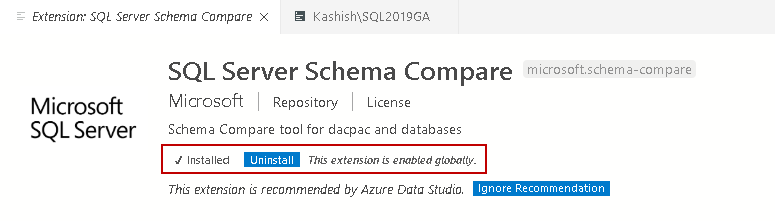
Click on the Install button, and it quickly installs the SQL Server Schema Compare. We do not need a restart of Azure Data Studio:
Explore Schema Compare extension
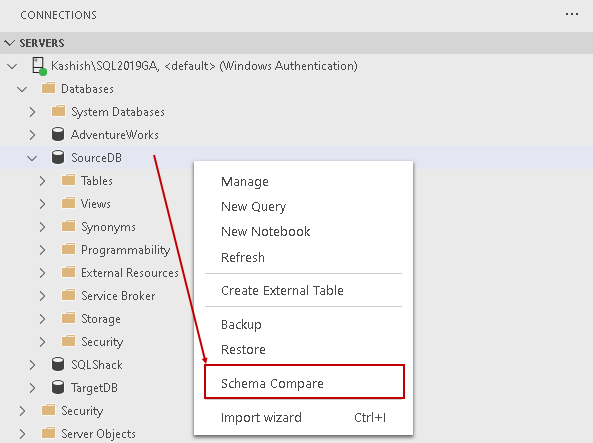
We can launch a Schema Compare extension from the database context menu.
Right-click on the source database and then choose Schema Compare:
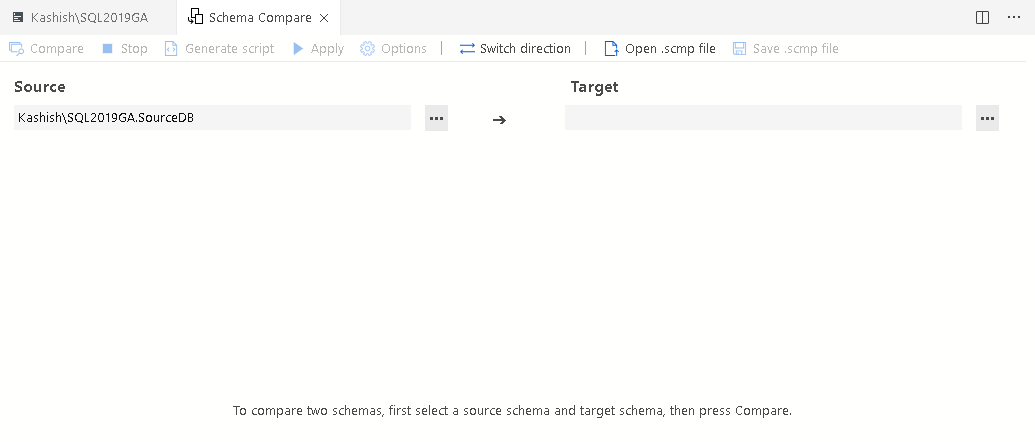
It launches Schema Compare with a populated source (source database from which we launched wizard) and blank target database:
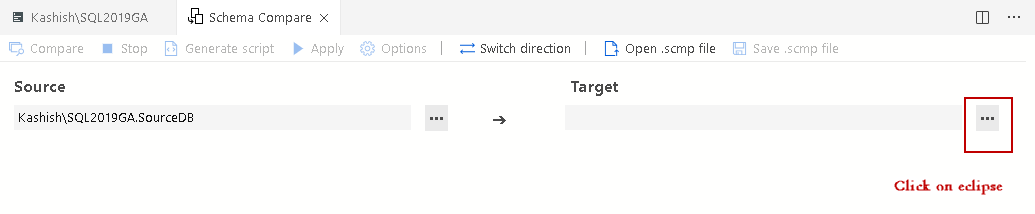
We need to right-click on the ellipsis near the target connection:
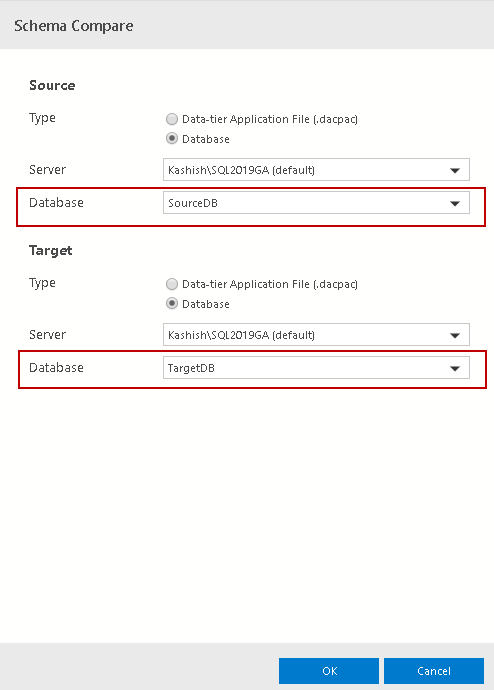
It opens the following Schema Compare window:

Here, you get options to compare databases or data-tier application files (DACPAC). We can compare the schema in the following ways:
|
Source |
Destination |
|
Database |
Database |
|
Database |
DACPAC file |
|
DACPAC file |
DACPAC file |
|
DACPAC file |
database |
Source (Database) to destination (Database) schema comparison
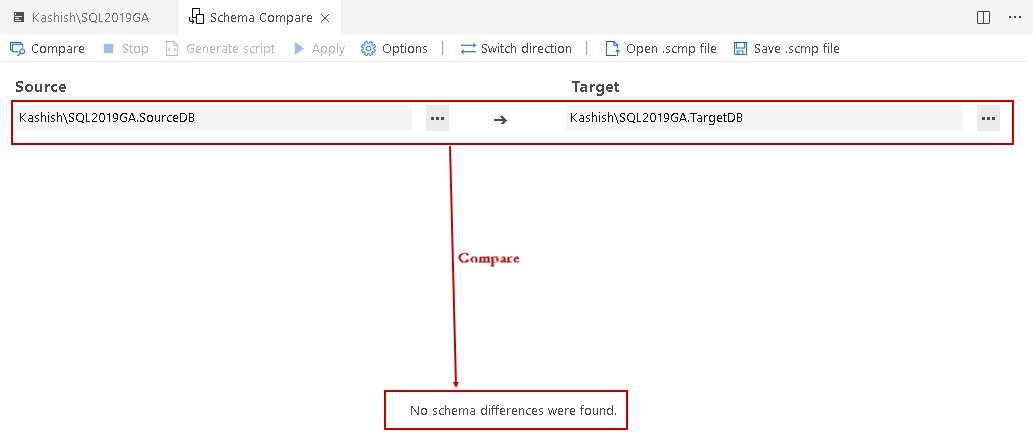
Let’s compare both source (SourceDB) and destination (TargetDB) database; we created earlier in the article:
Click OK, and we can see both source and target database details in the below screenshot:

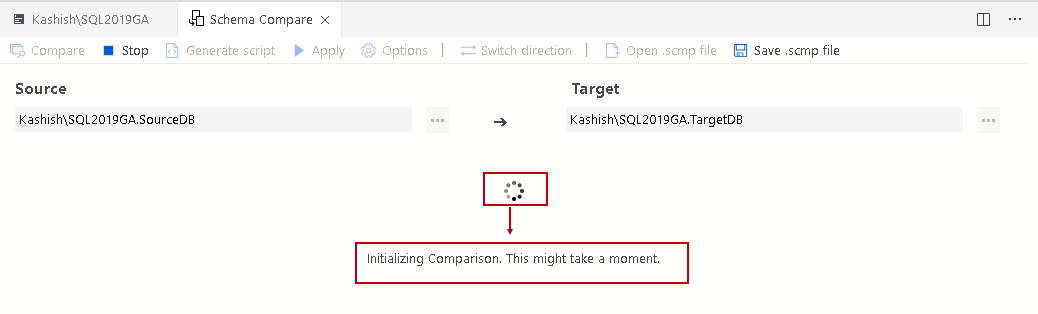
Click on Compare, and it starts the comparison, as shown below. It might take longer depending upon the database size and objects:
We do not see any schema difference between both the databases. Schema Compare also highlights no schema difference:

In the source database, let’s make the following changes:
-
Drop the existing table Employee and stored procedure [USP_EmpName]
12Drop table [dbo].[Employee]Drop procedure [dbo].[USP_EmpName] -
Create an Employee table with an additional column [EmpLocation]
1234CREATE TABLE [dbo].[Employee]([id] [INT] IDENTITY(1, 1) NOT NULL,[EmpName] [VARCHAR](50) NULL,[Country] [VARCHAR](30)); -
Create a Stored procedure to retrieve this additional column
12345678CREATE PROC [dbo].[USP_EmpName](@EmpID INT)ASBEGINSELECT EmpName,CountryFROM EmployeeWHERE id = @EmpID;END;GO
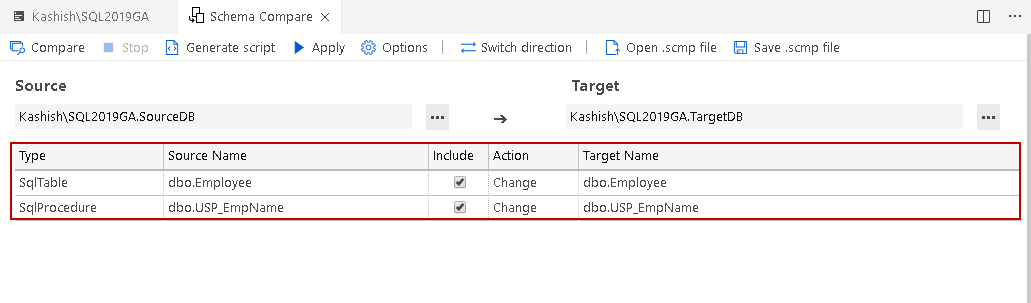
Again, click on Compare, and you can see the output in Azure Data Studio Schema Compare.
In the following screenshot, we can see it shows the difference in both the table and stored procedure:
Click on the table, and it shows the comparison details as per the following screenshot:
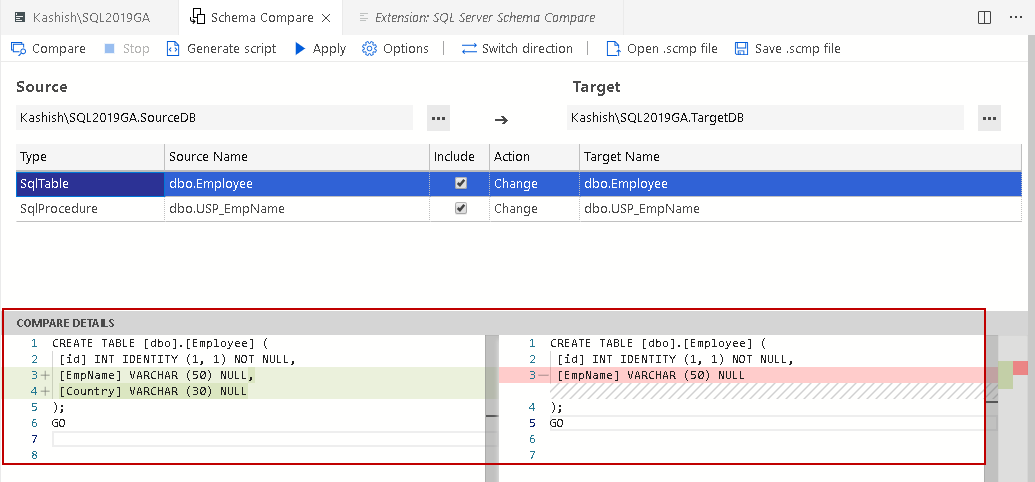
Here, we can see that the source table contains [EmpName] and [Country] columns while the target contains [EmpName] columns only.
Explore Schema Compare menu options
Let’s go over to menu options in Schema Compare extension of Azure Data Studio:

- Compare: As shown earlier, it is used to compare the source and target specified
- Stop: Schema comparison might take longer depending upon the schema and objects. We can stop the comparison using this button
-
Generate Script: We can use this option for generating the script of changes that we can directly apply to the target database. We cannot use this option while comparing two DACPAC’s
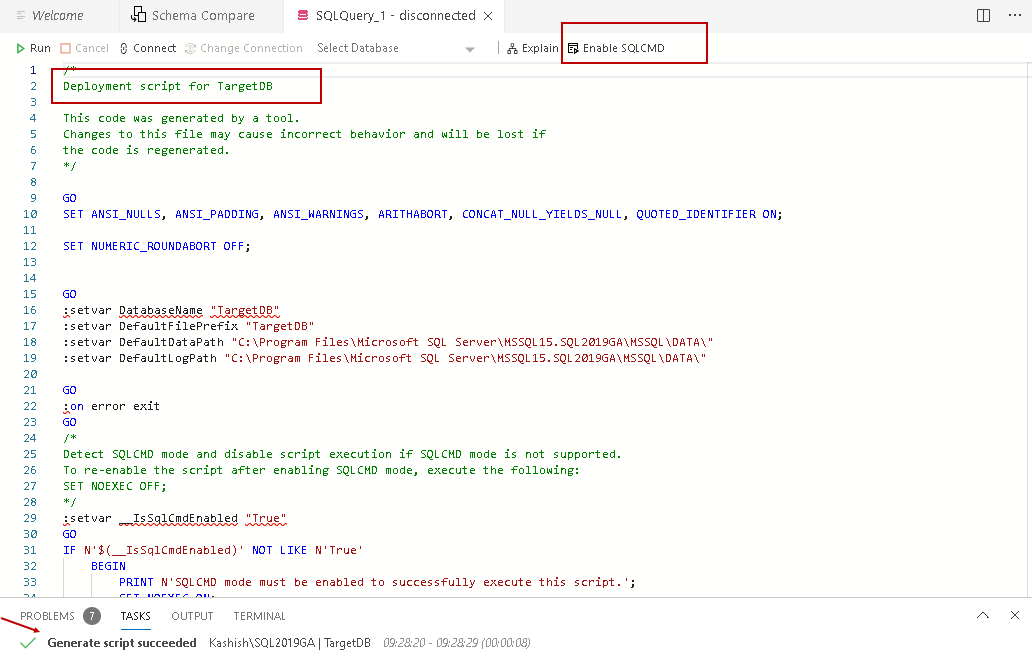
Let’s click on Generate script for the comparison we performed between the source and destination database. It generates the script for the targetDB

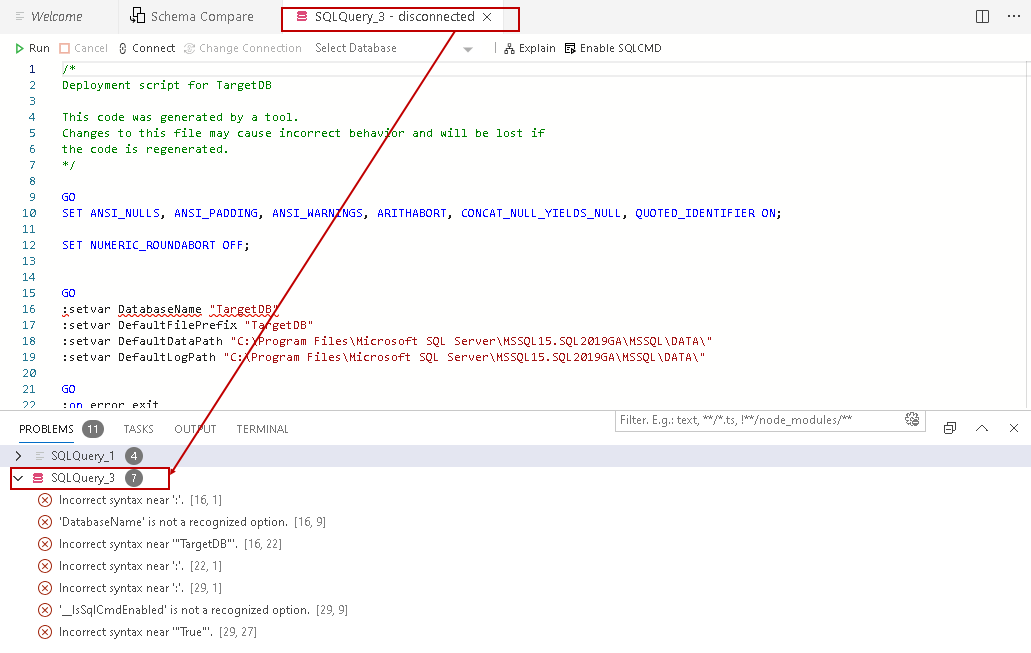
In the problem area, we can see problems with the line number, pointer to the line. We can click on any problem, and it takes you to a problematic line.
It might make you wonder why Azure Data Studio is generating a problematic code.
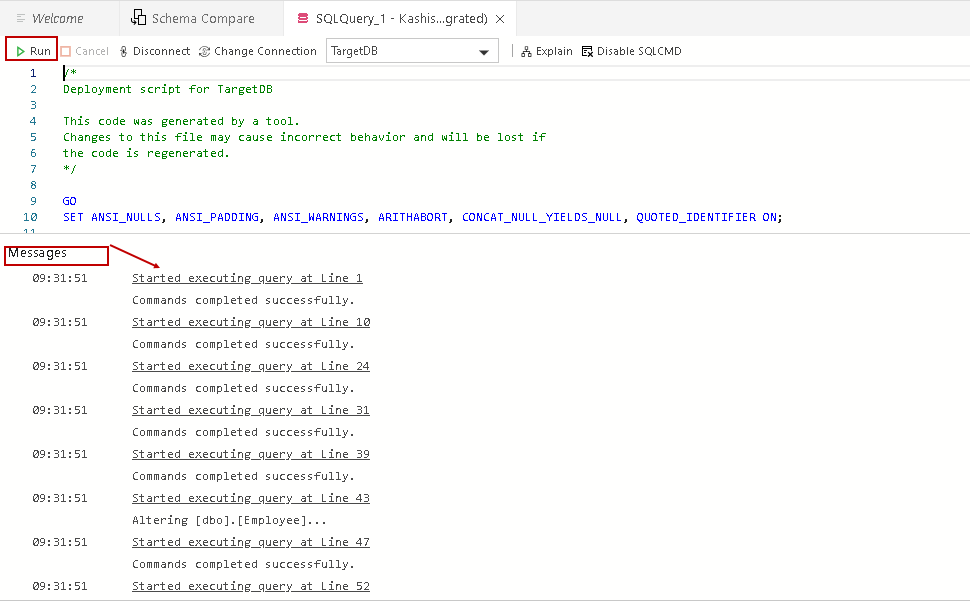
It is an SQLCMD code, and SQL Server does not recognize it. We can execute this script in SQLCMD mode only. Click on Enable SQLCMD as highlighted below. It changes the option from Enable SQLCMD to Disable SQLCMD:
Once we enable the SQLCMD mode, we do not see any problems for generating script:
Click on Run, and it executes the script in the target database:
After the applied script, both database schemas should be in synchronized status. Go back to Schema Compare and again start the comparison process for validation purposes. In the following screenshot, we can verify that there is no schema difference between the source and target database:
-
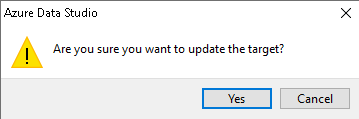
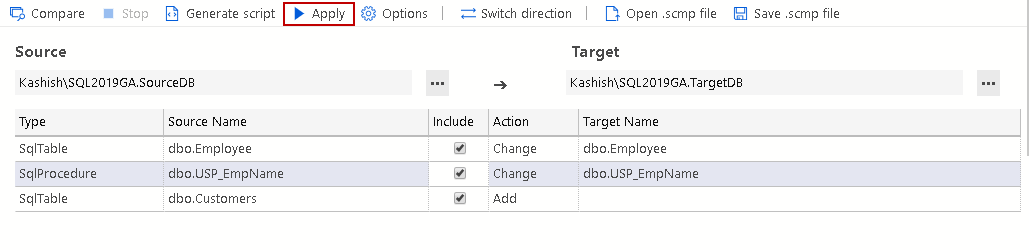
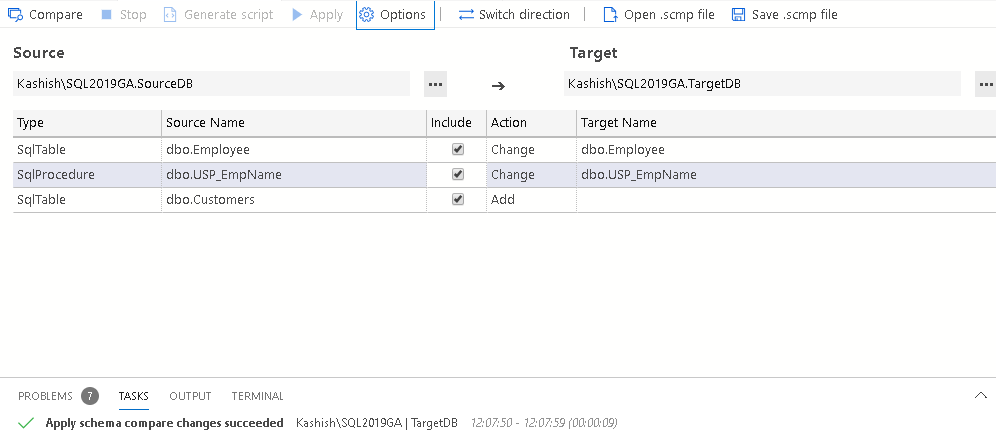
Apply: We can directly apply the changes in the target database using this option. Let’s click on it and verify it. Click on Yes in following the prompt dialog
In the Tasks, it gives the message that schema changes are successful
You can verify it by again generating the comparison report
-
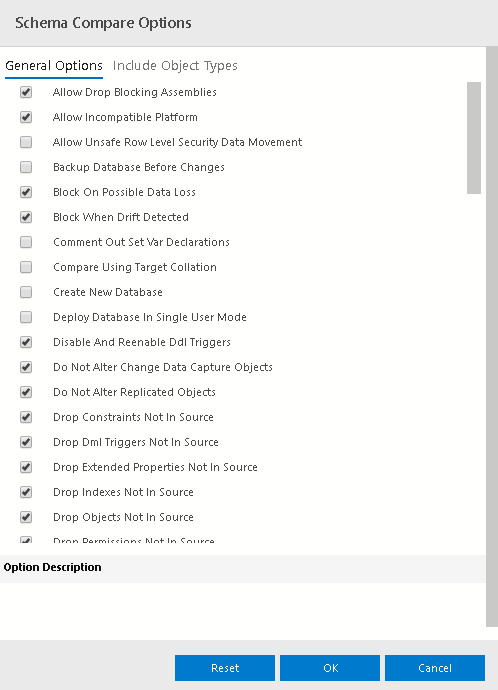
Options: We get multiple configuration options for schema comparison. For example, Block on possible data loss, Drop constraints not in source, ignore permissions, and ignore partitions. We should be careful while making changes in these rules as it might affect the schema comparison in both the databases and can generate inconsistent results
-
Switch Direction: It swaps the source and target connections. For example, at present, I have the following source and destination
Click on Switch direction. It swaps the connections and performs schema comparison as well. In the following screenshot, we can see swap connections. We do not see any differences in the schema; therefore, it gives a message that no schema differences were found:
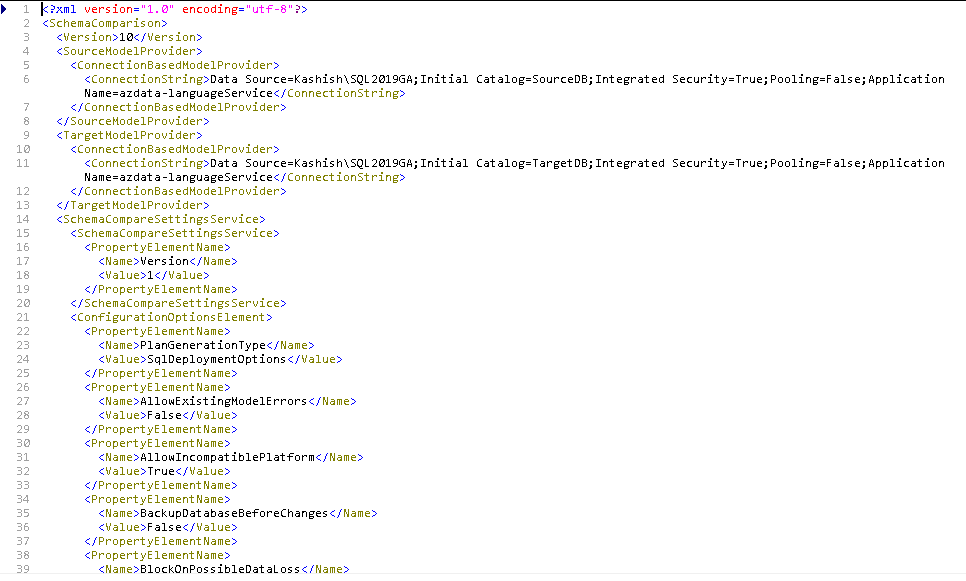
Open .scmp\Save .scmp: Schema comparison extension also allows you to save the comparison in a XML format. We can refer to this XML later once required. Click on Save. SCMP first and provide a location with a file name. The XML file looks like as shown below. It contains the version, source, target and the current state of all the options. We can open this .scmp file using the open .scmp option and provide the path of the file


Source (Database) to destination (.DACPAC) schema comparison
DACPAC file contains database model including all database objects like table, views, logins, and procedures. It is an abbreviation of the Data-tier Application package. You can read more about DACPAC in Microsoft docs.
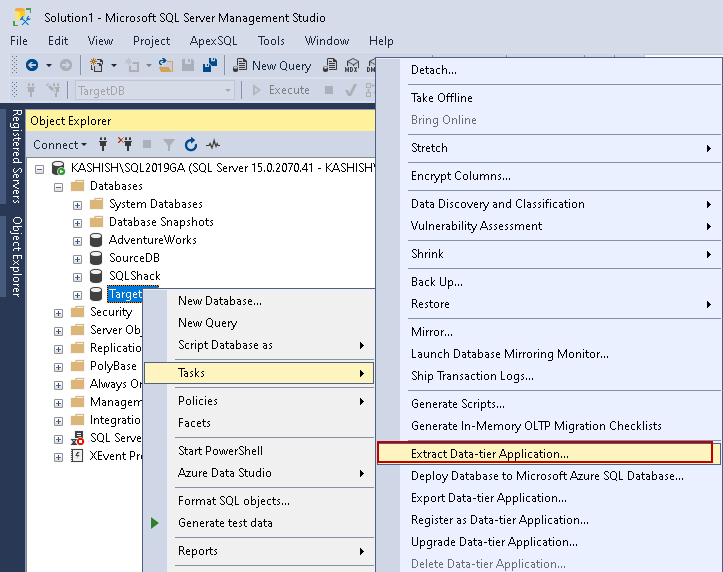
Let’s generate a DACPAC file for the target database. Connect to SQL instance in SSMS.
Right-click on the database |Menu |Tasks| Extract Data-tier Application:
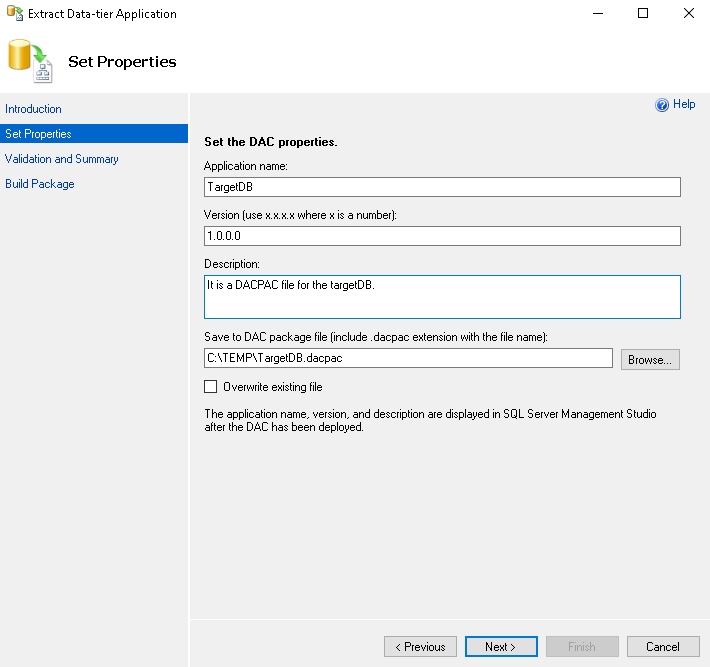
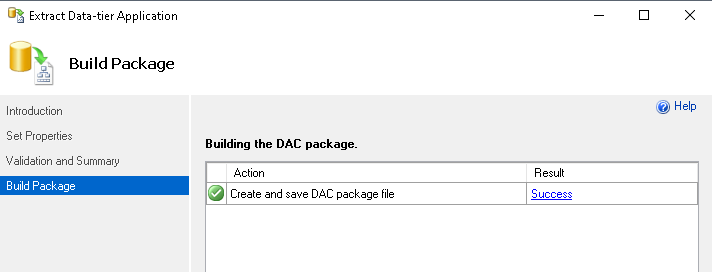
It opens the extract data-tier application wizard. It automatically takes input for application name, target version. Specify a location for this file and click on Next:
View the summary and click on Next:
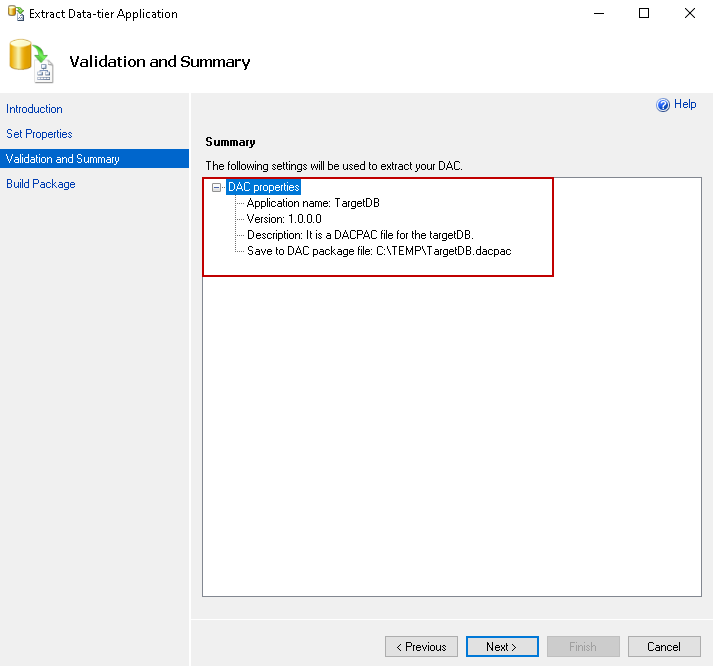
It creates and saves the DACPAC file in the destination directory:
Now go back to Schema Compare in Azure Data Studio and change the target to data-tier application package as shown below:
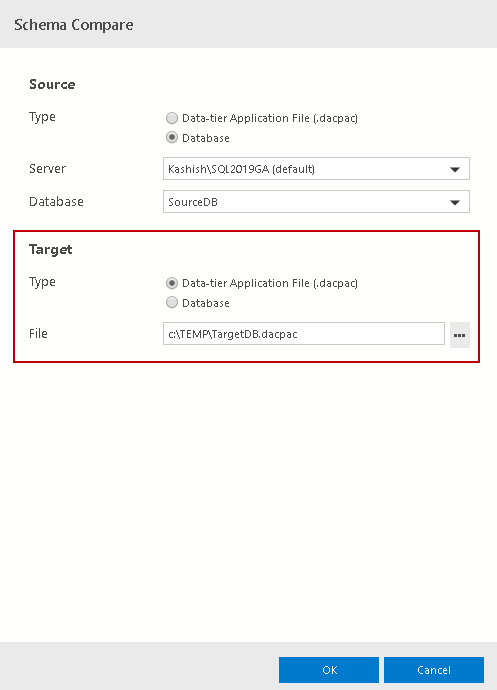
It gives a warning message because we want to compare schema from the source database to target a DACPAC file:

Click on Yes, and it starts the comparison process. We can see that it gives the comparison result similar to database schema comparison:
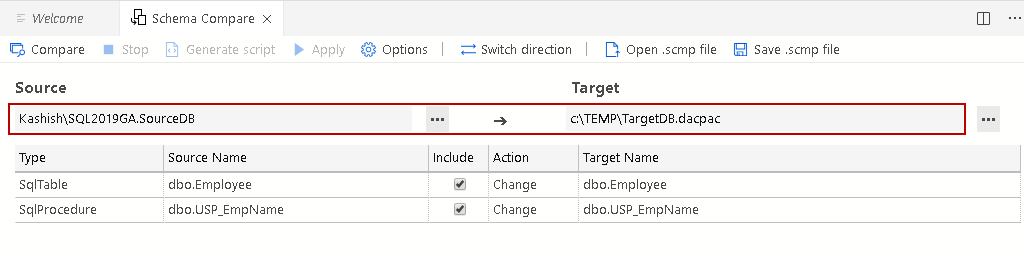
Let’s do a few more schema comparison tests. Previously, we compare the database with the same object with a difference in structure.
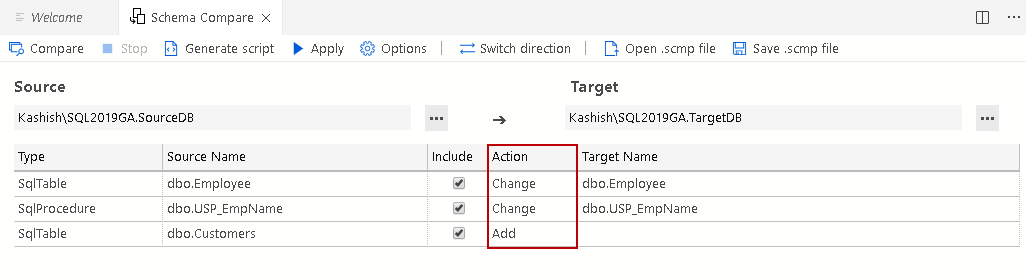
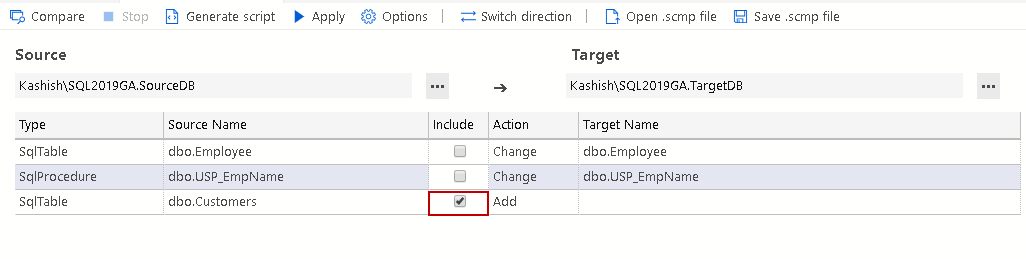
Now, add a new table in the SourceDB:
|
1 2 3 4 5 6 7 |
USE SourceDB; GO CREATE TABLE Customers (id INT, CustomerName VARCHAR(30), CustomerOrderID INT ); |
Go back to Azure Data Studio, start the Schema Compare wizard again between source and destination database and observe the result.
In the following screenshot, we can see two types of actions:
- Change: It shows that the object exists in both the source and target database. We need to execute alter statements on the target database for synchronization purposes
- Add: It shows that a particular object does not exist in the target database. We need to add this object to the target database for synchronization
Exclude an object in the schema synchronization process
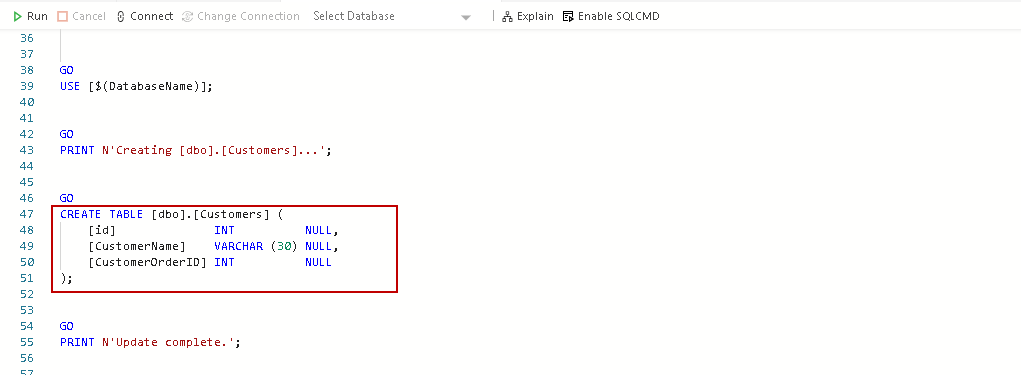
We can exclude a particular object in the synchronization process or generate a script wizard. Remove the check from include column for an object that we want to exclude.
In the following screenshot, we have excluded [Employee] and [USP_EmpName] objects:
Let’s generate the script, and in the script, we can see that it includes T-SQL for CREATE TABLE statement only:
Backup target database before making changes
It is always advisable to take a database backup before making any changes. It helps us to move back to the current state of the database if required.
We might want the Schema Compare extension to take care of this requirement. Click on Options in Schema Compare and put a check on the Backup Database Before Changes:
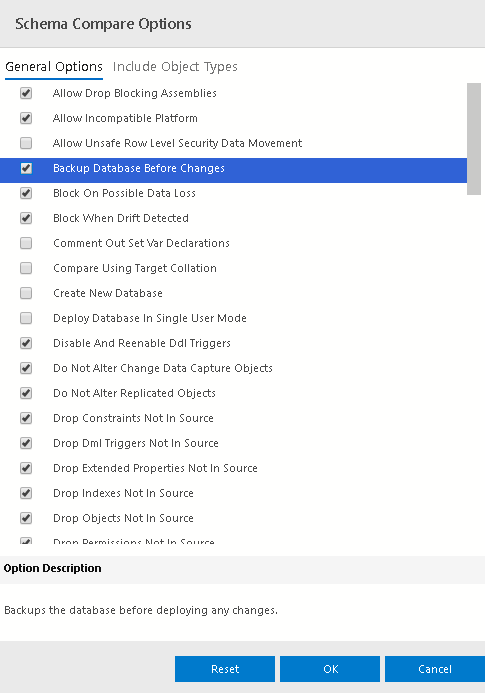
Click OK, and it gives the following warning message because the options have changed:

Click Yes, and it compares the schema with the modified option. Click Yes for applying the changes in the target database:
It applies the changes to the target database, but it is not as per our requirement, right?
We have enabled the option to take a database backup before making changes. We did not get any message or prompt for database backup.
Let’s check database backup history from the MSDB system database using the following query:
|
1 2 3 4 5 6 7 8 9 10 11 12 13 |
SELECT s.database_name, m.physical_device_name, s.backup_start_date, CASE s.[type] WHEN 'D' THEN 'Full' WHEN 'L' THEN 'Transaction Log' END AS BackupType, s.recovery_model FROM msdb.dbo.backupset s INNER JOIN msdb.dbo.backupmediafamily m ON s.media_set_id = m.media_set_id WHERE s.database_name = 'TargetDB'; |
We can see a full database backup in the default backup directory.
Note: You should be careful before enabling the backup option before making a change to the database. In the case of the vast database, we might face an issue due to backup drive space. It might also take longer as well for database backup:

Conclusion
In this article, we explored the Schema Compare extension in Azure Data Studio. We can compare databases, DACPAC files together using this extension. I find it useful, and you should give a try to compare objects without complex T-SQL or third-party tools.

I am the author of the book "DP-300 Administering Relational Database on Microsoft Azure". I published more than 650 technical articles on MSSQLTips, SQLShack, Quest, CodingSight, and SeveralNines.
I am the creator of one of the biggest free online collections of articles on a single topic, with his 50-part series on SQL Server Always On Availability Groups.
Based on my contribution to the SQL Server community, I have been recognized as the prestigious Best Author of the Year continuously in 2019, 2020, and 2021 (2nd Rank) at SQLShack and the MSSQLTIPS champions award in 2020.
Personal Blog: https://www.dbblogger.com
I am always interested in new challenges so if you need consulting help, reach me at rajendra.gupta16@gmail.com
View all posts by Rajendra Gupta
- Understanding PostgreSQL SUBSTRING function - September 21, 2024
- How to install PostgreSQL on Ubuntu - July 13, 2023
- How to use the CROSSTAB function in PostgreSQL - February 17, 2023