
SQL Server 2016 is the most advanced version of Microsoft’s Data Platform released yet. This is obviously my favorite one as it has tremendous capabilities and enormous features. These new additions not only enhance the productivity of its users (Database Developer, DBA or Application Developer), but also enable the enterprise to use its data more effectively and efficiently.
Microsoft SQL Server 2016 offer a lot of features and enhancements which cannot be covered in a single article. Though, in this article I will try to outline a couple of most useful T-SQL and SQL Server Engine Enhancements which are not commonly used, but they can make life of the user easier and boost up the enterprise productivity.
T-SQL is most used feature in the life of a DBA/Developer. Microsoft has focused on this part in almost every release of its SQL Server version.
Mentioned below are couple of T-SQL enhancements which are most useful for all DBAs/Developers but are rarely talked about.
1. The more flexible TRUNCATE TABLE:
TRUNCATE TABLE is not the favorite command of DBAs, especially while using the partitions. But that was history. Now, we can easily use the TRUNCATE TABLE in partitions to remove the data of specific partitions in a blink of an eye. Let me give you a small demo for this.
To test the scenario, we need to create a table with partition and put some data. Then we will try to remove data from a single partition using TRUNCATE TABLE.
Note: To benefit from this feature, you need to have all the indexes aligned to the partition.
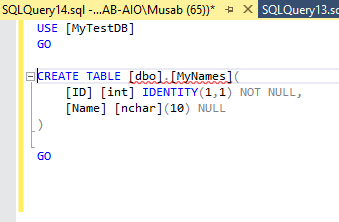
Create a Table with some columns:
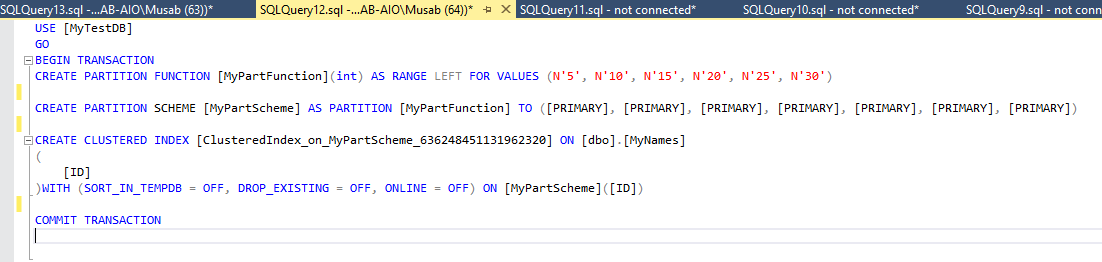
After creating the required schema, we can create Partition Function, Partition Scheme and create a Clustered Index on the table using the newly created Function and Scheme.
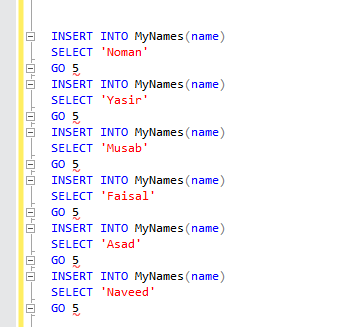
We have partitions (just for the demo we have small partitions but in your production you can test on large tables with huge partitions) with 5 rows each.
Now, we will insert some data with names of my friends, 5 times each.
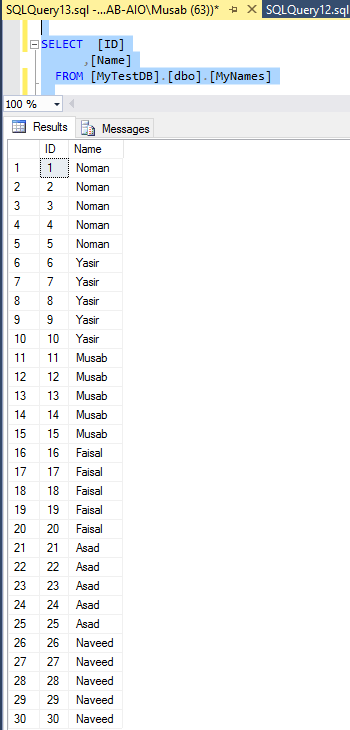
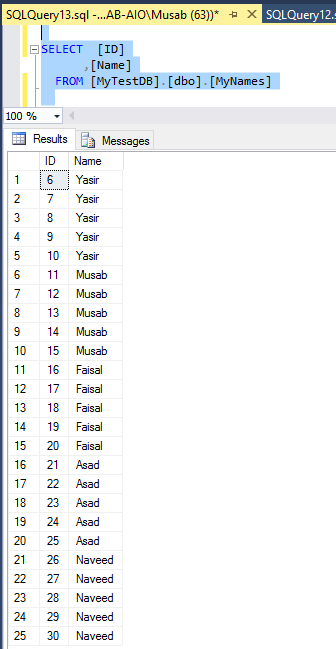
After the insert used above, we can see that the table is filled with sample data of 30 rows.
Now let’s see how the magic of TRUNCATE TABLE with PARITION Clause works!
For instance, we might have the requirement of removing the data of first partition containing “Noman” from the table completely. (Nothing is wrong with the name Noman, it’s just that Noman might not be with us anymore so we have to remove his name ).
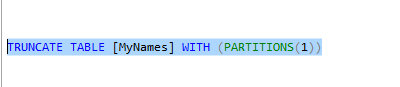
As we know that the first five rows are in the partition number 1 and we want to delete all those rows. To do this, we will use TRUNCATE TABLE with PARTITIONS clause.
The mentioned below command of TRUNCATE TABLE with PARTITIONS clause will remove only first partition’s data i.e. truncate the partition number one.
Note: We can use multiple Partition numbers in the PARTITIONS clause to delete data simultaneously for multiple partitions.
After the above statement executed successfully, we can see that all the rows in first partition are no longer in the table. And this is really a handy way to remove one partition’s data or even more partition numbers can be specified in this clause as per your requirements.
2. New String function for splitting
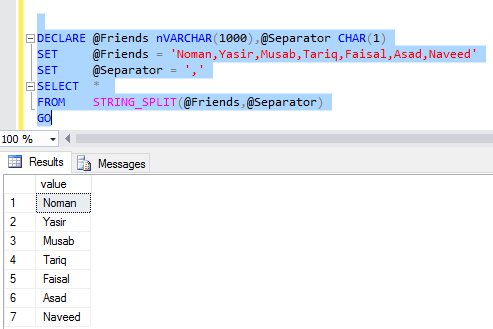
Every Database Administrator I know has his own string splitting function which he has written him in T-SQL or using some CLR functions. And generally I see a lot of functions in every environment. This is not very complex to implement but still in every new environment we might need to enable the CLR and deploy the DLL or even we might end up in re-writing what we already did.
With SQL Server 2016 the pain is over. You can simply use STRING_SPLIT table valued function to get a string split based on a separator.
The simplest example would be like this:
Though, there are endless ways you can use this T-SQL function but I will show you another useful feature of STRING_SPLIT which can be beneficial to Database or Application Developers.
Here I have used a string with random County names separated by Comma. I used the Table Valued Function STRING_SPLIT to join it with a table named “Countries”. The aim is to get all the countries in the Countries table which match the variable values.
This is one of the most common ways developer use to search items. Though, it’s not the best way but this is to show you that how flexible is the function and it can be used in multiple ways.
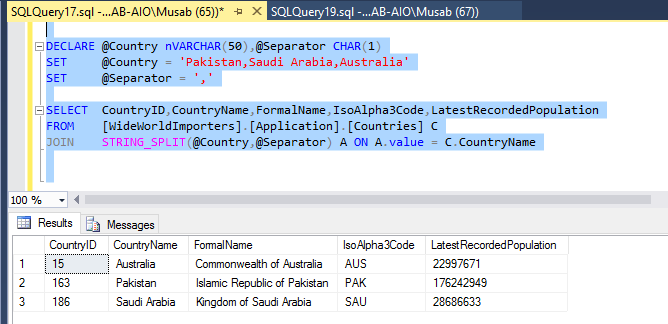
The Countries table is joined with STRING_SPLIT table valued function on the column “CountryName” from Countries table and column Value (the default column from the STRING_SPLIT function) from the STRING_SPLIT function. Based on this join, only values matching the string are returned.
Mentioned below are couple of enhancements which are done in the engine of Microsoft SQL Server 2016. These are also very useful but uncommon. These make the life of a DBA a lot easier and administration work more productive.
3. “Auto grow Single or All files” features at Database Level:
We all know that in large environments we have to use multiple data files. Ideally speaking, all the data files should grow in equal sizes. This is not directly supported by default in SQL Server 2014 and earlier editions.
Before SQL Server 2016, to make the files grow equally we used the Trace flag 1117. Now this is no more required and not even effective. The ALTER DATABASE command with AUTOGROW_SINGLE_FILE or AUTOGROW_ALL_FILES has the flexibility of using the Auto Growth for all or single file at File Group level.
Let’s have a small demo to see how it works.
I created a small database with 4 data files of 3 MB of equal size.
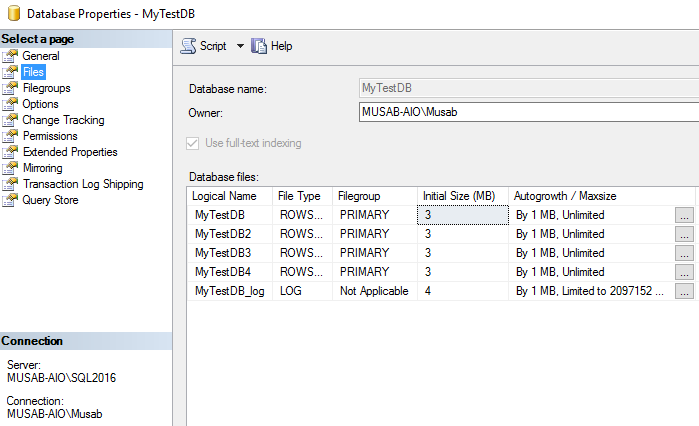
The current size of all the files are as follow

Now, let us update the database with AUTOGROW_SINGLE_FILE using the mentioned below command.
Note: Please note that all the mentioned below commands “altering the database” must be issued with no users connected to it. These command require exclusive lock on database.

Now, I have started to insert the data in the table using a loop. As soon as the files started to grow, the database files also expanded in Round Robin algorithm.
The file sizes looked like this after a while:

Here we can see that the files are growing one by one. The first & second files are of 4 MB while the 3rd & 4th are of 5MB. The files are incremented by 1 MB.
So, this was the behavior with single file size growth.
Note: This small size increment to data or log file is NOT recommended in production. This is just to show the demo for file growth. In Production environment always use a large file growth rate of at least 1 GB or more whichever is suitable.
Now we will see how the AUTOGRO_ALL_FILES will work. I will issue the mentioned below command on the same database.

After I started to insert data in the tables which were in the Primary file group, all files started to grow in parallel.

So, here we can see that all the files are growing equally and this is the result of AUTOGROW_ALL_FILES.
The AUTOGROW_SINGLE_FILE is enabled by DEFAULT on user databases and AUTOGROW_ALL_FILES is enabled by default on TEMPDB. This is really helpful as we always have to do this after a while on production database servers with high volume of data.
Microsoft is using the industry led best practices to be defaults, making the database servers run faster from day 1 and for a long time period. Though there are a lot of other configurations which depends upon the environment and needs expert judgment and detailed knowledge of the load on the server.
4. Controlling CPU Usage for DBCC CHECKDB, CHECKTABLE & CHECKFILEGROUP.
CHECKDB, CHECKTABLE & CHECKFILEGROUP are some of the most important features for Database Administrators which they use for checking the integrity of databases. But normally we do not get enough downtime or resources to run it on production servers. This is because the commands are Resource Intensive and we cannot control the resource allocation for them. This is the story for Microsoft SQL Server 2014 and earlier versions.
Now, we have the ability to change how many processors are being used by these commands. By default, these commands use all the processors available in the session based on Resource Governor or the Server Level MAXDOP Settings. But now SQL Server 2016 (and SQL Server 2014 SP2) enables users to use MAXDOP settings for individual commands.
The examples mentioned below are for executing DBCC CHECKDB for the sample database WideWorldImporters. These commands are executed one by one. You can see the difference between the CPU and elapsed time.

Even on my low-end machine with a 3 GB database, it made a 5 seconds difference. Just see the flexibility we can have with these commands.
The CHECKDB with MAXDOP 1 took less CPU and more time but the same command with MAXDOP 0 (which means the command will use all available processors) took more CPU but less time.
So, now we can control the execution behavior of CHECKDB. CHECKTABLE & CHECKFILEGROUP commands and optimize according to our enterprise requirement.
He has 9+ Years of Database Development & Administration experience with Medical Billing, Startup & Financial Companies. He is a Microsoft Certified Expert for Data Platform (SQL Server 2012/2014).
Currently, performing duties as Senior SQL Server Consultant at multiple Saudi Private and Governmental Organizations.
View all posts by Musab Umair
- How to identify slow running queries in SQL Server - May 31, 2017
- Adaptive Query Processing in SQL Server 2017 - April 28, 2017
- What is the SQL Server Virtual Log file and how to monitor it - April 26, 2017