

In this article, we will go deeply through the INSERT INTO statement by showing the different syntax formats and usage scenarios for that statement.
The T-SQL language is a rich database programming language that provides us with a large number of dynamic statements and functions that help us to perform any functionality in different ways, based on our development skills.
Usage
The INSERT INTO T-SQL statement is used mainly to add one or more rows to the target table or view in SQL Server. This can be done by providing constant values in the INSERT INTO statement or provide the source table or view from which we will copy the rows.
Syntax
The INSERT INTO T-SQL statement has a dynamic syntax that fits all types of data insertion processes. For a detailed view of the INSERT INTO T-SQL statement, check the Microsoft INSERT INTO documentation.
The INSERT INTO T-SQL statement syntax that is used to insert a single row into a SQL Server database table or view is like:
INSERT INTO table (column1, column2, … )
VALUES (expression1, expression2, …);
And the INSERT INTO statement syntax that is used to insert multiple rows from a source database table is like:
INSERT INTO table (column1, column2, … )
SELECT expression1, expression2, …
FROM source_tables
[WHERE conditions];
From the previous syntax statements:
- The table is the name of the target table that the rows will be inserted into
- Column1, column2 are the names of the columns in the target table that will be filled with the provided values
- The expression1, expression2 are the values that will be assigned to the mentioned columns in the target table based on the provided order. Take into consideration that you should provide the values for all NOT NULL columns in the target table, and optionally provide values for NULL columns
- The source_tables is the name of the table from which the values will be copied and inserted into the target table. These values will be filtered based on the provided WHERE conditions
- The INTO keyword of the INSERT INTO statement is optional
Getting started
For this demo purposes, we will create a new testing table, that contains an IDENTITY column, NULL, and NOT NULL columns, and we will perform the changes gradually on that table to cover most of the common use cases for the INSERT INTO T-SQL statement.
The demo table can be created using the CREATE TABLE T-SQL statement below:
|
1 2 3 4 5 6 7 8 9 |
CREATE TABLE InsertDemo ( ID INT IDENTITY PRIMARY KEY, StName NVARCHAR (100) NOT NULL, StBirthDate DateTime NOT NULL, StGrade int NULL, StAddress NVARCHAR (MAX) NULL, StParentsPhone VARCHAR(25) NOT NULL ) |
Examples
The simple way to use the INSERT INTO statement to add a new record to the created table is providing the values in constant format, where the values will be provided for all NULL and NOT NULL columns, except for the auto-generated columns, in the correct order for the columns in the target table, as in the T-SQL statement below:
|
1 2 |
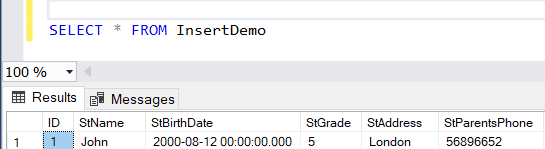
INSERT INTO InsertDemo VALUES ('John','2000-08-12',5,'London','56896652') |
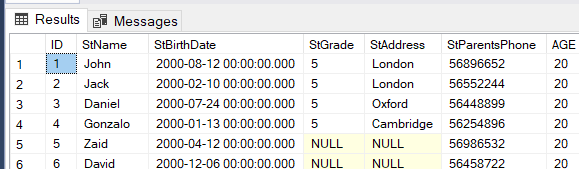
Checking the inserted row in the target table, you will see that the record is inserted successfully and assigned an auto-generated ID value of 1, as shown below:
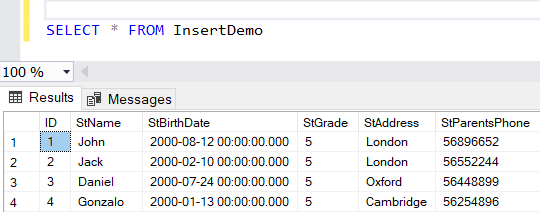
To insert multiple records in the same INSERT INTO statement, instead of writing multiple insert statements, we can provide the values for each row in comma-separated format, as in the T-SQL statement below that inserts a new three rows to the demo table:
|
1 2 3 4 |
INSERT INTO InsertDemo VALUES ('Jack','2000-02-10',5,'London','56552244') ,('Daniel','2000-07-24',5,'Oxford','56448899') ,('Gonzalo','2000-01-13',5,'Cambridge','56254896') |
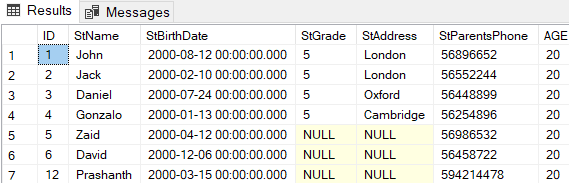
Checking the table for the newly inserted rows, you will see that a new three records are inserted into the target table, and assigned auto-incremented ID values, as shown below:
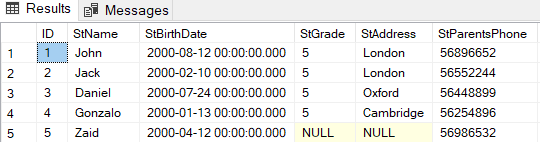
In order to insert values for specific columns only, we should mention the name of these columns and provide the values for these columns in the same order as in the columns list, taking into consideration that all NOT NULL columns are listed and assigned values, as in the T-SQL statement below:
|
1 2 |
INSERT INTO InsertDemo (StName,StBirthDate,StParentsPhone ) VALUES ('Zaid','2000-04-12','56986532') |
In the target table, you will see that a new row is inserted with the assigned columns’ values and NULL value for the NULL columns that are not mentioned in the columns list of the INSERT INTO T-SQL statement, as shown below:
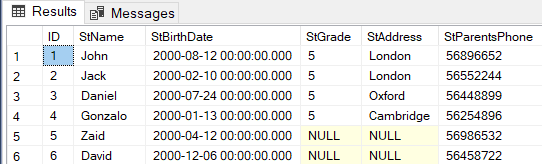
You can also provide the list of columns in the INSERT INTO statement in a different order from the order of the columns in the target table, making sure that you assign values for the columns in the same order as listed in the INSERT INTO statement, as in the T-SQL statement below:
|
1 2 |
INSERT INTO InsertDemo (StParentsPhone, StName ,StBirthDate) VALUES ('56458722', 'David','2000-12-06') |
And the record will be inserted successfully, with the correct value assigned for each column, as shown below:
If you try to assign values to the name and birthdate columns only in the INSERT INTO T-SQL statement, as in the below statement:
|
1 2 |
INSERT INTO InsertDemo (StName ,StBirthDate) VALUES ( 'Swathi','2000-11-04') |
The statement execution will fail, as you should assign value for the phone number NOT NULL column in the INSERT INTO T-SQL statement, recalling that all NOT NULL columns are mandatory columns, as shown in the error message below:

Let us modify the target table by adding a new computed column that is used to calculate the age of each student, as shown below:
|
1 2 |
ALTER TABLE InsertDemo ADD AGE AS DATEDIFF(YEAR, StBirthDate, GETDATE()) GO |
Remember that, the computed column value will be calculated automatically based on the defined equation, without being able to insert that value explicitly.
Checking the target table’s data again, you will see that the age is calculated automatically for all students, as shown below:
If you try to insert explicit value for the computed column, using the INSERT INTO statement below:
|
1 2 |
INSERT INTO InsertDemo (StName ,StBirthDate,StParentsPhone,AGE) VALUES ( 'Prashanth','2000-03-15','594214478',12) |
The statement execution will fail, showing that you cannot modify the automatically calculated value of the computed column, as shown below:

Also, if you try to insert explicit value for the ID column, with IDENTITY property, that is automatically incremented and generated, as in the INSERT INTO statement below:
|
1 2 |
INSERT INTO InsertDemo (ID,StName ,StBirthDate,StParentsPhone) VALUES (12, 'Prashanth','2000-03-15','594214478') |
The INSERT statement execution will fail, showing that you cannot insert explicit value for the identity column, that is automatically generated, as in the error message below:

In order to allow inserting an explicit value for the identity column, we need to enable the IDENTITY_INSERT property before executing the INSERT INTO statement and disable it after inserting the value, making sure that you mention the name of all NOT NULL columns and the identity column, and assign values for the for all these columns in the correct order, as in the T-SQL statement below:
|
1 2 3 4 |
SET IDENTITY_INSERT InsertDemo ON INSERT INTO InsertDemo (ID,StName ,StBirthDate,StParentsPhone) VALUES (12, 'Prashanth','2000-03-15','594214478') SET IDENTITY_INSERT InsertDemo OFF |
And the new row will be inserted successfully with the explicitly provided identity value. Providing an explicit value for the identity column is not highly recommended unless you plan to copy a record to another table with the same identity value, as it will make a gap in the identity values and will start counting after the provided ID value, as shown below:
Let us modify the target table again, by adding a new uniqueidentifier NULL column, taking into consideration that we should provide a default value to be assigned to the existing columns in case we plan to add the GUID column as NOT NULL. The new column can be added using the ALTER TABLE T-SQL statement below:
|
1 |
ALTER TABLE InsertDemo ADD STD_Guid uniqueidentifier |
The uniqueidentifier column can be assigned values using the NEWID() built-in function that generates a unique value at each call, which can be easily used in the INSERT INTO statement, as below:
|
1 2 |
INSERT INTO InsertDemo (STD_Guid, StName ,StBirthDate,StParentsPhone) VALUES (NEWID(), 'Johnson','2000-05-12','59785425') |
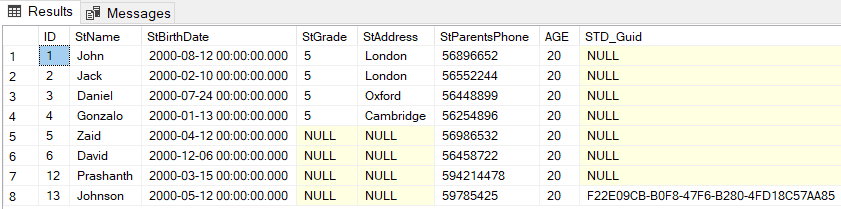
Checking the target table, you will see that a NULL value is assigned to that GUID column for all previously existing columns, and a unique GUID value assigned to the newly inserted column, using the NEWID() function, as shown below:
The INSERT INTO statement can be used to add values to the target table from another source table, in which you need to provide the list of columns in the target table and the related columns from the source table that have the values to be assigned to the target table columns, as in the T-SQL statement below:
|
1 2 3 4 5 6 |
INSERT INTO [dbo].[InsertDemo] (STD_Guid, StName ,StBirthDate,StParentsPhone) SELECT TOP (10) P.[rowguid], P.[FirstName] + P.[MiddleName] + P.[LastName] AS StName, P.[ModifiedDate], PP.PhoneNumber FROM [Person].[Person] P JOIN [Person].[PersonPhone] PP ON P.BusinessEntityID=PP.BusinessEntityID WHERE P.[FirstName] + P.[MiddleName] + P.[LastName] IS NOT NULL and PP.PhoneNumber IS NOT NULL |
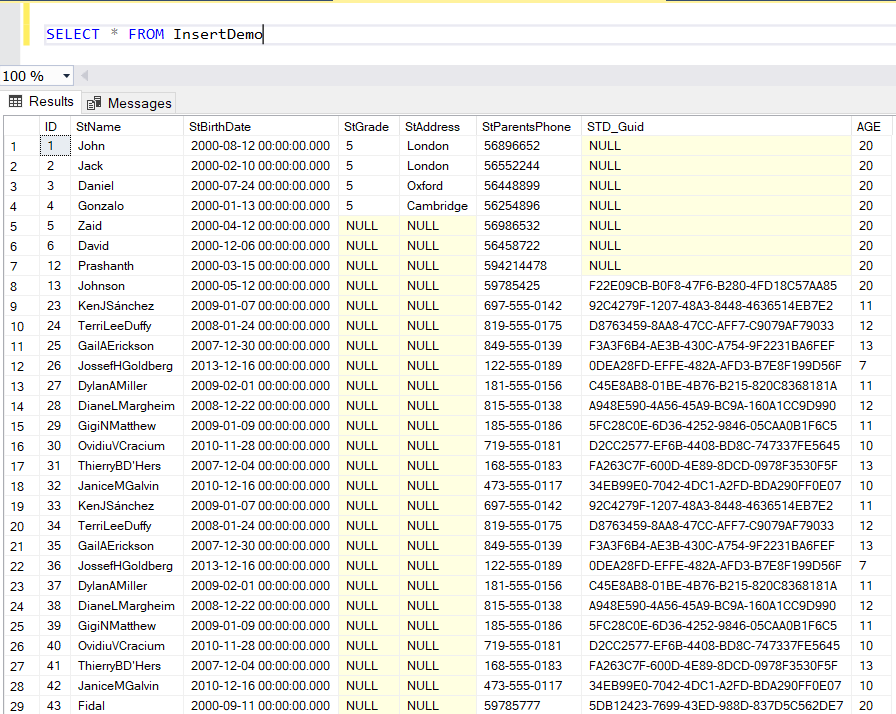
The previous INSERT INTO statement is used to copy 10 records from two source tables based on the provided logic, and the inserted records will be as below:

We can modify the previous INSERT INTO statement by controlling the number of inserted columns using the TOP option in the INSERT clause rather than controlling it in the SELECT statement from the source table, as shown below:
|
1 2 3 4 5 6 |
INSERT TOP (10) INTO [dbo].[InsertDemo] (STD_Guid, StName ,StBirthDate,StParentsPhone) SELECT P.[rowguid], P.[FirstName] + P.[MiddleName] + P.[LastName] AS StName, P.[ModifiedDate], PP.PhoneNumber FROM [Person].[Person] P JOIN [Person].[PersonPhone] PP ON P.BusinessEntityID=PP.BusinessEntityID WHERE P.[FirstName] + P.[MiddleName] + P.[LastName] IS NOT NULL and PP.PhoneNumber IS NOT NULL |
And the 10 records will be copied from the source table and inserted to the inserted table, as shown in the result below:
INSERT INTO statement can also be used to add rows to a database table located in a remote server using the OPENQUERY statement when there is a linked server to connect to that remote SQL Server or using OPENDATASOURCE statement using a specific connection string, as in the T-SQL statement below:
|
1 2 3 4 |
INSERT INTO OPENDATASOURCE('SQLNCLI', 'Data Source= .; Integrated Security=SSPI') .AdventureWorks2016.dbo.InsertDemo (STD_Guid, StName ,StBirthDate,StParentsPhone) VALUES (NEWID(), 'Fidal','2000-09-11','59785777') ; |
And the new record will be inserted to that remote database table, as shown below:
It is beneficial to mention that the OUTPUT clause can be used with the INSERT INTO statement to retrieve information from about each row added by the executed INSERT statement. This information can be used later as a confirmation message from the application or for data archiving purposes.
In the example below, we create a temp table to store the inserted students’ names, as in this T-SQL statement:
|
1 2 3 4 5 6 7 |
CREATE TABLE #InsertAudit (StName NVARCHAR (100)) INSERT INTO InsertDemo (STD_Guid, StName ,StBirthDate,StParentsPhone) OUTPUT INSERTED.StName INTO #InsertAudit VALUES (NEWID(), 'Doni','2000-07-10','59785887') GO SELECT * FROM #InsertAudit |
Querying the temp table, the inserted student name will be displayed, as below:


He is a Microsoft Certified Solution Expert in Data Management and Analytics, Microsoft Certified Solution Associate in SQL Database Administration and Development, Azure Developer Associate and Microsoft Certified Trainer.
Also, he is contributing with his SQL tips in many blogs.
View all posts by Ahmad Yaseen
- Azure Data Factory Interview Questions and Answers - February 11, 2021
- How to monitor Azure Data Factory - January 15, 2021
- Using Source Control in Azure Data Factory - January 12, 2021