Introduction
Microsoft SQL Server 2014 is considered to be the first version that supports Hybrid Cloud by adding a lot of exciting new features.
In this article, I will cover some of the top new features in these main points including Hekaton and Hybrid Cloud enhancements:
Hekaton
Hekaton is the code name of the new feature of In-Memory OLTP. It is a new database engine, fully integrated with SQL server and designed to enhance memory resident data and OLTP workloads. In simple words, with Hekaton we can store the entire table in memory.
Let’s list some of the benefits of this new feature:
- Memory-Optimized-Tables can be accessed using T-SQL like Disk-Based-Tables.
- Both of Memory-Optimized-Tables and Disk-Based-Tables can reference in the same query, and also we can update both types of tables by one transaction.
- Stored procedures that only reference Memory-Optimized-Tables can natively compile into machine code which results in improving performance.
- This new engine designed for a high level of session concurrency for OLTP transactions.
There are still some limitations for Memory-Optimized-Tables in SQL server 2014 which are:
- ALTER TABLE statement, SP_RENAME stored procedure, ALTER BUCKET_COUNT statement, and add\remove index outside statement of CREATE TABLE, all of these not supported by In-Memory table
- Some constraints not supported like (CHECK, FOREIGN KEY, UNIQUE)
- RANGE INDEXES and TRIGGERS not supported by In-Memory table
- REPLICATION, MIRRORING, and LINKED SERVERS are incompatible with Memory-Optimized-Tables.
To know more information, you can check SQL Server Support for In-Memory OLTP.
Memory-Optimized-Tables are appropriate for the following scenarios:
- A table has a high insertion rate of data from multiple concurrent sources
- A table cannot meet scale-up requirements for high performance of reading operations especially with periodic batch inserts and updates
- Intensive logic processing inside a stored procedure
- A database solution cannot achieve low latency business transaction
Let’s now go through the steps to create a Memory-Optimized-Table
-
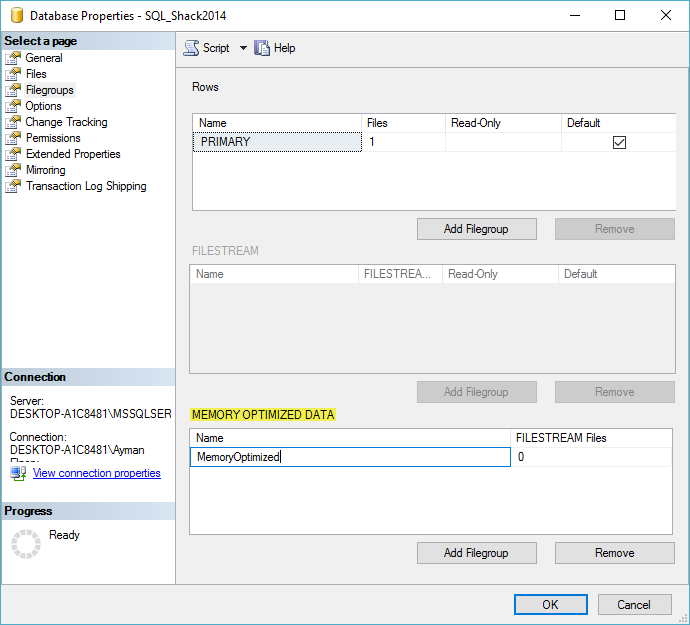
First of all, we must create an MEMORY-OPTIMIZED-DATA filegroup as shown in figure 1:

Figure 1 – Creating MEMORY-OPTIMIZED-DATA file group Note: You can’t create more than one MEMORY-OPTIMIZED-DATA filegroup at the same database.
Then, we will add a file to this filegroup. Also, we can implement this step using the following code:
1234567891011USE [master]GOALTER DATABASE [SQL_Shack2014]ADD FILEGROUP [MemoryOptimized] CONTAINS MEMORY_OPTIMIZED_DATAGOALTER DATABASE [SQL_Shack2014]ADD FILE (NAME = N'MemoryOptimizedHekaton2014', FILENAME = N'D:\MemoryOptimizedHekaton2014')TO FILEGROUP [MemoryOptimized]GO -
Create a MEMORY-OPTIMIZED-TABLE using the following code as example:
12345678910111213141516USE [SQL_Shack2014]GOSET QUOTED_IDENTIFIER ONGOCREATE TABLE DailyWorkRate(WorkRateID int NOT NULL,WorkRateDate datetime NOT NULL,WorkCode nchar (3),WorkAverageRate money NOT NULL,EndOfWorkDayRate money NOT NULL,WorkModifiedDate datetime NOT NULL,CONSTRAINT PK_DailyWorkRate_WorkRateID PRIMARY KEY NONCLUSTERED HASH (WorkRateID) WITH (BUCKET_COUNT = 1024),) WITH (MEMORY_OPTIMIZED = ON, DURABILITY = SCHEMA_AND_DATA)GOHybrid Cloud enhancements
Hybrid Cloud is a cloud computing environment that uses a mix of On-premises private cloud and public cloud platforms.
SQL server 2014 provides this feature through three new solutions:
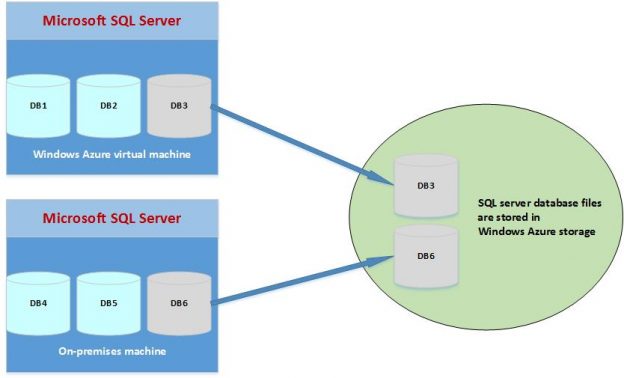
1. Data files in Windows Azure
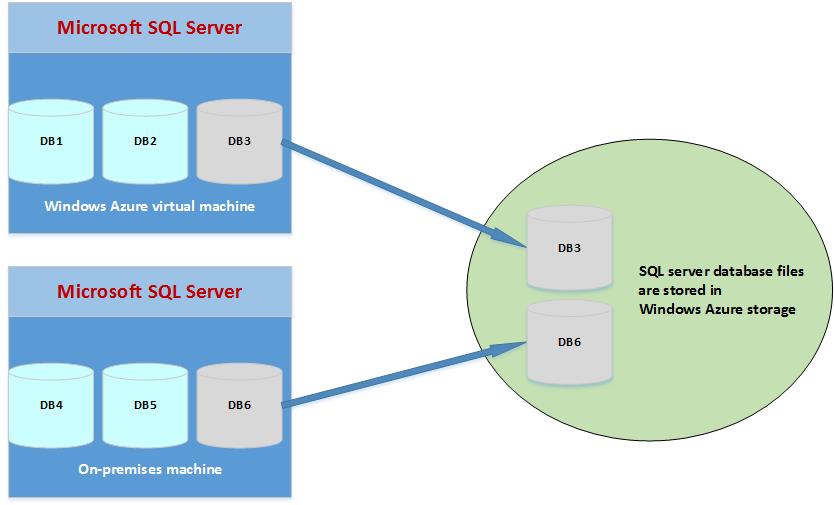
Means that now, we can have databases created in an on-premises or in a Windows Azure virtual machine which its data and log files stored in windows azure storage.
Figure 2 – SQL Server Data Files in Windows Azure So we can move our storage to the cloud while keeping all transactions running on the local server, which gives us the following benefits:
- Less downtime and easy migration
- Less cost and more storage for large environments
- Easier high availability and disaster recovery solutions
- Separates the compute instance from the storage instance which means we can use Transparent Data Encryption (TDE) certificates which are stored locally in the master database to encrypt all data that resides on the public cloud
We can use the following code to create a database whose files will be stored on a Windows Azure storage container and policy that generated a Shared Access Signature (SAS) key:
1234567891011121314-- Create a credentialCREATE CREDENTIAL [https://.......]WITH IDENTITY='SHARED ACCESS SIGNATURE',SECRET = 'your SAS key'-- Create database with data and log files in Windows Azure container.CREATE DATABASE testdbON(NAME = SQL_SHACK,FILENAME = N'https://......../SQL_SHACK.mdf')LOG ON(NAME = testdb_log,FILENAME = N'https://....../SQL_SHACK.ldf')2. Deploy databases to a Microsoft Azure Virtual Machine
There is a new wizard option added to SQL Server 2014 for deploying a database from an instance of the database engine to SQL Server in Windows Azure Virtual machine using full database backup operation.
There are some requirements you must know to complete this wizard successfully:
- Details of the Microsoft account linked to your Windows Azure subscription
- Your Windows Azure publishing profile
- The management certificate linked to your Windows Azure subscription
- The management certificate saved to the computer where the wizard is running
- Temporary storage is available to the computer where the wizard is running and also available to the computer where the database hosted
- The SQL Server instance –you are deploying to- must be configured to listen on a TCP/IP port
- The VM must have the SQL Server Cloud Adapter configured and ran
- You must configure an open endpoint for your SQL Server Cloud Adapter on the Windows Azure gateway with private port 11435
To start the wizard follow these steps:
- Connect with SSMS to your desired instance.
-
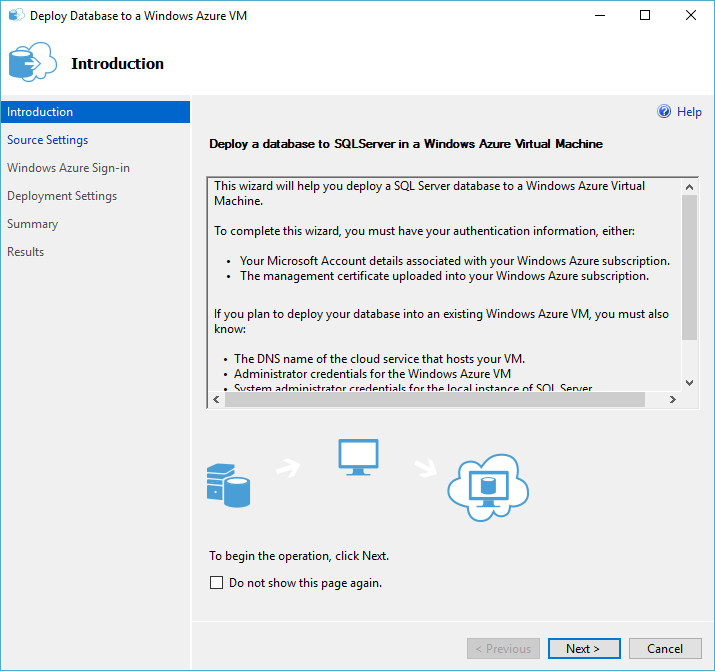
In object explorer, right click on your desired database then choose tasks then select deploy database to Windows Azure VM to launch the following introduction screen:
Figure 3 – Deploy Data database to Windows Azure VM wizard (Introduction section)b - Complete its sections by providing the information requested which you prepared according to the above requirements.
3. Backup to and restore from Windows Azure Storage
This feature introduced in SQL Server 2012 SP1, but it was supported only using T-SQL.
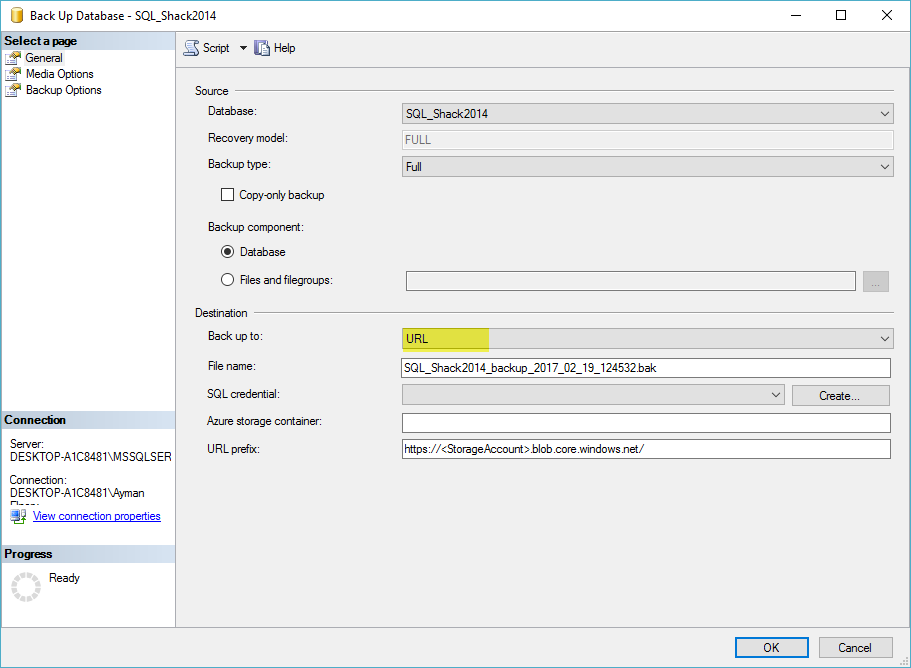
Now in SQL Server 2014, we can use SSMS to backup to Windows Azure Storage by filling in these requirements as shown in figure 3:
Figure 4 – Backup to Windows Azure Storage - File name: the name of the backup file you want to specify
- SQL credential: it stores the name of the storage account and the access key values, and you can specify an existing one or create a new one
- Azure storage container: The name of the Windows Azure storage container to store the backup files
- URL prefix: this is generated automatically according to the previous information
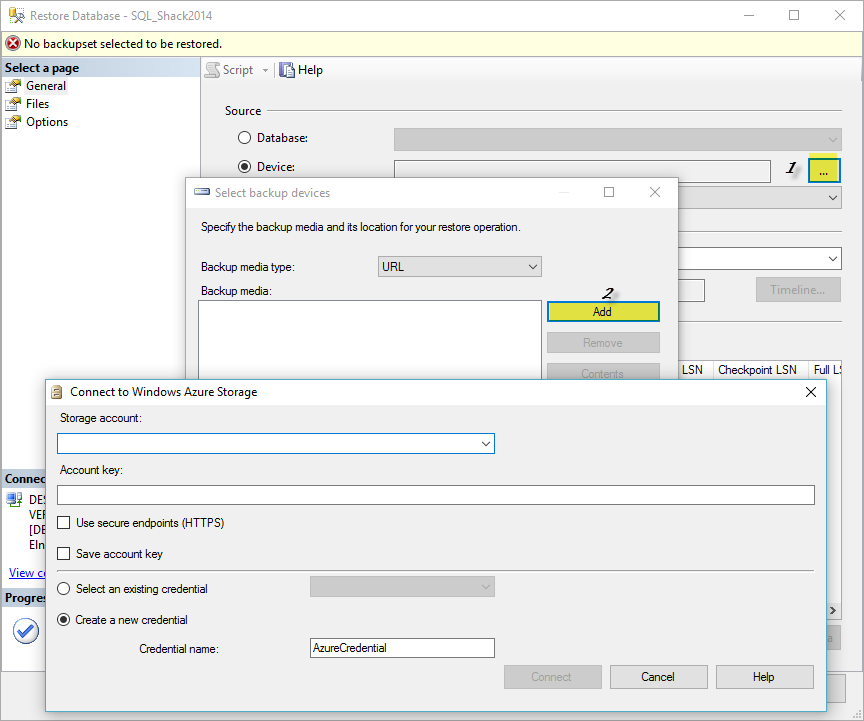
We can use SSMS to restore from Windows Azure Storage as shown in figure 5:
Figure 5 – Restore from Windows Azure Storage By providing SQL credentials, SQL server will connect to the Windows Azure storage and open the Locate Backup File in Windows Azure dialog where we can select our backup file from the displayed files and complete the restore process.
Before we start using this new feature we should know some limitations first:
- Backup to premium storage not supported
- The maximum size of the backup file must be less than 1 TB
- We cannot append to an existing backup file
- We cannot backup to multiple files at the same operation
- We cannot specify a block size with backup
- We cannot specify backup options(RETAINDAYS and EXPIREDATE)
Mustafa EL-Masry is a Senior database consultant and one of the experts in Database performance tuning in the Middle East.
Currently, he is working as a Senior consultant production DBA and Development DBA in many projects in multiple government sectors. He is a Top SQL Server blogger in the Middle East, founder of the community mostafaelmasry.com, and is the second Arabic author on Microsoft MSDN in SQL Server.
Based on his current position, he solved fairly interesting problems on fairly large databases and highly sensitive performance cases.
View all posts by Mustafa EL-MasryLatest posts by Mustafa EL-Masry (see all)- Concept and basics of DBCC Commands in SQL Server - March 31, 2017
- Hybrid Cloud and Hekaton Features in SQL Server 2014 - February 28, 2017
- How to analyze Storage Subsystem Performance in SQL Server - February 23, 2017