
In this article, I am going to explain how we can split the data within the excel file and upload it to the tables created on the Azure SQL database.
To demonstrate the process, I have created two tables in the “AzureDatabase” database, which is hosted on the Azure SQL Server instance. The names of the tables are “AmericanCountries” and “AsianCountries.” Following is the Create Table script.
|
1 2 3 4 5 6 7 8 9 10 11 12 13 14 15 16 17 18 19 20 21 22 23 |
CREATE TABLE ASIANCOUNTRIES ( COUNTRYID INT IDENTITY(1,1) PRIMARY KEY CLUSTERED , COUNTRYNAME VARCHAR(300), COUNTRYTYPE VARCHAR(200), LATESTRECORDEDPOPULATION INT, CONTINENT VARCHAR(100), REGION VARCHAR(50), SUBREGION VARCHAR(100), ) GO CREATE TABLE AMERICANCOUNTRIES ( COUNTRYID INT IDENTITY(1,1) PRIMARY KEY CLUSTERED , COUNTRYNAME VARCHAR(300), COUNTRYTYPE VARCHAR(200), LATESTRECORDEDPOPULATION INT, CONTINENT VARCHAR(100), REGION VARCHAR(50), SUBREGION VARCHAR(100), ) GO |
I have created an excel file named “Application_Countries“, (see attached below), that has details of countries. To export data to multiple tables, we are going to do the following:
- Export the data of the American Countries to the “AmericanCountries” table
- Export the data of the Asian countries to the “AsianCountries” table
To filter the data, we are going to use
- The conditional split component of the SQL Server integration services
- Excel file as a Source
- ADO.NET as a destination
First, let’s configure the Excel Source.
Configure Excel Source
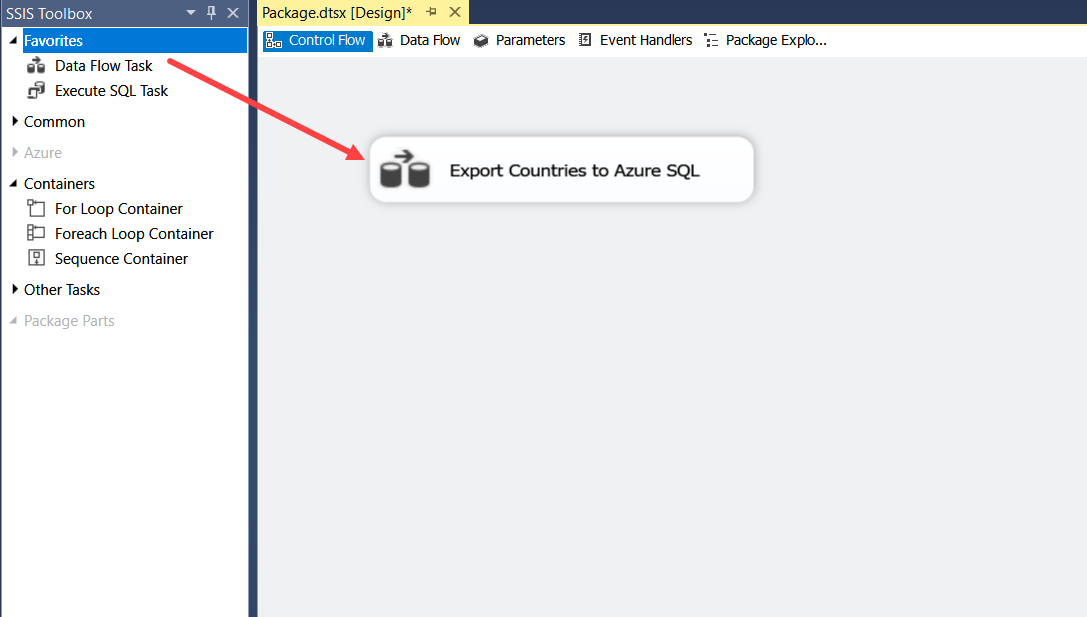
First, Open the SQL Server data tools Create a new SSIS project named “ExportData.sln.” In the SSIS package, Drag and drop the “Data Flow Task” in the Control Flow window and rename it to “Export Counties to Azure SQL.” See the following image:
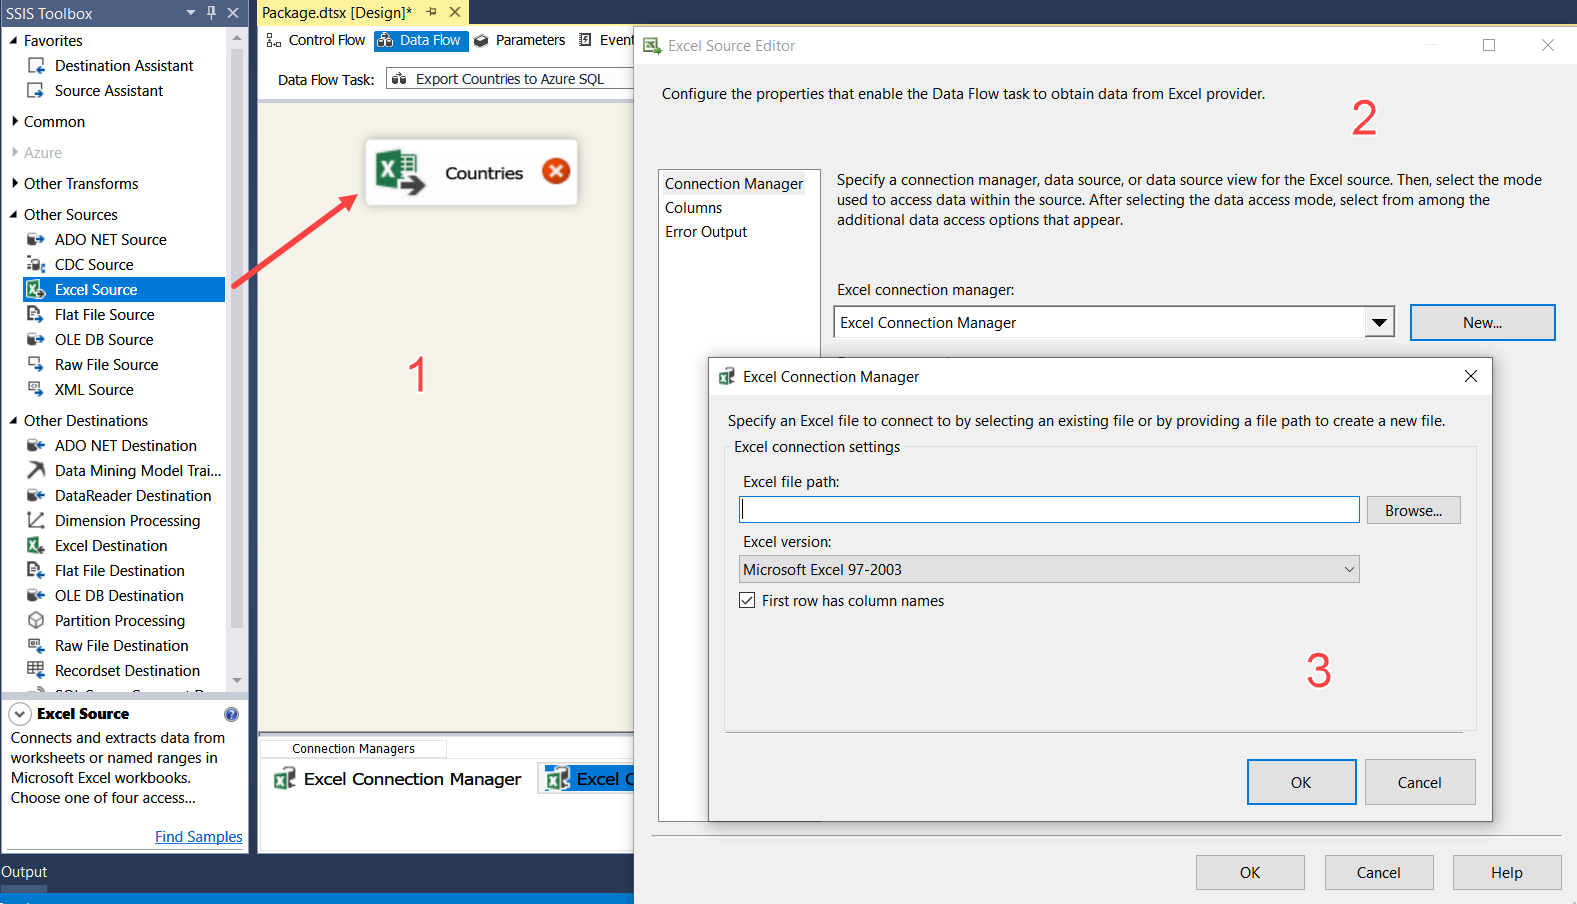
Double-click on “Export Countries to Azure SQL.” On the “Data Flow” window (Screen 1), Drag Excel Source and rename it to Countries. Double click on “Countries.” On the “Excel Source Editor” dialog box (Screen 2), Click on New. On Excel Connection Manager (Screen 3), click on Browse to locate the file and click ok to close the Excel Connection Manager dialog box and click OK to close the Excel Source editor dialog box. See the following image:
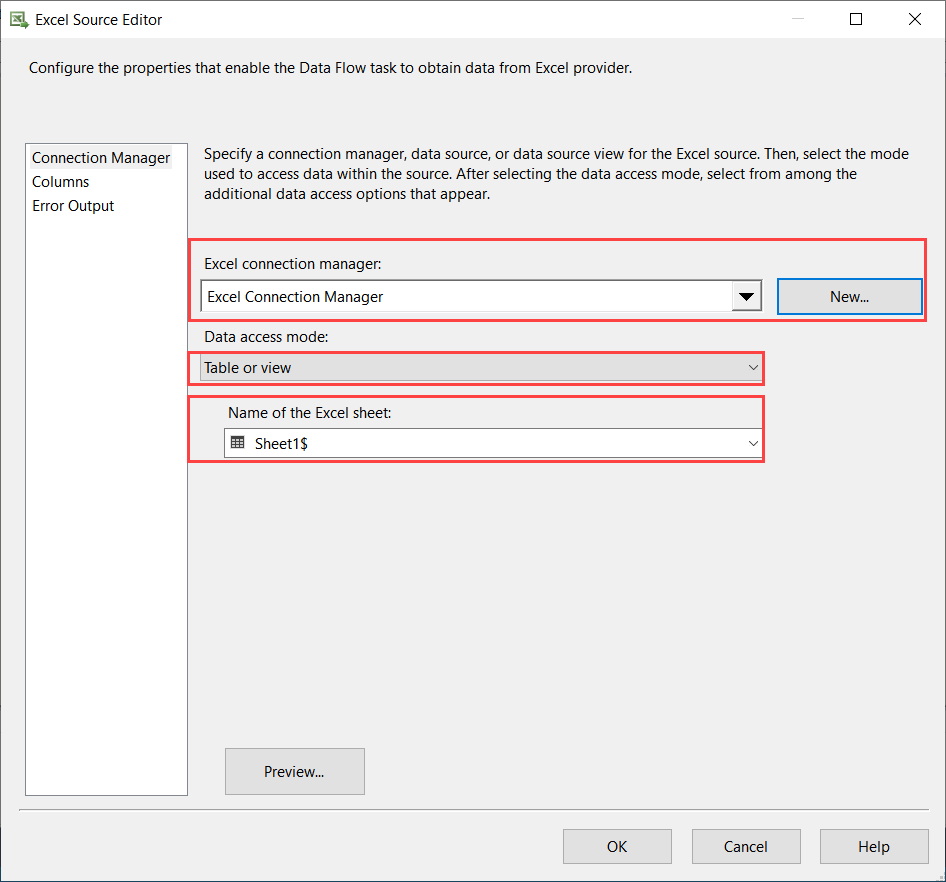
Select “Table or view” from the Data access mode drop-down box and select Sheet1$ in the “Name of the excel sheet” drop-down box. See the following image:
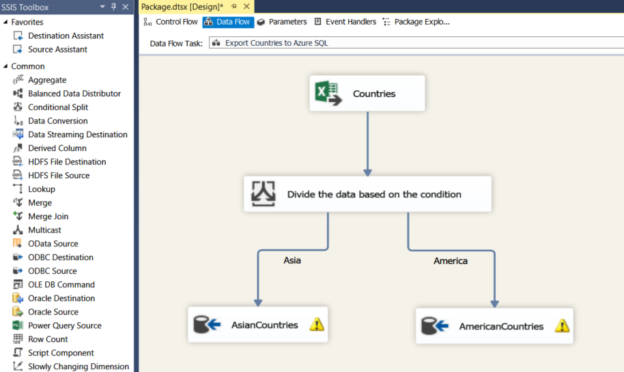
Now, to export data in different tables based on the condition, we must use conditional Split transformation.
Configure the conditional split component
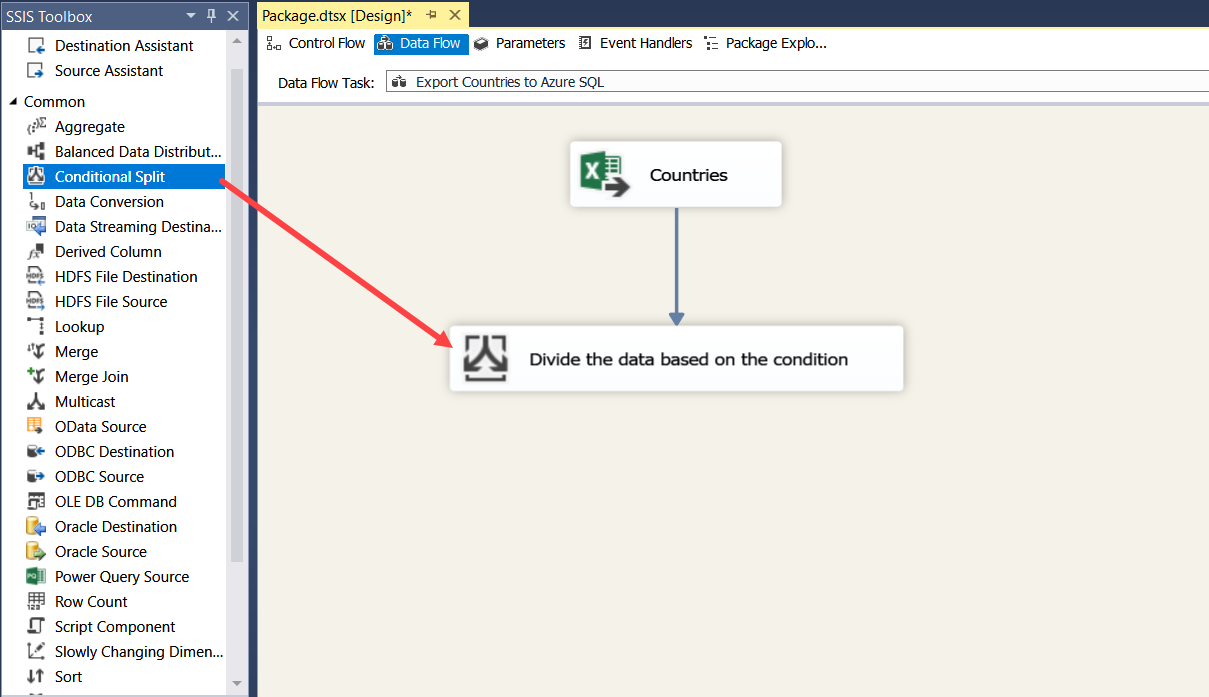
To configure conditional split transformation, drag and drop the Conditional Split transformation from SSIS data tools to the Data Flow Task window. See the following image:
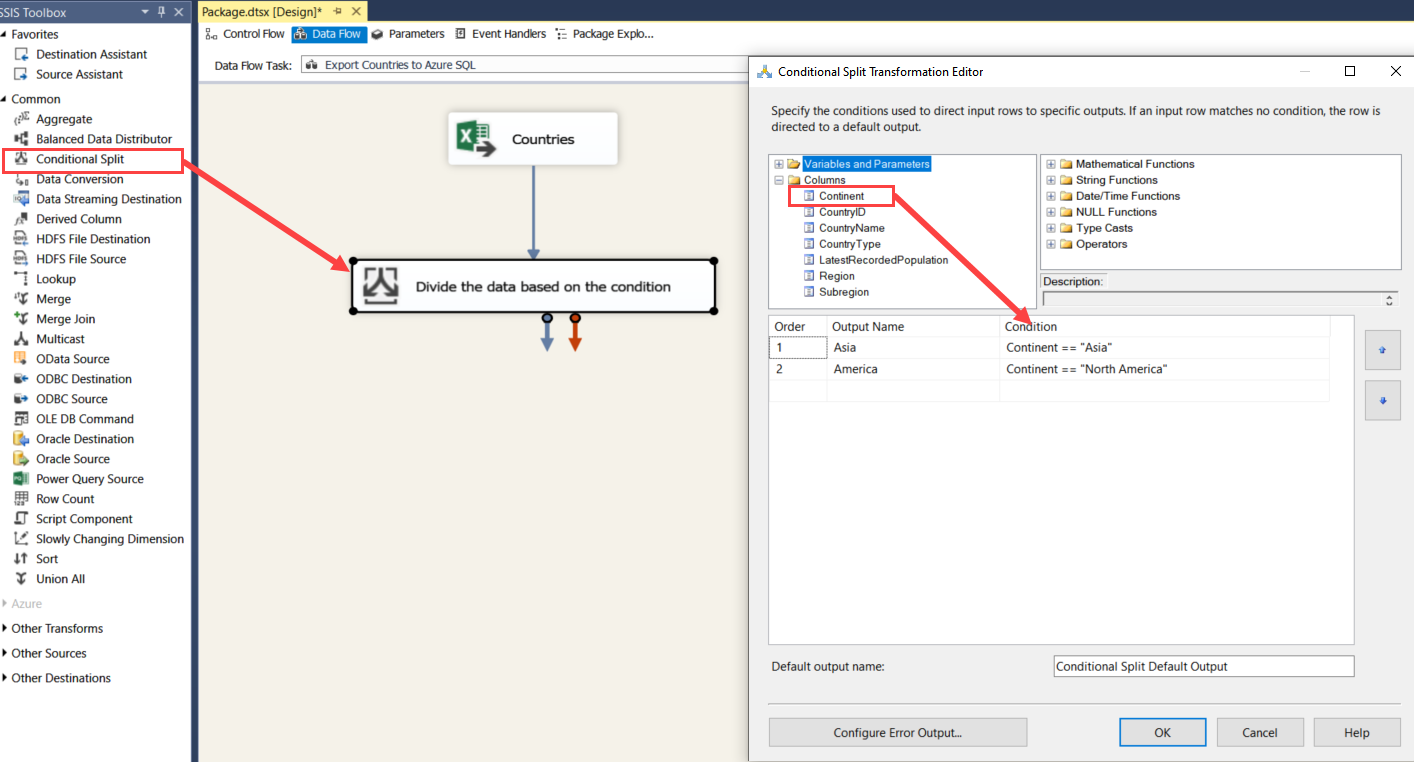
As I mentioned, we want to copy the data of the “Asia” continent to the “AsianCountries” table and data of the “North America” continent to the “AmericanCountries” table. To do that, we will configure the conditional split transformation as follows:
-
If the value of the continent column is equal to the “Asia,” then the data will be stored in the AsianCountries table
- Case 1: [Continent]==”Asia”
-
If the value of the continent column is equal to the “America,” then the data will be stored in the AmericanCountries table
- Case 2: [Continent] == “North America”
To configure it, double-click on “Divide the data based on the condition“. Conditional Split transformation editor opens. In the editor, configure the condition cases as explained above. See the following image. Click OK to close the editor.
The Conditional split transformation is configured, let us configure the ADO.NET destination now.
Configure ADO.NET destination
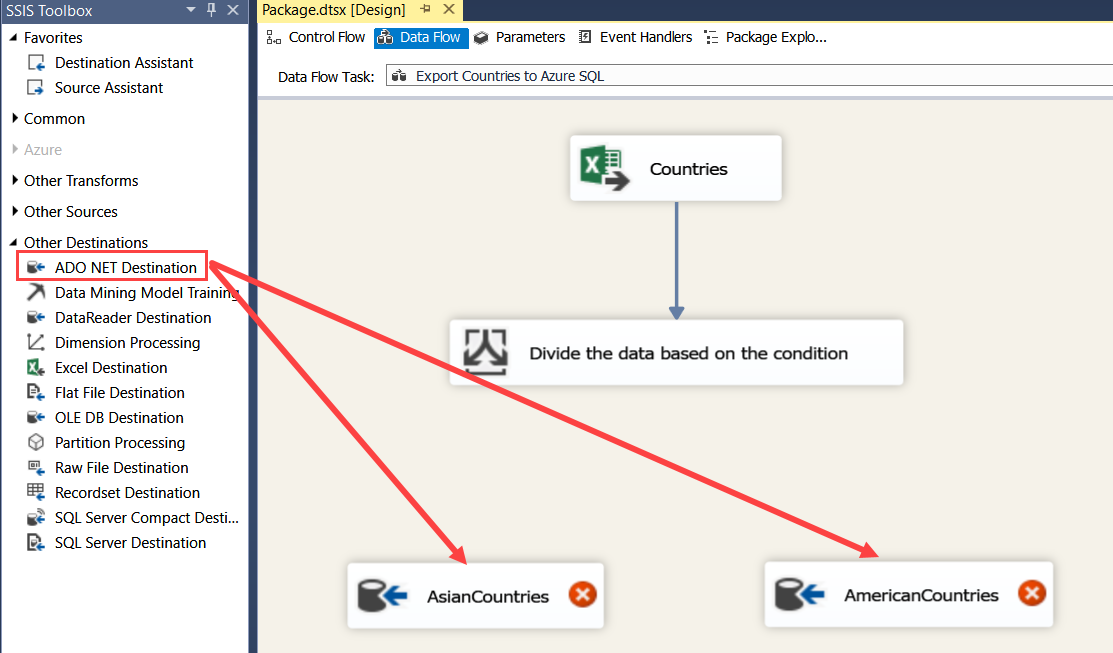
To configure the ADO.NET, drag and drop the two ADO.Net destination components in the data flow window. Rename the first component to “AsianCountries” and second component to “AmericanCountries.” See the following image.
Now the process of configuring ADO.Net destination is the same; hence I will explain the process to configure the ADO.Net component AsianCountries.
To do that, double click on it.

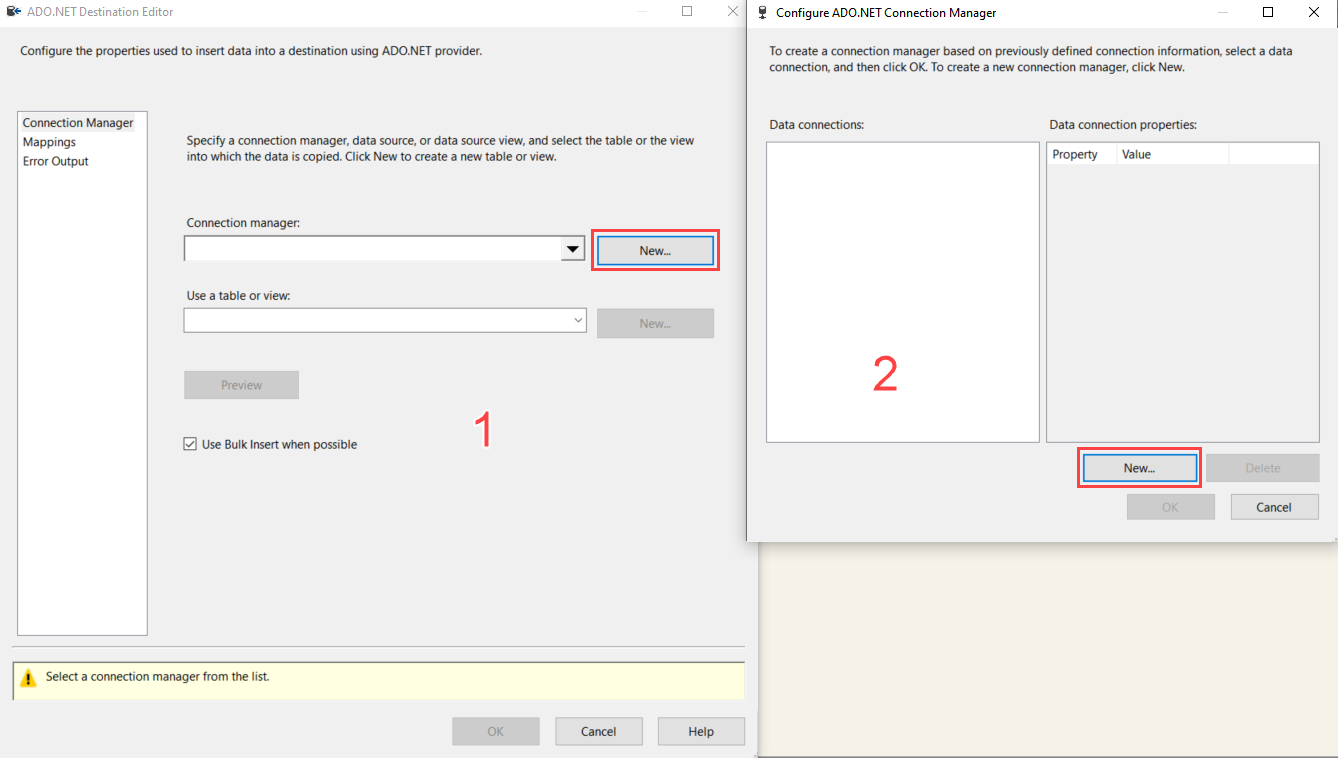
As you can see, when you double click on it, you will receive an error that says we did not provide any input columns to the ADO.Net component. We can ignore the error and click on “Yes.” A dialog box “ADO.Net destination editor” opens (Screen 1). On the “ADO.NET Destination Editor” dialog box, click on New. The dialog box, “Configure ADO.Net Connection Manager,” opens (Screen 2). Click on New on it. See the following image:
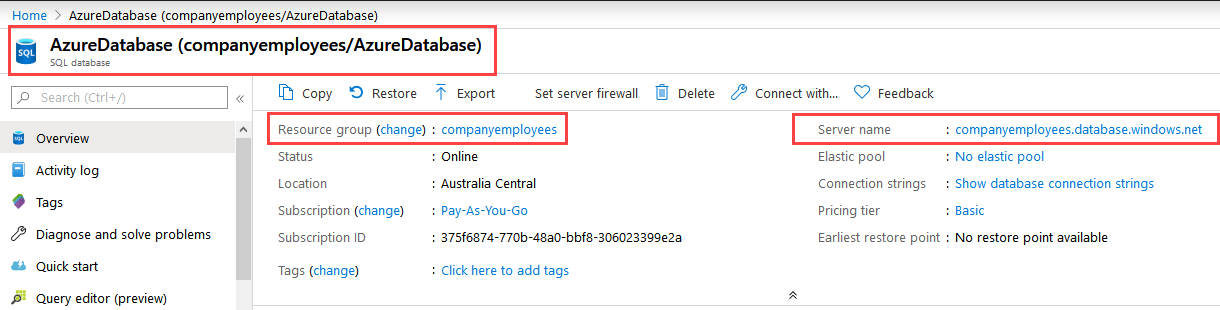
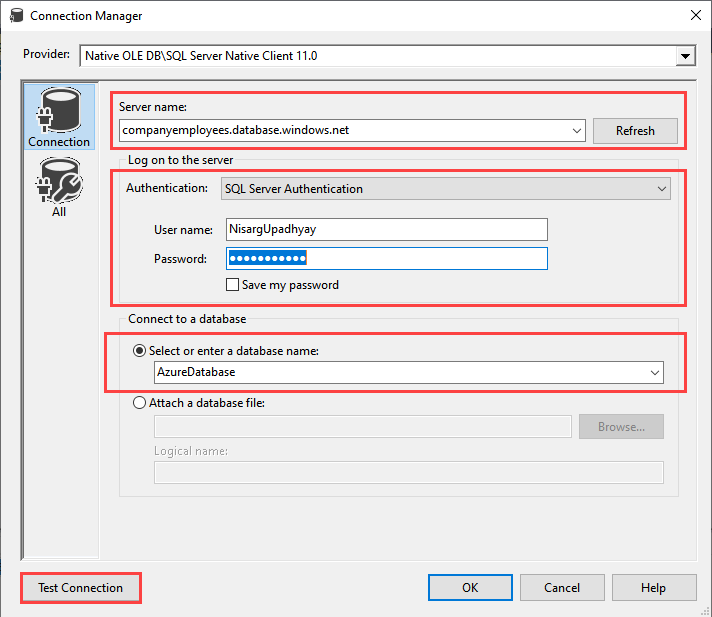
Another dialog box, “Connection Manager” opens. In the Dialog box, Provide the Azure SQL Server name in the “Server Name” text box. You can find the server name on the Azure Portal. Login to Azure Portal Open Azure SQL Database resource pool page.
In the authentication drop-down box, select “SQL Server Authentication.” Enter the user name and password, which is used to connect the Azure SQL Database. Select the database name from the “select or enter database name” drop-down box. See the following image.
Once the connection is configured, Click OK on Test connection. You will see the following error message.

Error message:
Test connection failed because of an error in initializing provider. Cannot open server ‘companyemployees’ requested by the login. Client with IP address ‘43.228.96.58’ is not allowed to access the server. To enable access, use the Windows Azure Management Portal or run sp_set_firewall_rule on the master database to create a firewall rule for this IP address or address range. It may take up to five minutes for this change to take effect.
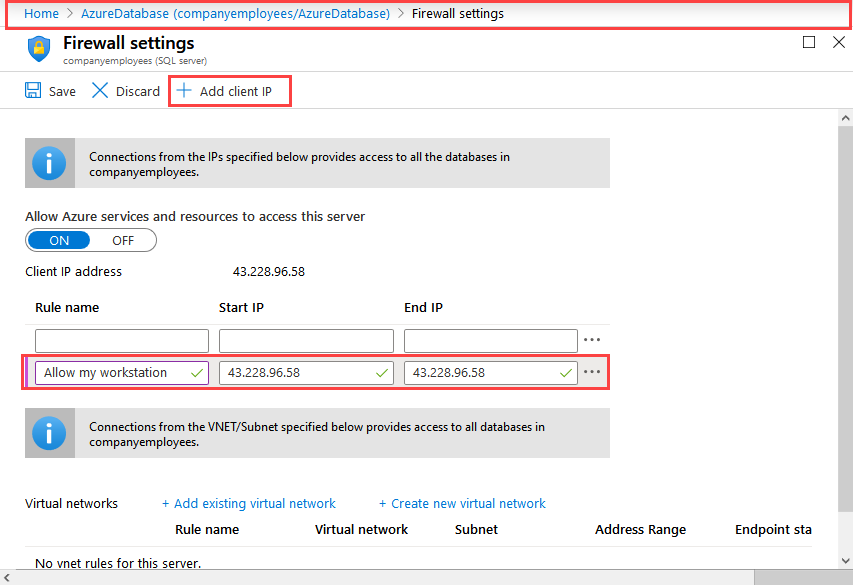
The error message clearly says that we must add the IP of the server in the Azure firewall rule to allow the incoming connections. You can configure it from the “Firewall settings” page of the Azure portal. To add the client IP, open the Firewall settings page and click on “Add client IP” It automatically adds the IP address. You can also provide the range of the IP address in “Start IP” and “End IP” text box. See the following image:
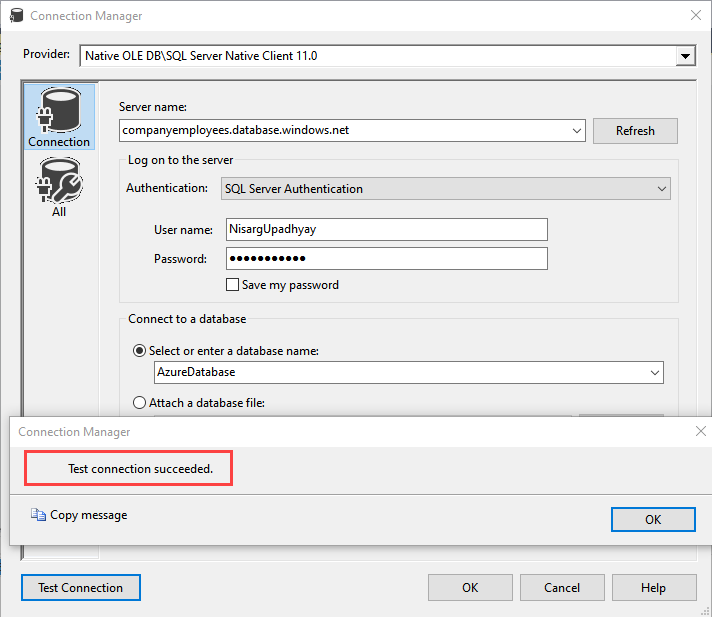
Once the firewall has been configured, click on the “Test Connection” button. The connection will be established successfully.
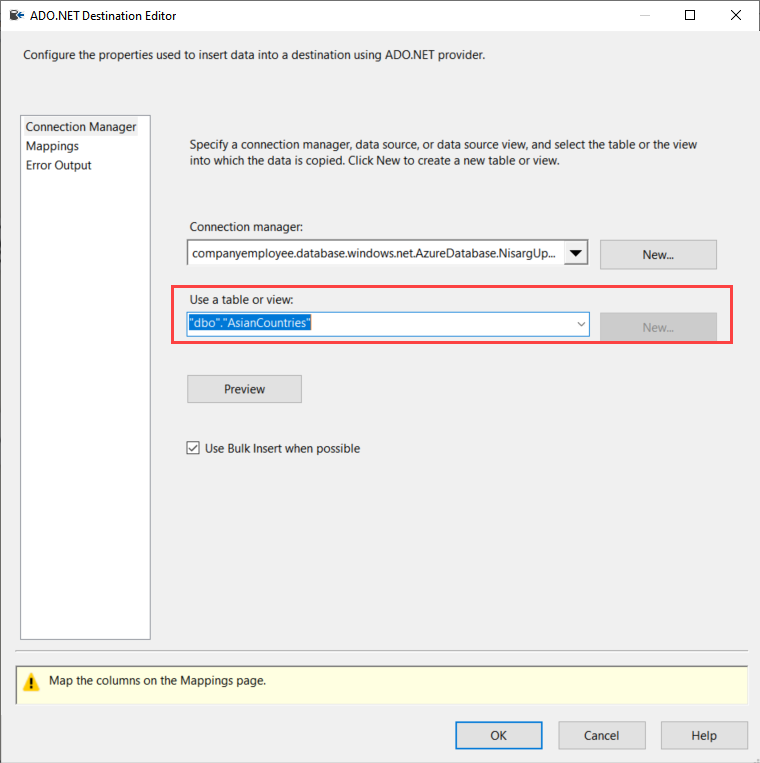
On the “ADO.Net destination editor” dialog box, select “AsianCountries” from the table or view name drop-down box. See the following image:
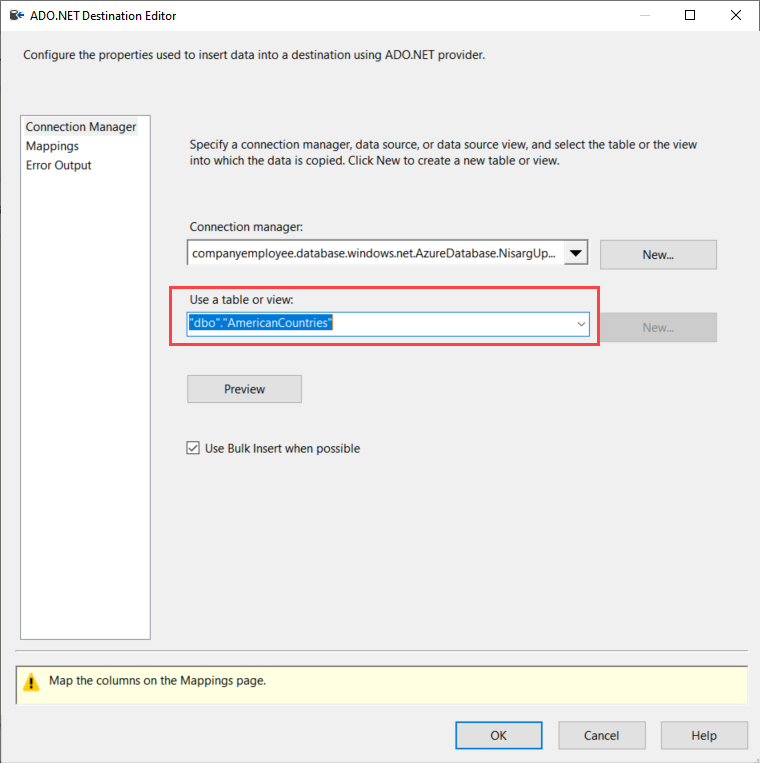
Similarly, configure the “AmericanCountries” ADO.Net destination editor. The only difference is that you must select “dbo.AmericanCountries” from Use a table or view drop-down box. See the following image.
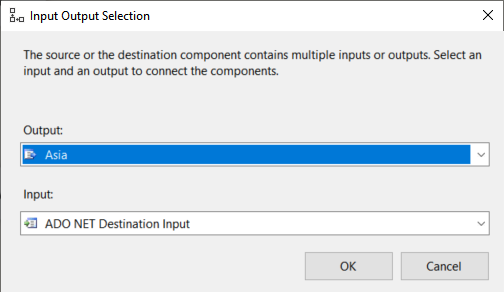
Now to configure the data path, drag the blue data path arrow from the Divide the data based on the condition to the AsianCountries ADO.Net destination. When we connect the data path to the ADO.Net destination, a dialog box will appear, which will allow us to choose the output. Using it, we can determine the destination where we want to direct the output. The first output of the conditional split will be directed to the “AsianCountries“, hence choose “Asia” from the “Input Output Selection” dialog box. See the following image:
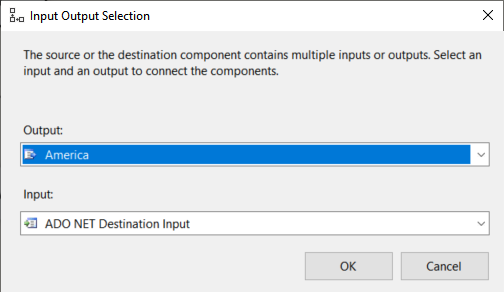
The second output will be exported to the AmericanCountries table hence select “America” from the Output drop-down box. See the following image:
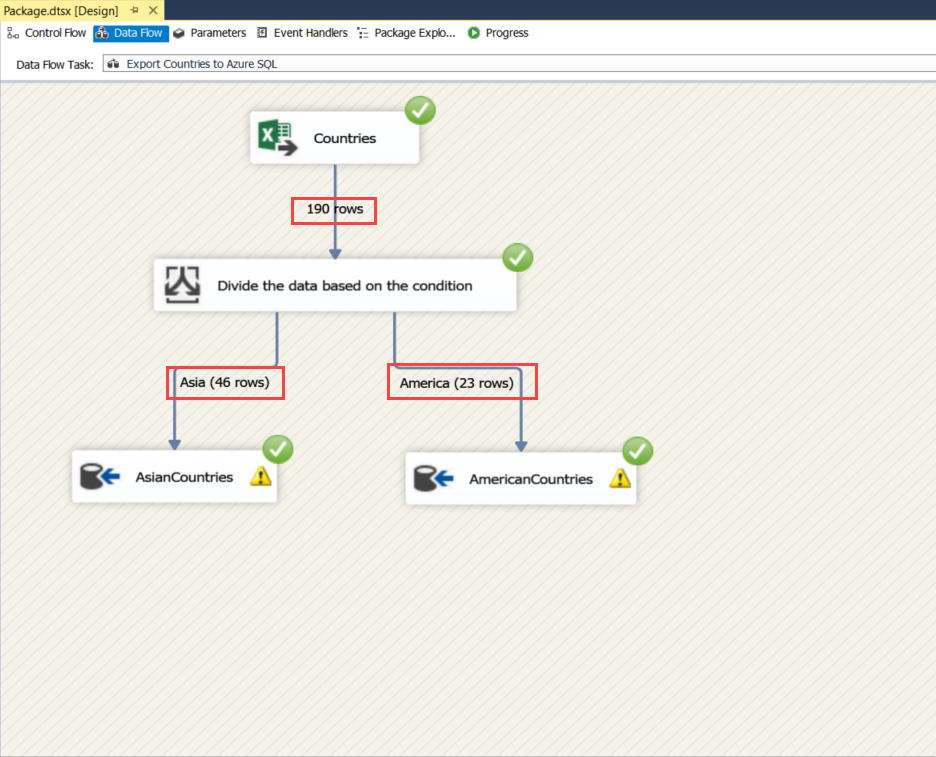
The entire Data Flow Task looks like the following image:

Now click on Execute to run the package. If package executes successfully, it should look like the following image:
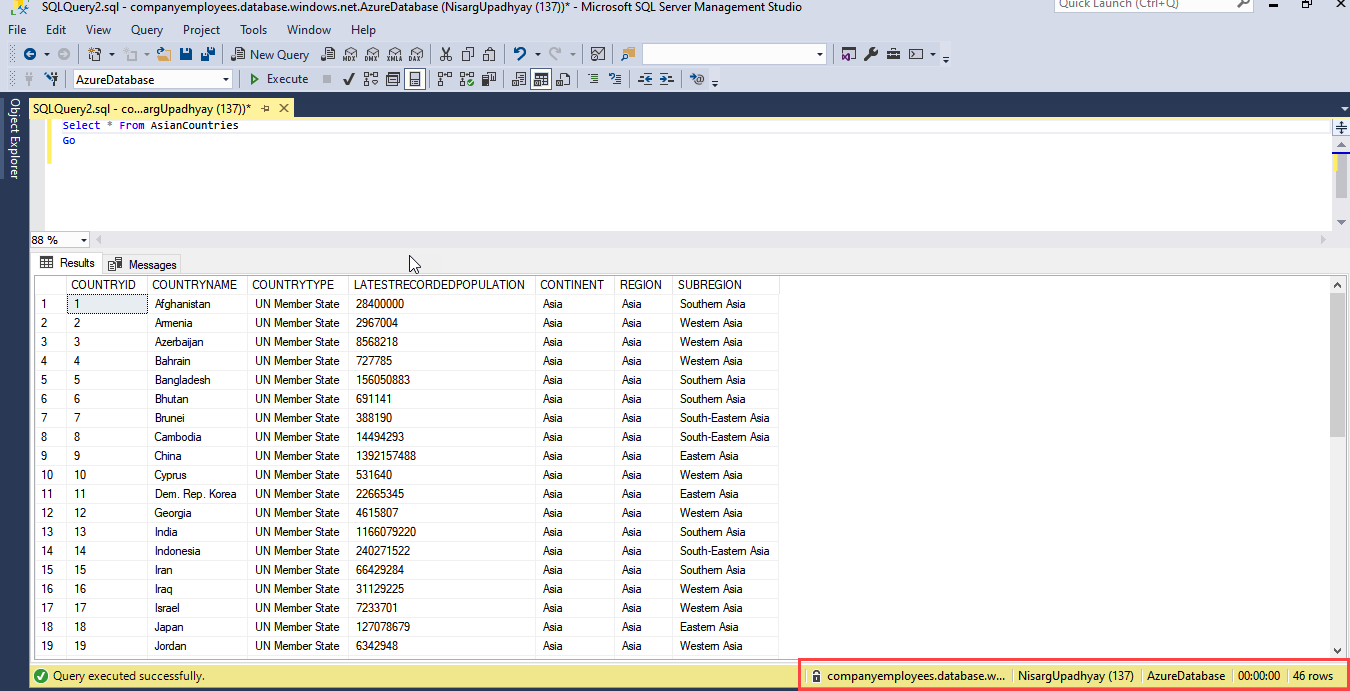
You can verify the data by querying the Azure SQL database. Execute the following queries to review the output:
|
1 2 3 4 |
SELECT * FROM AMERICANCOUNTRIES GO SELECT * FROM AsianCountries GO |
The following screenshot shows the output of the AsianCountries table:
And below is the output of the AmericanCountries table.

Summary
In this article, I have explained how can we use the SSIS package to split the data within the excel file and upload it to the tables created in the Azure SQL database.
Application_Countries.xls
He has expertise in database design, performance tuning, backup and recovery, HA and DR setup, database migrations and upgrades. He has completed the B.Tech from Ganpat University. He can be reached on nisargupadhyay87@outlook.com
- Different ways to identify and change compatibility levels in SQL Server - July 22, 2024
- Copy SQL Databases between Windows 10 and CentOS using SQL Server data tools - October 19, 2022
- Changing the location of FILESTREAM data files in SQL Database - October 14, 2022