
In this article, we will learn how to get started using PostgreSQL on Docker. PostgreSQL is one of the most popular open-source databases that is being used by a lot of developers. It is highly stable and has a large community that maintains and supports the database development lifecycle. PostgreSQL can be installed on any operating system like Windows, macOS, and Linux. With the rise in containerization technologies, PostgreSQL can now also be installed using Docker.
Docker is a popular application that enables users to bundle applications into containers that help in the easy deployment of resources. This article will introduce you to the basic concepts of installing and using Docker on a Mac and then pulling a PostgreSQL Docker image from the Docker Hub repository. In addition to PostgreSQL, we will also install PgAmin4 using Docker, which can be used to administer the PostgreSQL instance with Docker.
What is Docker and why do we need it?
Docker is an open-source containerized application technology using which you can deploy your applications easily on-premises or on the cloud. You can bundle your applications into docker images that will already store the necessary configurations required to run the application. During deployment, you need to just run the docker image on the production environment, and all the configurations will be in from the image. In my previous article, How to set up and run SQL Server Docker image, I have talked about installing Docker on a local machine. Please refer to the installation procedure and follow along. Once Docker has been successfully installed, you can check it on the terminal by using the following command.
docker –version
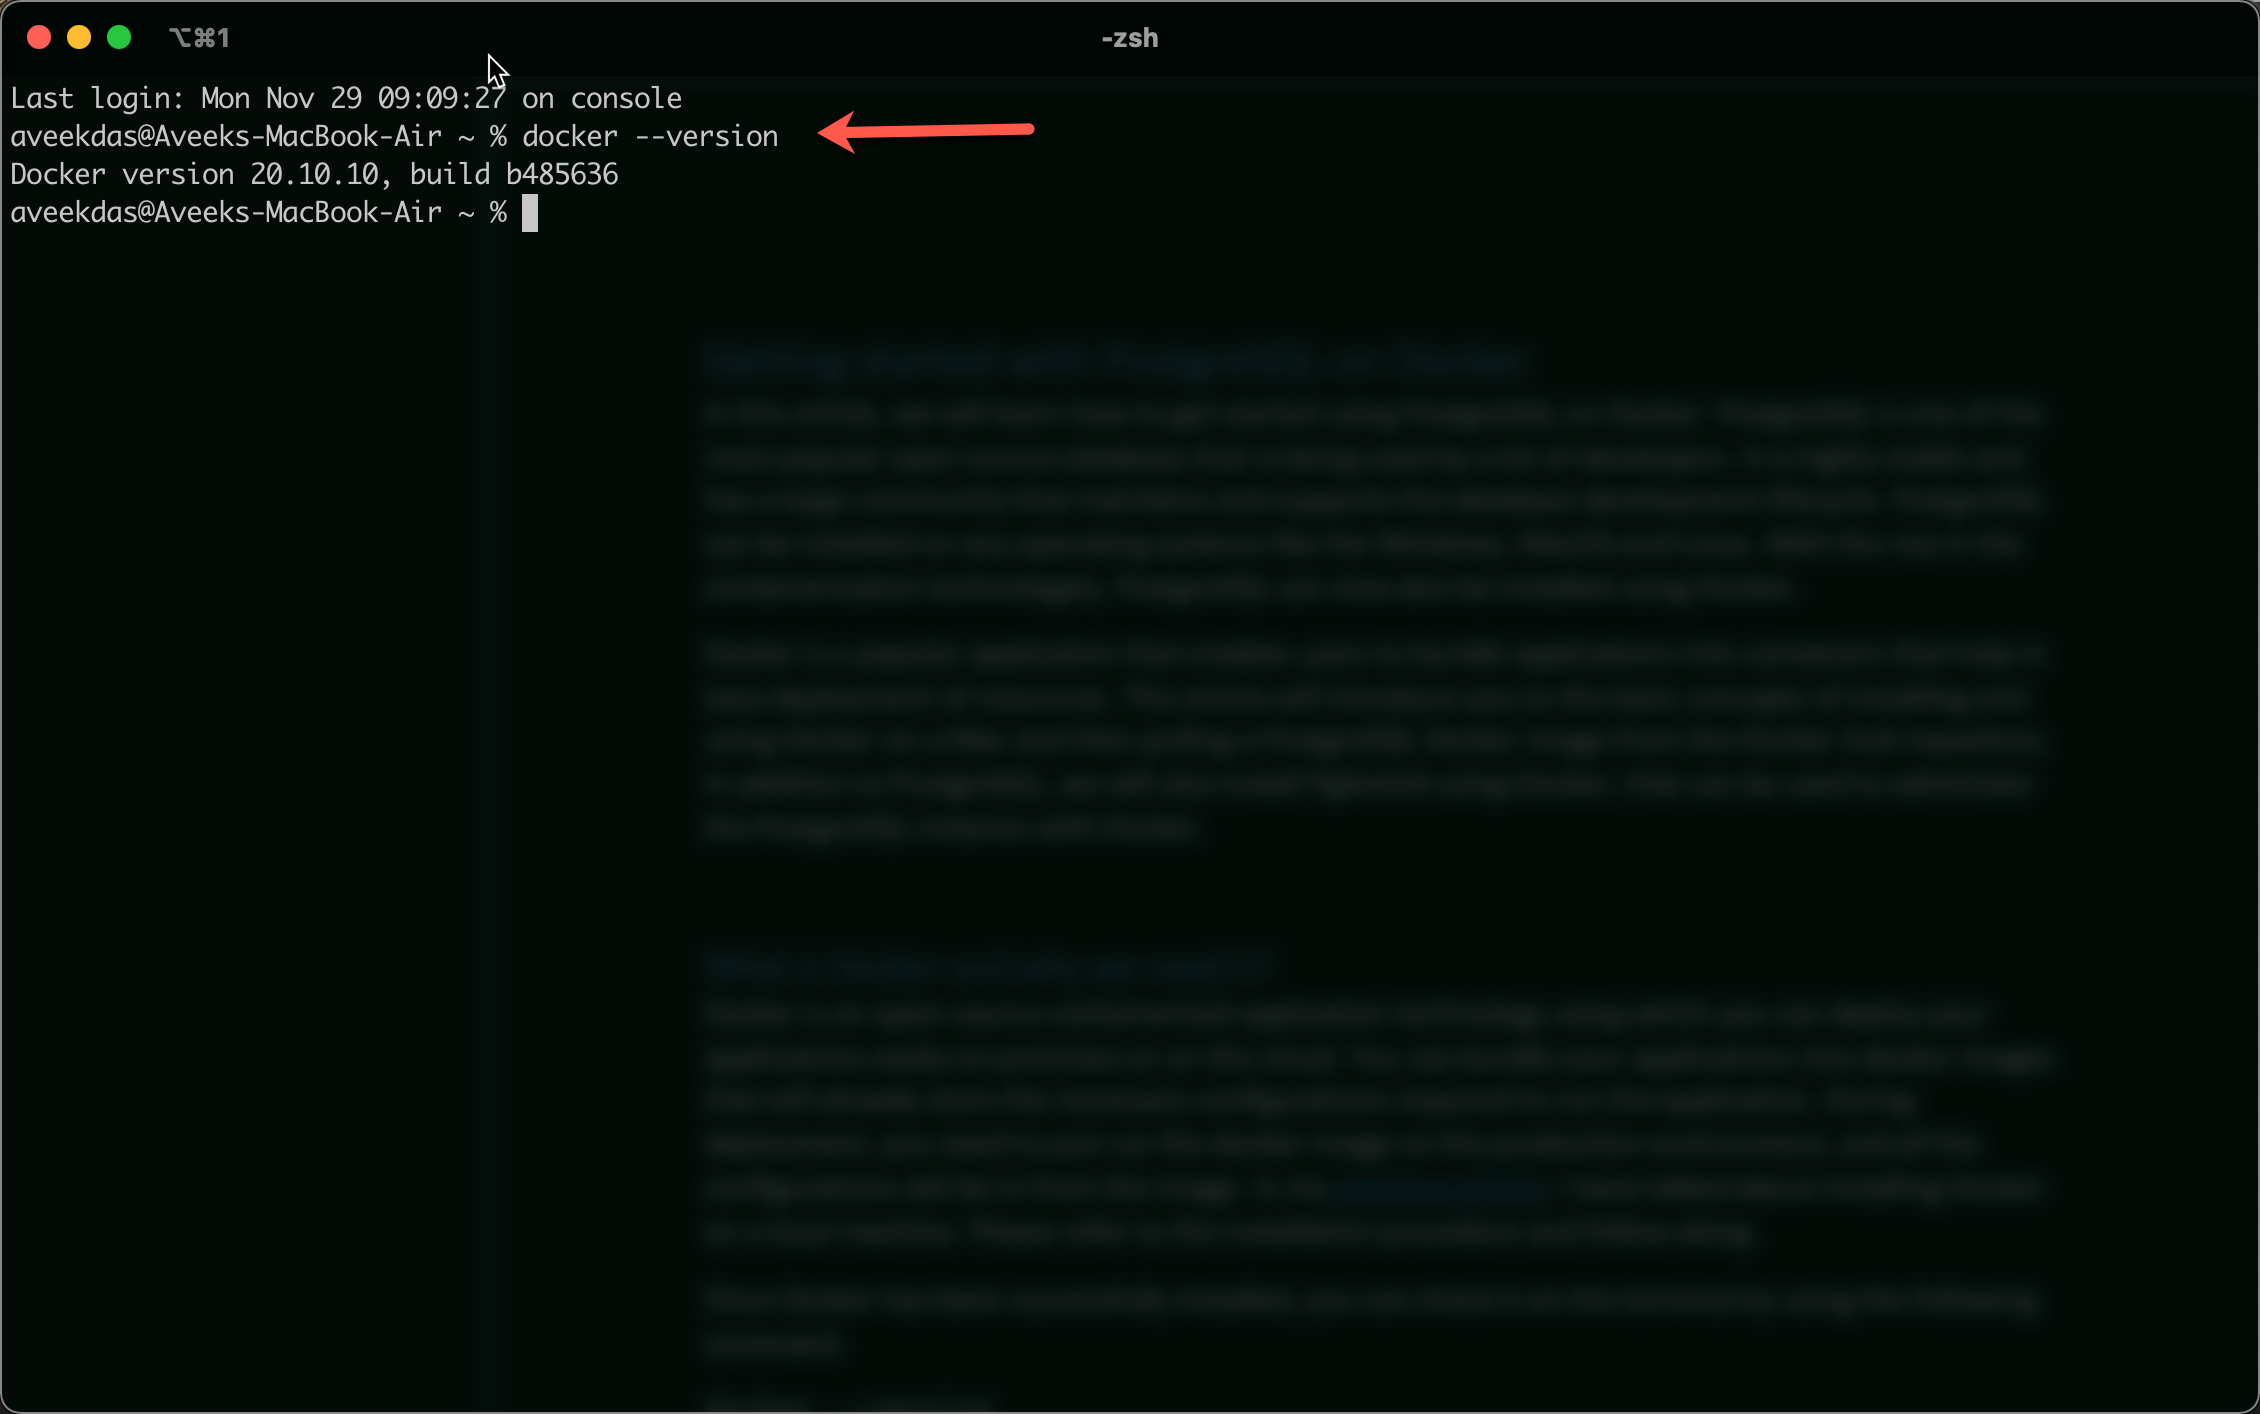
Figure 1 – Checking Docker Version
You can check all the images that are installed on the Docker by using the following command.
docker image ls

Figure 2 – List all installed Docker Images
It is important to note that there should be no active installation of the PostgreSQL Docker image or else you need to remove it before proceeding further. You can remove your existing images by using the following command on the terminal.
docker image rm <<IMAGE_NAME>>
Installing the PostgreSQL Docker image
Now, we are good to start pulling the PostgreSQL Docker image to our local machine. Docker images are hosted on a repository on the cloud known as the Docker hub. You can pull images from the Docker hub and can also publish your images to the Docker hub. The official PostgreSQL Docker image can be found on the Docker Hub. To pull the image to your local, you can run the following command on the terminal.
docker pull Postgres
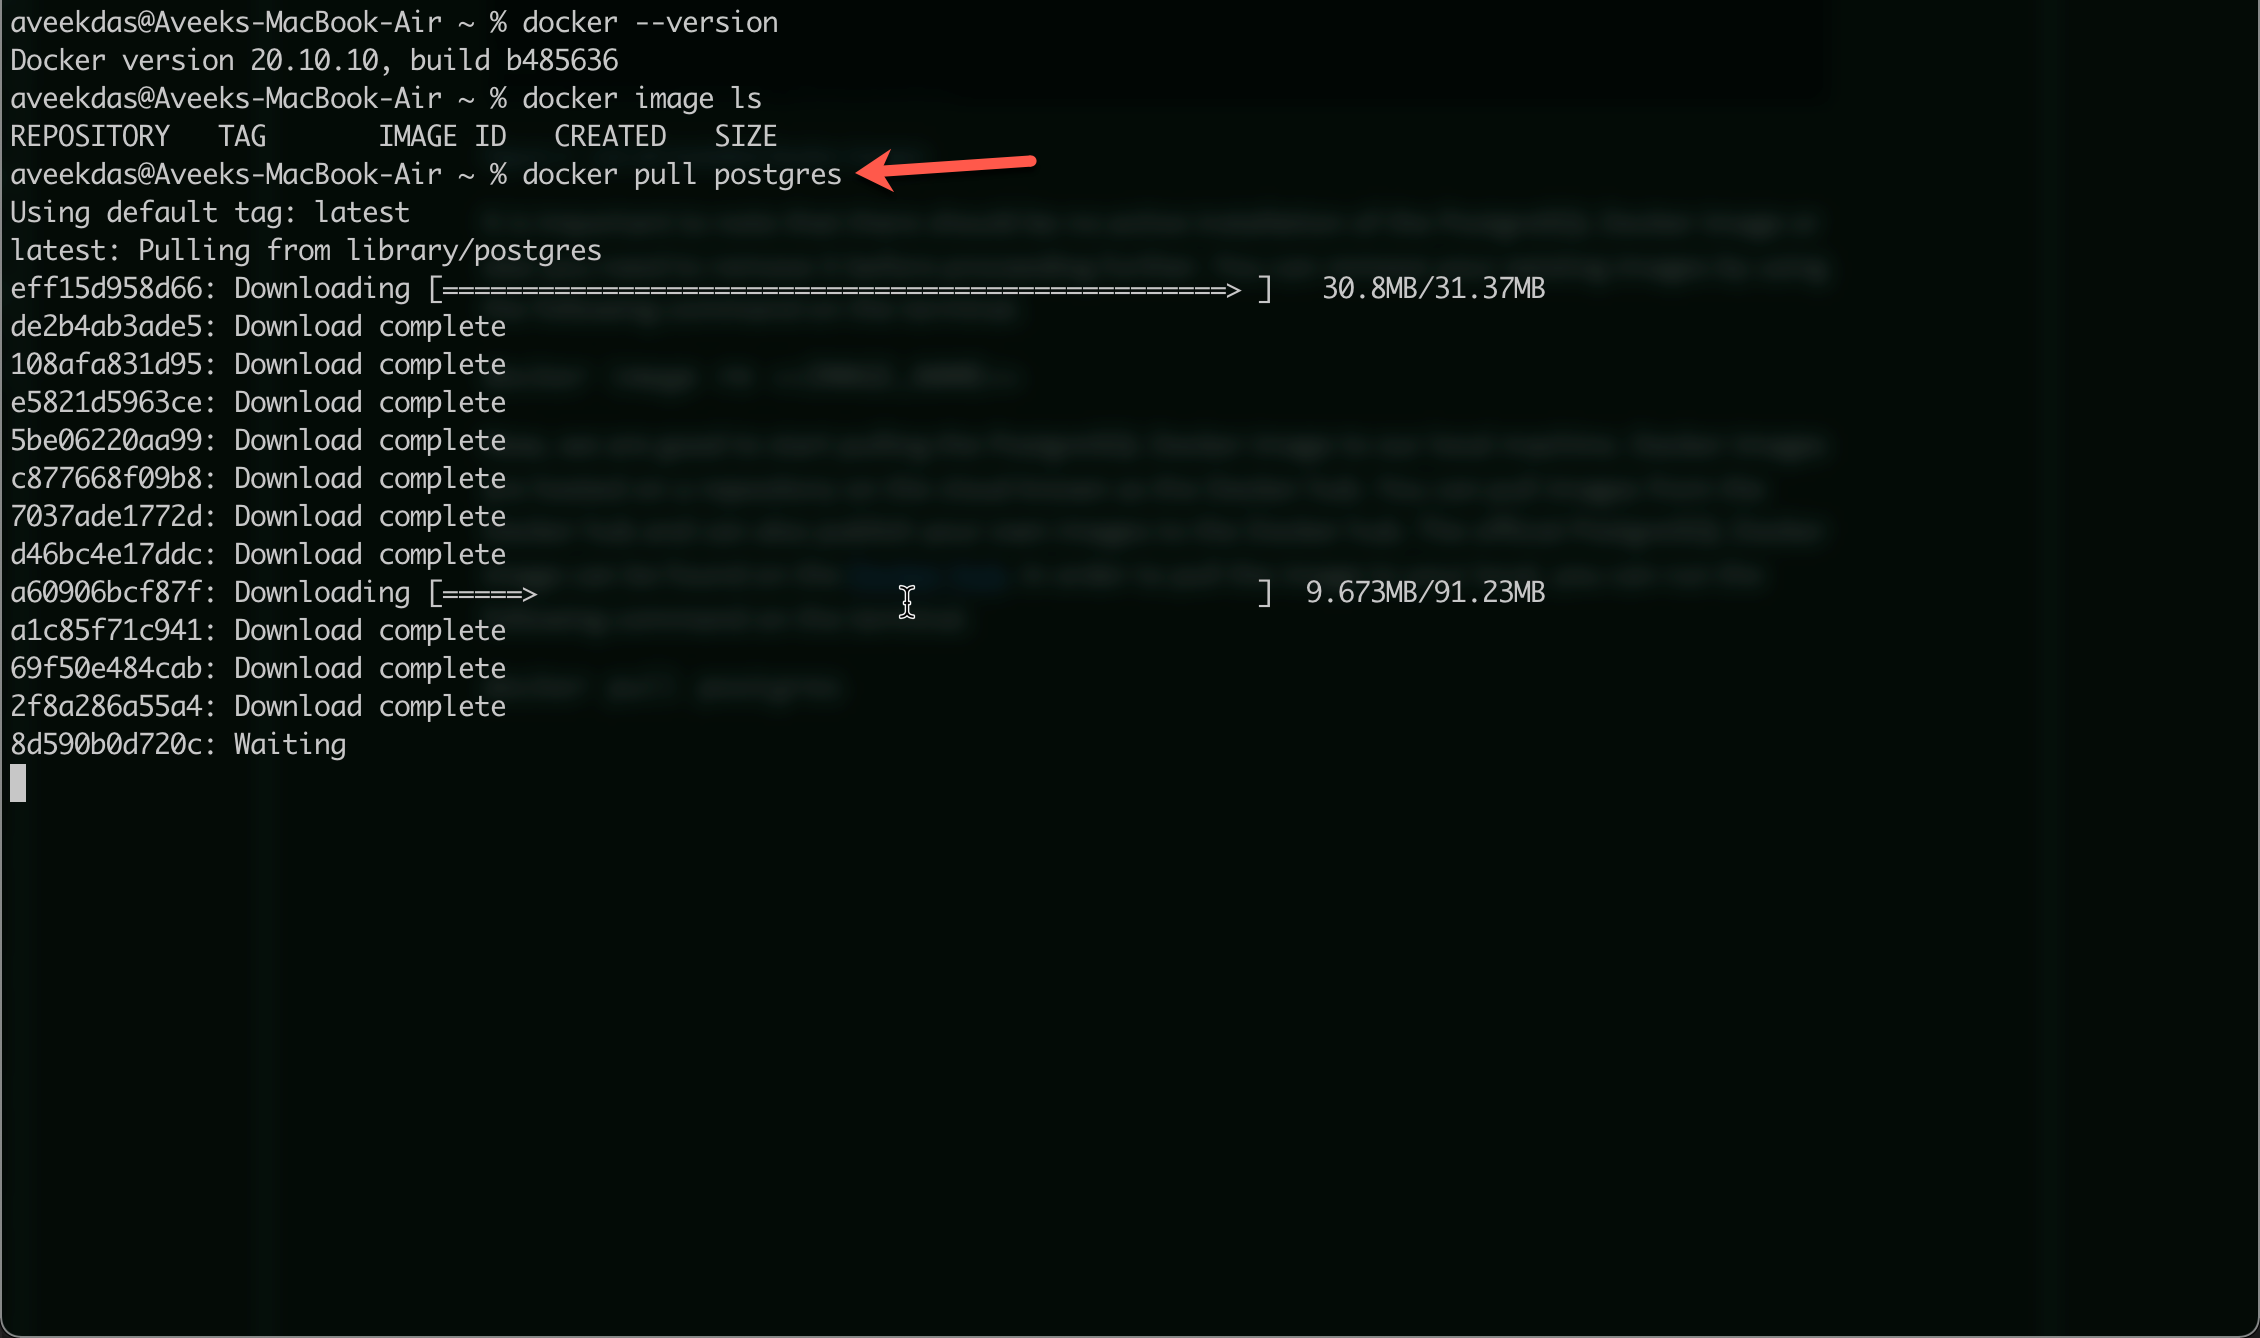
Figure 3 – Pulling the PostgreSQL Docker image on local
Once the docker image has been pulled to the local machine, you can check all installed images on your local by the following command.
docker image ls
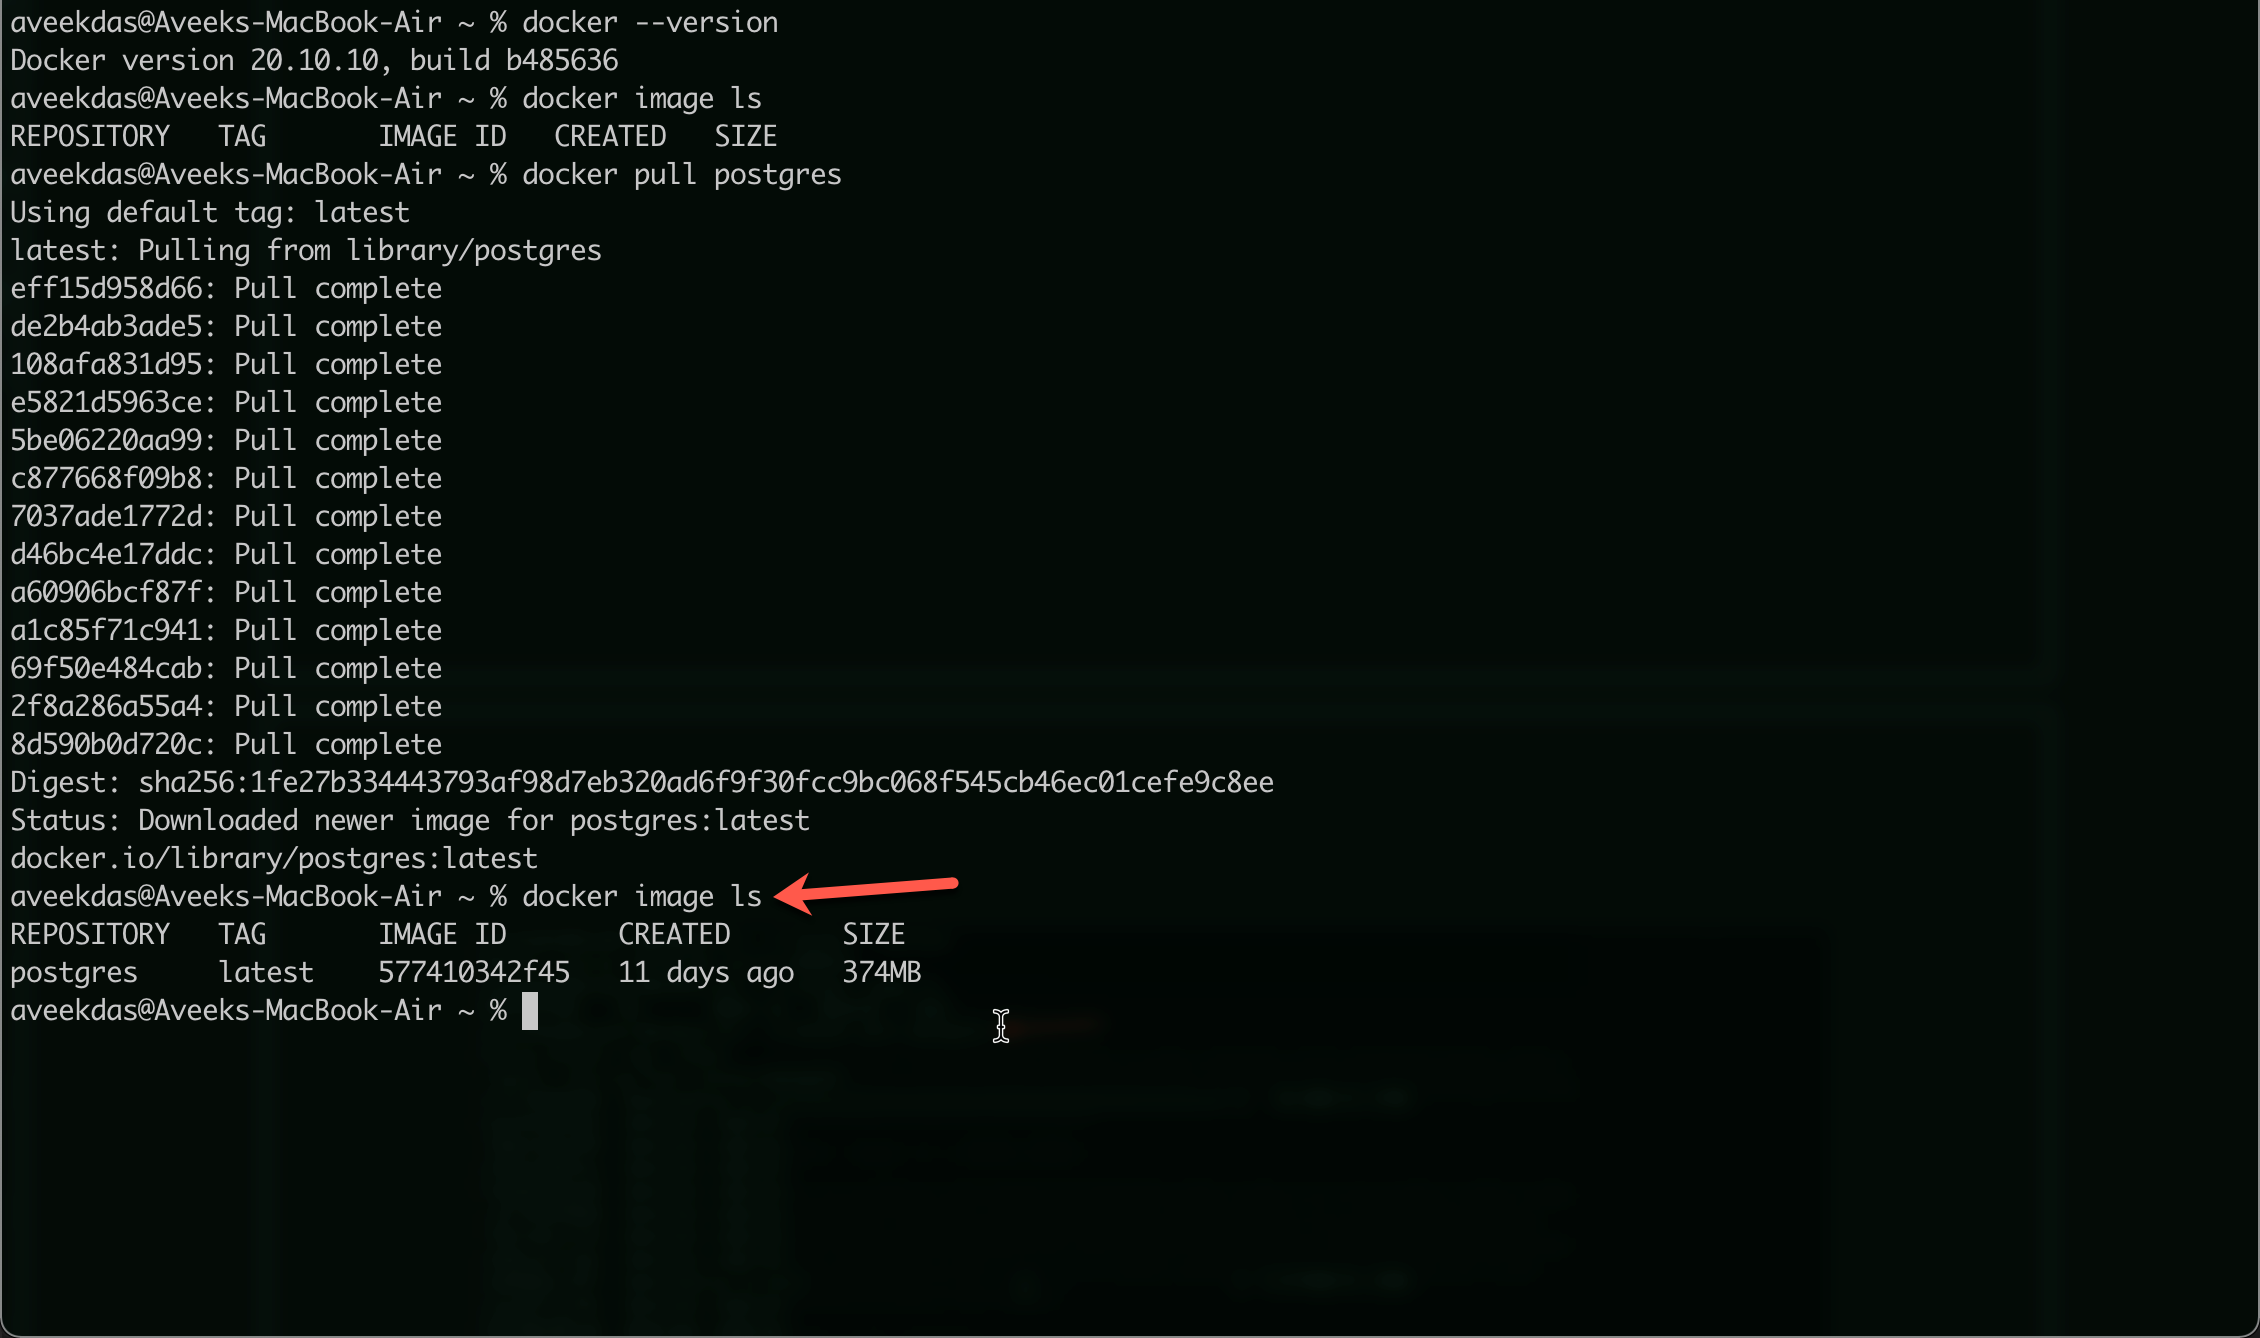
Figure 4 – Checking installed images on local
As you can see in the above figure, the PostgreSQL image has been installed on your machine. Now, that the image is installed, the next step would be to run this image. When we run a Docker image, a new container is created for that image. In other words, a container is a running instance of a Docker image.
Running the PostgreSQL image
To run the docker image for PostgreSQL, you can use the following command.
docker run –name pgsql-dev -e POSTGRES_PASSWORD=Welcome4$ -p 5432:5432 Postgres
In the above command, we call the run method on docker that will create a running instance of an existing docker image. Along with that we also need to pass a few parameters as follows.
- Name – We need to provide a name for the container that is going to be created when docker will run the image.
- Environment variables – When running the docker image for PostgreSQL, the only mandatory environment variable that we need to set is the password for the database. The default user is ‘Postgres’.
- Port – We need to define on which port is the database going to run in the container and which port on the host can be used to access it. As you can see, there are two ports mentioned in the command which are in the form HOST_PORT:DOCKER_PORT.
Finally, we provide the name of the docker image from which the container is to be created.
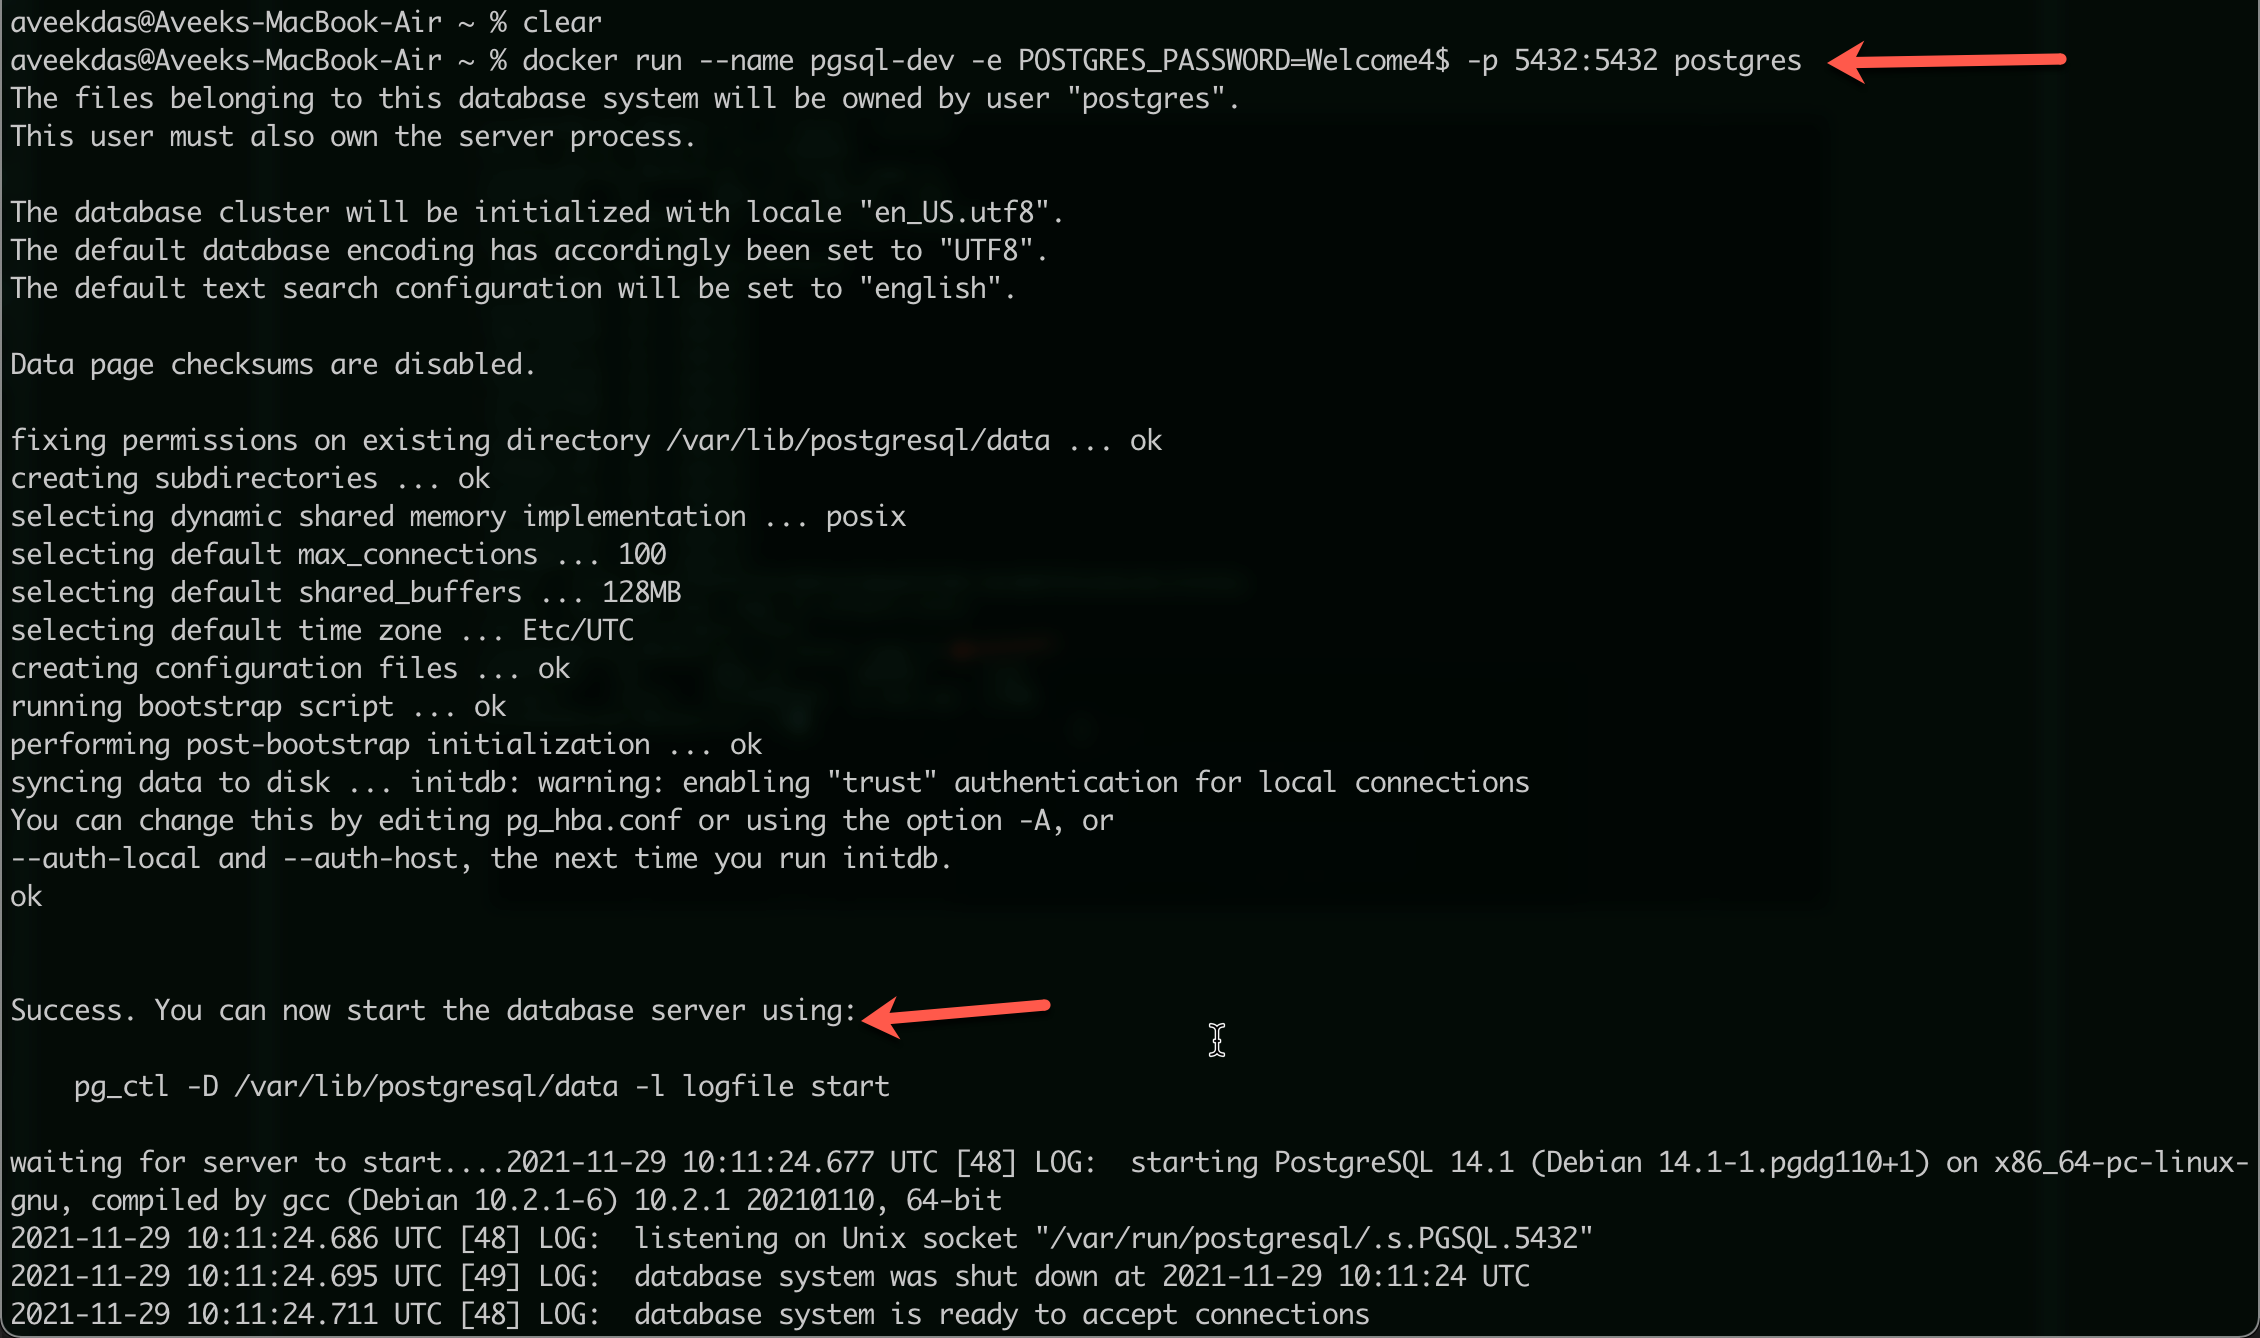
Figure 5 – Running the PostgreSQL docker image
Once you run the command, you can see that the container starts up and is ready to accept database connections. An important point to note here is that we have not executed the command in detached mode, which means the database or the container will be running as long as the terminal is open.
Now to connect to the database, let us open a new terminal window and type the following command.
docker exec -it pgsql-dev bash
This command will start an interactive terminal inside the container. Next, you can start the PostgreSQL by running the following command on the same terminal.
psql -h localhost _U postgres
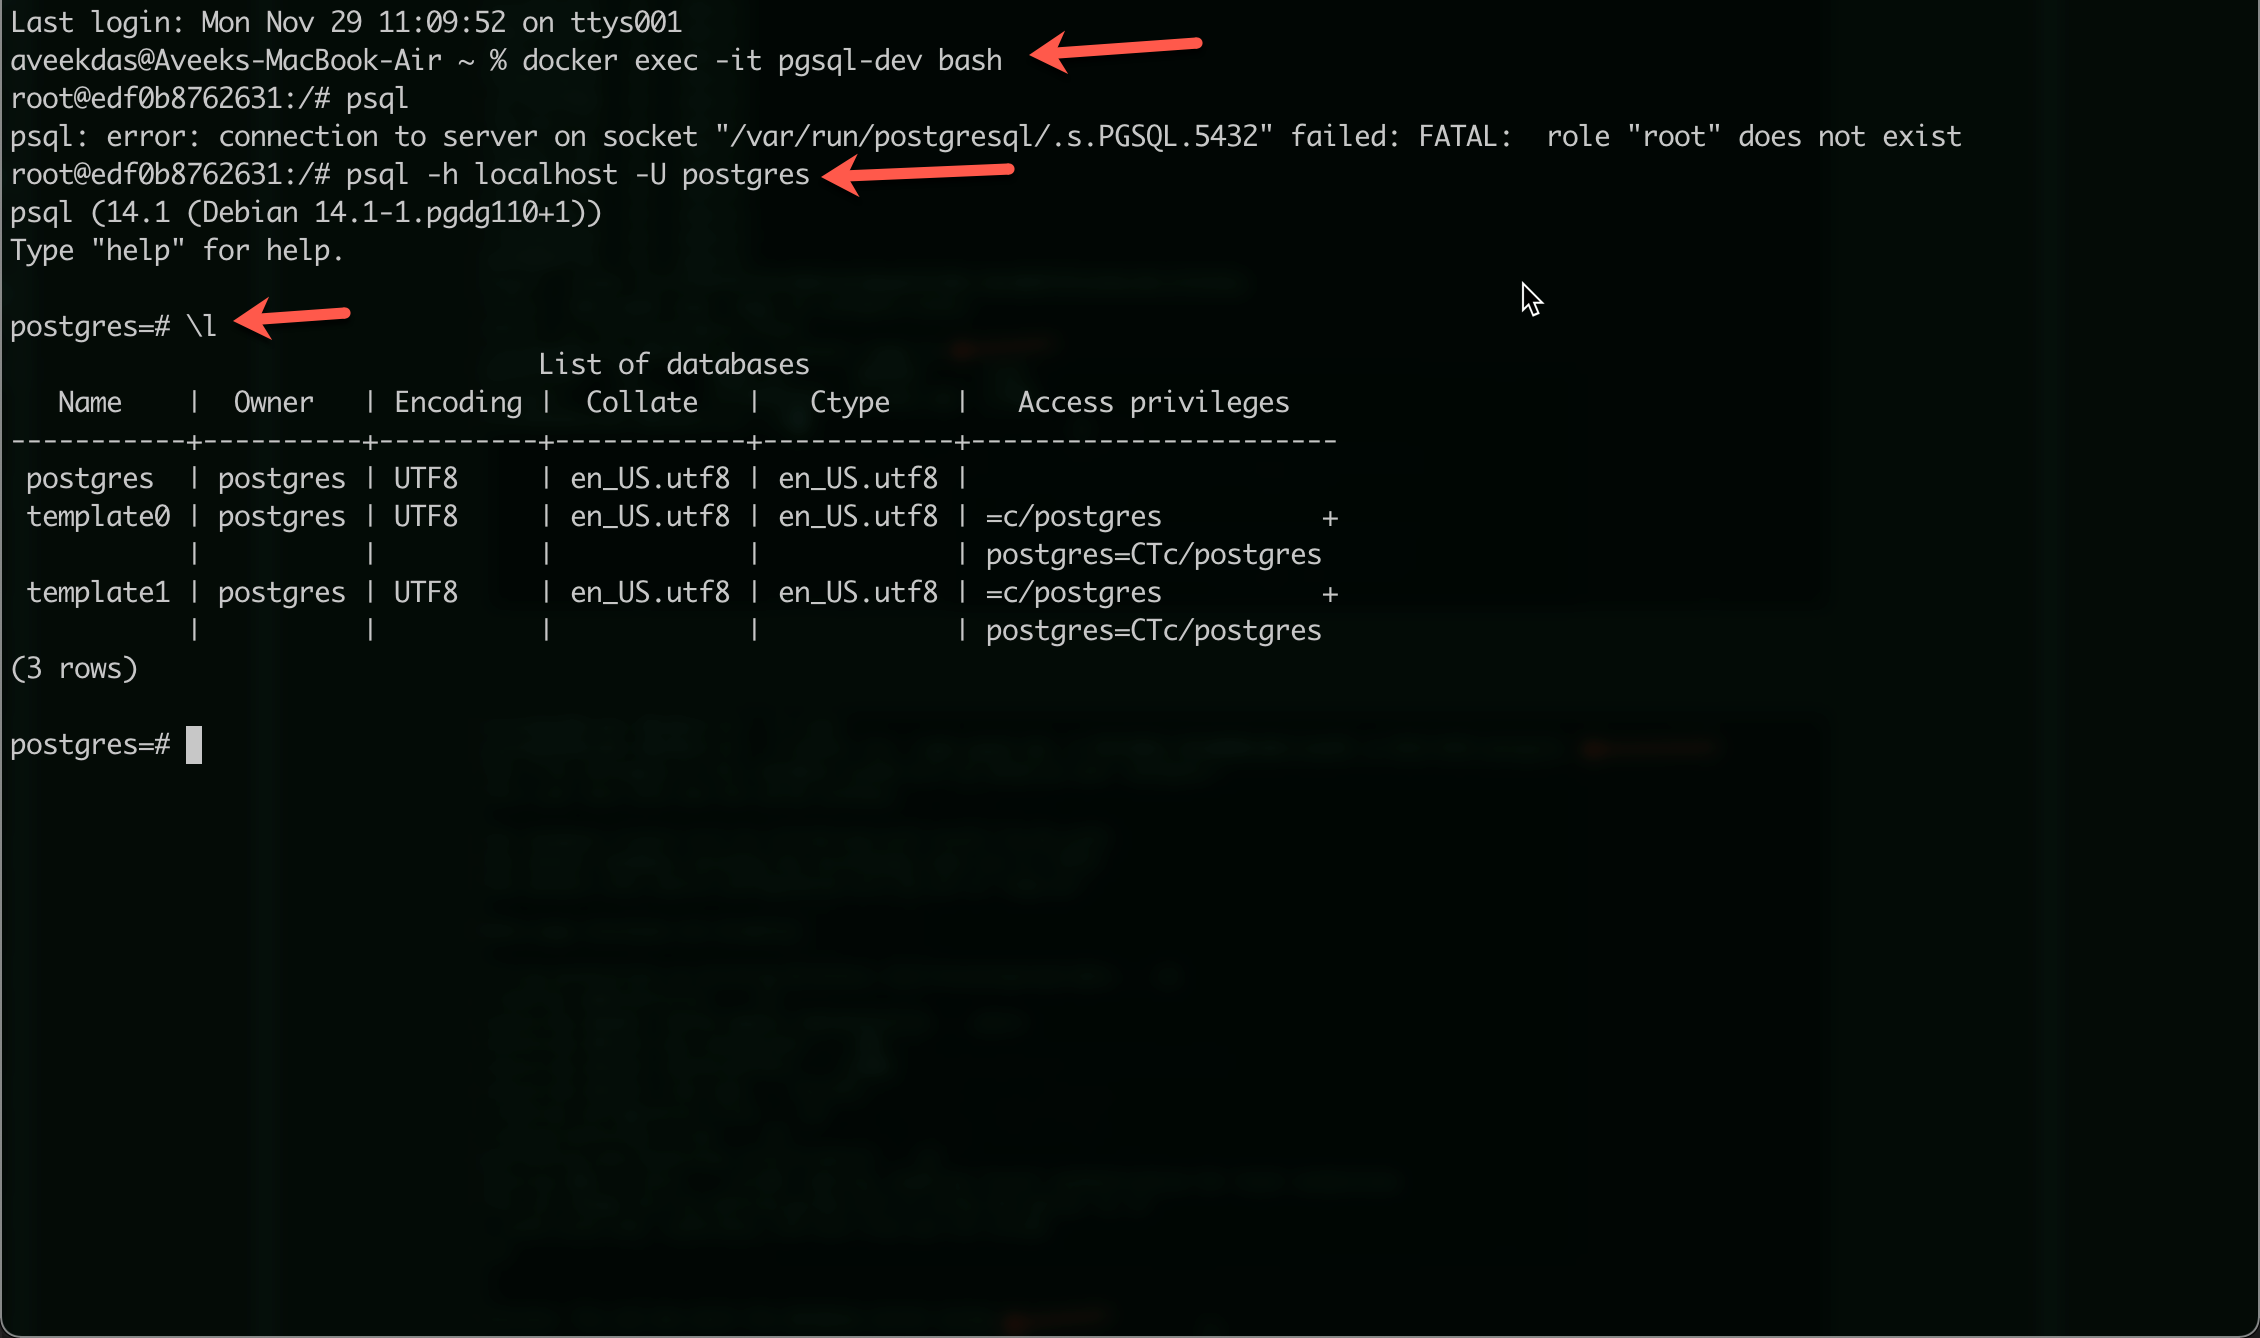
Figure 6 – Interacting with the PSQL command-line utility from terminal
You can list all the running databases and execute other SQL statements once connected through the command line utility. If you prefer using the PostgreSQL environment through a GUI, then follow along. We will also install the PgAdmin4 utility and connect it to the PostgreSQL database from it.
Installing the PgAdmin4 docker image
You can follow similar steps while pulling the docker image for PgAdmin4. You can run the following command on a new terminal window.
docker pull dpage/pgadmin4
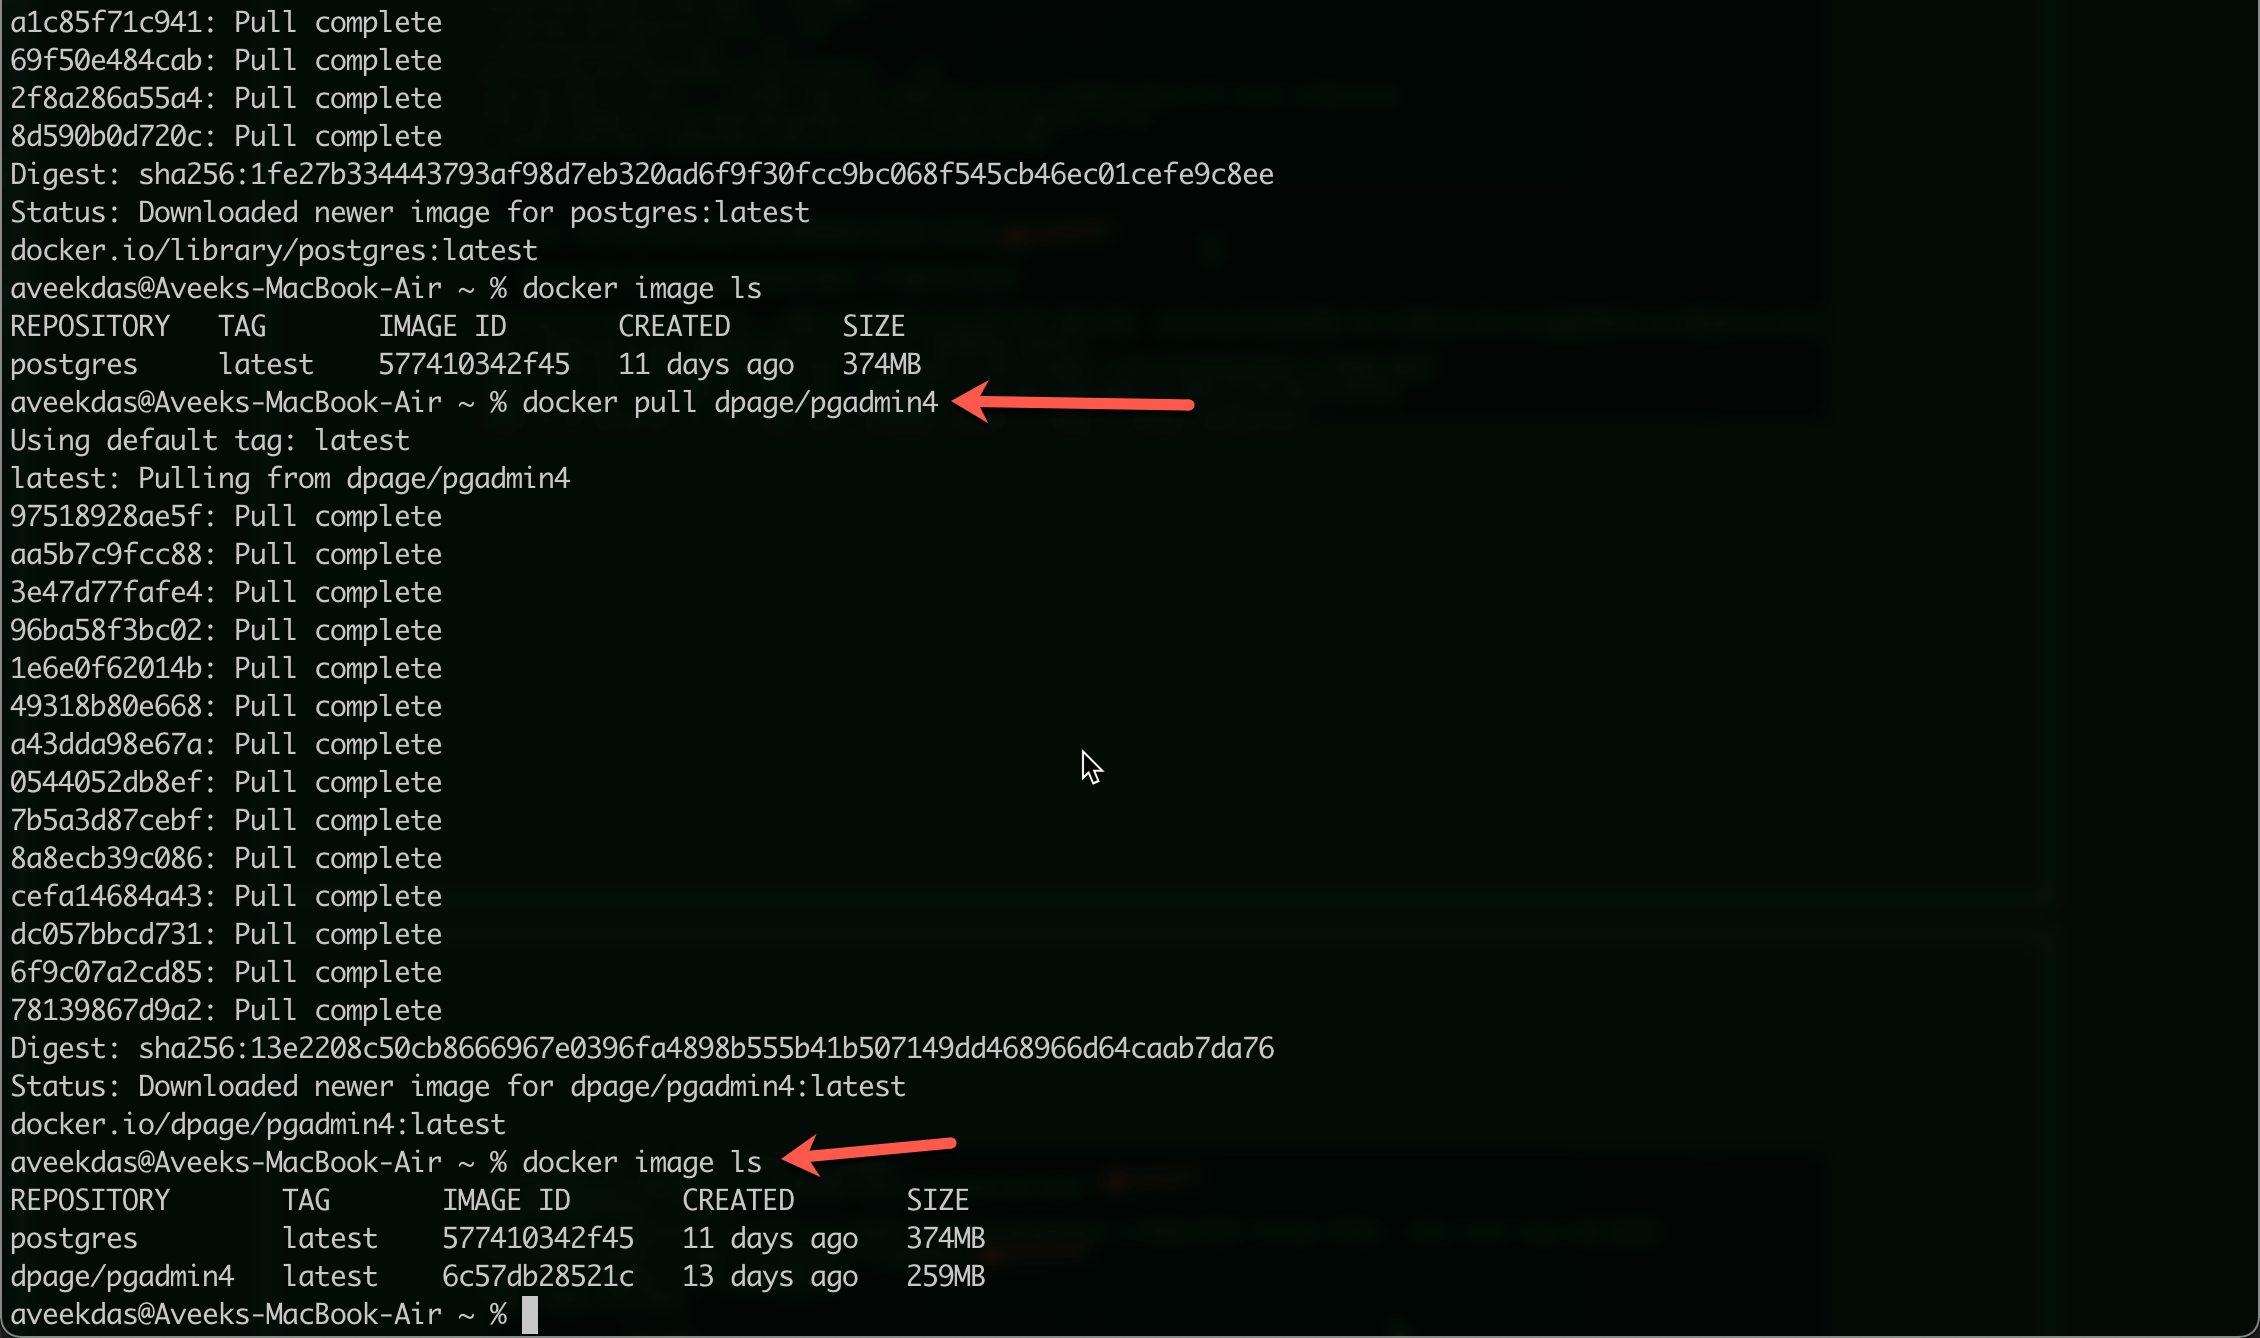
Figure 7 – Installing Docker image for PgAdmin4
To run the PgAdmin4 docker image, you need to run the following command.
docker run -e ‘PGADMIN_DEFAULT_EMAIL=test@domain.local’ -e ‘PGADMIN_DEFAULT_PASSWORD=test1234’ -p 8080:80 –name pgadmin4-dev dpage/pgadmin4
The PgAdmin4 image accepts two mandatory environment variables PGADMIN_DEFAULT_EMAIL and PGADMIN_DEFAULT_PASSWORD that enable the web application to log in. Along with that, we also specify the port on which the PgAdmin4 will run. We have specified that port 80 of docker shall bind to port 8080 of the host machine. That means the web app will be available on port 8080 from the host machine.
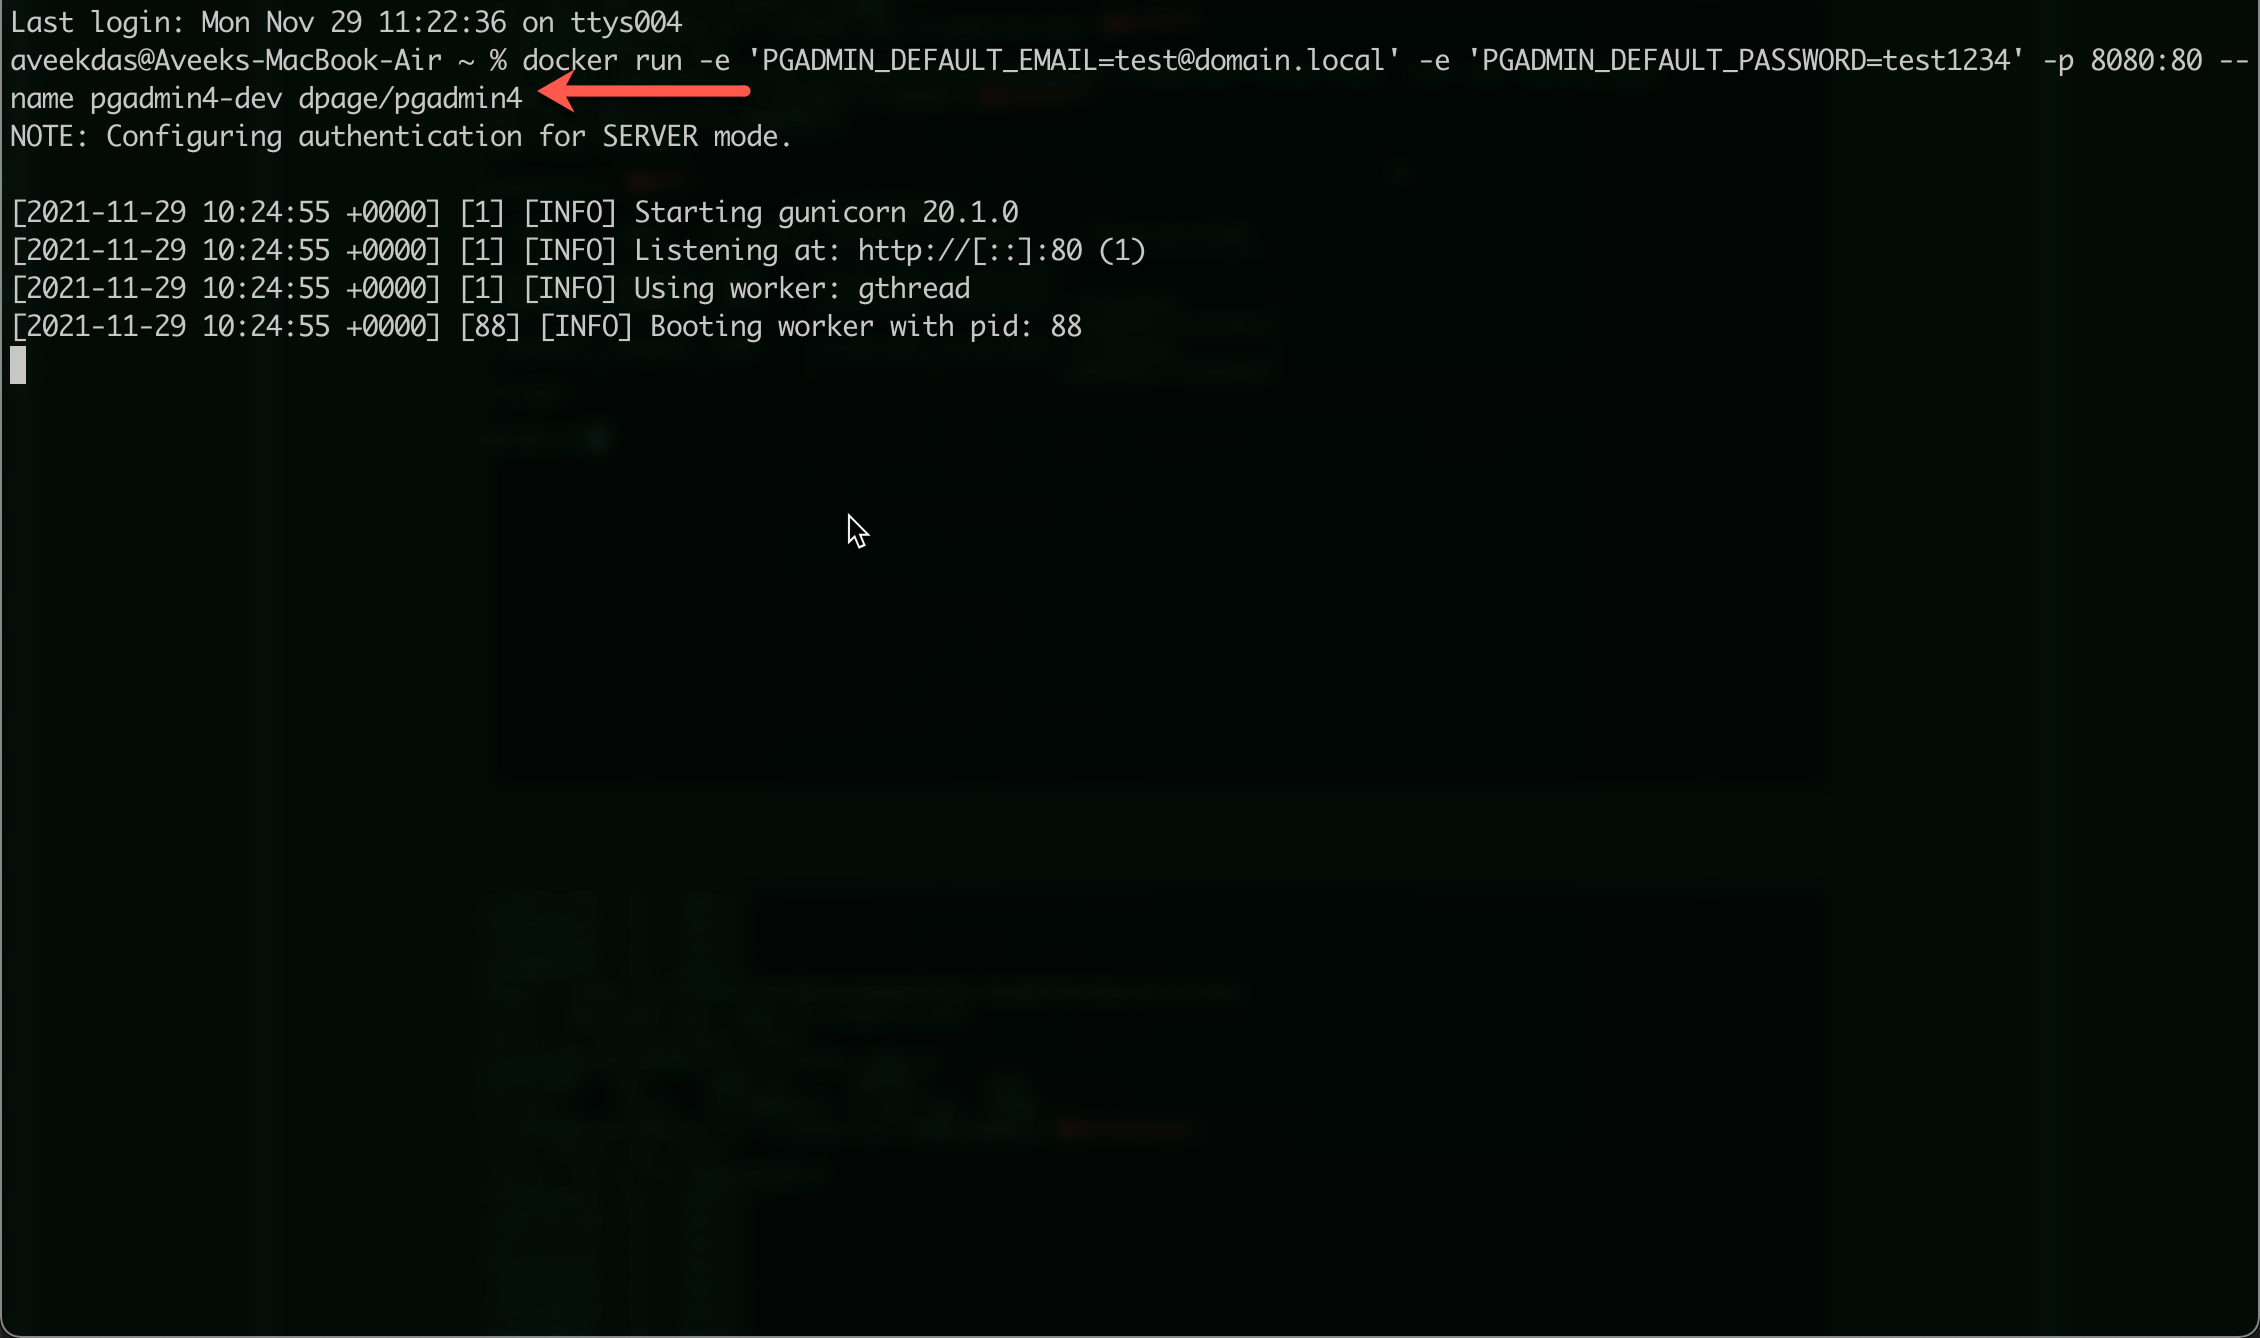
Figure 8 – Running the PgAdmin4 image on local
Once the docker container is up and running, you can head over to the web browser and connect to http://localhost:8080.

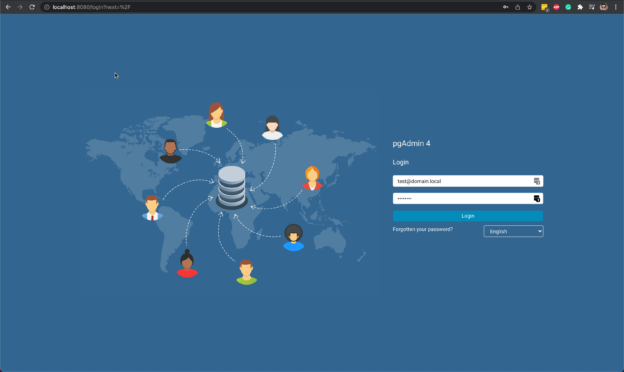
Figure 9 – Running the PgAdmin4 web application
As you can see, the PgAdmin4 web application is up and running and is available on port 8080. You can use the credentials to log in to the PgAdmin4 console.
Connecting to PostgreSQL database from PgAdmin4
Once you have logged in to the PgAdmin4 console, the final step is to create a server by connecting to the PostgreSQL docker instance that is already running on the machine. For that, we need to know the exact IP address of the PostgreSQL database. We can fetch that information by inspecting the container that is running. Open a new terminal window and type the following command.
docker inspect pgsql-dev
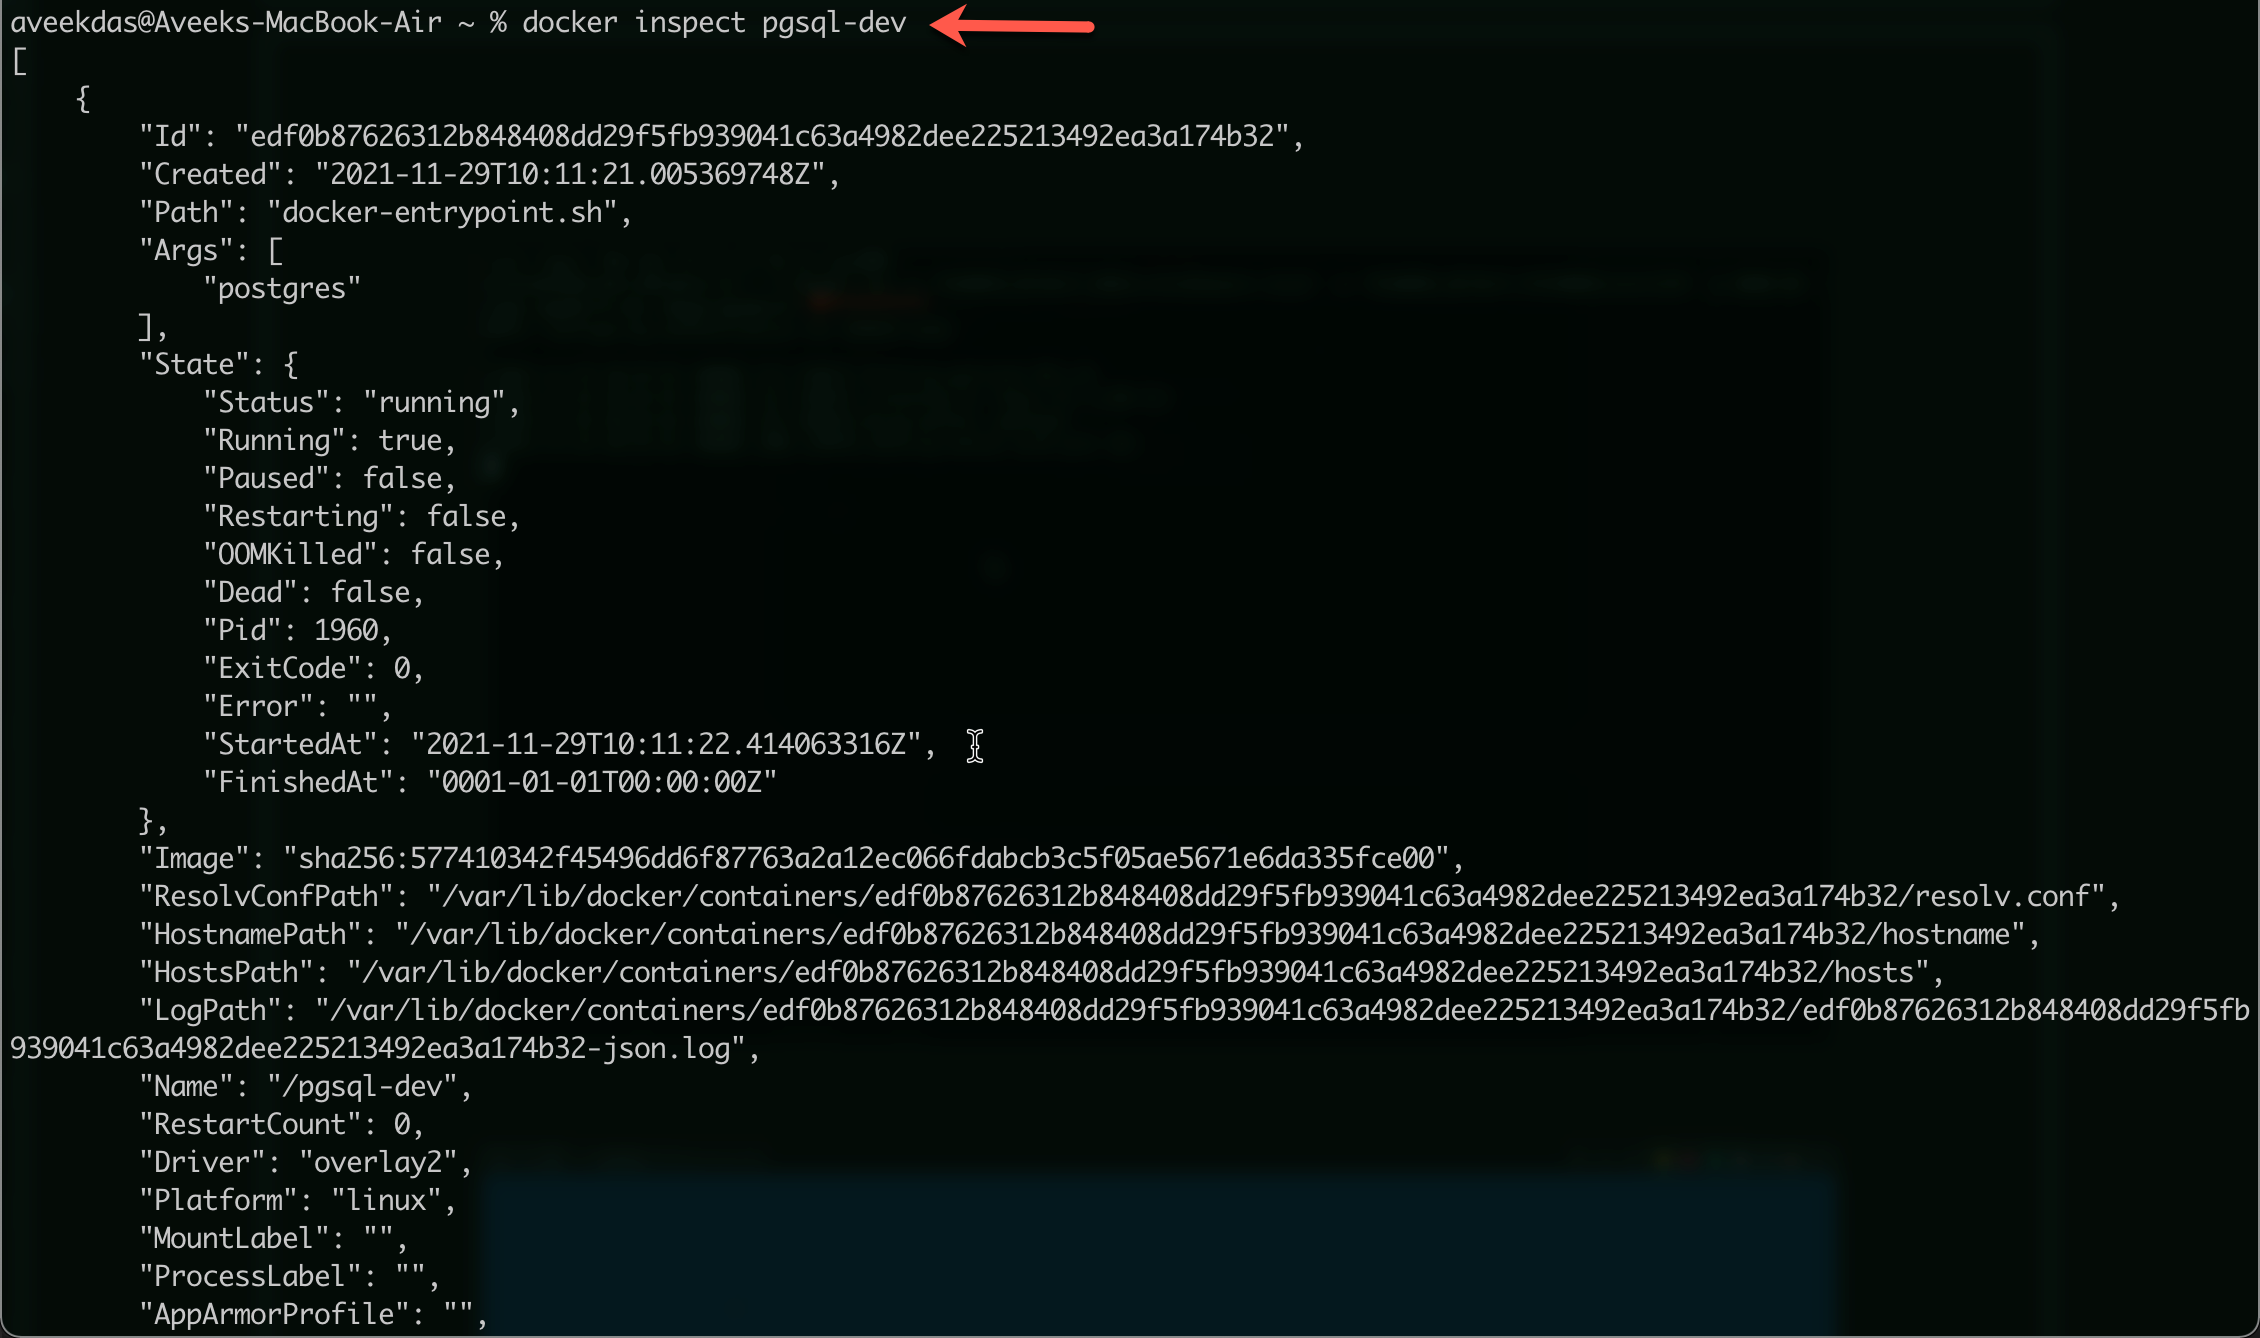
Figure 10 – Inspecting PostgreSQL Docker container
Scroll down below until you find the section Networks. bridge.IPAddress. Copy the IPAddress and store it for later use.
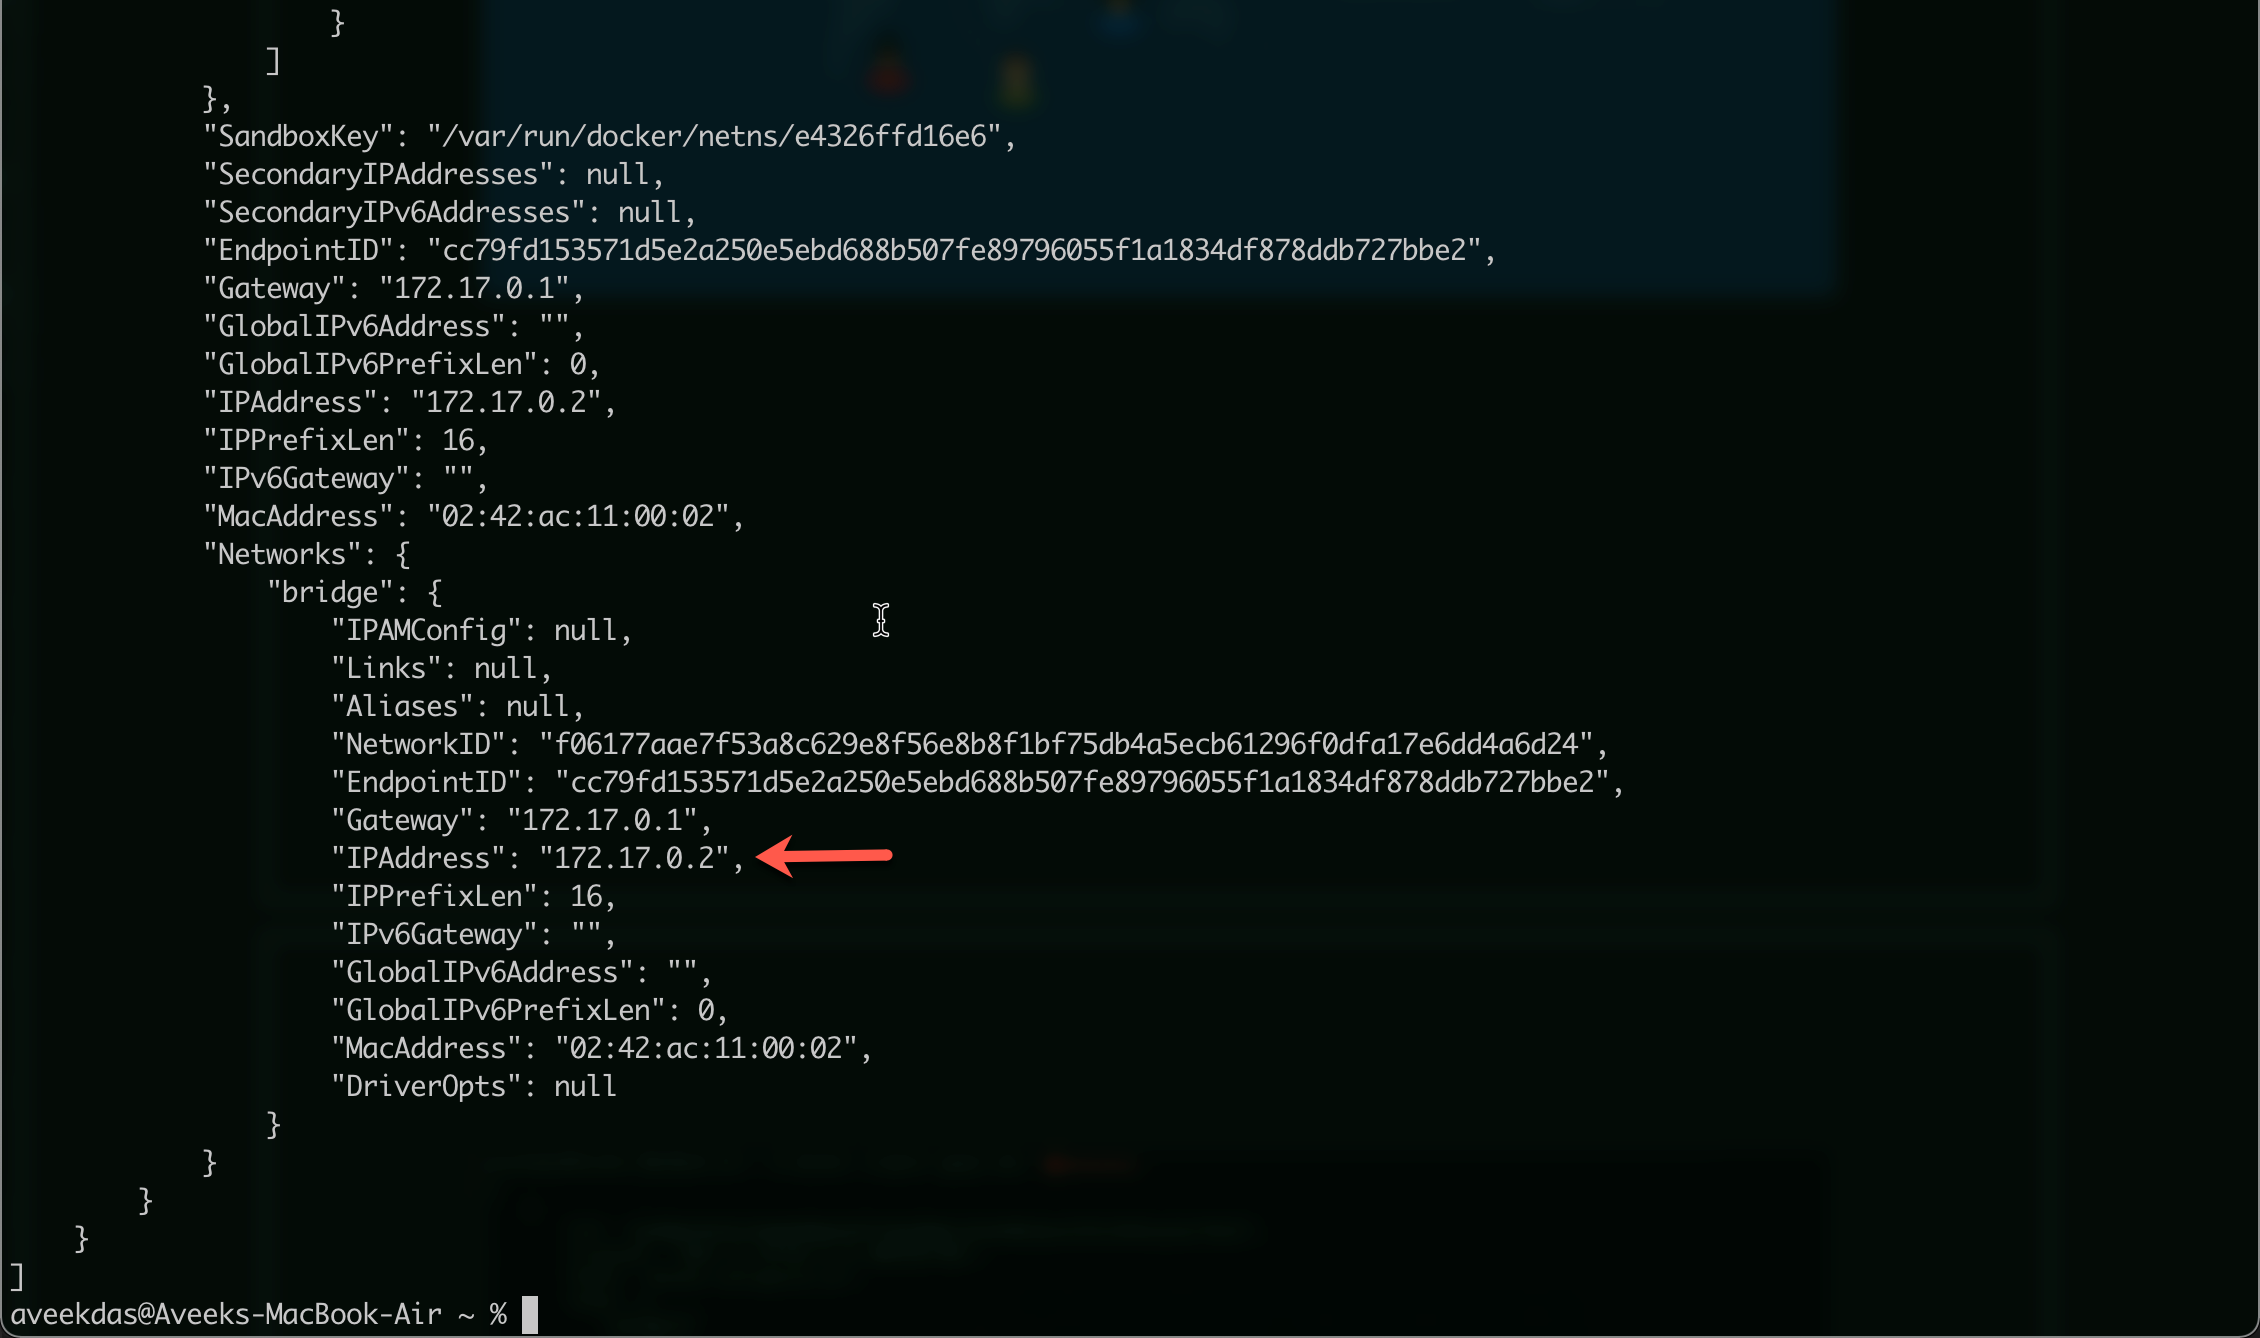
Figure 11 – Fetching the IPAddress of the PostgreSQL Docker container
Now that we have the IP address of the PostgreSQL database, head over to the PgAdmin4 window and create a new server. Use the IP Address as copied in the previous step and the password you used while creating the container. Click on Save.
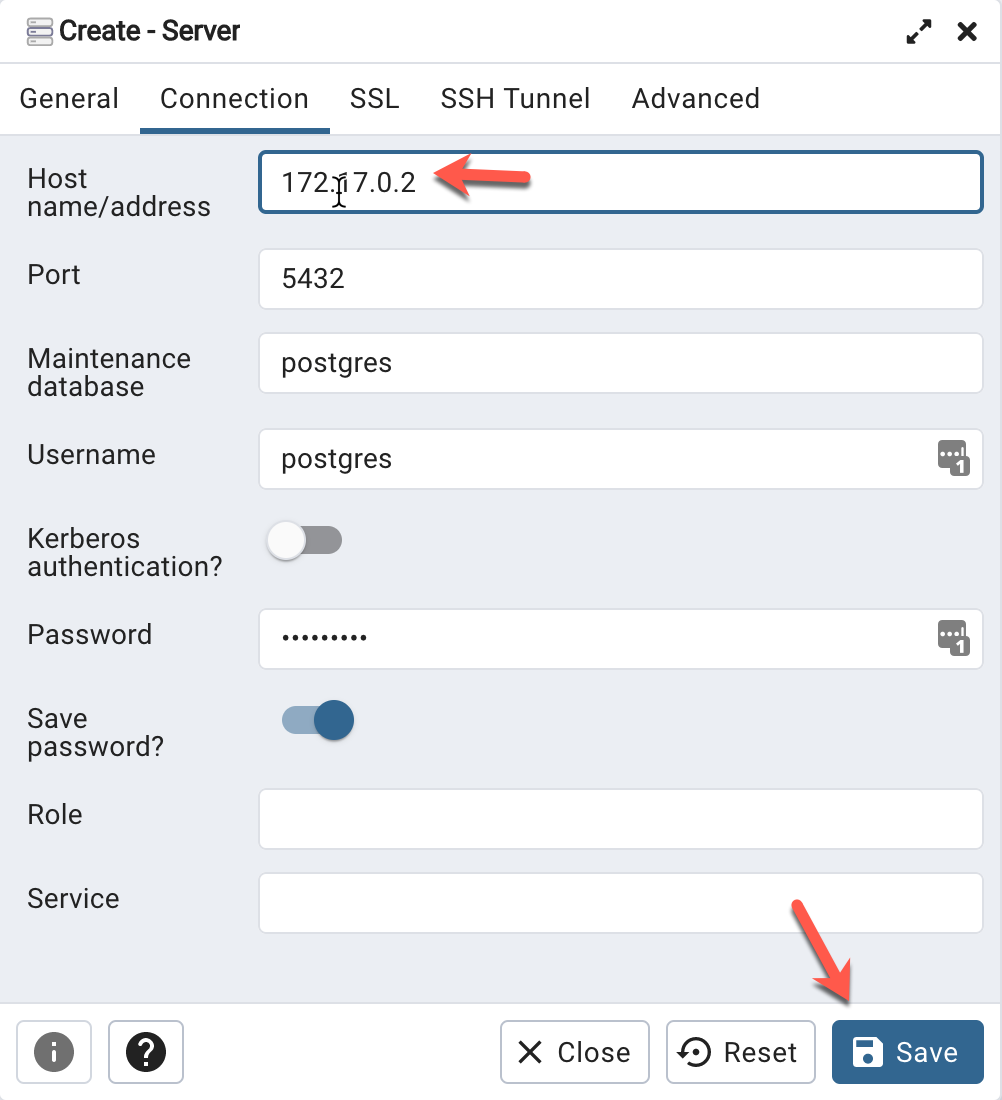
Figure 12 – Connecting to the PostgreSQL database
Once the connection is successful, you will see the dashboard for the instance will open up with the default Postgres database.
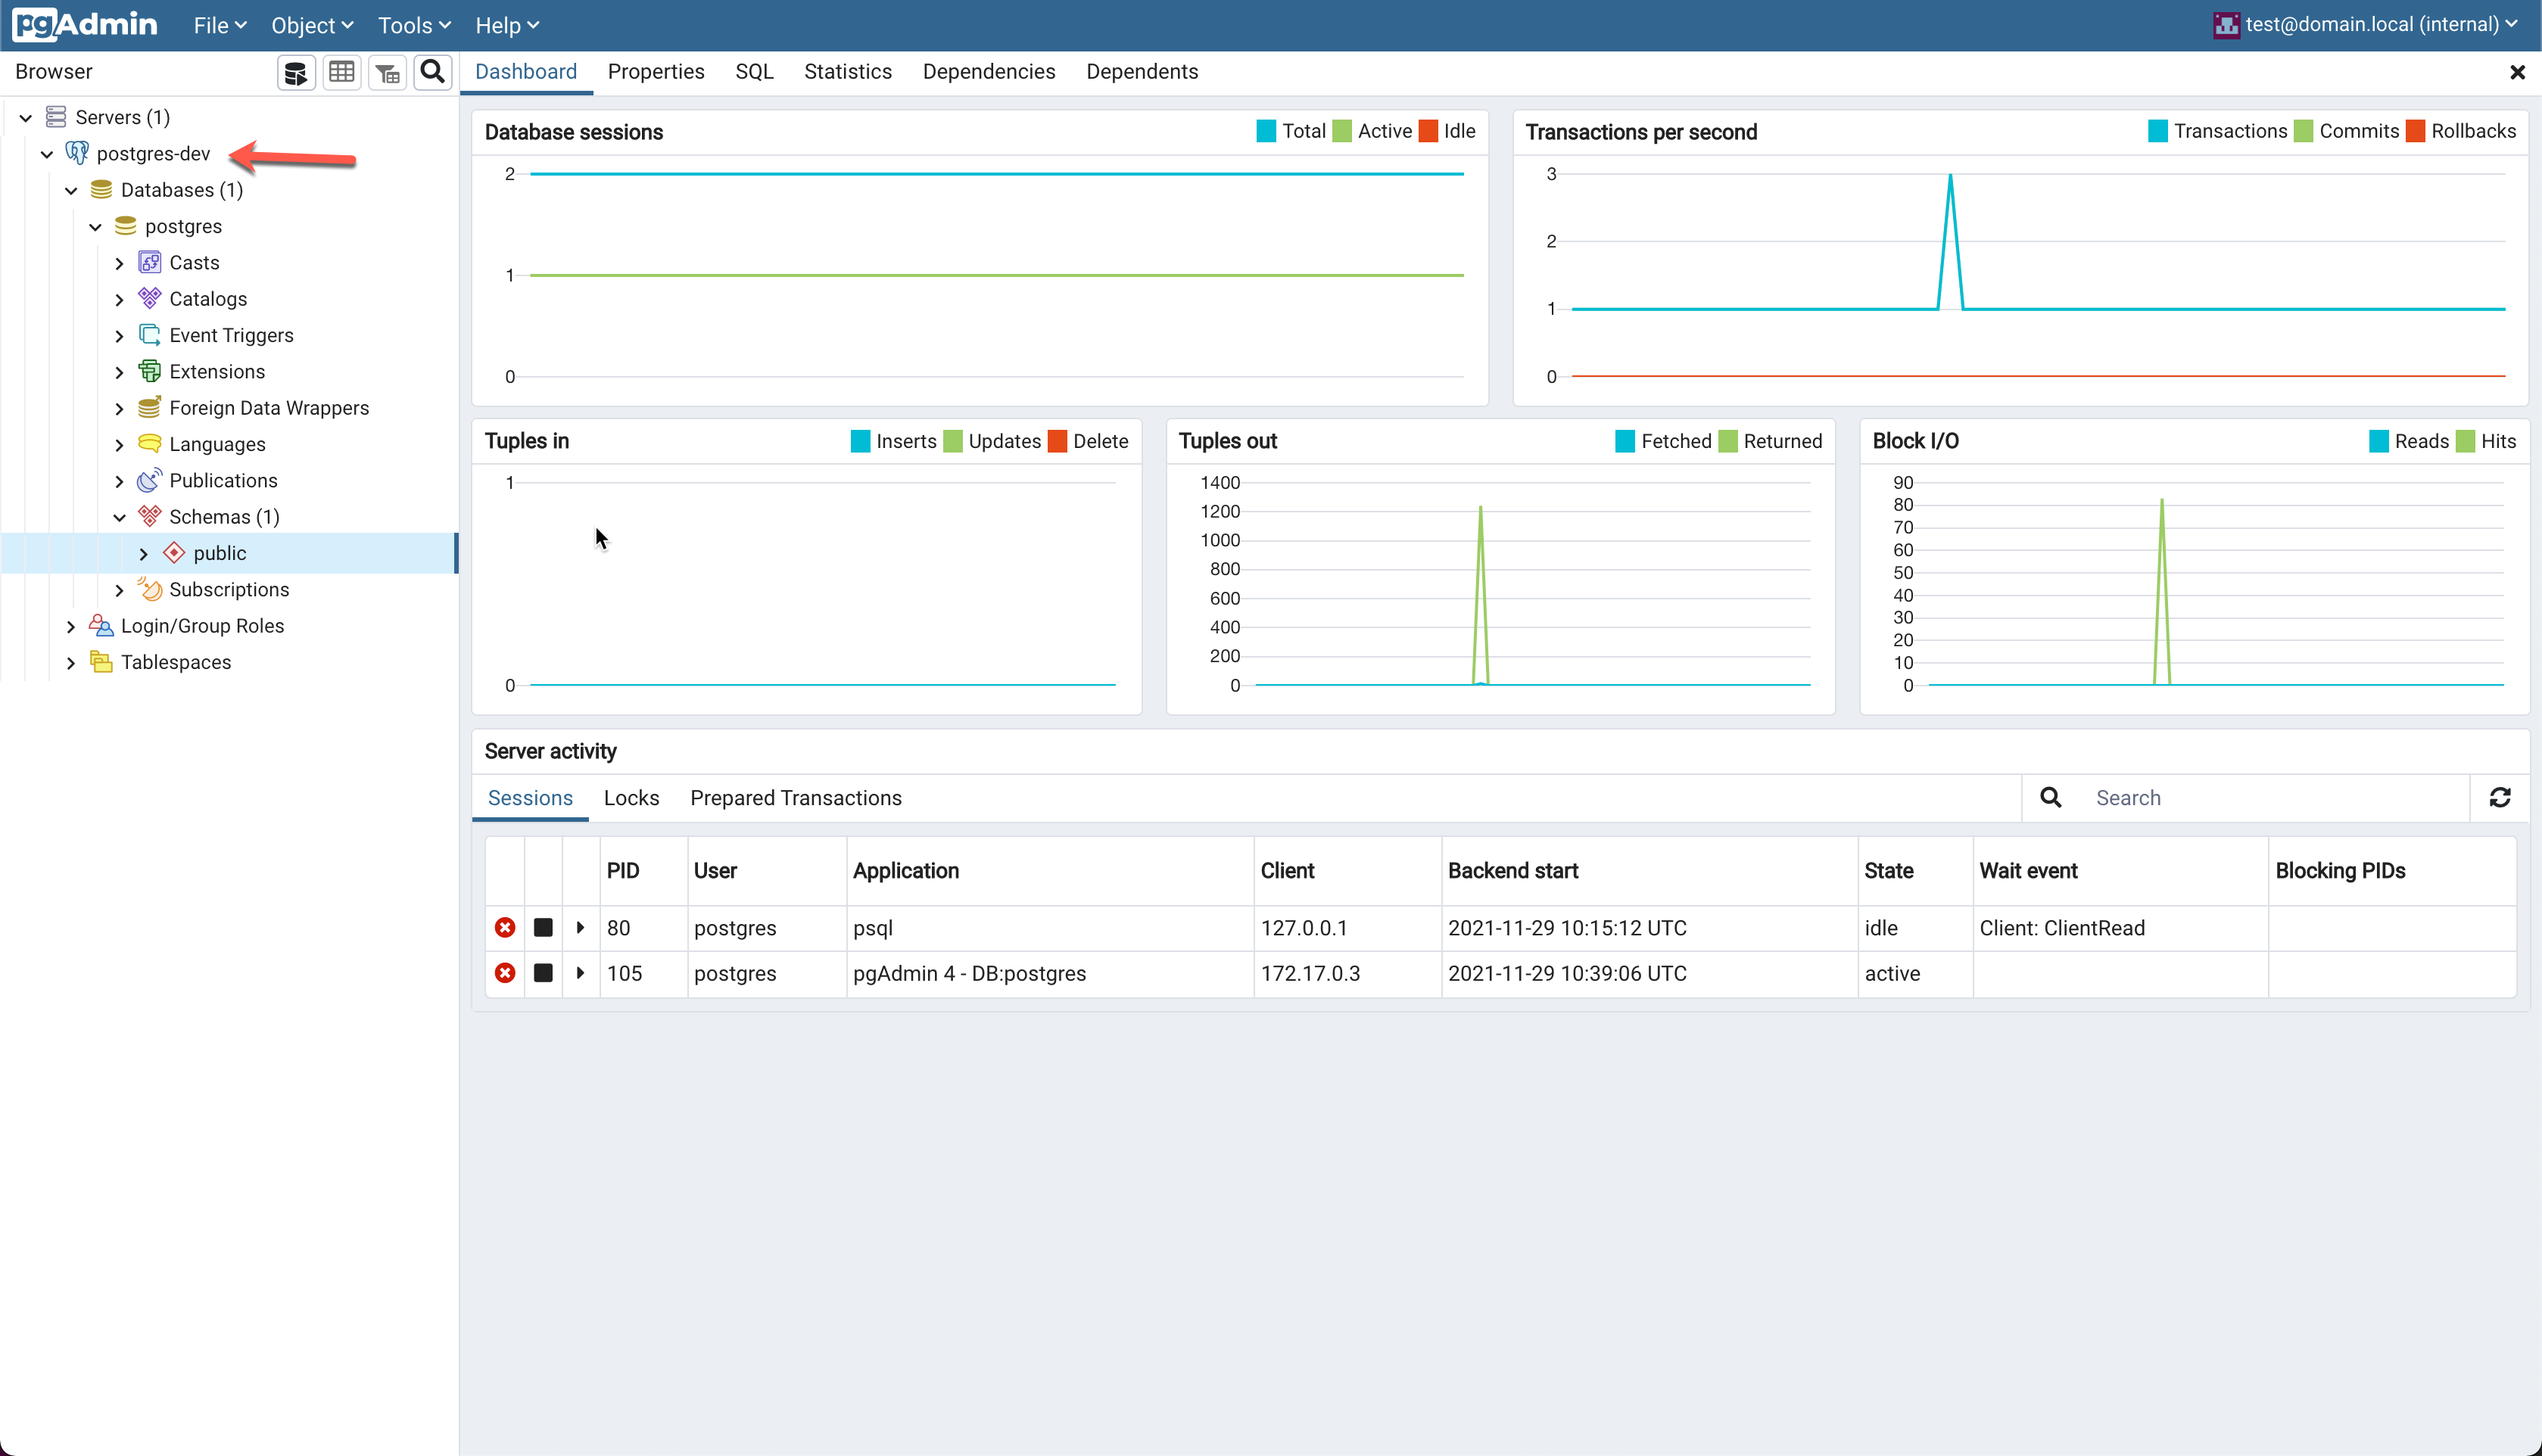
Figure 13 – Connected to PostgreSQL Docker container
Conclusion
In this article, we have learned about installing PostgreSQL on Docker. We have understood how to pull the PostgreSQL Docker image from the repository and then create a container that will run and host the database application within it. We have used the command-line interface to interact with the PostgreSQL database. We have also installed PgAdmin4, a tool used to manage and administer the PostgreSQL instance. Both PostgreSQL and PgAdmin4 are available for standalone installations, however, using Docker enables it to be containerized and you can easily ship the bundle to other machines for deployment.
To learn more about Docker, you can refer to the documentation from Microsoft and Docker documentation.

He is a prolific author, with over 100 articles published on various technical blogs, including his own blog, and a frequent contributor to different technical forums.
In his leisure time, he enjoys amateur photography mostly street imagery and still life. Some glimpses of his work can be found on Instagram. You can also find him on LinkedIn
View all posts by Aveek Das
- Getting started with PostgreSQL on Docker - August 12, 2022
- Getting started with Spatial Data in PostgreSQL - January 13, 2022
- An overview of Power BI Incremental Refresh - December 6, 2021