
This article will explain about Global Distribution feature of Azure Cosmos DB and how to enable it to distribute data across regions. Azure Cosmos DB is developed to address modern application requirements in this digital era. There are different requirements to run web-based or online internet-facing applications smoothly. You need to cater enormous amount of data that can generate with very high velocity and this will cause huge numbers of read and write operations on the database. Your database needs to be responsive and quickly show the updated details for other customers. You might also need to address autoscale which will be used to address unpredictable workload during any discount offer, or festive seasons. These modern days applications must also develop in a way so that if you need to add another location to expand your business to the different regions so you don’t need to do many changes and it could be easily adjusted to expand the application for other regions.
Let’s understand it more with an example. You have an online retail portal which is serving customers from a specific region. Now, you want to expand your business and add 2 more regions to start selling your products to these 2 new regions. Here you need a database that is near to these 2 locations where you are planning to expand your business. Azure Cosmos DB provides a feature to distribute your data to multiple regions without doing multiple changes to fulfill this requirement.
There might be other requirements like data protection, business continuity, or disaster solutions where you want to save another copy of your data, you can distribute your data to another location in such scenarios as well.
Azure Cosmos DB is a fully managed, highly secure, and globally distributed NoSQL database that is designed for new-age advanced application development. Global distribution is a feature that enables you to replicate data globally and make that accessible for read and write operations. As it is globally distributed so reads and write operations happen to its local replicas which reduce its latency and makes your application highly responsive. Global Data Distribution enables you to build a highly responsive and available application. You can also scale your application globally for read and write operations and protect your data in case of any disaster scenario. This feature also allows your application to be available from any region from its globally distributed replicas.
Here, we will explore and learn how to enable global data distribution to replicate data to newly added or multiple regions where you either want to expand your business or you want to save this data considering data protection or DR requirements.
First, we must have a Cosmos DB account provisioned, if you don’t have Cosmos DB then I will recommend you read another article “Understanding and creating Azure Cosmos DB accounts” to provision a Cosmos DB. Let me show you its high-level step in the below section.
Provision Azure Cosmos DB
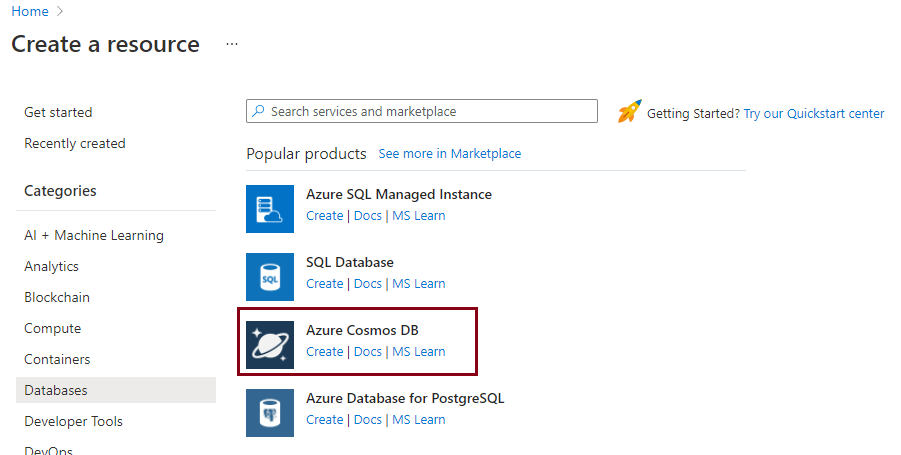
Log in to the Azure portal and type “Azure Cosmos DB” in the search window and press enter button. Click on this option once it will appear in the drop-down. You can also get this option by accessing Create a resource -> Databases -> Azure Cosmos DB as shown in the below image.
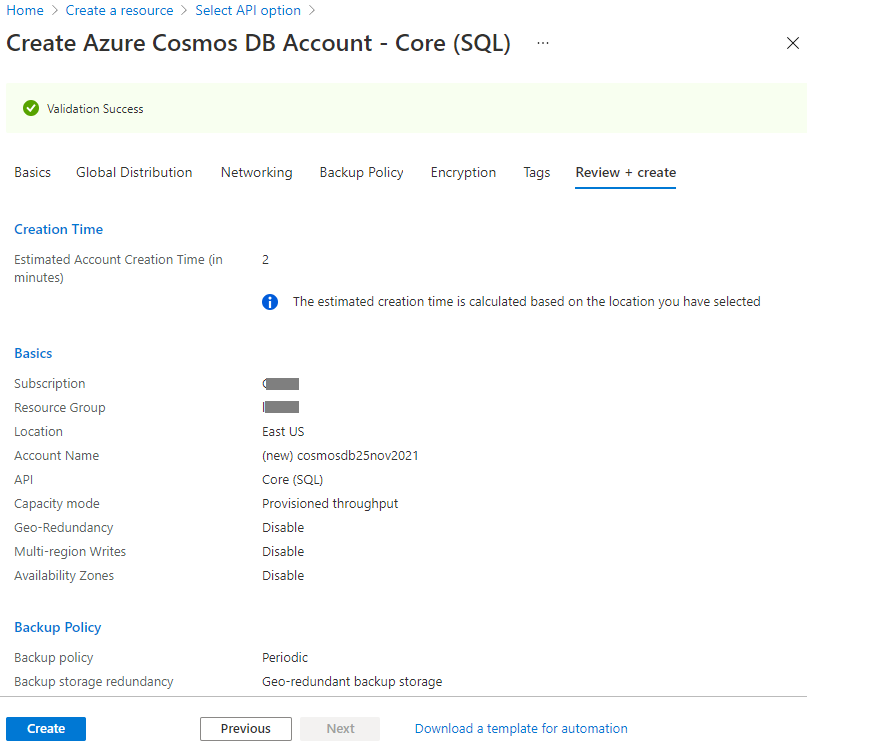
Click on the Create button showing for Azure Cosmos DB. You will get the below page to select your desired API for Cosmos DB. I have chosen recommended option Core (SQL).

Once you will choose your desired API and hit the Create button, it will display another window to enter details to create Azure Cosmos DB account. I have created this cosmos DB account with default configurations. I only entered the below details:
- Subscription name
- Resource group name
- Cosmos DB account name
- Location
Click at Review + create button to start the validation process. You can see validation is successful in my case. Now, we will go ahead and click on Create button to initiate the provisioning process.
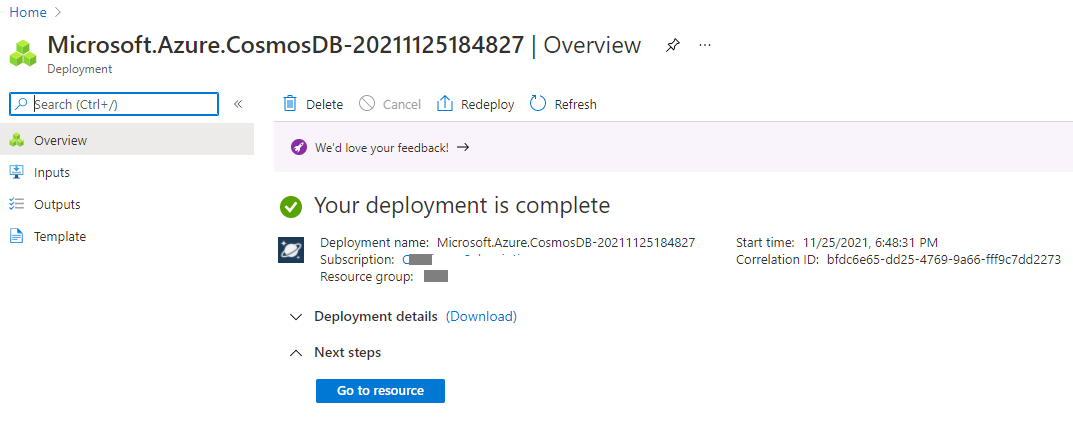
Once deployment will be successful, you will get the below screen confirming the Azure Cosmos DB account has been successfully provisioned.
Review existing configuration for Global distribution
We have provisioned the Azure Cosmos DB account in the above section. You can follow the same steps to create it in case you don’t have any cosmos DB account. If you already have Cosmos DB accounts, then we will check the existing configuration of data distribution like data is distributed to all locations, etc. Follow the below steps to check the current configuration.
If you have provisioned Cosmos DB account using the above steps, then your next step will be to click on the blue tab named Go to a resource shown in the above image. If you already have Cosmos DB accounts, then you can go to the Azure Cosmos DB page by simply typing it in the search bar and accessing this page from there. Click on your desired Cosmos DB account from this page to open its dashboard page.
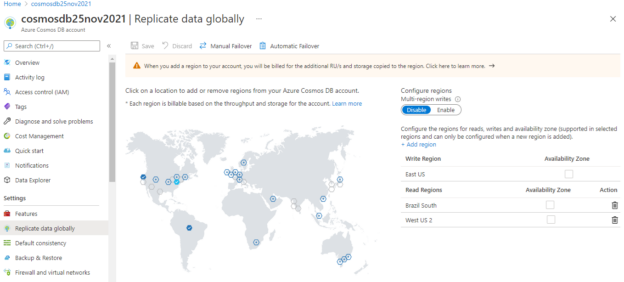
Here, you are on your desired Cosmos DB account dashboard page. Now click on the Replicate data globally option showing under the Settings tab from the left side pane as shown in the below image. We can only see one sky blue check which is representing the write region and there are no read regions configured for this cosmos DB.
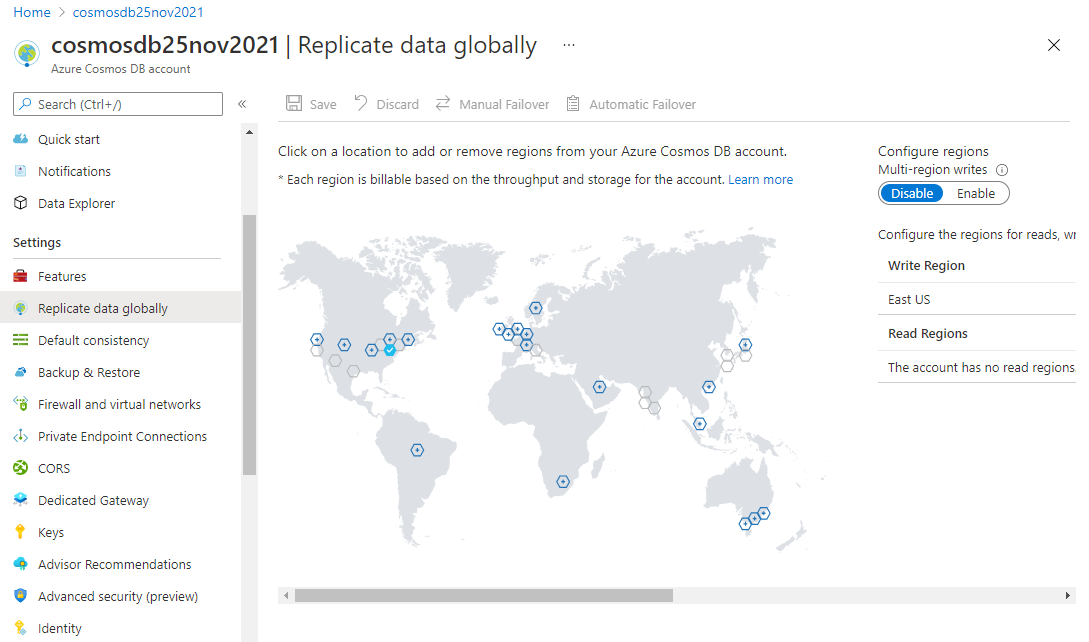
We can see data is not being replicated to any location and it is stored in only one region which is shown in the blue tick mark in the above image. This is the location where we had provisioned this Cosmos DB account i.e., East US. You can get its location name by putting your cursor on this sky-blue tick mark.
Now, you got the data distribution configuration of your Azure Cosmos DB account. Next, I will show you how to enable multiple regions to replicate your data or add new regions to distribute your existing data to that newly added region.
Enable Global data distribution to multiple regions
Here, we will explore global data distribution to other regions, or we can say replicate data from East US to other regions as per desired need. Let’s consider two scenarios, one is regarding expanding business to a specific region, and another is to save a copy of data for DR or data protection needs. Now, assume your company has decided to expand business in Brazil, which is in the South America region, and want to save a copy of this data to another region for data protection. Let’s go ahead and enable data distribution to these regions.
Go to the same page which is shown in the above image for your desired Cosmos DB account for which you want to enable replication or data distribution. You can go back to the above page by clicking on the Replicate data globally option showing under the Settings tab from the left side pane of your desired Cosmos DB account.
There are many hexagons on the map with the plus sign mark. They represent the regions where you can replicate your data. Click at the desired hexagon and then hit the save button to configure data replication for that region. I have clicked at the plus sign showing our desired locations. I have chosen the Brazil South location as the company wanted to expand business there and West US2 as a region for data protection. You can see both regions are showing in blue tick mark, which means we have marked these two regions to replicate the data from East US where Cosmos DB account is provisioned. Now go ahead and hit the Save button to apply this change and initiate the data distribution process to both regions.
You must be aware of Azure pricing while adding any region for data distribution. Replicating data to another region will be cost you based on additional RU/s and the amount of data copied to that location. You must read the attached MSDN link to explore pricing impact while enabling data distribution to other regions.
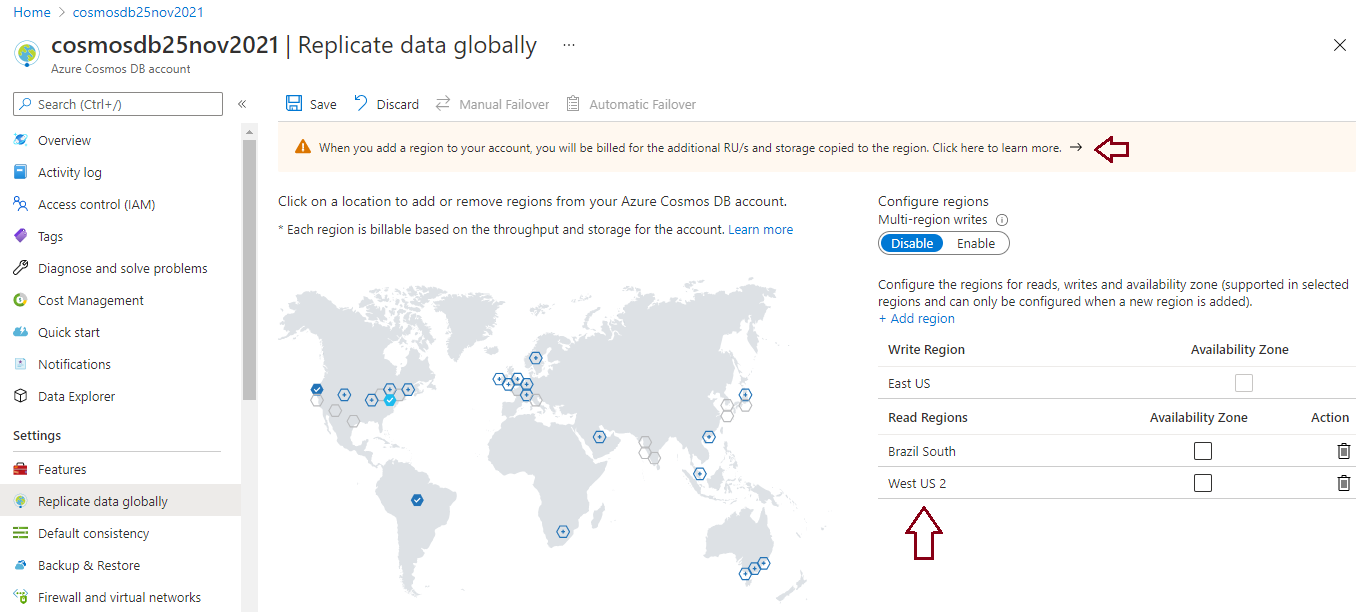
You can focus on dark red arrows to understand the regions you are adding to distribute your data. You can see both regions are shown in the Read Regions section whereas the Write region is still only to East US. Once you will click on the Save button to initiate the replication to both regions, processing will start, and the above screen will be freeze and will be grayed out to prevent any further change on this page as shown in the below image.
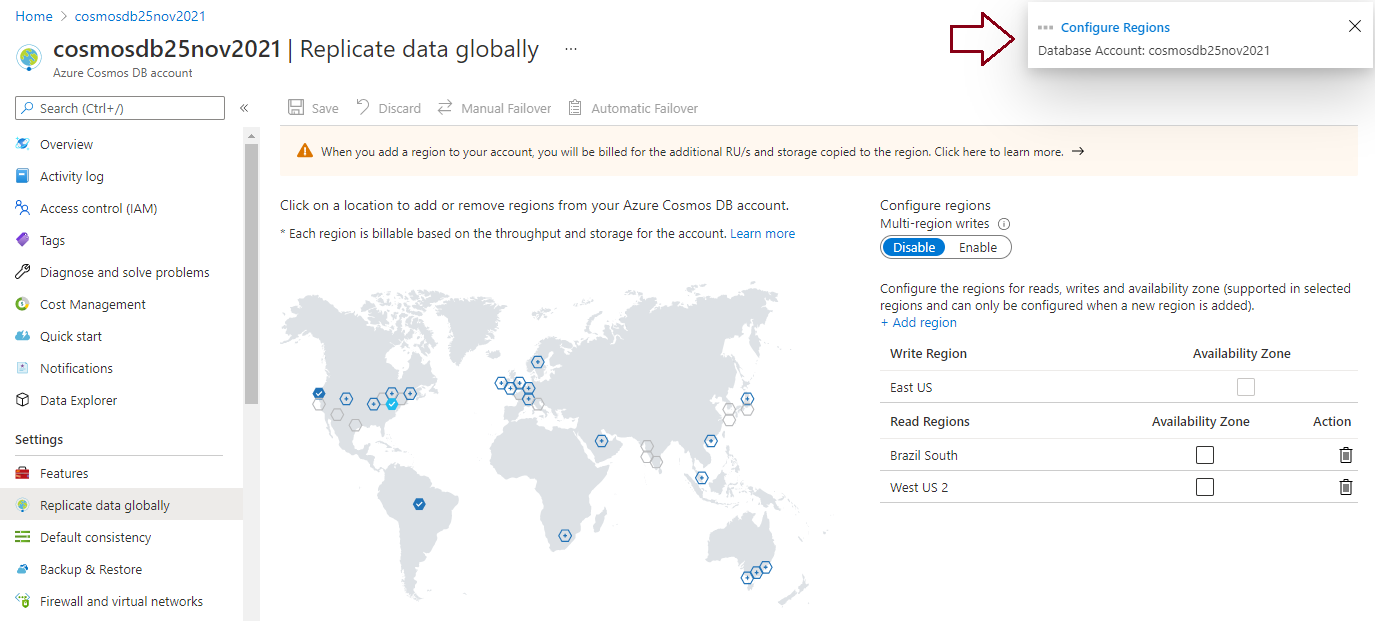
Have a look at the dark red arrow of the below image which shows new regions are being added for data replication.
Here, we can observe this screen, data replication has started and till the time this process will run below screen will be showing as Updating as shown in the below image.
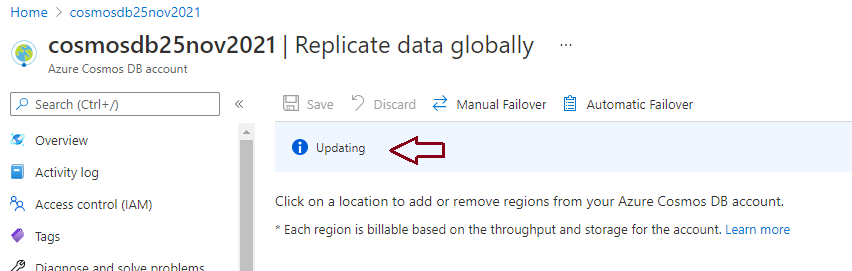
Generally, Microsoft says data replication can take up to 30 minutes so the above screen will be showing till the time data will not be replicated to their respective regions. If you have a very small size of data, then it will take a few minutes. Once data will be replicated to all respective regions, the screen will return to its normal state as it was before as shown in the below image. Here we can see both newly added regions are showing in blue tick mark which shows data is replicating to these regions.

You can see both regions Brazil South and West US2 are showing in blue tick in the above image. It means data distribution is configured for both locations. Additionally, you can also observe that Manual Failover and Automatic Failover buttons are also enabled after configuring global data distribution. We can initiate a failover between these regions as per our requirement but this part is out of the scope of this article so I will cover them in another article.
If you want to disable data distribution for any specific region or want to remove any region for this data replication then also you need to do the same thing. You just need to deselect that region by clicking at this blue tickmark for that specific region and hitting the Save button to apply the changes. Data replication will stop for that region.
Conclusion
Today, I have explained the Global distribution feature of Azure Cosmos DB along with its steps to enable it for multiple regions to replicate data. This feature enables developers to build highly scalable, responsive, and available applications. You can add or remove your desired regions as per your requirement, but you should make a note that adding additional regions will come up with an additional cost for RU/s and the size of storage used to that region, so it is recommended to do a proper cost study before enabling this feature.

He loves to talk and write about database technologies. He has lead and delivered many projects from designing to deployments on Migrations to the cloud, heterogeneous migrations, Database consolidations, upgrades, heterogeneous replication, HA / DR solutions, automation, and major performance tuning projects.
You can also find him on LinkedIn
View all posts by Manvendra Singh
- Configure backup storage redundancy for Azure Cosmos DB account - May 15, 2024
- Difference between SQL SELECT UNIQUE and SELECT DISTINCT - January 16, 2024
- How to do a group by clause - April 12, 2023