

Introduction
I have dedicated this article to the topic of Elastic Jobs in Azure SQL Database which is in Public Review. This feature allows you to run scheduled tasks in your Azure SQL Databases. This is similar to SQL Server Agent you have in the On-prem SQL Server versions. However, in Elastic Jobs, you can execute the scheduled tasks in multiple Azure SQL Servers and multiple Databases which is an added advantage when considering the features of SQL Server Agent. Further, this execution performs parallelly.
This type of Elastic Jobs can be used to capture information on servers such as wait stats, index stats, and a number of users or execute maintenance tasks such as Partition Maintenance, Index Rebuild, Statistics Update, or data update for multiple databases or schema update for multiple databases. Like in SQL Server Agent jobs, Elastic Jobs can be scheduled as well. This shows that Elastic Jobs in Azure SQL Database can be used in distributed databases heavily.
This feature supports all the options of Azure SQL Database offerings such as General Purpose, Basic, Hyper-Scale, Serverless, Elastic pools, etc. However, to enable Elastic Agent Job you need at least Standard S0 level which has at least DTU 10. It is important to remember that the Elastic Job feature will not be available for Azure SQL Managed Instance.
Explanation using a Scenario
Let us select a scenario to explain Elastic Jobs in Azure SQL Database. In the case of distributed databases or sharding databases, let us look at some database distribution as follows:
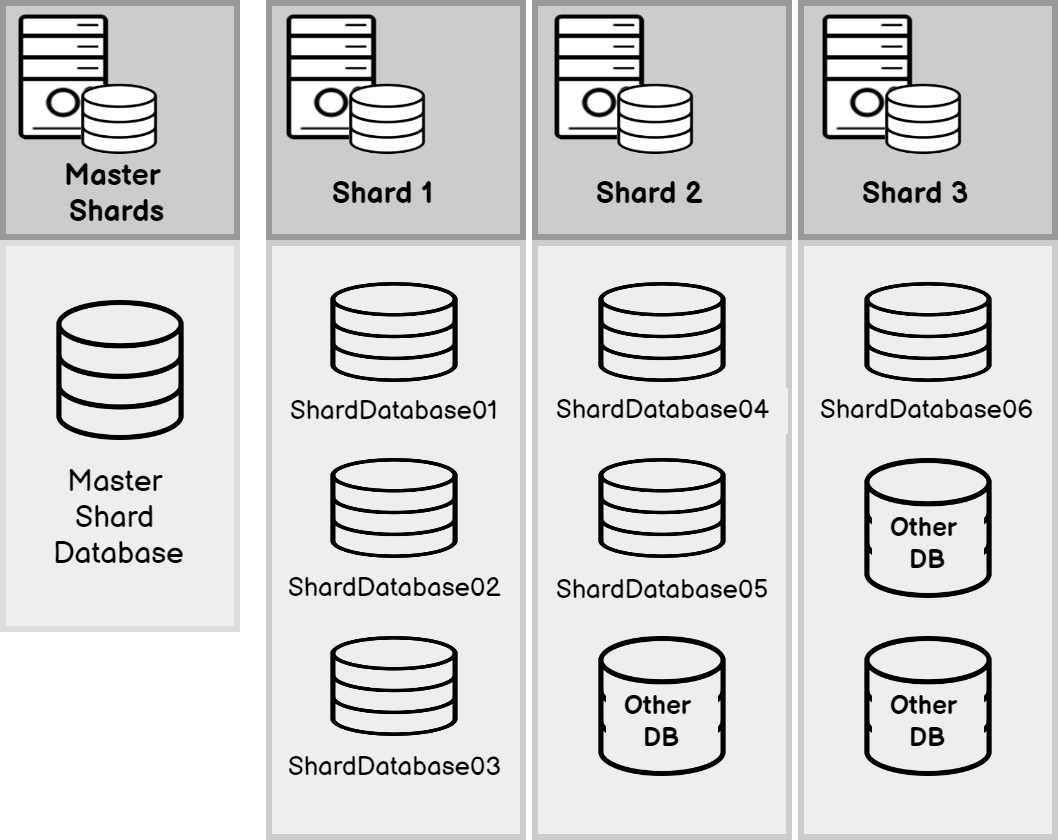
As shown in the above figure, a typical database sharding environment will contain a master shard that decides the method to connect to its member shards. In the above environment, Sharding databases are distributed among three database servers and sharded databases are shown in blue color. There are other databases in these servers which are not logically part of these sharding. This distribution of databases means that your tasks should execute only in the relevant sharded databases. In the above example, all databases in shard 1 to be executed meanwhile one database should be excluded from the execution in shard 2, meanwhile, only one database should be selected from the third shard.
Creating Azure SQL Databases
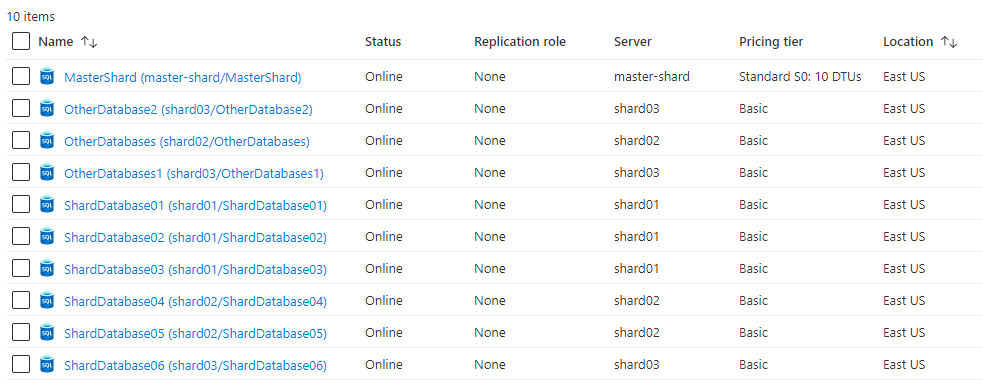
Let us create 10 databases in four servers and the Master shard should be at least in the capacity of Standard S0. If you need to know the details of how to create an Azure SQL Database, please refer to the Creating your first Azure SQL Database article.
All ten databases were created as shown in the Azure portal below.
When necessary firewalls are enabled, you can connect to all the servers and databases from the SSMS as shown below.

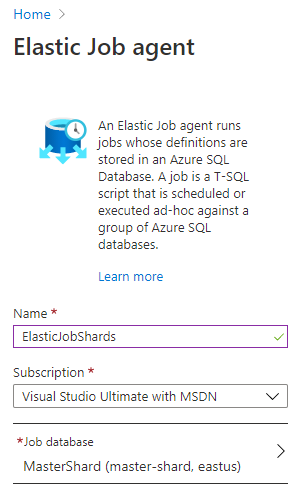
Now we are ready with the environment to Create Elastic Jobs in Azure SQL Databases. First of all, let us enable Elastic Job Agent for the master shard database as shown below.
Once this is enabled, tables, views and stored procedures related to the jobs will be created in selected the database. In Elastic jobs, there are two important credentials that need to be created. One user to connect to the shard server and the other user to execute the job in each server.
The following credentials are created on the master shard database:
|
1 2 3 4 5 6 7 8 9 10 |
CREATE MASTER KEY ENCRYPTION BY PASSWORD='Password@123'; CREATE DATABASE SCOPED CREDENTIAL JobExecution WITH IDENTITY = 'JobUser', SECRET = 'passw0rD@23'; GO CREATE DATABASE SCOPED CREDENTIAL MasterUser WITH IDENTITY = 'MasterUser', SECRET ='passw0rD@23'; |
Further, the user MasterUser should be created in all the servers as below. Remember to use the same password that was used to create the SCOPED CREDENTIAL for the relevant login. In case you are changing the password for the login, make sure that you are changing the password for the policies as well.
|
1 2 3 |
CREATE LOGIN MasterUser WITH PASSWORD = 'passw0rD@23'; GO |
The next step is the creation of the group and adds the members to the created group. The following t-SQL statement will create a group named shardDatabase.
|
1 |
EXEC jobs.sp_add_target_group 'ShardDatabase' |
As discussed before, we have three different members. Let us add these memberships one by one.
First, we need to enable the entire shard01 to the membership. This means that we are enabling the entire server as below.
|
1 2 3 4 5 |
EXEC jobs.sp_add_target_group_member N'ShardDatabase', @target_type = N'SqlServer', @refresh_credential_name = 'MasterUser', @server_name ='shard01.database.windows.net' |
In the shard02, we need to exclude the database OtherDatabases and for that purpose we can use the exclude option as shown in the below script.
|
1 2 3 4 5 6 7 8 9 10 11 12 |
EXEC jobs.sp_add_target_group_member N'ShardDatabase', @target_type = N'SqlServer', @refresh_credential_name = 'MasterUser', @server_name ='shard02.database.windows.net' EXEC jobs.sp_add_target_group_member N'ShardDatabase', @membership_type = N'Exclude', @target_type = N'SqlDatabase', @server_name ='shard02.database.windows.net', @database_name ='OtherDatabases' |
From the above two scripts, the entire server is included and then the unwanted database is excluded. This needs not to be executed in the same order. For example, you can do the exclude first and then include one.
In the shard03, we need to include the database ShardDatabase06 and for that purpose, we will use the below script.
EXEC jobs.sp_add_target_group_member N’ShardDatabase’, @target_type = N’SqlDatabase’, @server_name =’shard03.database.windows.net’, @database_name =’ShardDatabase06′
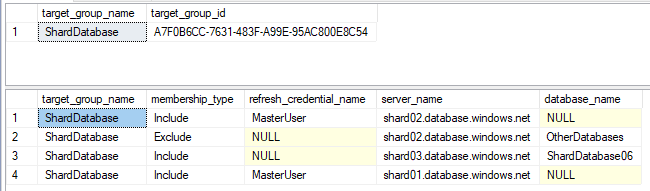
We can verify these create groups and its members from the following views:
|
1 2 3 4 5 6 7 |
SELECT * FROM jobs.target_groups SELECT target_group_name, membership_type, refresh_credential_name, server_name, database_name FROM jobs.target_group_members |
Next is to create the Job which is the key part of the Elastic Jobs in Azure SQL Databases. Configuration of Elastic Job is somewhat similar to the SQL Server Agent job. In the Elastic jobs, we need to create the job and its step.
Let’s say we want to create a table in all databases in the shards. Since this job will execute under the jobuser credential, we need to create the jobuser in every database and need to create the user in the master and other relevant databases. The following statement should be executed in the master database.
|
1 2 3 |
CREATE LOGIN jobuser WITH PASSWORD = 'passw0rD@23'; GO |
The next step is to map the above login into a user in all the databases including the master databases.
|
1 2 3 4 |
CREATE USER jobuser FOR LOGIN jobuser WITH DEFAULT_SCHEMA = dbo GO |
Let’s create the job name create_elastic_job_table with the following script in the master shard database.
|
1 2 |
EXEC jobs.sp_add_job @job_name ='create_Elastic_Job_Table', @description ='Creation of Elastic Job Table' |
The idea of the job is to create the following table in all the shards that mean we are looking at six databases.
|
1 2 3 4 5 6 |
IF NOT EXISTS (SELECT name FROM sys.tables WHERE name ='ElasticJob') CREATE TABLE ElasticJob (ID INT IDENTITY, CurrentDateTime DateTime, Description VARCHAR(50) ) |
We need to add a job step to the job as shown below.
|
1 2 3 4 5 6 7 |
EXEC jobs.sp_add_jobstep @job_name = 'create_Elastic_Job_Table', @command = 'IF NOT EXISTS (SELECT name FROM sys.tables WHERE name =''ElasticJob'') CREATE TABLE ElasticJob (ID INT IDENTITY, CurrentDateTime DateTime, Description VARCHAR(50) )', |
Remember to use the correct credential and the correct target group name.
Since you are creating a table, the jobuser should have the DDL admin permission or DB owner permission in all the databases from the following script.
|
1 2 |
EXEC sp_addrolemember N'db_owner', N'jobuser' GO |
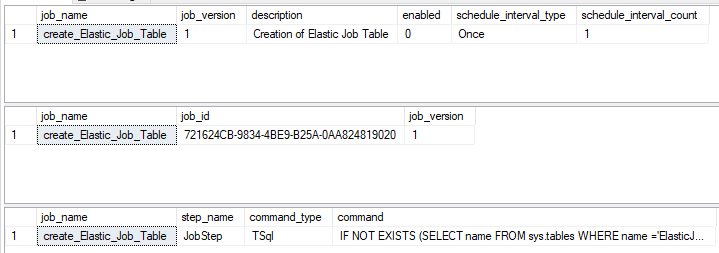
Let us see how Elastic Jobs in Azure SQL Databases are created using the following scripts.
|
1 2 3 4 5 6 7 8 9 10 11 12 13 14 |
SELECT job_name, job_version, description,enabled, schedule_interval_type, schedule_interval_count FROM jobs.jobs SELECT * FROM jobs.job_versions SELECT job_name, step_name, command_type, command FROM jobs.jobsteps |
Following are the output for above queries.
Now we are ready to execute the job using the following script:
|
1 |
EXEC jobs.sp_start_job 'create_Elastic_Job_Table' |
For the execution of elastic jobs in Azure SQL Databases, you need to enable the IP address of the master shard at the other database server. If you do not know the IP address, you can retrieve the IP address from the job failure message as well.
The execution of the jobs can be monitored from the following query:
|
1 2 3 4 5 6 7 |
SELECT job_name, start_time, last_message, target_server_name, target_database_name FROM jobs.job_executions |
Following is the output for the above query:

After examining the target_database_name column, it is clear that all the databases that are in the shards are selected. From the last_message, you can view the last error. By default, there will be 11 retries before returning the job with a failure.
You can verify that the relevant table is created in all six databases. The next step is to schedule the job. Let us add a step to the job to add a record to the previously created job. Since you are adding the second step, you need to explicitly name the step name.
|
1 2 3 4 5 6 7 8 |
EXEC jobs.sp_add_jobstep @job_name = 'create_Elastic_Job_Table', @command = 'INSERT INTO ElasticJob (CurrentDateTime,Description) VALUES (GETDATE(),''Schedule Record'')', @step_name = 'Step 2', @credential_name = 'JobExecution', @target_group_name = 'ShardDatabase' |
Next is to schedule the job to execute every minute as shown from the below script.
|
1 2 3 4 |
EXEC jobs.sp_update_job @job_name = 'create_Elastic_Job_Table', @enabled = 1, @schedule_interval_type ='minutes', @schedule_interval_count = 1 |
Now you will observe that data is inserted to the table every minute for all the databases that are in the shard.
Conclusion
Elastic Jobs in Azure SQL Database can be utilized to execute the same query in multiple Azure SQL Databases parallelly. You can configure the Elastic jobs from T-SQL or from power shell scripts as there are no options in Azure Portal. This scalable feature can be enabled in any Azure SQL Databases but not in Azure Managed SQL Server.
References
- https://docs.microsoft.com/en-us/azure/azure-sql/database/elastic-jobs-tsql-create-manage
- https://docs.microsoft.com/en-us/azure/azure-sql/database/elastic-jobs-overview

View all posts by Dinesh Asanka
- Testing Type 2 Slowly Changing Dimensions in a Data Warehouse - May 30, 2022
- Incremental Data Extraction for ETL using Database Snapshots - January 10, 2022
- Use Replication to improve the ETL process in SQL Server - November 4, 2021