

I will explain how to use and perform security testing using SQL Server vulnerability assessment in this article. I have explained basic understanding about multiple layers of security that we configure to protect our SQL Server instances in my last article. I have also explained about security testing at each layer we should perform to understand how secure our systems are. I would request you to read this article, Understanding security testing for SQL Server environments to learn more about them.
Security is a very critical area for any database environment. Database security measures help an organization to protect its data to maintain its privacy and integrity. Security testing should be done regularly to ensure all security policies are properly configured to protect the systems.
SQL Server also offers various features using which we can perform security testing for our databases. One of such features is SQL Server vulnerability assessment. This feature scans the database for which you are running it and displays all weaknesses along with their probable solutions.
SQL Server Vulnerability Assessment
Vulnerability assessment in SQL Server helps us to discover and remediate potential database vulnerabilities. We can scan any database to identify all existing vulnerabilities for that database and then apply suggested remediations or action items to the databases to prevent external threats. This tool is very helpful during database security testing exercises.
When you run a vulnerability assessment against any database, it will scan that database and displays a detailed report in which there are multiple flags highlighted with their respective action items to fix that vulnerability.
The scan process is done against a set of rules and these rules are being checked and validated whether it is there in that database or not. Each rule will be logged in the report with its rule testing outcome. If the rule is passed, then it will be captured in the green tab known as “Passed” and if this rule is not met and testing is failed then its outcome will be reported under the red cross tab known as “Failed”. We can also run a scan against a system database in SQL Server to identify instance-level vulnerabilities.
The report will be divided into two sections.
- Passed
- Failed
Each failed rule will display a detailed report with the action items which you can take to fix that vulnerability. Below is the screenshot of the vulnerability assessment dashboard report.
Scan a Database using the vulnerability assessment tool
We generally scan our systems and databases as part of security testing or proactive steps to find loopholes in the system. Here, I will scan a SQL Server database to identify all security risks in that database.
The first task to run a scan is to launch SQL Server management studio. Make a note that you are using SQL Server management studio v17.4 or later versions because the vulnerability assessment feature is supported in these versions only. Connect to your SQL Server instance in SQL Server management studio.
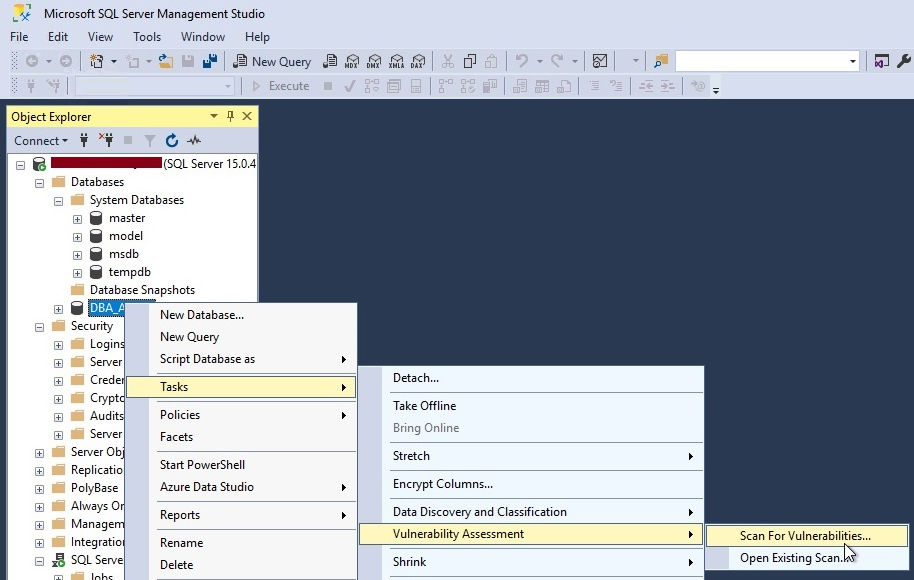
Select your identified database on which you want to run a scan. Right-click at this database then choose Tasks, then Vulnerability Assessment, and finally click on Scan for Vulnerabilities… as shown in the below image.
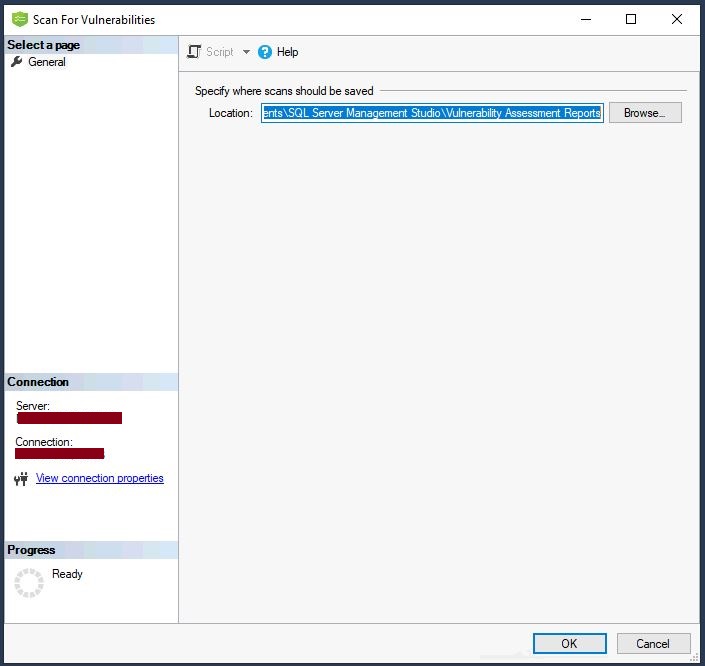
Another window will appear once you click on the above option as shown in the below image. This screen will allow you to choose your desired location where you want to save this scan report. You can see the default location is chosen to save this report, you can click on the Browse.. button to alter this location. Click at OK button once you have chosen the target location to save this report.
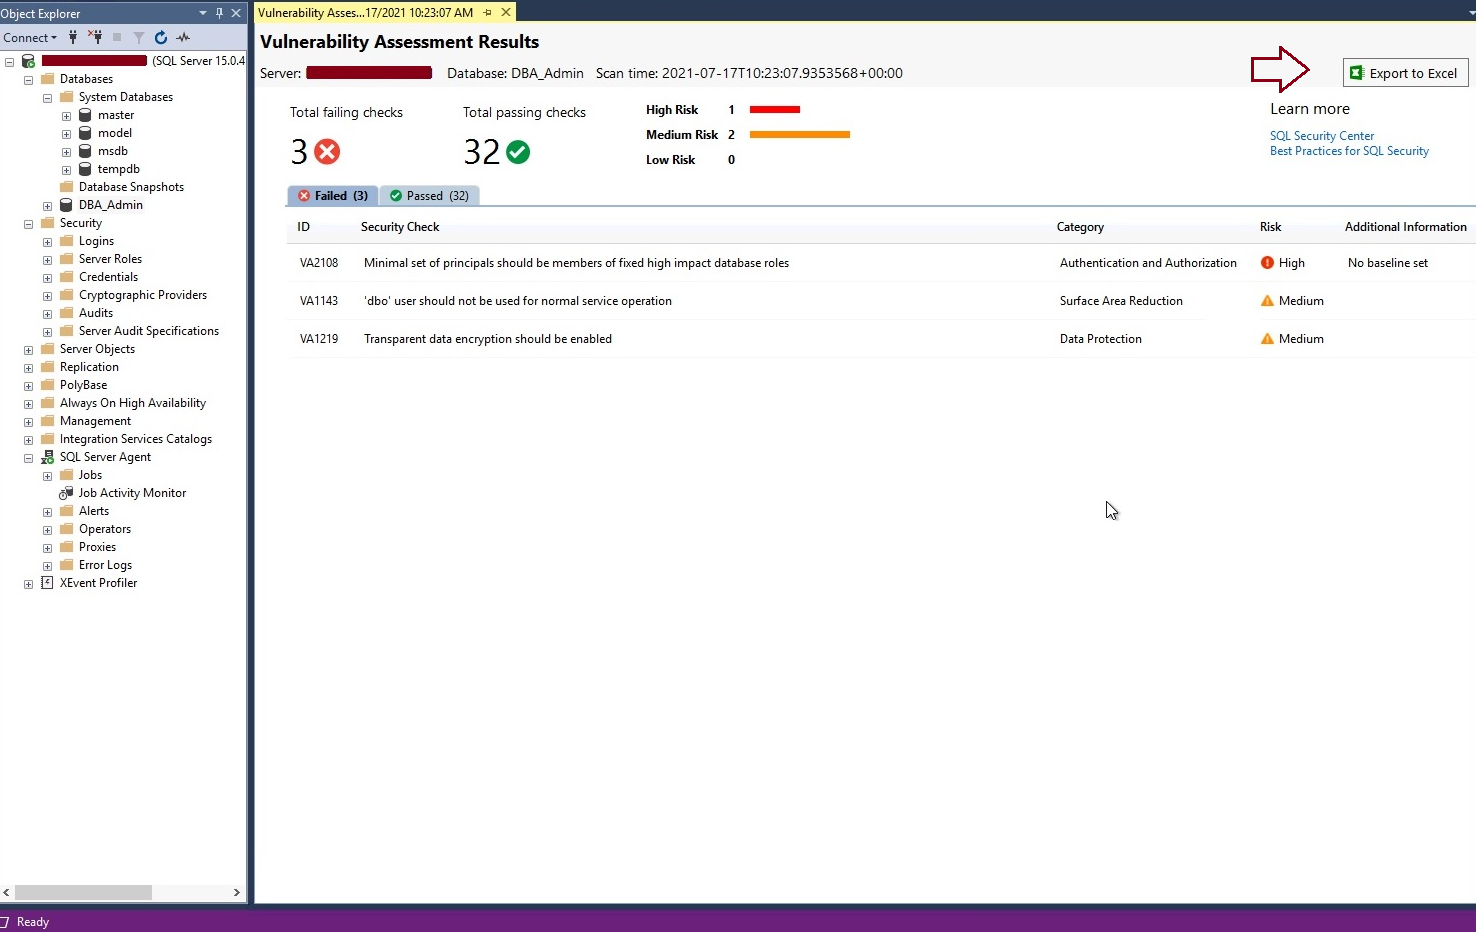
The scan report will be displayed in the right-side pane of SQL Server management studio within a minute of the above step. The below screen is showing its dashboard report. You will get a similar view for your scan as well. Below are the main points you should focus on to understand this report.
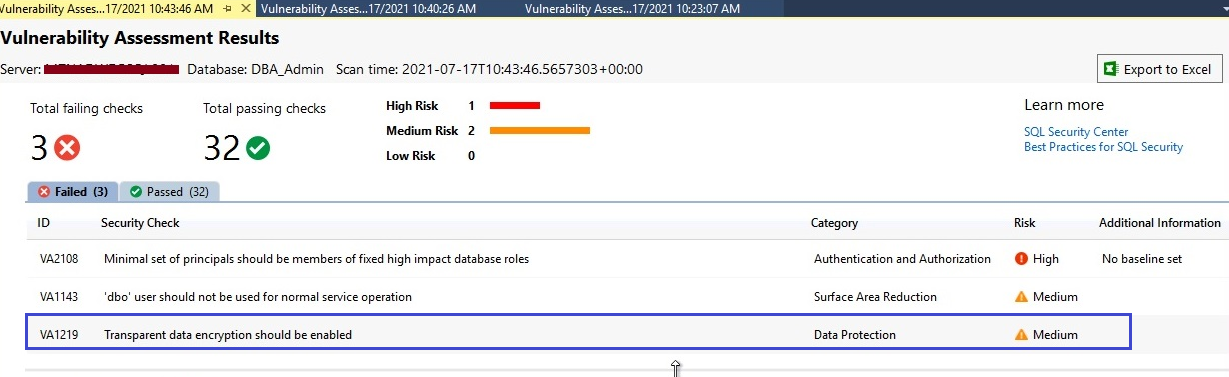
- High-level dashboard report showing the number of failed or passed rules. We can see 3 rules are failed whereas 32 are passed.
- Failed checks are further categorized under the High, Medium, and Low-level risk categories. It will help you identify the severity of the risk.
- Two tabs Failed and Passed are given below these numbers to further drill down about all these checks. You can get detailed information about each check once you click on them.
- You can also export this report in excel by clicking on the tab showing near the dark red arrow.
All failed checks are shown in the above image. If you want to check details about all passed checks then you just need to click on the Passed tab from the above image to list out all its checks as shown in the below image.
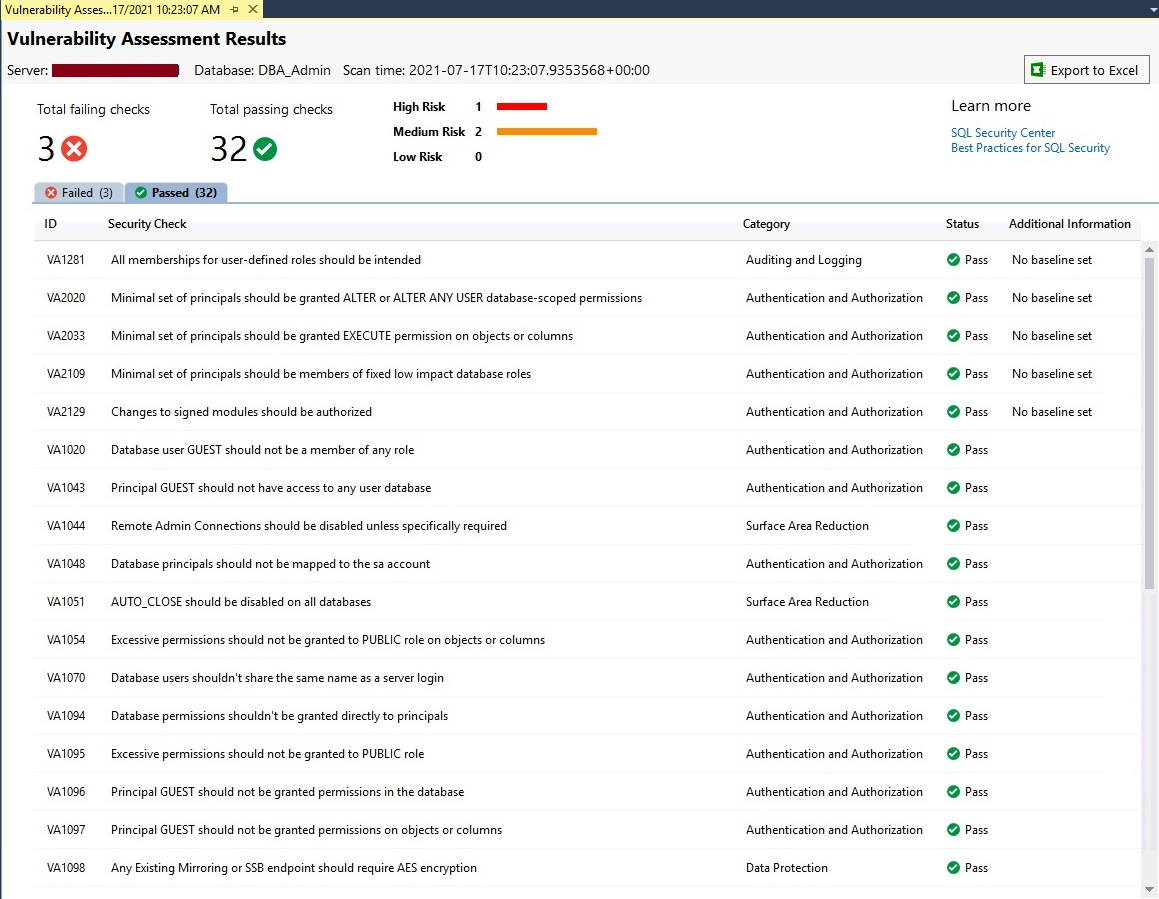
You can see 5 columns are shown in the above report.
- ID is the identification number of each security check
- Security Check is the name and details of the check being performed during the scan
- The category represents its area from where you need to look
- Status is showing whether this check is pass or fail
- Additional information displaces whether you have set the baseline to exempt that rule to fail or not
Now, we have a scan report to access and analyze the details of each check, especially from failed checks. Let’s go ahead and understand how to analyze these checks.
Analyze the scan report
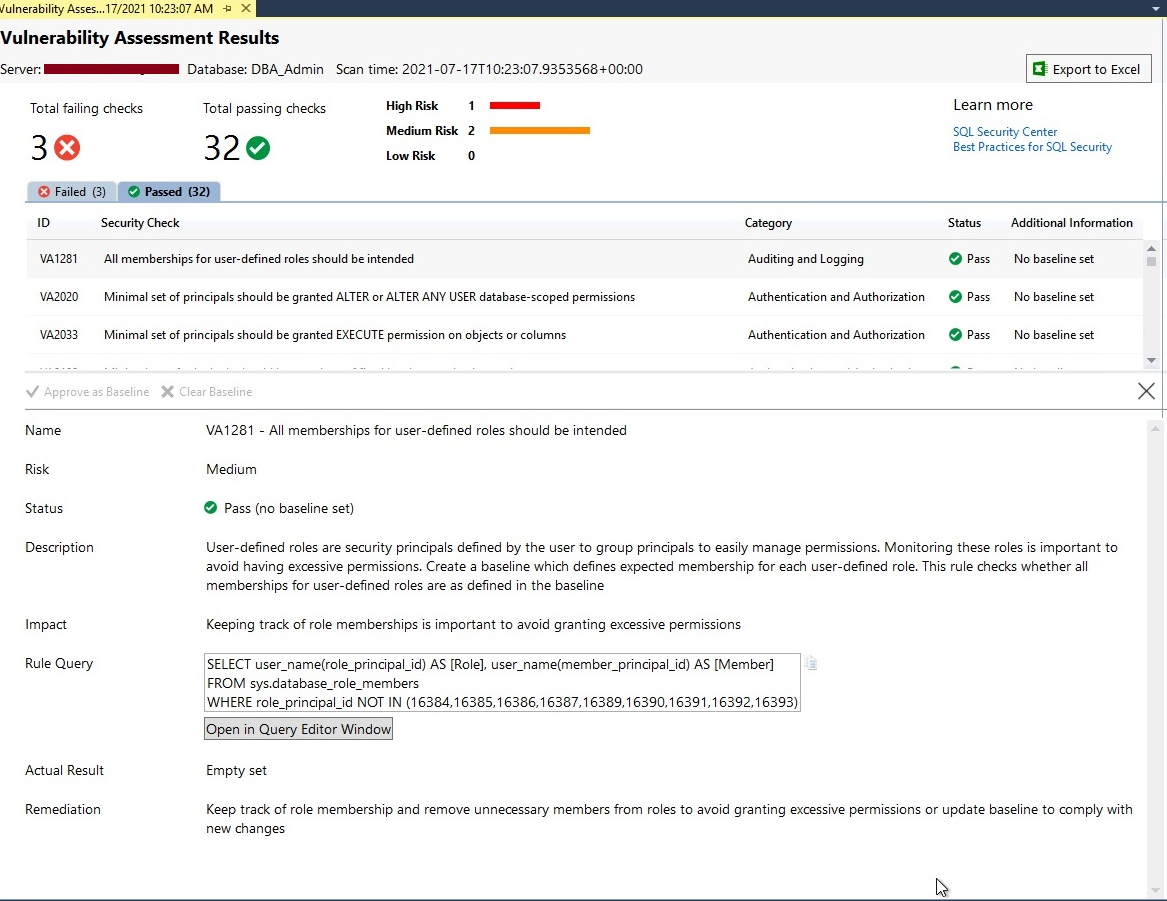
We have learned how to view the report in the above section. Let’s analyze this report to identify issues that have been reported in this scan report during this security testing. You just need to click on any security check, an additional window will appear on the bottom side of the report as shown in the below image.
You can see selected security check has been explained in detail with its name, risk, status, description, impact, rule query, actual result, and remediation. You can go through each security check and understand more about it.
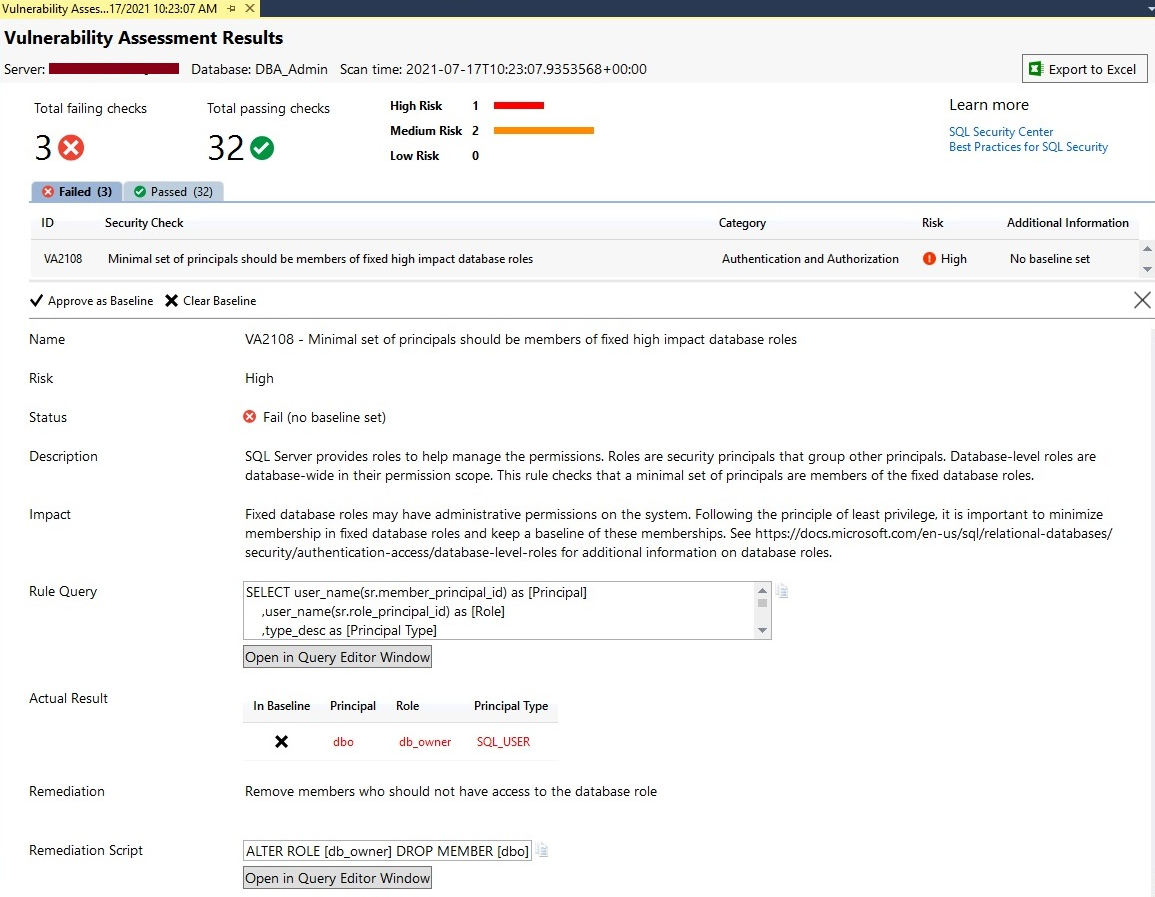
Let’s analyze failed security checks. Click on the Failed tab shown in the scan report. All failed security checks will be displayed with details in their respective columns. I have decided to first analyze High severity risk so clicked on it to get its in-depth information like why it is failed and what are its remediations.
You can analyze the below screen. The status of this security check is showing fail. It is also showing which query is executed to evaluate this check in the Rule Query section. You can understand more about the impact of this security check by reading the Impact section. The Actual Result will display the outcome of this rule check.
As I have explained about this report will also display the set to action items which you can use to remediate the failed security check. Here we can see Remediation is suggesting removing members who should not have access to a database role. The beauty of this tool is it also gives you Remediation Scripts that you can run on your database to fix this issue.
Have a look at the below screen to understand all the above details of this security testing outcome.
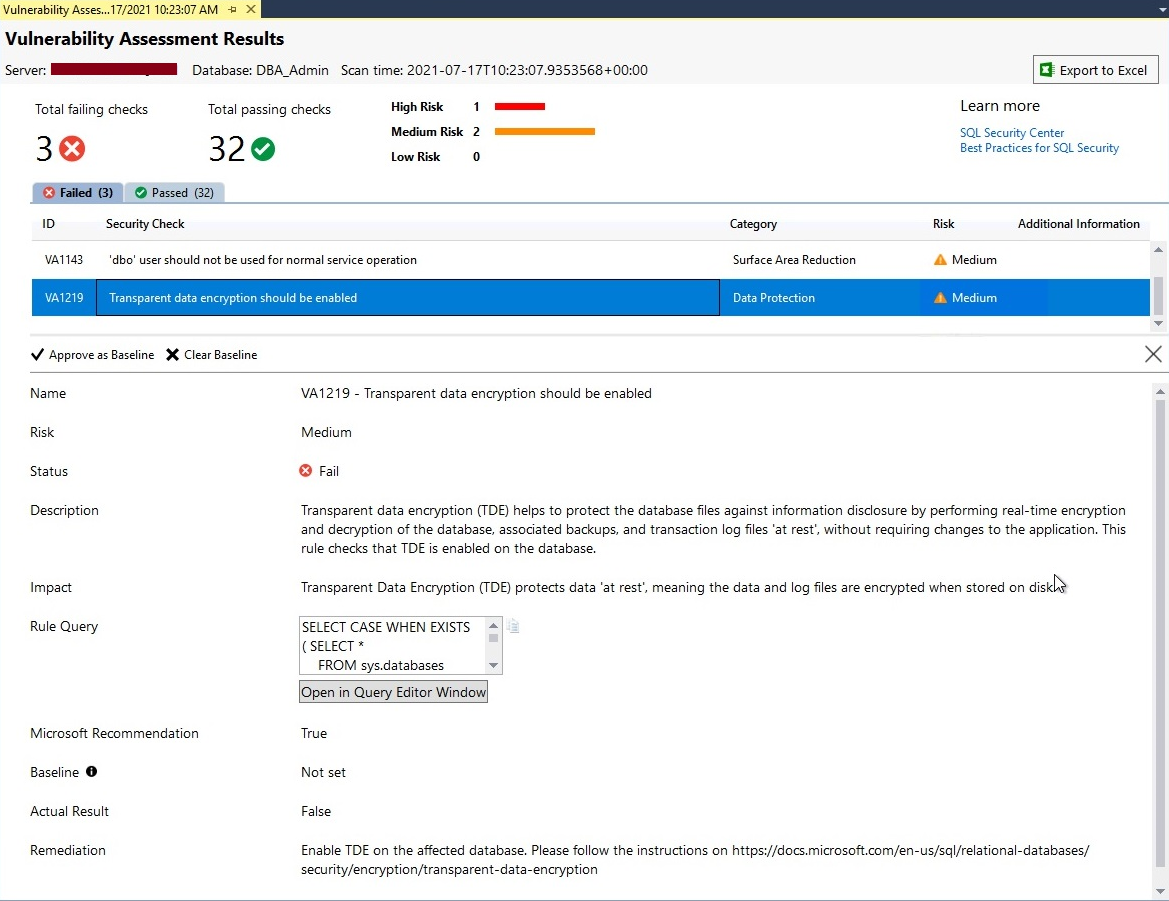
Let’s analyze another failed security check which is showing with Medium risk level by following the same steps as above. The security testing of this database using vulnerability assessment is categorically letting us know that our data can be compromised because it is not protected, and it should be encrypted to protect the data. You can consider the below-suggested remediation if you want to protect your data.
Set or Remove the Baseline
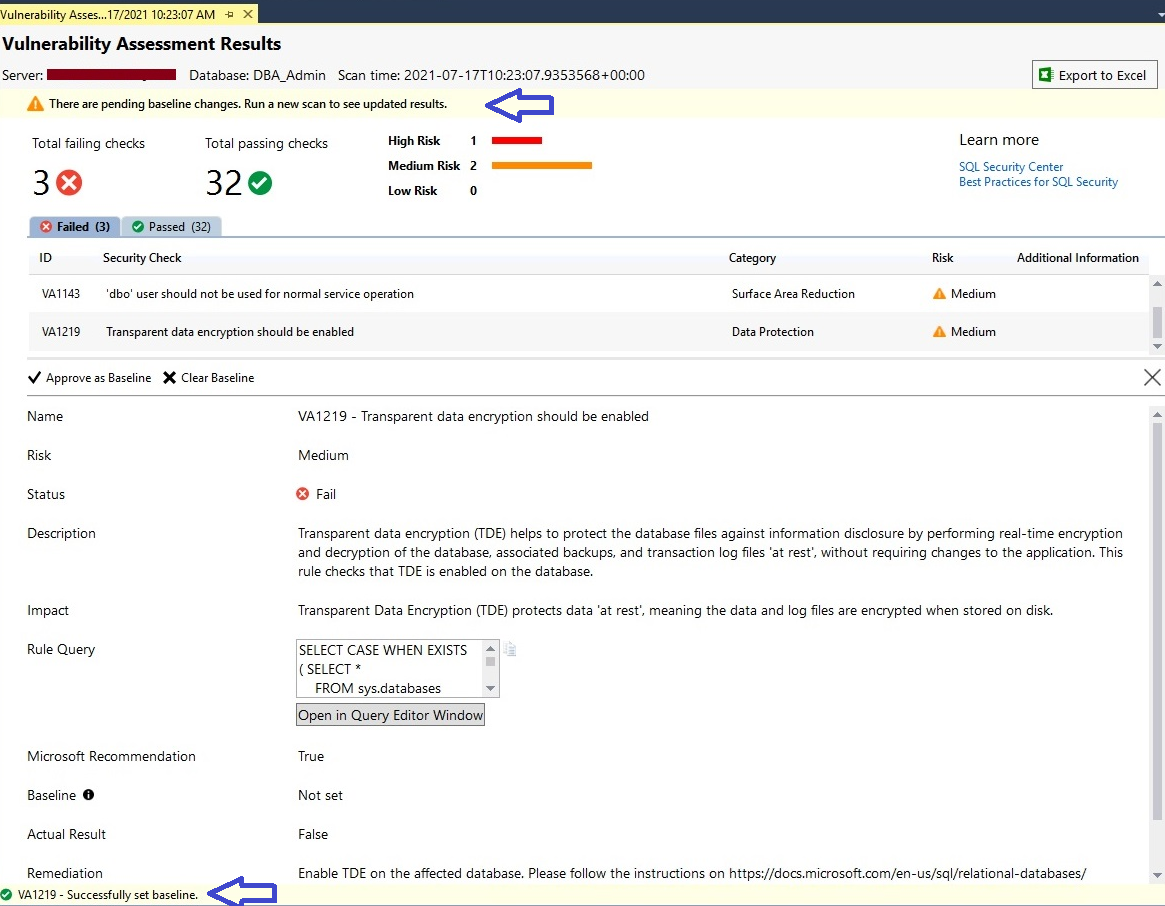
Sometimes we need to make exceptions for some of the security rules because they are not needed or there are some road blockers in its remediations. This tool even allows us to set a baseline for each security check and the scan will consider that baseline value as a pass and will not show it in Failed tab.
Consider the above screenshot where the fix of one of the security checks is to implement TDE (Transparent Data Encryption) but, you cannot implement it because of some restrictions or road blockers. Now, we want this check to be shown as passed in the next security testing. We can get that by approving the exciting outcome of the security check as its baseline. Next time wherever you will run vulnerability assessment for this database as part of your database security testing then this security check will assume the existing configuration as a baseline and mark it as a pass to show this security check green.
Let’s understand how to configure such baselines for various security checks. When you click at any security check showing in the dashboard scan report, it will display its details in the bottom side window of the report as shown in the below image. You can see 2 options for each security check in the details pane of the security check.
- Approve as Baseline
- Clear Baseline
You need to click on the Approve as Baseline options highlighted in the blue rectangle of the below screen to set this result as the acceptable baseline for this security check.
If you want to remove any baseline in the future or of any existing baseline, then you just need to click on the Clear Baseline option to remove the baseline. The next scan report will start reporting this security check as failed if you have not implemented the suggested remediations.
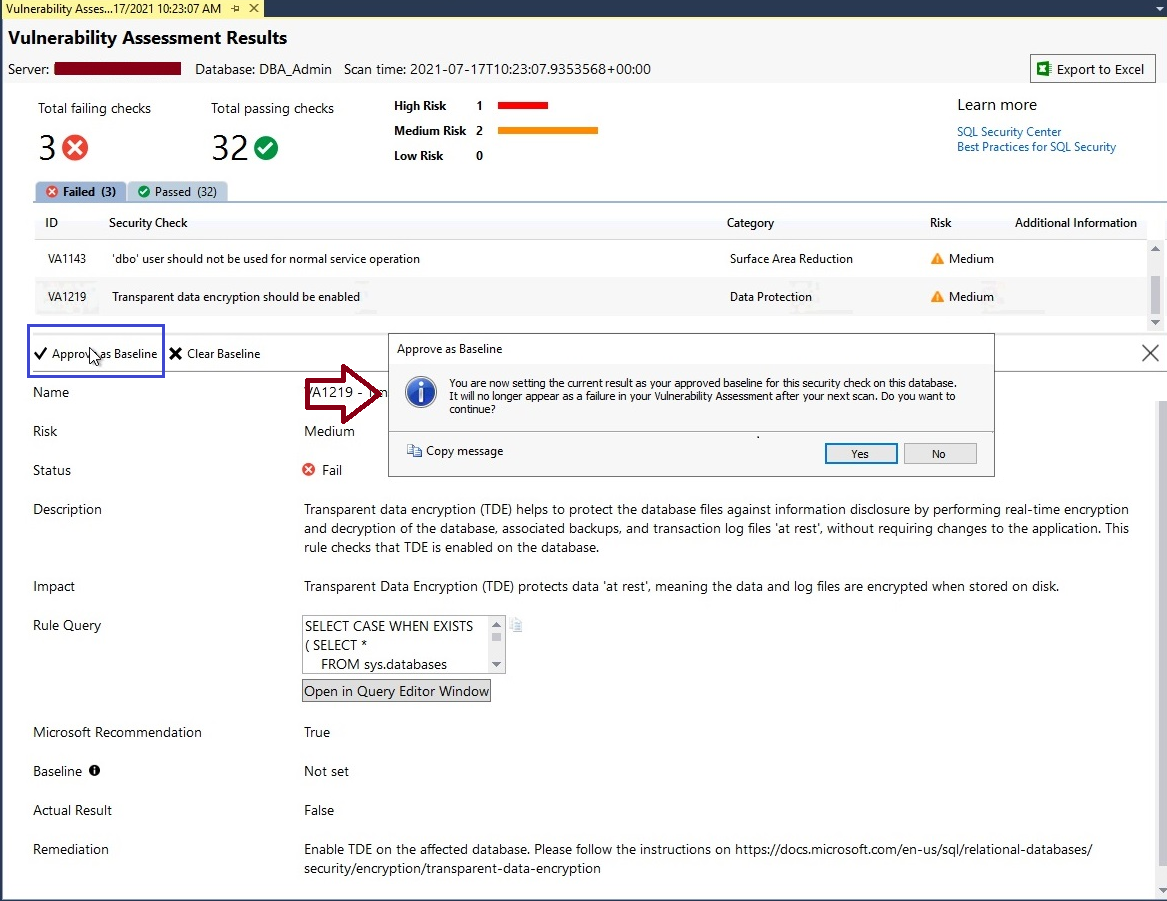
I have clicked on Approve as Baseline for this security check, it will display a popup window mentioning the description of this step. Click at Yes button to apply this result as the acceptable baseline for Data Protection security check.
Once baseline will be approved and set for any security check, you can get its confirmation by looking at the bottom of the screen as shown in the below image in the blue arrow. It says baseline is successfully set for security check ID VA1219.
You can also see a warning in the top pane of this report which is suggesting running the scan report again to see the updated result, whether the security check for which we set a baseline is reporting as failed or it is being passed in the next report.
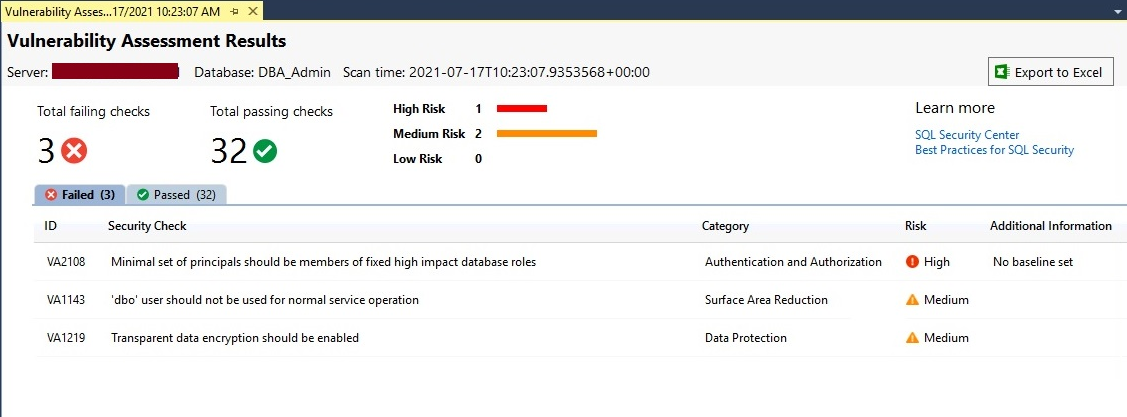
Let’s run a scan report again by following the same steps as I have described in the above section. The below screen is showing its updated report and here we can only see 2 failed security checks. It means the above security check for which we approved a baseline is passed and not being reported as failed in security testing of this database.
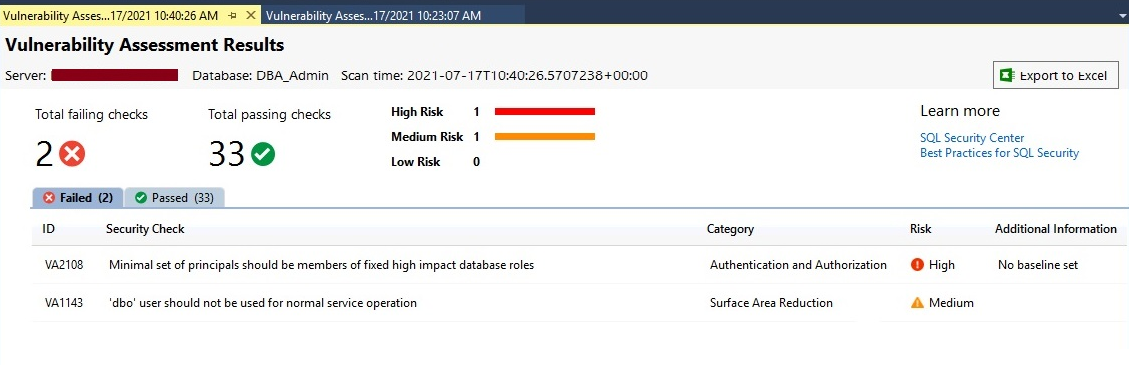
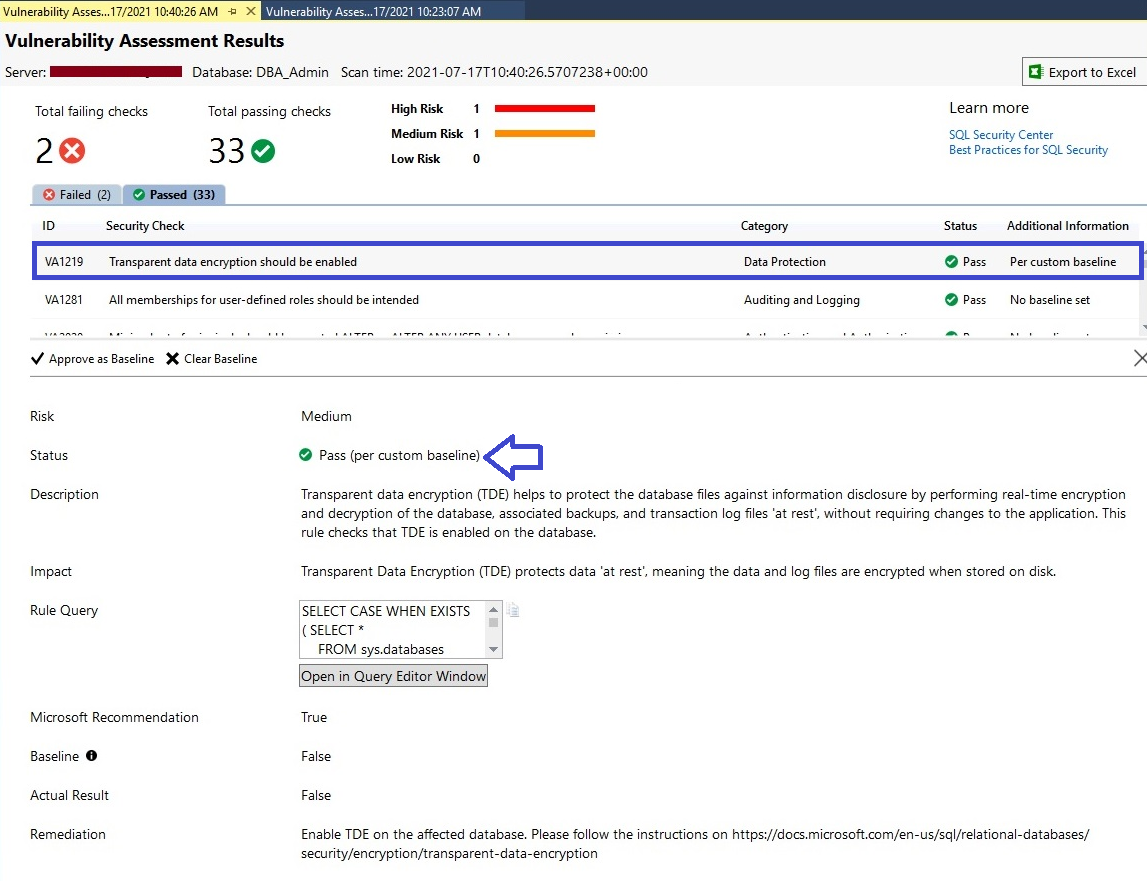
Now we have only 2 failed checks and 33 passed checks. Let’s see the status of the above security check for which we have approved the baseline. You can also identify whether a specific security check has any baseline set or not. Click on the Passed tab from the above image to find that security check.
Here, you can identify whether a specific security check is passed without an acceptable baseline or with a custom baseline approval. We can see security ID VA1219 is showing in the Passed section which is also highlighted in the blue rectangle of the below image.
You must focus on the last column named Additional Information to identify whether that specific security check is passed as per specified custom baseline or passed by standard best practices. You can see “Per custom baseline” is reported in this column along with its status which is also displaying this tag that is passed as the custom baseline in the below image whereas the rest of all rules are checked and passed without mentioning any baselining.
Make sure to get proper approval before making or approving such baselining because security testing is done to identify the loopholes and not to find another way to keep your security testing reports in green.
If you want to remove this custom baseline and want to scan such security checks as per standard best practices, then you can remove this baseline and rerun the scan report again. I have removed the above-configured baseline by clicking “Clear Baseline” as shown in the below image. Have a look at the below screen where I removed the above baseline.
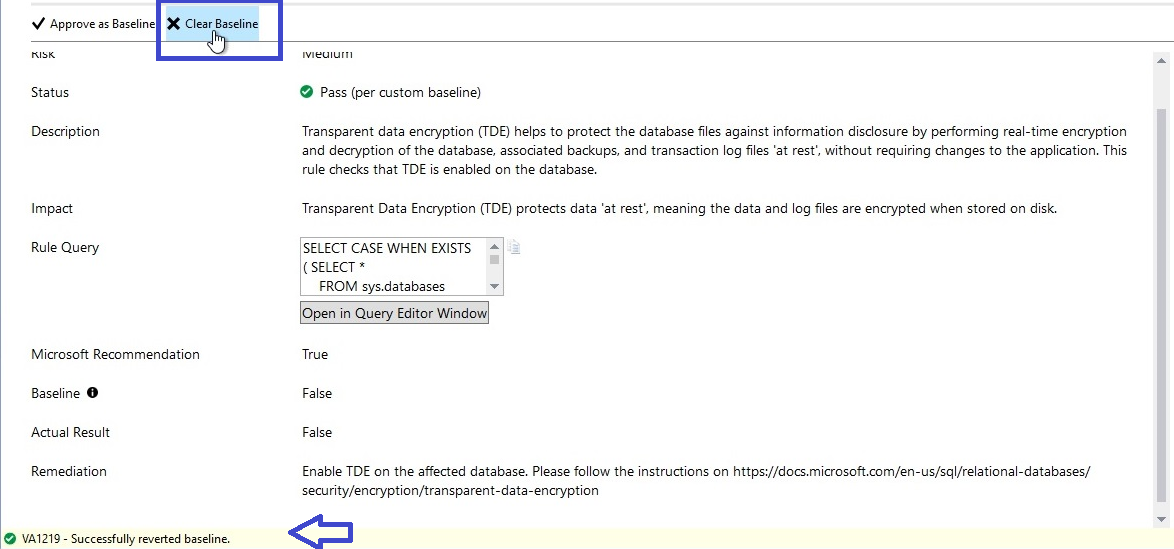
Now, rerun the scan to generate the new report and here we can see security ID VA1219 has been reported under failed checks again. Total failed checks are now again 3 whereas passed check is only 32 now.
Open existing scan reports
As we know, all these scan reports which we generate during security testing can be accessed later as per our need. When we run the scan for any database, we provide a location where these reports will be saved, if you don’t provide any location it will take the default location.
Go to SQL Server management studio, right-click at any database, choose Tasks, then Vulnerability Assessment, and finally, here you need to click at Open Existing Scan.

Next, it will ask you to locate your desired location where you have saved your scan reports. Choose the desired location and click on the Open button post selecting your desired scan report which you want to open.

Once you will click on the Open button, the scan report will open in SQL Server management studio as shown in the below image.
You can save these reports and use them later as an outcome of your database security testing.
Conclusion
Security testing is a very important exercise we should do regularly to ensure we are using all the best practices as part of our security policies. Vulnerability Assessment in SQL Server is a very good tool to scan databases and identify the weaknesses of the databases along with their remediations suggested in the scan report. These scans can be performed for any database including all system databases. The scan report will list out all detailed information along with its remediations recommendation which you can consult and later deploy on your system to fix the open security risks.

He loves to talk and write about database technologies. He has lead and delivered many projects from designing to deployments on Migrations to the cloud, heterogeneous migrations, Database consolidations, upgrades, heterogeneous replication, HA / DR solutions, automation, and major performance tuning projects.
You can also find him on LinkedIn
View all posts by Manvendra Singh
- Configure backup storage redundancy for Azure Cosmos DB account - May 15, 2024
- Difference between SQL SELECT UNIQUE and SELECT DISTINCT - January 16, 2024
- How to do a group by clause - April 12, 2023