

This article uses Azure policies to check compliance of Azure SQL Databases against the backup retention period.
Introduction
Azure SQL Database offers DTU and vCores based pricing models. These service tiers primarily depend on the business continuity, storage, and performance requirements. In a managed database service, Azure automatically manages the database backups for point-in-time recovery. These database backups have different maximum retention periods based on their service tier.
- Basic Service tier: 7 days
- Standard and Premium Service tier: 35 days
- Note: The default backup retention is seven days for all service tiers of the Azure SQL Database
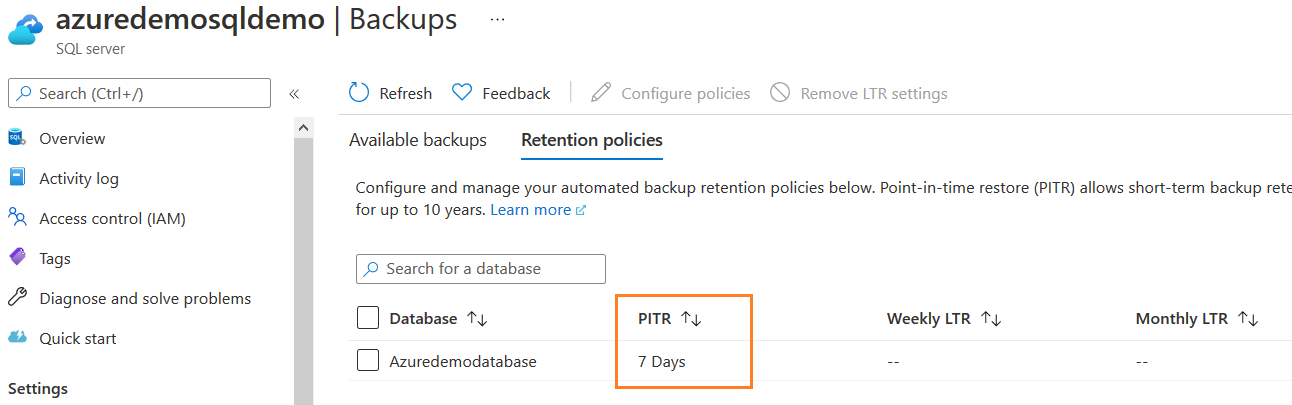
For example, in my lab environment, the Azure database is in the Standard S0 pricing tier. It is configured with default backup retention. To verify the configured backup retention, go to Azure server configuration and click on Backups.
As shown below, PITR ( Point-In-Time-Recovery) is for 7 days.
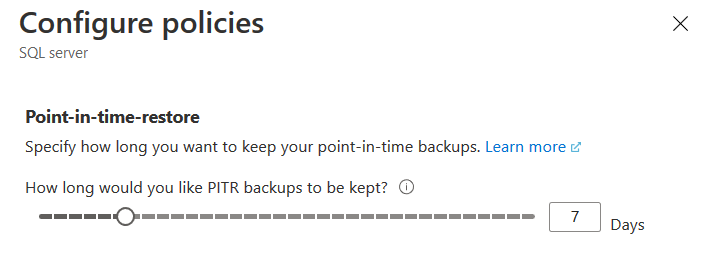
To modify this configuration, select the database and configured policies. You can move the slider to increase the PITR value to 35 days. Similarly, you can reduce the PITR to a minimum of 1 day if you do not want to restore backups for the environment, such as the development database.
Suppose you have a large Azure database infrastructure. You also have given permissions to specific users for database deployment. As a database administrator, you require the PITR value should be 35 days instead of the default 7 days period.
In the article, Identify and remediate non-compliant Azure SQL Databases for auditing on SQL Server, we explored the default Azure policy for Auditing on SQL server. This article guides you through creating a custom policy, implementing it, and remediating issues so that the database is fully compliant against the business rule or configuration.
To configure the custom policy definition, search for Policy in the Azure portal and navigate to Definitions.
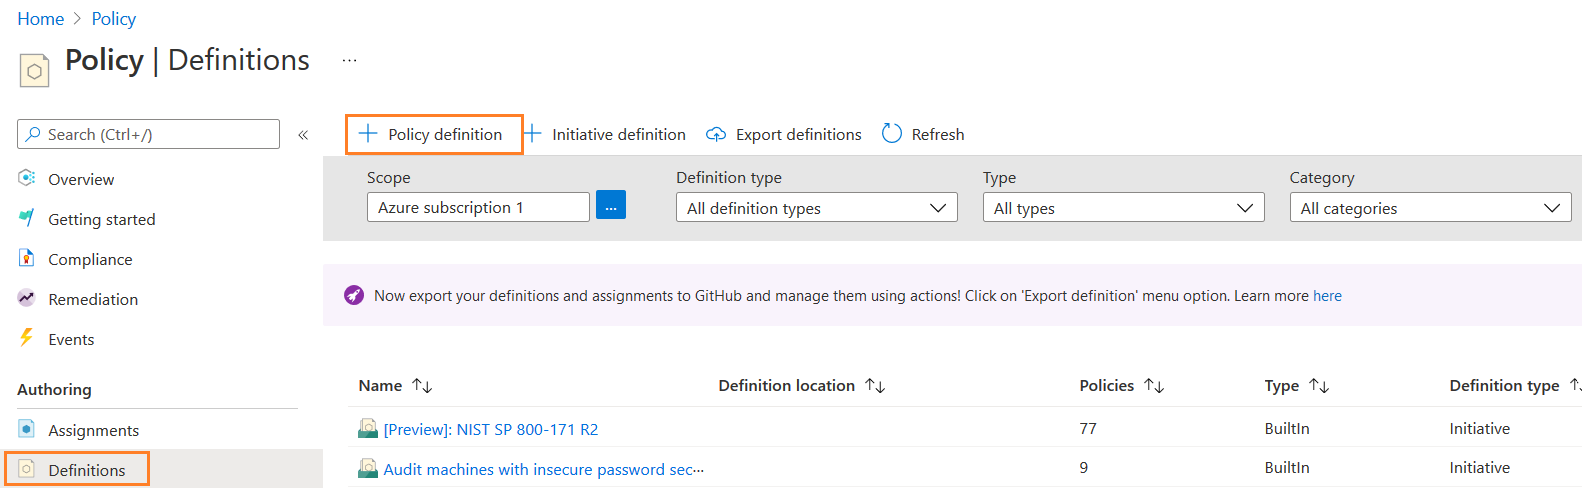
Click on Policy definition to define a custom policy. In the new policy definition, enter the following details:
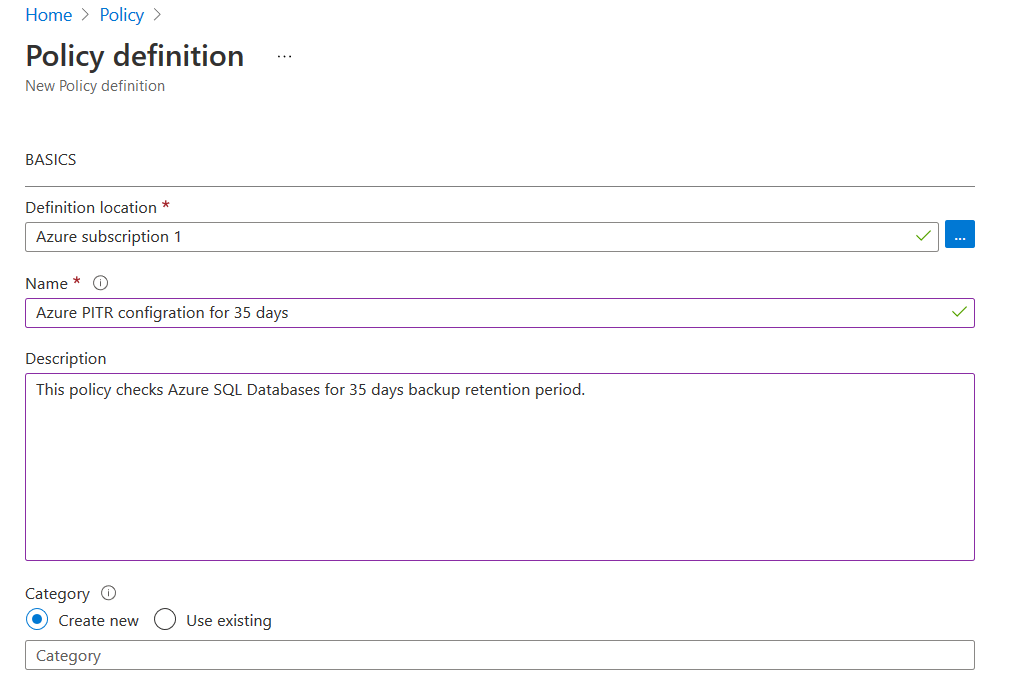
- Definition Location: In the definition location, click on eclipse and select the Azure subscription
- Name: Enter the custom policy definition display name
- Description: It is an optional field. You can use this field to describe the policy definition and requirement
- Category: It is the Azure policy category that helps you to group policies together. For example, you can find all related policies in the SQL category belongs to Azure SQL Database. You can choose to create a new category or an existing category
- Policy Rule: In the policy rule, we define the JSON policy document to evaluate Azure resources.
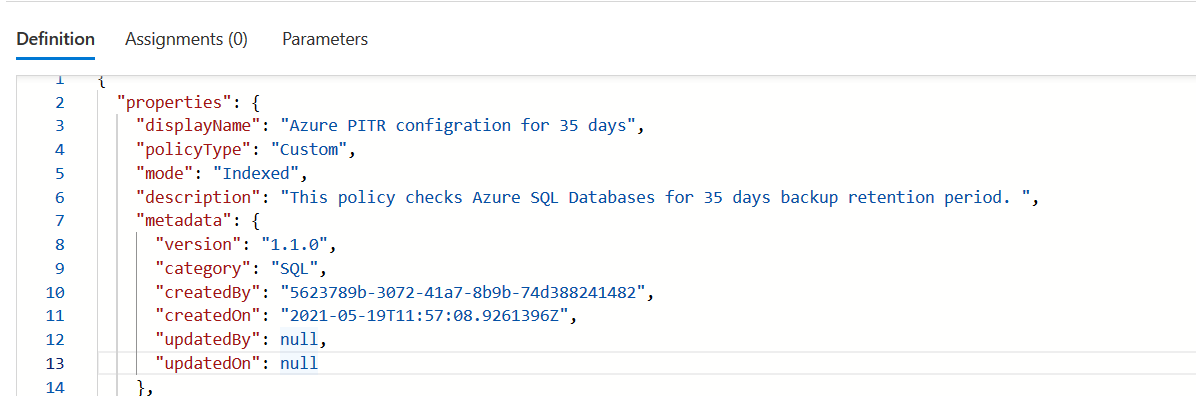
For this article, we use the following JSON script. You can note the specified retention period is 35 days in this policy script. Suppose you want to configure a policy with a default backup retention of 7 days, modify the value from 35 days to 7 days.
Script Reference: Azure Database Support Blog
{
“properties”: {
“displayName”: “Azure PITR configration for 35 days”,
“policyType”: “Custom”,
“mode”: “Indexed”,
“description”: “This policy checks Azure SQL Databases for 35 days backup retention period. “,
“metadata”: {
“version”: “1.1.0”,
“category”: “SQL”,
“createdBy”: “5623789b-3072-41a7-8b9b-74d388241482”,
“createdOn”: “2021-05-19T11:57:08.9261396Z”,
“updatedBy”: null,
“updatedOn”: null
},
“parameters”: {
“effect”: {
“type”: “String”,
“metadata”: {
“displayName”: “Effect”,
“description”: “Enable or disable the execution of the policy.”
},
“allowedValues”: [
“DeployIfNotExists”,
“Disabled”
],
“defaultValue”: “DeployIfNotExists”
},
“retentionDays”: {
“type”: “String”,
“metadata”: {
“displayName”: “Retention Days”,
“description”: “Set the number of Backup Retention Days.”
},
“defaultValue”: “35”
}
},
“policyRule”: {
“if”: {
“field”: “type”,
“equals”: “Microsoft.Sql/servers/databases”
},
“then”: {
“effect”: “[parameters(‘effect’)]”,
“details”: {
“type”: “Microsoft.Sql/servers/databases/backupShortTermRetentionPolicies”,
“name”: “default”,
“roleDefinitionIds”: [
“/providers/Microsoft.Authorization/roleDefinitions/9b7fa17d-e63e-47b0-bb0a-15c516ac86ec”
],
“existenceCondition”: {
“field”: “Microsoft.Sql/servers/databases/backupShortTermRetentionPolicies/retentionDays”,
“equals”: “[parameters(‘retentionDays’)]”
},
“deployment”: {
“properties”: {
“mode”: “incremental”,
“template”: {
“$schema”: “https://schema.management.azure.com/schemas/2015-01-01/deploymentTemplate.json#”,
“contentVersion”: “1.0.0.0”,
“parameters”: {
“serverName”: {
“type”: “string”
},
“shortTermRetention”: {
“type”: “string”
}
},
“resources”: [
{
“name”: “[concat(parameters(‘serverName’),’/default’)]”,
“type”: “Microsoft.Sql/servers/databases/backupShortTermRetentionPolicies”,
“apiVersion”: “2017-10-01-preview”,
“properties”: {
“retentionDays”: “[parameters(‘shortTermRetention’)]”
}
}
]
},
“parameters”: {
“serverName”: {
“value”: “[field(‘fullname’)]”
},
“shortTermRetention”: {
“value”: “[parameters(‘retentionDays’)]”
}
}
}
}
}
}
}
},
“id”: “/subscriptions/c6eb5552-7748-4d57-82bb-4c52c1c8f87e/providers/Microsoft.Authorization/policyDefinitions/f5d5c854-5a1c-4521-ab9d-ec2d82ccbc1d”,
“type”: “Microsoft.Authorization/policyDefinitions”,
“name”: “f5d5c854-5a1c-4521-ab9d-ec2d82ccbc1d”
}
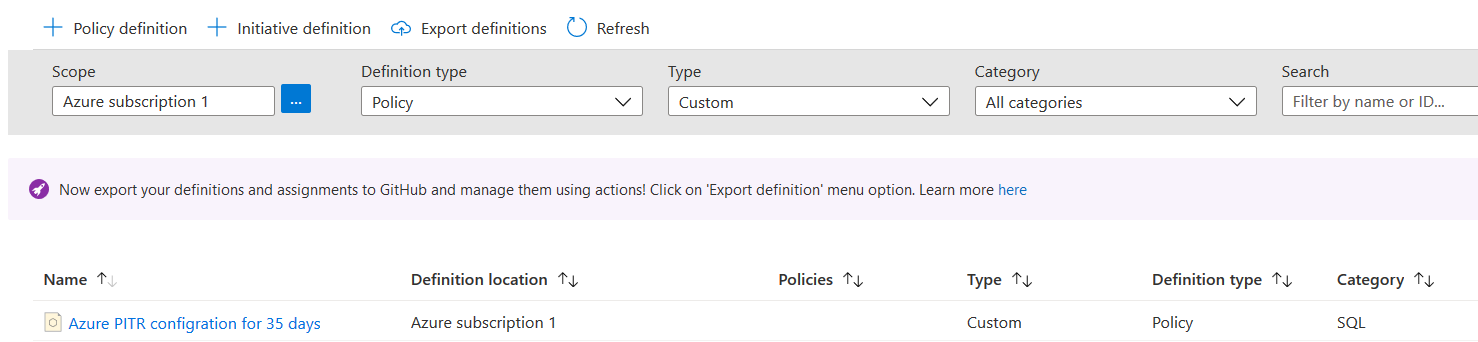
Save the policy definition, and it has the following properties:
- Policy Name: Azure PITR configuration for 35 days
- Policy type: Custom
- Definition Type: Policy
- Category: SQL
Assign Azure custom policy for Azure SQL Database
In the previous section, we implemented an Azure policy for validation PITR configuration of 35 days for the Azure SQL database. After the implementation, we need to assign this policy to Azure resources to check its compliance.
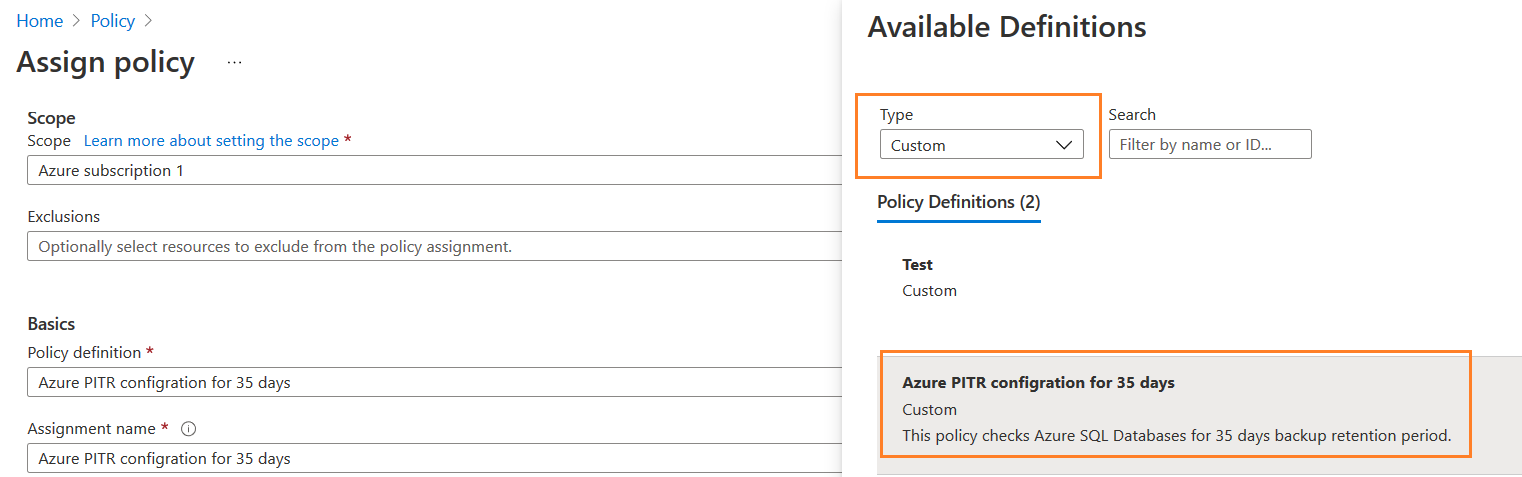
In the Azure policy dashboard, click on Assign policy.
On the Assign policy page, enter the following information on the basic page.
- Scope: Select the Azure subscription
- Exclusion: If you wish to exclude any resources from the policy assignment, you can choose those resources. Suppose you have an Azure SQL Database that requires 7 days PITR due to specific reasons. Therefore, exclude that resource so that you are compliant with the remaining Azure databases
Policy definition: In this policy definition, we use the custom policy we defined earlier. You can select the custom type to find out the policy quickly

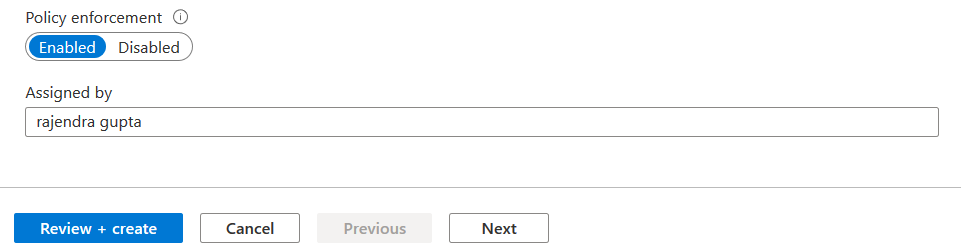
- Policy enforcement: Enabled
Assigned by: You can enter the policy assignee or owner name
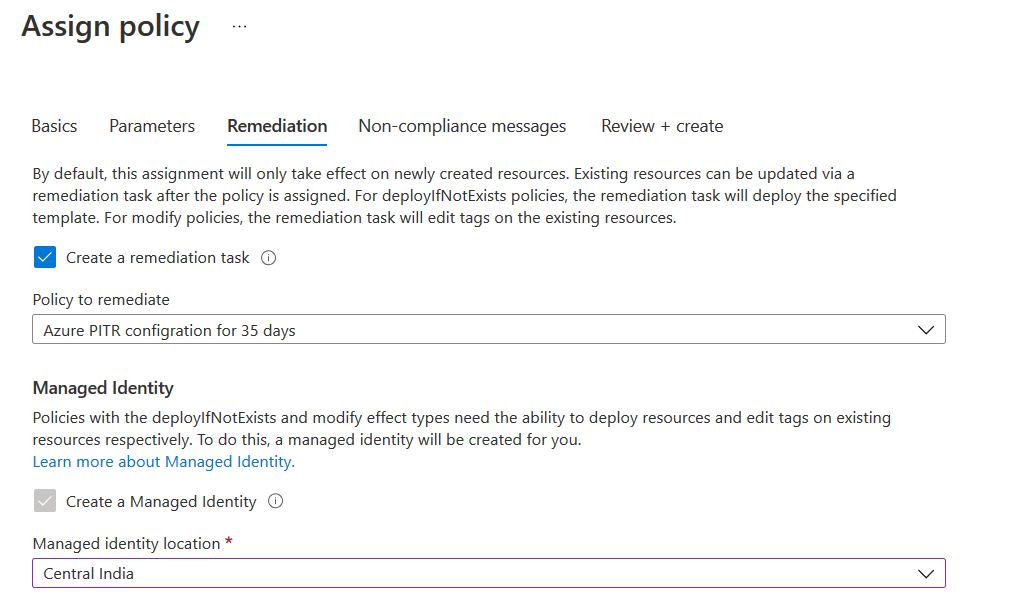
Parameters: The parameter page defines the policy effect and retention days. Here, we have specified 35 days as a retention period
Remediation: Azure remediation task can update the Azure resources to comply with the deployed policy. For example, if Azure SQL Database does not have 35 days retention period, the remediation task modifies the database configuration for compliance. Click on – Create a remediation task
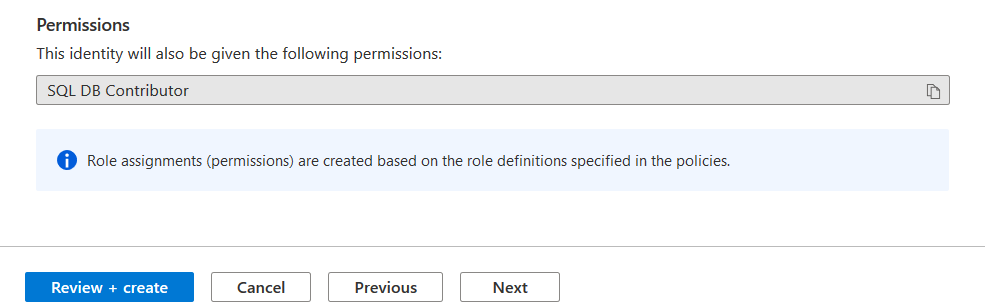
It uses the SQL DB contributor role based on the role definition in the policy. The role manages the Azure SQL Databases
- Note: The SQL DB role cannot modify the configuration for SQL Server (instance) level. You can refer to Azure built-in roles for more details
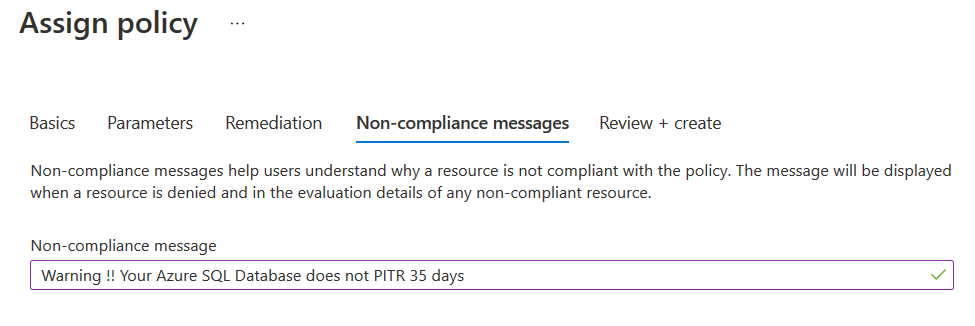
Non-Compliant message: Enter the message that the user gets if the policy outcome is Non-Compliant

In the last section, review all policy assignments carefully.
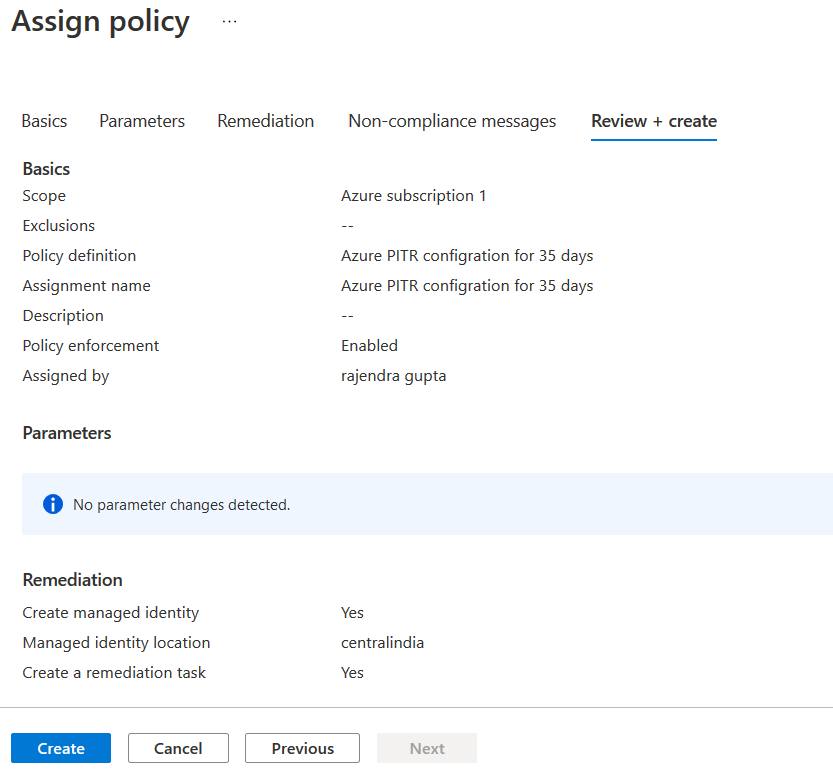
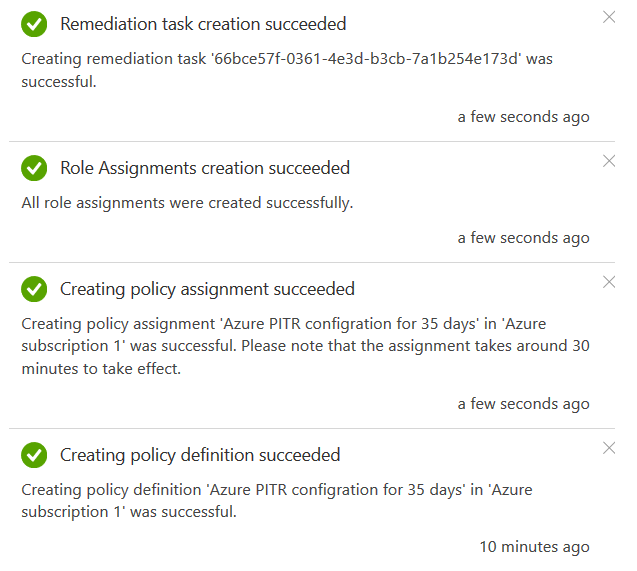
Click on Create. During the policy assignment to Azure SQL Database, you get the following messages in the notification area.
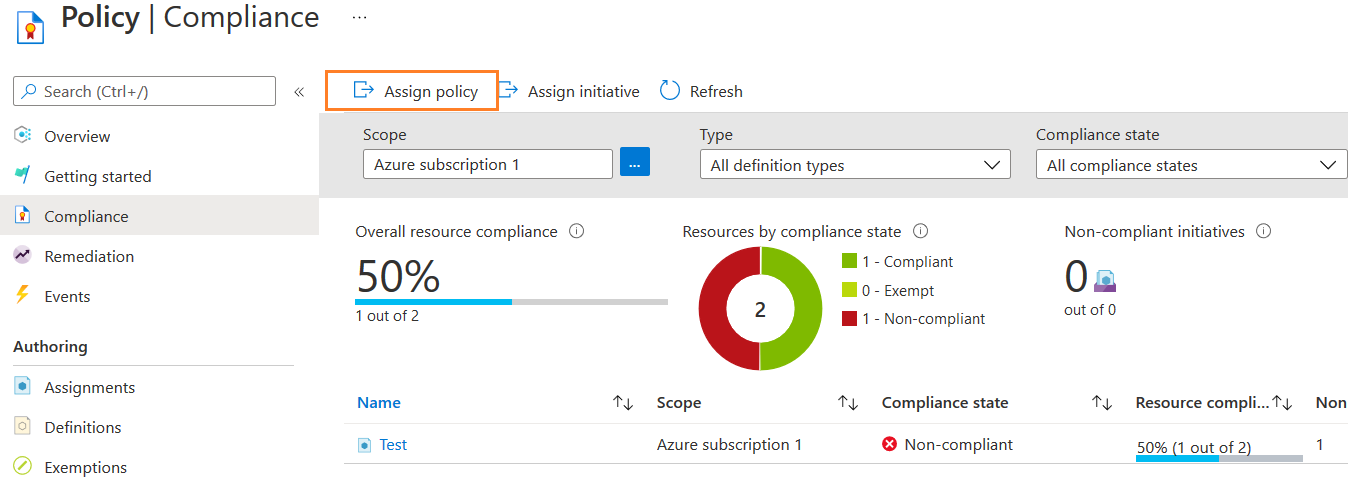
Check Policy compliance for Azure PITR configuration
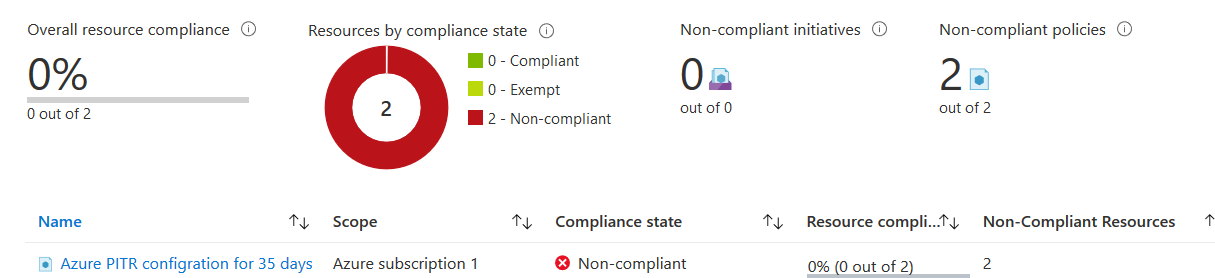
To check the policy compliance for Azure PITR configuration, navigate to the Azure policy dashboard. As shown below, my lab environment database is non-compliant.
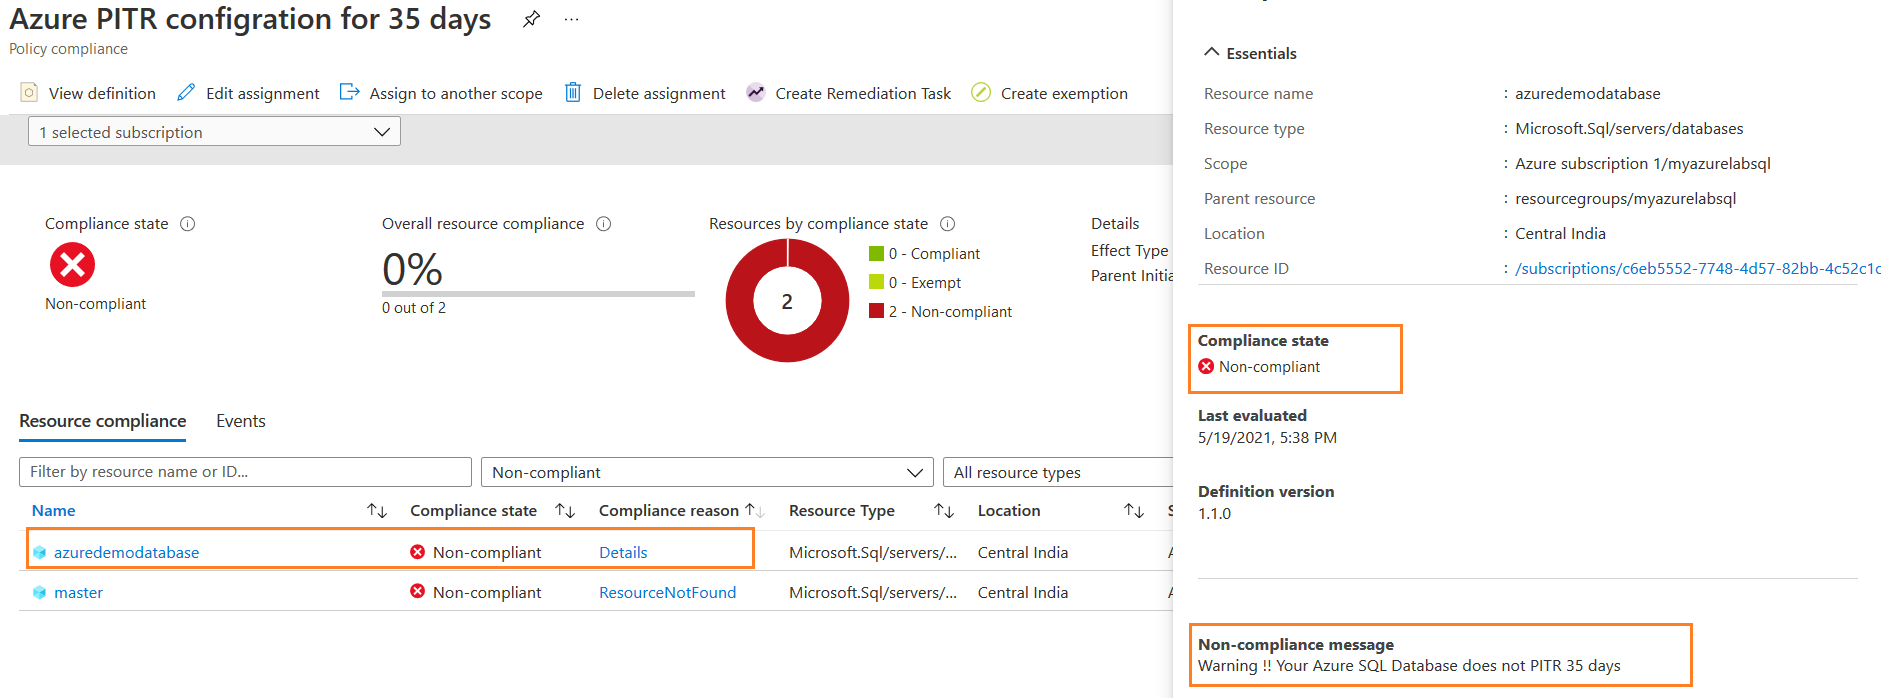
Click on the policy name, and you get detailed information such as resource name, scope, parent resource, compliance state and non-compliance message.
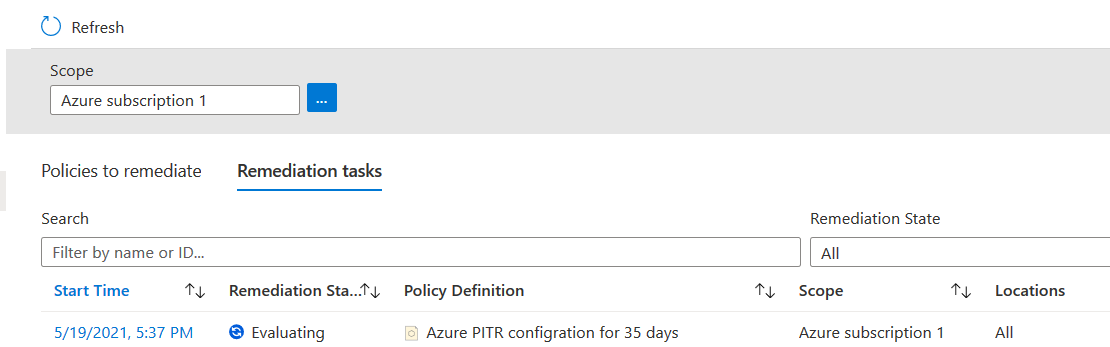
We have configured remediation tasks as well during the policy assignment. It takes a few minutes for the remediation task to make the configuration changes. As shown below, its status is Evaluating.
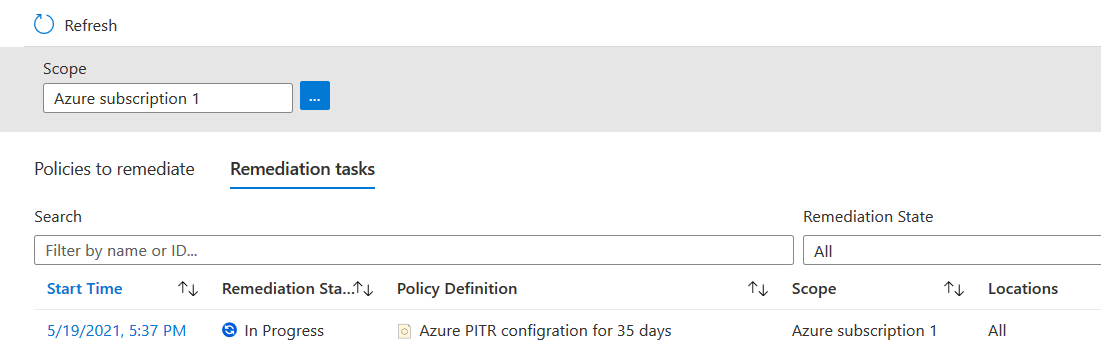
The status changes to In Progress after the evaluation is finished.
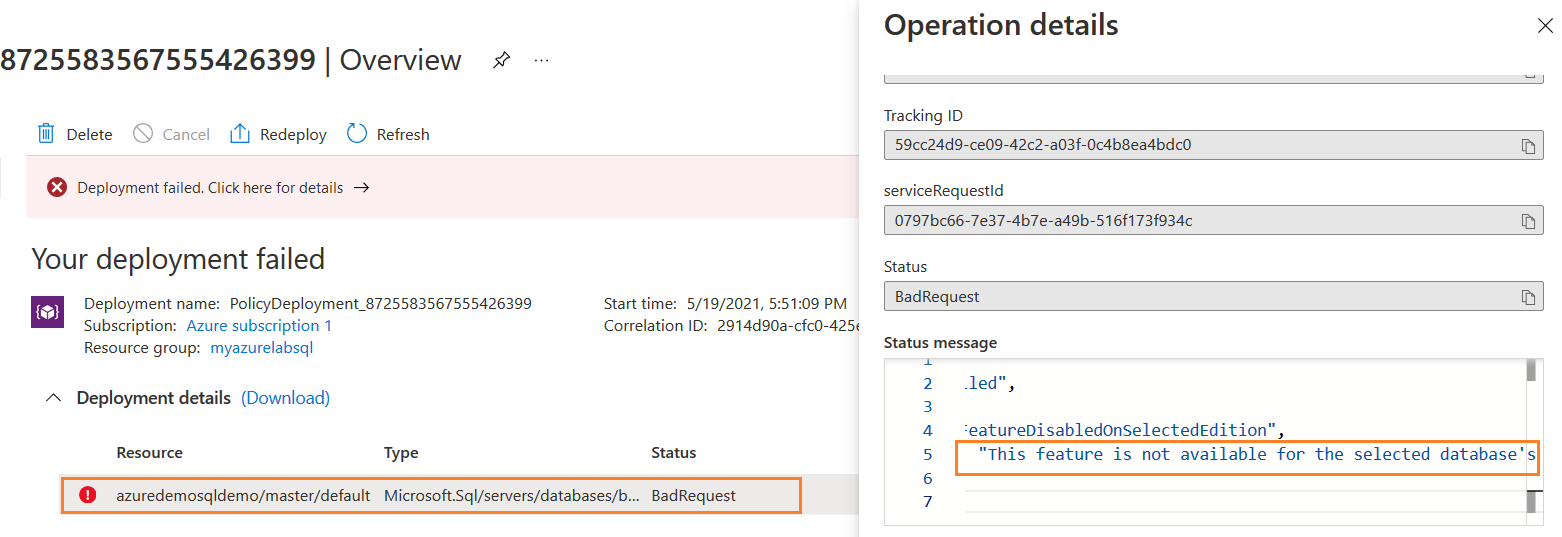
Open the remediation task properties to get the details. As shown below, policy remediation is successful for Azure SQL Database. However, it is failed for the master database.

Click on deployment ID for the master database to know the failure reason. As shown below, modifying the feature is not available for the selected ( Master) database because you cannot make changes to it for the Azure database.
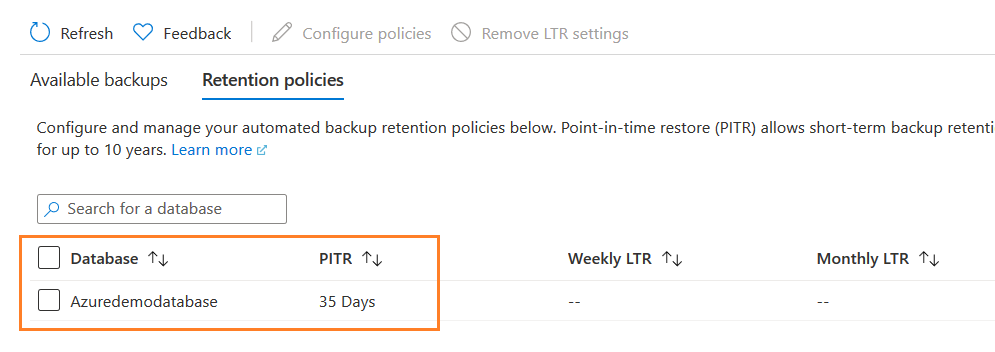
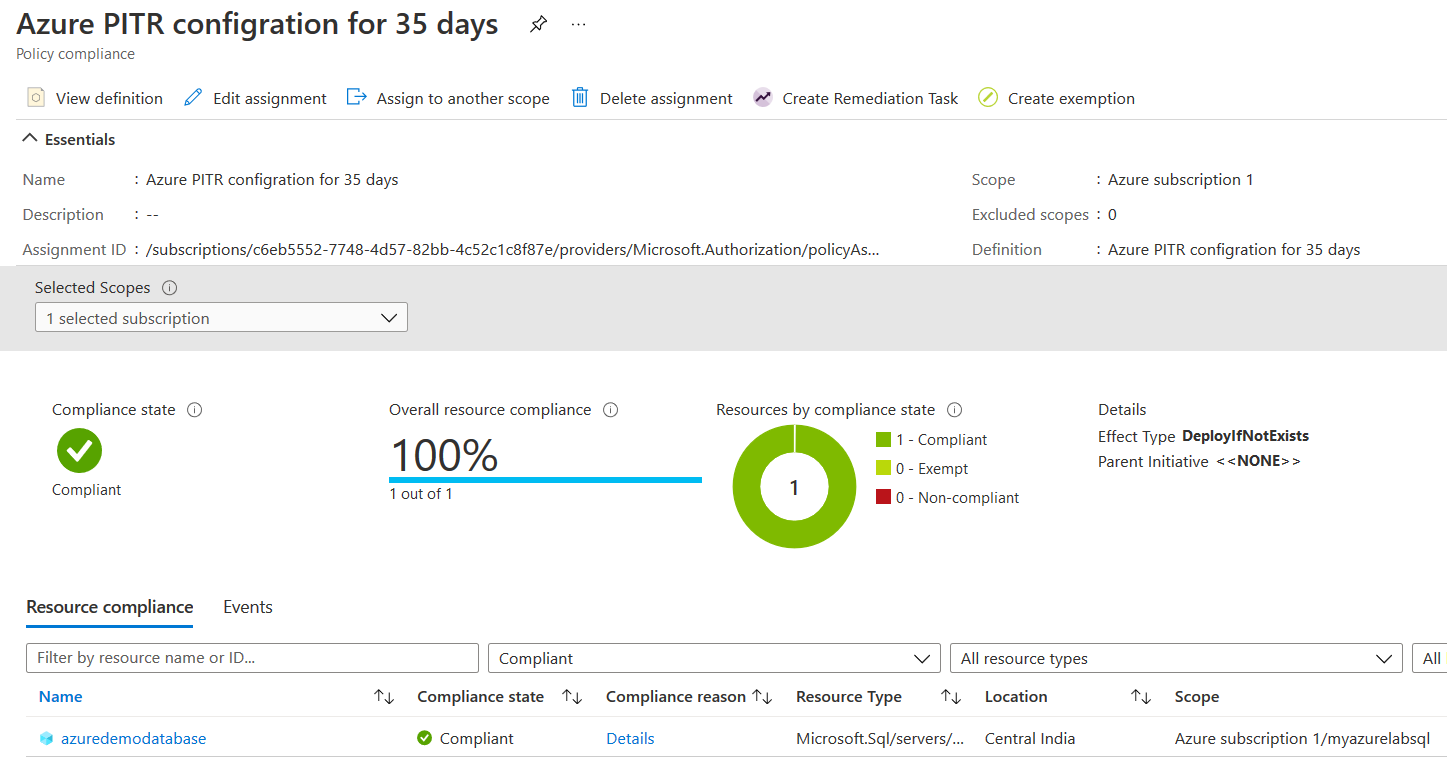
You can validate the Azure database backup PITR value. As shown below, it is modified to 35 days.
In the Azure policy dashboard, the policy is showing Compliant after the remediation task is successful.
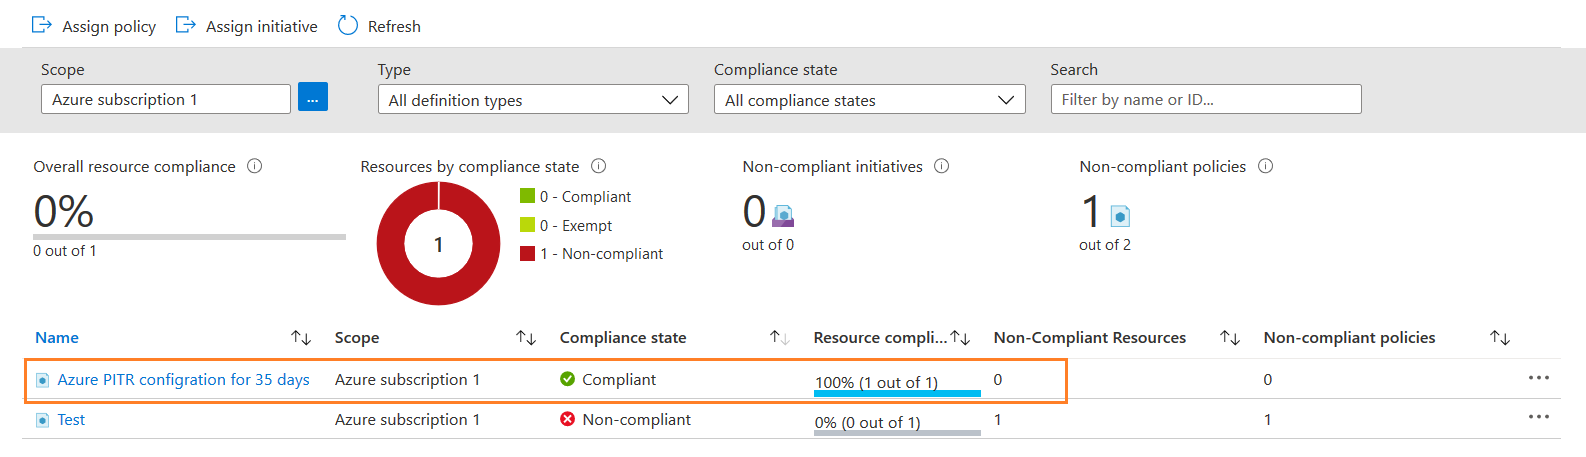
Click on the Azure policy to check individual resource compliance. If you have multiple Azure databases, you can check the status of individual resources.
Conclusion
This article explored the custom Azure policy for validating the PITR configuration of Azure SQL Databases. You can use it for checking the compliance status of Azure databases against the policy configuration. You can also configure the remediation task to change Azure DB configuration and change their status from Non-Compliant to Compliant. It also makes sure you have a sufficient PITR configuration that protects you against accidental data losses or issues.

I am the author of the book "DP-300 Administering Relational Database on Microsoft Azure". I published more than 650 technical articles on MSSQLTips, SQLShack, Quest, CodingSight, and SeveralNines.
I am the creator of one of the biggest free online collections of articles on a single topic, with his 50-part series on SQL Server Always On Availability Groups.
Based on my contribution to the SQL Server community, I have been recognized as the prestigious Best Author of the Year continuously in 2019, 2020, and 2021 (2nd Rank) at SQLShack and the MSSQLTIPS champions award in 2020.
Personal Blog: https://www.dbblogger.com
I am always interested in new challenges so if you need consulting help, reach me at rajendra.gupta16@gmail.com
View all posts by Rajendra Gupta
- Understanding PostgreSQL SUBSTRING function - September 21, 2024
- How to install PostgreSQL on Ubuntu - July 13, 2023
- How to use the CROSSTAB function in PostgreSQL - February 17, 2023