
In this article, we are going to learn about the CREATE TABLE statement. This article consolidates the various scenarios. I have covered the following scenarios.
- How to create a table in a specific schema of the database
- How to create a global and local temporary table
- How to create a table with constraints
- How to create a table in a different filegroup
- How to create a system-version temporal table
The CREATE TABLE statement is used to create a new table in a database. The syntax of CREATE TABLE statement is as follows:
|
1 2 3 4 5 6 7 8 |
CREATE TABLE [Sch_Name].[tbl_Name]( [Col_Name_1] [Datatype](Length), [Col_Name_2] [Datatype](Length) [Constraint_Name] , [Col_Name_3] [Datatype](Length), …. . . . . ) ON [FilegroupName] |
In the syntax,
- sch_name: Specify the name of the schema in which you want to create a table. You can read this article to learn more about SQL Server Schema.
- tbl_name: Specify the desired table name.
- col_name: Specify the column name that you want to add to a table.
- Datatype: Specify the datatype of the column.
- length: Specify the length of the column.
- contrsint_Name: Specify the constraint name.
- filegroupName: Specify the filegroup name in which you want to create the table. You can read this article to learn more about SQL Server filegroups.
Let us understand various use cases to create a table in a database.
Create a table in a specific schema
To create table in specific schema, we must use two-part name. The schema in which you are creating the table must exists in the database. For example, you want to create a table named tblPatient in Patients schema, the Create table definition will be as following:
|
1 2 3 4 5 6 7 8 9 10 |
CREATE TABLE [Patients].[tblPatient]( [Patient_ID] [bigint] IDENTITY(1,1), [Patient_code] [varchar](50), [Patient_name] [varchar](50), [Address] [varchar](25), [City] [varchar](50), [AppointmentDate] [datetime], ) ON [PRIMARY] |
Screenshot
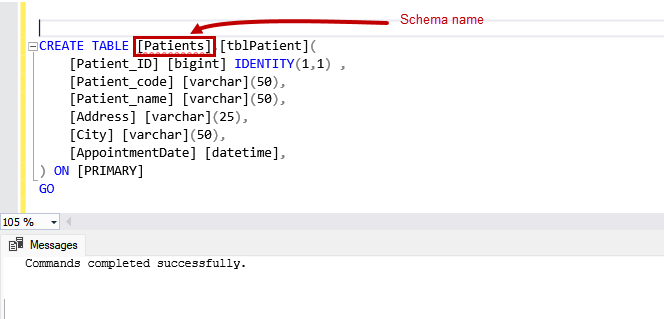
The above command creates a table named tblPatient in Patients schema.
Create a table with constraints
Now, let us understand how we can create a table with a constraint. A table can have the following constraints.
- NOT NULL: This constraint ensures that a query does not insert a NULL value in a column on which the constraint has been created.
- UNIQUE: This constraint ensures that the query inserts only unique values in the column on which the constraint has been created.
- CHECK: When we insert a record in a table, the check constraint ensures that the values that we are inserting in a column must satisfy the condition specified in a CHECK constraint.
- DEFAULT: The DEFAULT constraint inserts a default value. If we do not specify the values for the column on which the default constraint, it inserts the default value specified in the DEFAULT constraints.
- PRIMARY KEY: The Primary key constraint is used to identify each record uniquely. Following are the characteristics of the Primary key
- The primary key consists of one or more columns.
- The primary key contains unique values and cannot contain a NULL value.
- We can create one primary key in a table.
- When we create a primary key, a clustered index will be created automatically.
- FOREIGN KEY: The foreign key is a column that creates a link between two tables. The foreign key of any table refers to the Primary Key of another table. A table can have one or more foreign keys. A foreign key constraint prevents the UPDATE and DELETE statement that breaks the link between two tables.
Now, let us create a table named tblPatient with NOT NULL constraint.
|
1 2 3 4 5 6 7 8 9 10 |
CREATE TABLE [tblPatient]( [Patient_ID] [bigint] IDENTITY(1,1), [Patient_code] [varchar](50) NOT NULL, [Patient_name] [varchar](50), [Address] [varchar](25), [City] [varchar](50), [AppointmentDate] [datetime], ) ON [PRIMARY] |
Now, run the following query to insert a record with a NULL value.
|
1 2 3 4 5 6 |
insert into tblPatient ([Patient_code],[Patient_name],[Address],[City],[AppointmentDate]) values (NULL, 'Nisarg U', 'D5, Sector 15', 'Ahmedabad', getdate()) |
Query output
Msg 515, Level 16, State 2, Line 12
Cannot insert the value NULL into column ‘Patient_code’, table ‘VSDatabase.dbo.tblPatient’;
column does not allow nulls. INSERT fails.
Screenshot
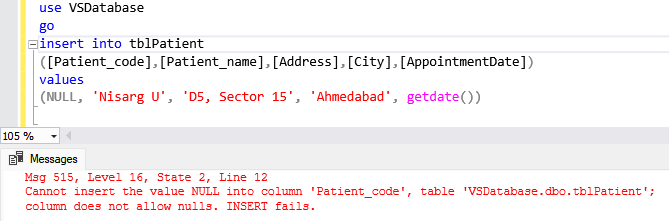
As you can see, the query has returned an error.
Create a table in the secondary filegroup
To create a table in the secondary filegroup, we must specify the filegroup name in the CREATE TABLE statement. Make sure that the filegroup in which you are creating a table must exist on the database. Creating a table in a secondary filegroup is useful when you want to keep your frequently accessed tables on a separate disk.
Suppose we want to create table tblPatient in a secondary filegroup named FG_Patient. The CREATE TABLE statement is as following:
|
1 2 3 4 5 6 7 8 9 10 11 12 |
CREATE TABLE [tblPatient]( [Patient_ID] [bigint] IDENTITY(1,1) , [Patient_code] [varchar](50), [Patient_name] [varchar](50), [Address] [varchar](25), [City] [varchar](50), [AppointmentDate] [datetime], ) ON [FG_Patients] GO |
Screenshot
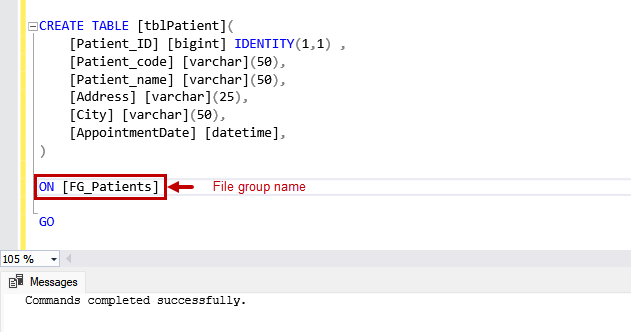
The table tblpatient has been created. Now, to view the tables created in the FG_Patient filegroup, run the following query.
|
1 2 3 4 5 6 7 8 9 10 |
SELECT OBJECT_SCHEMA_NAME(tbl.object_id) AS schema_name ,tbl.name AS table_name ,fg.name AS filegroup_name FROM sys.tables tbl INNER JOIN sys.indexes indx ON tbl.object_id=indx.object_id INNER JOIN sys.filegroups fg ON indx.data_space_id=fg.data_space_id and tbl.name not like 'sys%' ORDER BY tbl.name, indx.index_id |
Query Output
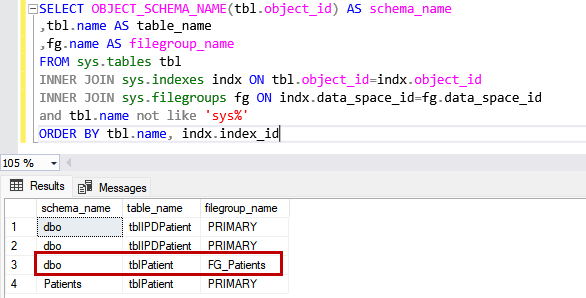
As you can see, the tblpatient has been created in the FG_Patients filegroup.
Create a temporary table
The temporary tables are session-specific tables and are used to store the data temporarily. It is good practice to create and store the desired dataset temporary table and perform complex operations when performing complex string or arithmetic functions. The Temp tables are created in the TempDB database. There are two types of the temporary tables
- Local temp tables
- Global Temp tables.
The syntax of the regular table and temp tables are the same. The only difference is the prefix that we used before the table name. To create the local temp table, we must use # before the name of the table. To create a global temp table, we must use ## before the name of the table. For example, we want to create a local temp table named #tblpatient, the CREATE TABLE statement written as follows.
|
1 2 3 4 5 6 7 8 9 10 11 |
CREATE TABLE [#tblPatient]( [Patient_ID] [bigint] IDENTITY(1,1) , [Patient_code] [varchar](50), [Patient_name] [varchar](50), [Address] [varchar](25), [City] [varchar](50), [AppointmentDate] [datetime], ) GO |
If you want to create a global temp table named ##tblpatient, the CREATE TABLE statement is written as follows:
|
1 2 3 4 5 6 7 8 9 10 11 |
CREATE TABLE [##tblPatient]( [Patient_ID] [bigint] IDENTITY(1,1) , [Patient_code] [varchar](50), [Patient_name] [varchar](50), [Address] [varchar](25), [City] [varchar](50), [AppointmentDate] [datetime], ) GO |
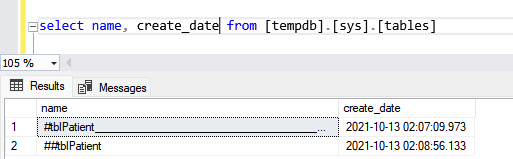
To view the temp tables, run the following query.
|
1 2 3 |
select name, create_date from [tempdb].[sys].[tables] |
Query output
Create a SYSTEM VERSION temporal table
The system version temporal tables were introduced in SQL Server 2016. These tables are special types of tables used to keep the history of the data modification. You can use them to analyse the data at a specific point in time analysis.
When we create a temporal table, we must specify two-period columns with datetime2 datatype. When the data changes occur in the table, the system records the datetime of the data change in the period tables. Along with the period columns, we must specify the history table, which stores the information about the data change.
The syntax to create a temporal table named tblPatient is the following:
|
1 2 3 4 5 6 7 8 9 10 11 12 13 14 |
CREATE TABLE [tblPatient]( [Patient_ID] [bigint] IDENTITY(1,1) Primary key clustered, [Patient_code] [varchar](50) NOT NULL, [Patient_name] [varchar](50), [Address] [varchar](25), [City] [varchar](50), [AppointmentDate] [datetime], [Frm_date] datetime2 GENERATED ALWAYS AS ROW START , [To_date] datetime2 GENERATED ALWAYS AS ROW END , PERIOD FOR SYSTEM_TIME (Frm_date, To_date) ) ON [PRIMARY] WITH (SYSTEM_VERSIONING = ON (HISTORY_TABLE = dbo.tblPatient_History)); |
In the syntax, frm_date and to_date are the period columns. The datatype of frm_date and to_date is datetime2. The data changes will be recorded in the tblPatient_History table. Now, let us insert some dummy data to analyse the behaviour.
|
1 2 3 4 5 6 |
insert into tblPatient ([Patient_code],[Patient_name],[Address],[City],[AppointmentDate]) values ('OPD0001', 'Nisarg U', 'D5, Sector 15', 'Ahmedabad', getdate()), ('OPD0002', 'Nirali U', 'D5, Sector 15', 'Ahmedabad', getdate()), ('OPD0003', 'Dixit U', 'D5, Sector 15', 'Ahmedabad', getdate()) |
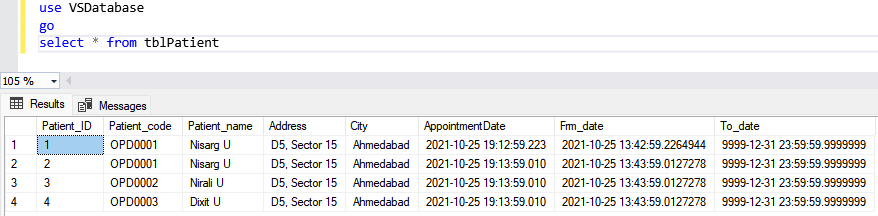
Once records are inserted, run the SELECT query on the tblPatient table.
|
1 2 3 4 5 |
use VSDatabase go select * from tblPatient |
Output
Run the following query on the history table.
|
1 2 3 4 5 |
use VSDatabase go select * from tblPatient_History |
Output
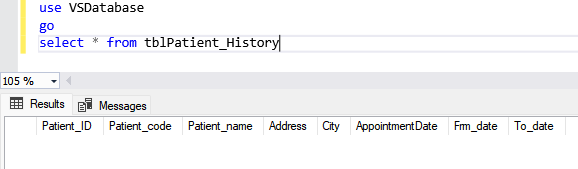
As you can see, the records are inserted in tblPatient with date and time. No records are inserted in the tblPatient_history table. Now, run an UPDATE query to change the data of a specific patient.
Query
|
1 2 3 4 5 |
use VSDatabase go update tblPatient set Patient_code='OPD0005' where Patient_code='OPD0003' |
Run select query on tblPatient table.
|
1 2 3 4 5 |
use VSDatabase go select * from tblPatient_History |
Output
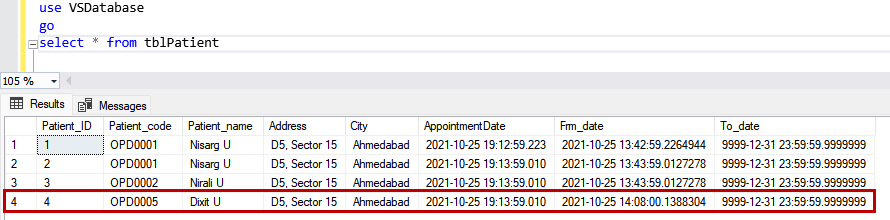
After updating the data, the date and time of the period columns are changed. Let us look at the history table. Run the SELECT query on the tblPatient_History table.
Query
|
1 2 3 4 5 |
use VSDatabase go select * from tblPatient_History |
Query Output

As you can see, the old values of the tblPatient have been inserted in the history table.
Sometimes, the temporal tables can be used to revert the changes made by an UPDATE or DELETE query. I will write a separate article on it.
Summary
This article taught us about the CREATE TABLE statement in SQL Server. We have learned various use cases that can be used to create a table. We learned:
- How to create a table in a specific schema of the database.
- How to create a global and local temporary table.
- How to create a table with constraints.
- How to create a table in a different filegroup.
- How to create a system-version temporal table.

He has expertise in database design, performance tuning, backup and recovery, HA and DR setup, database migrations and upgrades. He has completed the B.Tech from Ganpat University. He can be reached on nisargupadhyay87@outlook.com
- Different ways to identify and change compatibility levels in SQL Server - July 22, 2024
- Copy SQL Databases between Windows 10 and CentOS using SQL Server data tools - October 19, 2022
- Changing the location of FILESTREAM data files in SQL Database - October 14, 2022