
Database Mail, as you would expect from its name, is a solution for sending e-mail messages from the SQL Server Database Engine to users. Using Database Mail, database applications can send e-mail messages that can, for example, contain query results or simply alert a user about an event that occurred in the database.
The process of Database Mail configuration has three main steps. In order to complete this successfully, we need to:
- create a Database Mail account,
- create a Database Mail profile,
- and configure those two to work together
Configuring Database Mail
To create a Database Mail profile, we can use either the Database Mail Configuration Wizard or T-SQL code. Using Configuration Wizard is easier, but bear in mind that Database Mail is turned off in SQL Server Express editions.
Usually, all we need to do is go in Object Explorer, connect to the SQL Server instance we want to configure Database Mail on and expand the server tree. Then expand the Management node and double-click Database Mail or right-click and choose Configure Database Mail to open the Database Mail Configuration Wizard:

Since Microsoft SQL Server 2016 Express edition is used in this article as an example, the Management node does not have Database Mail:

This doesn’t mean we cannot use it because it’s only not available as an interface, but it’s still available in the SQL Server Database Engine itself. We just need to enable it using T-SQL.
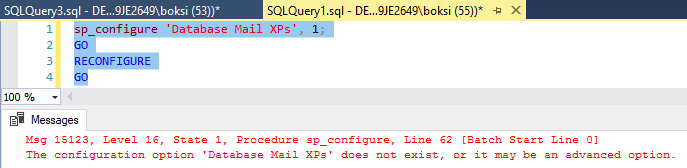
To enable Database Mail, run the following code:
|
1 2 3 4 5 6 |
sp_configure 'Database Mail XPs', 1; GO RECONFIGURE GO |
In this case, running the code triggered an error:
Msg 15123, Level 16, State 1, Procedure sp_configure, Line 62 [Batch Start Line 0] The configuration option ‘Database Mail XPs’ does not exist, or it may be an advanced option.
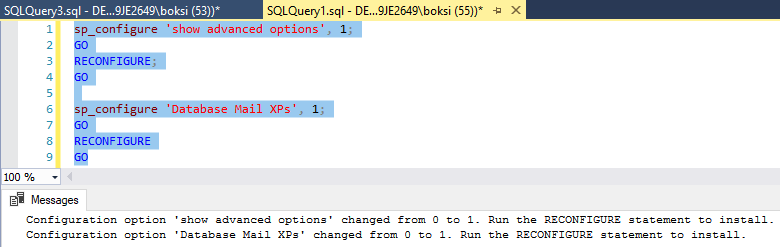
This is going to happen from time to time because this is an advanced option. To fix this, we need to change the show advanced options default value from 0 to 1.
To do this run the following code:
|
1 2 3 4 5 6 7 8 9 |
sp_configure 'show advanced options', 1; GO RECONFIGURE; GO sp_configure 'Database Mail XPs', 1; GO RECONFIGURE GO |
This time, the query is executed successfully. Once these two options are changed from ‘0’ to ‘1’, Database Mail is turned on:
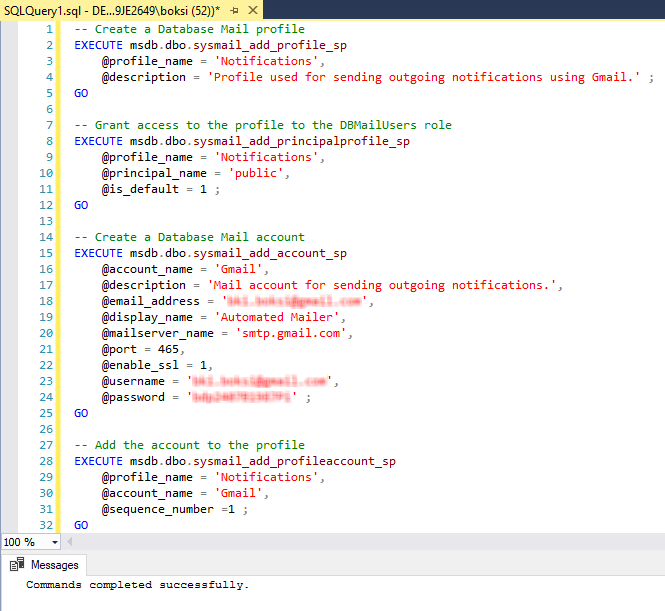
Now we can get back to setting up the e-mail profile and adding an e-mail account. To do this we will use some stored procedures in msdb database.
To create a new Database Mail profile named ‘Notifications’ we will use the sysmail_add_profile_sp stored procedure and the following code:
|
1 2 3 4 5 |
-- Create a Database Mail profile EXECUTE msdb.dbo.sysmail_add_profile_sp @profile_name = 'Notifications', @description = 'Profile used for sending outgoing notifications using Gmail.' ; GO |
To grant permission for a database user or role to use this Database Mail profile, we will use the sysmail_add_principalprofile_sp stored procedure and the following code:
|
1 2 3 4 5 6 |
-- Grant access to the profile to the DBMailUsers role EXECUTE msdb.dbo.sysmail_add_principalprofile_sp @profile_name = 'Notifications', @principal_name = 'public', @is_default = 1 ; GO |
To create a new Database Mail account holding information about an SMTP account, we will use the sysmail_add_account_sp stored procedure and the following code:
|
1 2 3 4 5 6 7 8 9 10 11 12 |
-- Create a Database Mail account EXECUTE msdb.dbo.sysmail_add_account_sp @account_name = 'Gmail', @description = 'Mail account for sending outgoing notifications.', @email_address = 'Use a valid e-mail address', @display_name = 'Automated Mailer', @mailserver_name = 'smtp.gmail.com', @port = 465, @enable_ssl = 1, @username = 'Use a valid e-mail address', @password = 'Use the password for the e-mail account above' ; GO |
To add the Database Mail account to the Database Mail profile, we will use the sysmail_add_profileaccount_sp stored procedure and the following code:
|
1 2 3 4 5 6 |
-- Add the account to the profile EXECUTE msdb.dbo.sysmail_add_profileaccount_sp @profile_name = 'Notifications', @account_name = 'Gmail', @sequence_number =1 ; GO |
Execute the code from all stored procedures, and you should get the message that the whole code is executed successfully:
If for some reason, execution of the code above returns an error, use the following code to roll back the changes:
|
1 2 3 4 |
EXECUTE msdb.dbo.sysmail_delete_profileaccount_sp @profile_name = 'Notifications' EXECUTE msdb.dbo.sysmail_delete_principalprofile_sp @profile_name = 'Notifications' EXECUTE msdb.dbo.sysmail_delete_account_sp @account_name = 'Gmail' EXECUTE msdb.dbo.sysmail_delete_profile_sp @profile_name = 'Notifications' |
If anything goes wrong, executing the stored procedures individually could help in troubleshooting the issue. Just make sure to execute the ‘sysmail_add_profileaccount_sp’ stored procedure after the Database Account, and a Database Profile are created.
Test Database Mail configuration
Okay, now we’ve set up an email account, so what’s next? Well, let’s send a test e-mail and see if it works.
As we mentioned before, we could send an e-mail to alert a user about an event that occurred in the database and this is exactly what we are going to do later on using a simple DML trigger. For now, let’s just send an e-mail to the specified recipient using the sp_send_dbmail stored procedure.
|
1 2 3 4 5 6 |
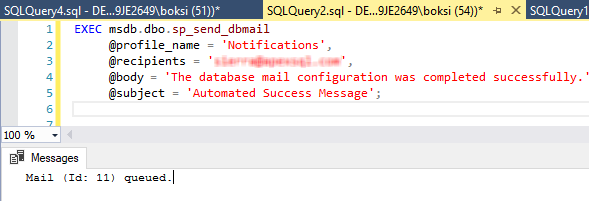
EXEC msdb.dbo.sp_send_dbmail @profile_name = 'Notifications', @recipients = 'Use a valid e-mail address', @body = 'The database mail configuration was completed successfully.', @subject = 'Automated Success Message'; GO |
The Results grid will show the message that the e-mail is queued and ID number:
The code above should send an e-mail using the profile that was previously created to a recipient specified @recipients argument. The subject and body are specified @body and @subject arguments.
Pretty simple, right? Well, not exactly. In this case and in most situations in the real world the mail will not be sent successfully even though every step during the configuration was successful.
Troubleshooting Database Mail
In this case, the e-mail message was successfully queued, but the message was not delivered.
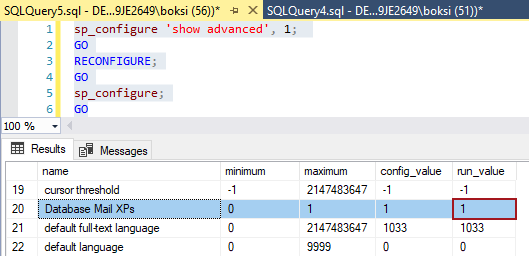
First things first, check if Database Mail is enabled by executing the following code:
|
1 2 3 4 5 6 |
sp_configure 'show advanced', 1; GO RECONFIGURE; GO sp_configure; GO |
In the Results grid, make sure that the ‘run_value’ column for Database Mail XPs is set to 1:
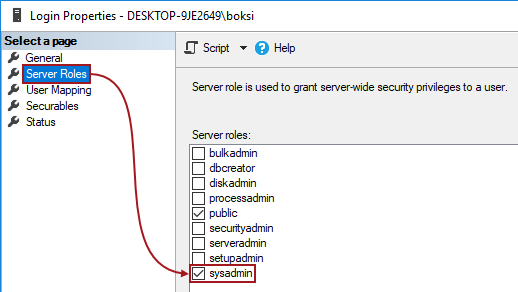
To send e-mails, the user must also be a member of the DatabaseMailUserRole server role. Members of the sysadmin fixed server role and msdb db_owner role are members automatically. This can be easily checked by going to Security > Logins, right-click the current user and select Properties. In the Login Properties dialog click the ‘Server Roles’ page and make sure that the ‘sysadmin’ server role is checked:
The Database Mail system logs e-mail activity in the ‘msdb’ database. To view the error messages returned by Database Mail, execute the following code:
|
1 2 3 |
SELECT * FROM msdb.dbo.sysmail_event_log; |
The statement will return logs and in a case like ours when e-mails are not delivered look for the errors under the ‘event_type’ column:
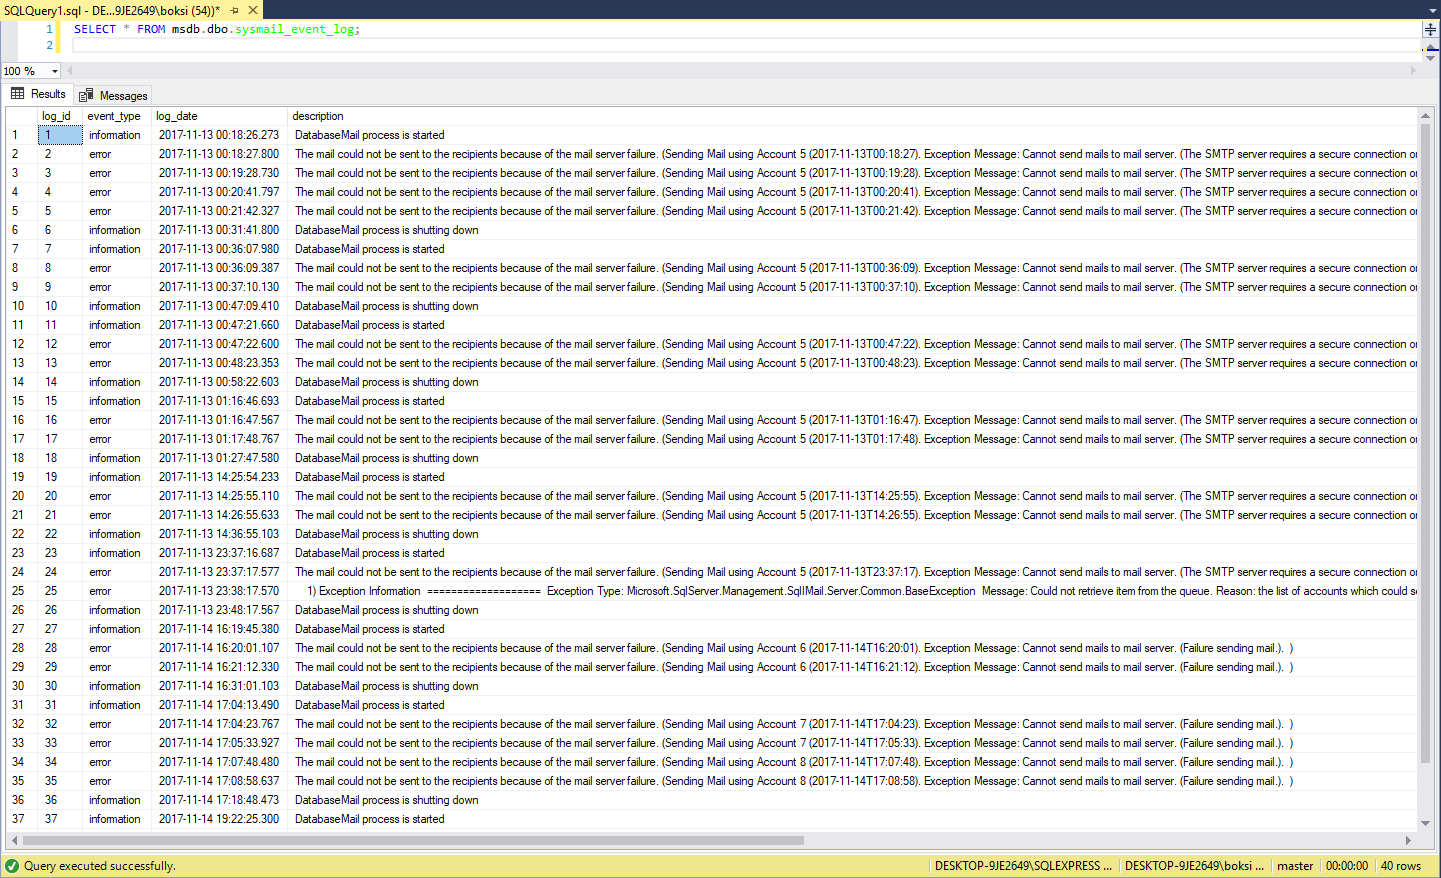
These logs have all sorts of useful information that could help in troubleshooting, and we are in particular interested in the ‘description’ column as it holds detailed information about the error and what went wrong.
The very first error logged says:
2 error 2017-11-13 00:18:27.800 The mail could not be sent to the recipients because of the mail server failure. (Sending Mail using Account 5 (2017-11-13T00:18:27). Exception Message: Cannot send mails to mail server. (The SMTP server requires a secure connection or the client was not authenticated. The server response was: 5.5.1 Authentication Required. Learn more at). ) 12092 1 NULL 2017-11-13 00:18:27.800 sa
However, this information won’t be useful unless there is some documentation e.g. in the TechNet library. There is an article about Troubleshooting Database Mail that provides information for users to quickly isolate and correct common problems with Database Mail, but going through the documentation was not helpful in this case and it took a long time without success.
One other message that was logged of this type was:
28 error 2017-11-14 16:20:01.107 The mail could not be sent to the recipients because of the mail server failure. (Sending Mail using Account 6 (2017-11-14T16:20:01). Exception Message: Cannot send mails to mail server. (Failure sending mail.). ) 14452 8 NULL 2017-11-14 16:20:01.107 sa
The problem, in general, is not with the Database Mail itself and its functionality. The error description messages are not predefined in the SQL Server Engine. This explains the missing Microsoft documentation. Those messages are usually authentication responses from SMTP servers that are required before allowing access to mail services.
To troubleshoot this further, we need to approach the problem from another perspective.
So far in troubleshooting, we have verified the following general steps:
- Database Mail is enabled
- The user is properly configured to send Database Mail
- Sending a test e-mail doesn’t work
- No TechNet library documentation could be found for the error messages logged
Another approach could be to setup an e-mail account used for sending outgoing notifications on another e-mail client like Microsoft Outlook. This should be fairly simple as both Gmail and MS Outlook are well-known services that should work together and there’s online documentation available on official websites.
To use the Gmail account with MS Outlook, we have to configure it to work with POP3 or IMAP.
Log onto your Gmail account at www.gmail.com and click the Settings in the top right corner:
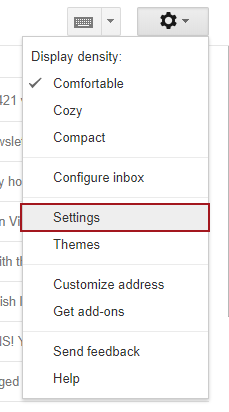
Choose the Forwarding and POP/IMAP tab at the top of the page:

In the IMAP Access section, make sure that Enable IMAP option is selected and click the Configuration instructions link at the bottom:
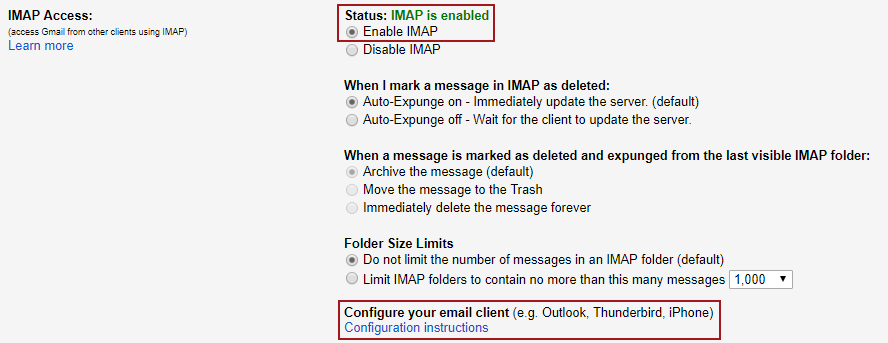
This will open an instruction webpage on how to set up IMAP. Skip the 1st step as we already checked and verified that IMAP is turned on.
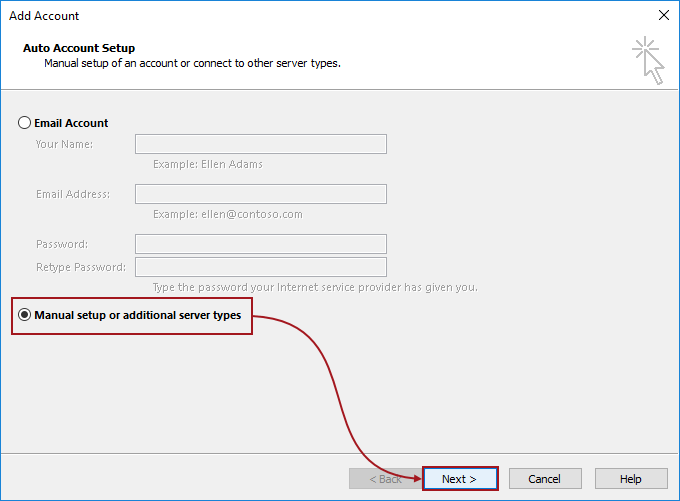
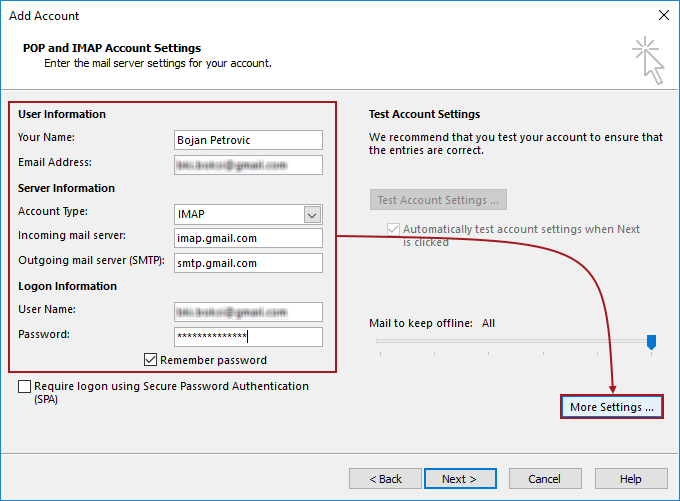
Fire up Outlook client to add the Gmail email account to it. Once Outlook is opened, click the File tab, and select Add Account:

In the Add Account dialog, select the Manual setup or additional server types option and click the Next button:
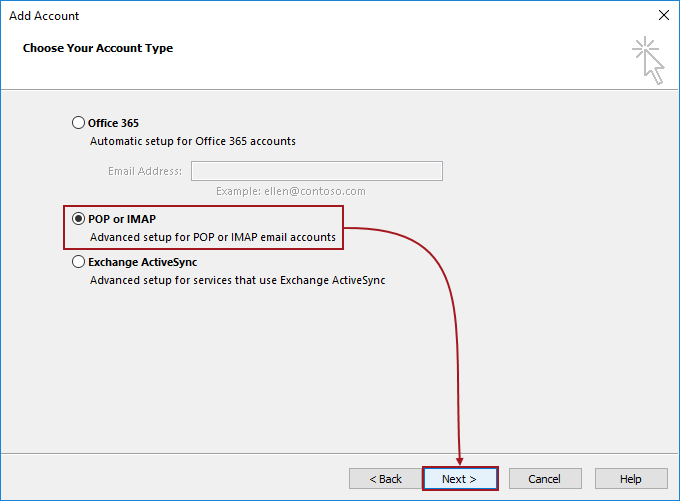
In the next step, choose the POP or IMAP option and click the Next button:
Use the information from the table below to set up Outlook client with the correct settings:
| Incoming Mail (IMAP) Server |
imap.gmail.com
Requires SSL: Yes Port: 993 |
| Outgoing Mail (SMTP) Server |
smtp.gmail.com
Requires SSL: Yes Requires TLS: Yes (if available) Requires Authentication: Yes Port for SSL: 465 Port for TLS/STARTTLS: 587 |
Under User Information section, make sure to enter a valid e-mail address. The e-mail address entered here will be automatically set as User Name for the Logon Information once the Account Type is selected from the drop-down box. Once finished, click the More Settings button on the right to configure additional settings before continuing further:
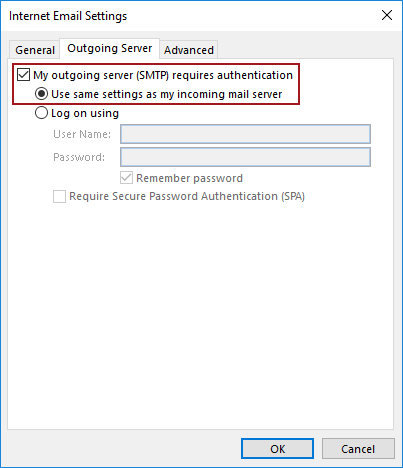
This will open the Internet e-mail settings dialog. Leave everything as it is under the General tab. Next, click the Outgoing Server tab, check the My outgoing server (SMTP) requires authentication check-box and select the Use same settings as my incoming mail server option:
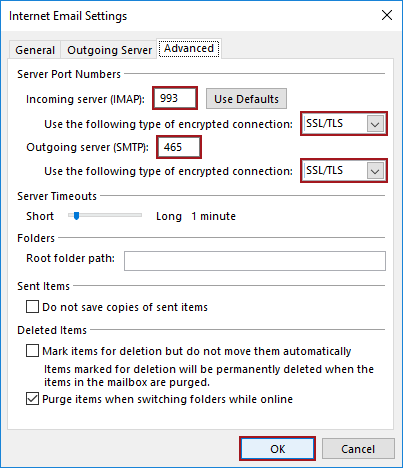
Move on to the Advanced tab. Once again, use the information from the table above to set server port numbers. Set the incoming server (IMAP) to 993, and the outgoing server (SMTP) to 465. From the drop-down boxes select the SSL/TLS type of encrypted connection for both IMAP and SMTP servers. Leave the rest as it is and click the OK button to confirm settings:
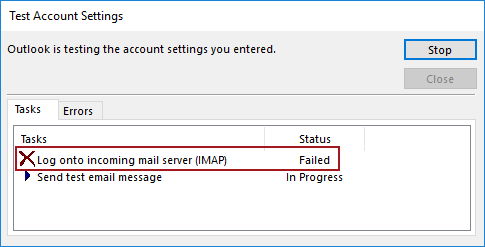
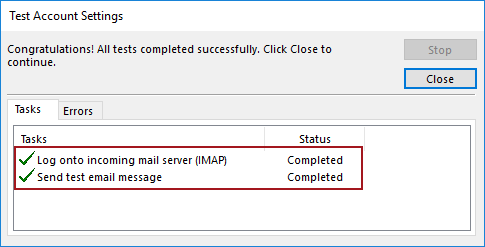
Now it’s the time to test e-mail account settings to ensure that the entries are correct. Click the Next button and this will pop-up two additional dialogs. In the first dialog, Outlook will perform two tasks:
- Log onto incoming mail server (IMAP)
- Send test e-mail message
This step is crucial as this task previously failed for Database Mail. In the second dialog, Outlook will ask for the username and password. This was already configured, optionally check the Save this password in your password lint option if your Windows user account is password-protected, and no other person has access to it:
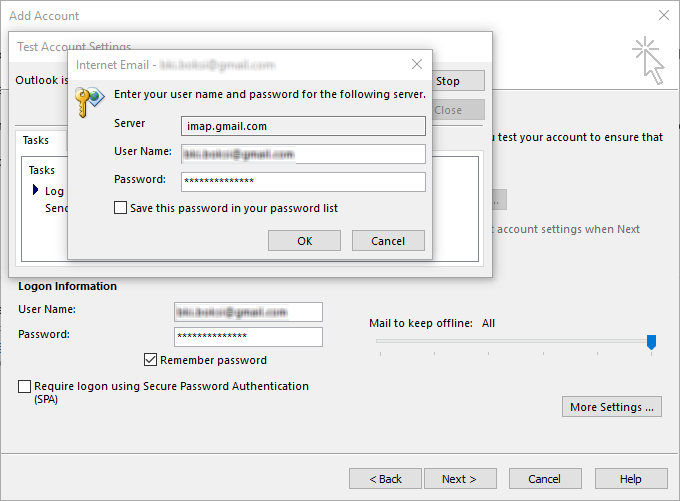
Note: The credential dialog can pop-up more than one time. Just click the OK button each time, until the server stops asking for login information. This usually happens when something is not configured right e.g. username or password, port numbers, etc.
In this case, the first task failed and sending test e-mail message failed as well right afterward:
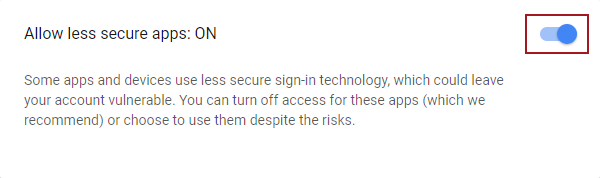
Some applications and devices use less secure sign-in technology, which makes their respective accounts more vulnerable and Gmail will block these sign-in requests. By default, access for these applications is turned off, but we can also turn access on to use them despite the risks. In this case, we also have to.
This can be solved by logging into Gmail account and making sure that Less secure apps option is enabled for the desired account. Go to the Less secure apps section of the Gmail account and enable access for less secure applications.
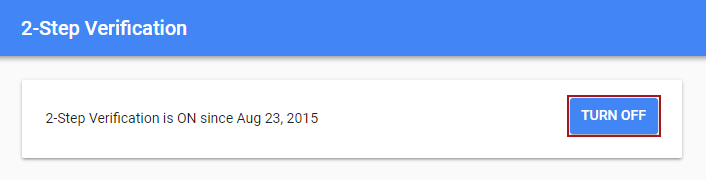
Note: This setting is not available for accounts with 2-Step Verification enabled. Such accounts require an application-specific password for less secure apps access.
Since this account has 2-Step Verification enabled, we have to turn it off, so we can continue further.
Go to ’Sign in & security’ section of My Account, select 2-Step Verification, sign in using your credentials, and enter verification code if asked received via text message with a 6-digit verification code or phone call, and click the Turn off button:
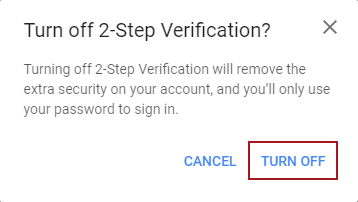
A pop-up dialog will appear informing the user about security and vulnerability. We are aware of this, so just click the Turn off button to continue:
Now we can go back to the Less secure apps section and allow access for less secure applications:
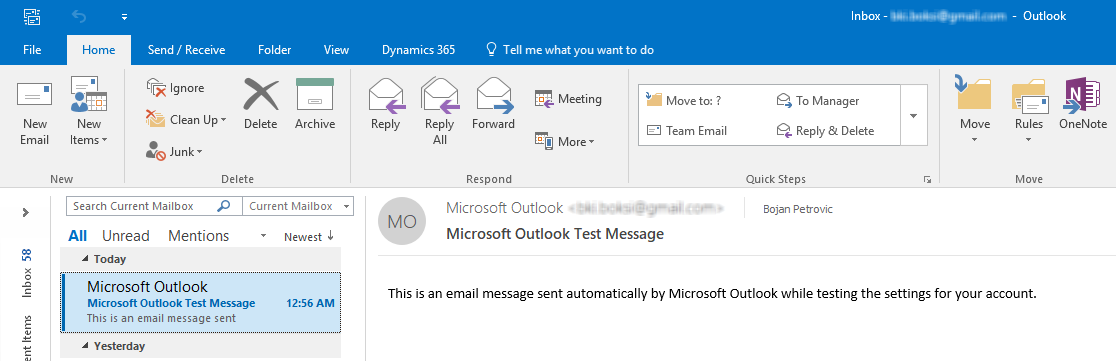
Back to Outlook, click the Next button once again to test e-mail account settings and finally a message without errors. Both tasks completed successfully:
The test e-mail message is also delivered successfully which means that sending another test e-mail from Database Mail should work this time:
There is only one way to find out. Go back to SSMS and execute the code for sending the test e-mail:
|
1 2 3 4 5 6 |
EXEC msdb.dbo.sp_send_dbmail @profile_name = 'Notifications', @recipients = 'Use a valid e-mail address', @body = 'The database mail configuration was completed successfully.', @subject = 'Automated Success Message'; GO |
Unfortunately, even after all this trouble, the test e-mail is not getting through. A quick look at the log files shows another error message of another type:
51 error 2017-11-18 16:21:22.803 The mail could not be sent to the recipients because of the mail server failure. (Sending Mail using Account 10 (2017-11-18T16:21:22). Exception Message: Cannot send mails to the mail server. (Failure sending mail.). ) 3564 14 NULL 2017-11-18 16:21:22.803 sa
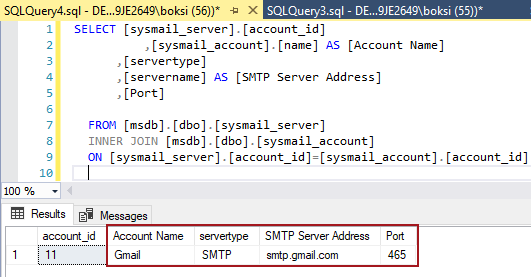
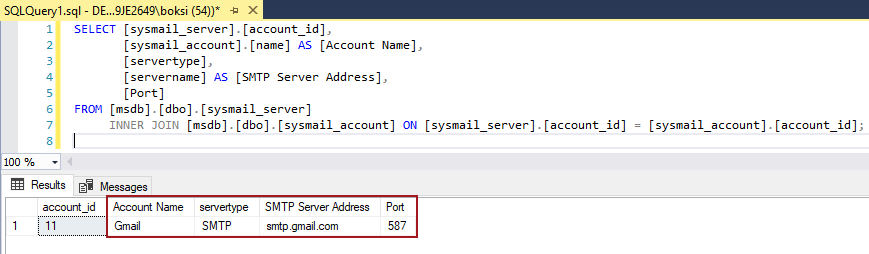
At this point, let’s do a quick look up, just to make sure that the e-mail profile is configured the same as it is for Outlook. Execute the code from below:
|
1 2 3 4 5 6 7 |
SELECT [sysmail_server].[account_id], [sysmail_account].[name] AS [Account Name], [servertype], [servername] AS [SMTP Server Address], [Port] FROM [msdb].[dbo].[sysmail_server] INNER JOIN [msdb].[dbo].[sysmail_account] ON [sysmail_server].[account_id] = [sysmail_account].[account_id]; |
This will return settings for account name, server type, server address, and port number:

Everything looks good, but the e-mail is still not getting out. A quick online lookup of the error message leads to a Stack Overflow thread in which the user has the exact same error message. In the comment section, another user says that changing the port number to 587 instead of 465, even though information from Gmail says otherwise, fixed the issue for him. As we are running out of options here, let’s try that and see what happens.
We will use the sysmail_update_account_sp stored procedure to change the port number in the existing Database Mail account.
Execute the following code:
|
1 2 3 4 |
EXECUTE msdb.dbo.sysmail_update_account_sp @account_name = 'Gmail', @port = 587; GO |
Execute the code from the previous step to verify that the change is applied. The port number will change leaving all other account information intact:
For some reason configuration instructions for SSL provided by Google does not work on port 465 for Database Mail system, but port 587 that is specified for TLS/STARTTLS worked like a charm.
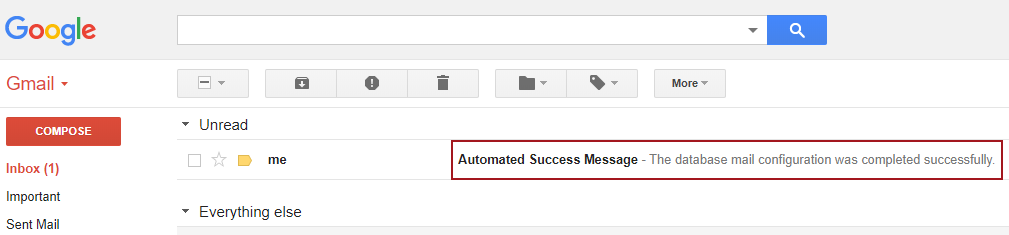
Finally, after giving it another try there is a new e-mail in the inbox sent from the Database Mail system:
Send e-mail from a trigger
To demonstrate how to send an e-mail notification to a user when a specific event occurred in the database, we can create a simple trigger.
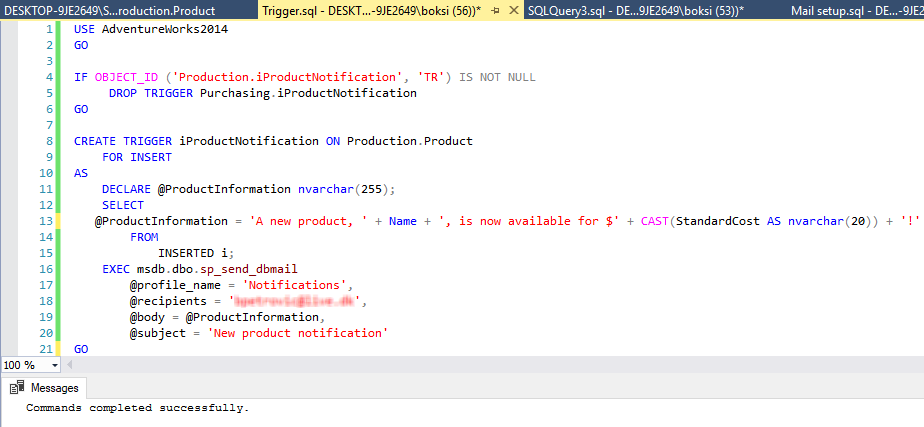
Use the code below to create a trigger named iProductNotification on the Product table which is contained in the Production schema:
|
1 2 3 4 5 6 7 8 9 10 11 12 13 14 15 16 17 18 19 20 21 |
USE AdventureWorks2014 GO IF OBJECT_ID ('Production.iProductNotification', 'TR') IS NOT NULL DROP TRIGGER Purchasing.iProductNotification GO CREATE TRIGGER iProductNotification ON Production.Product FOR INSERT AS DECLARE @ProductInformation nvarchar(255); SELECT @ProductInformation = 'A new product, ' + Name + ', is now available for $' + CAST(StandardCost AS nvarchar(20)) + '!' FROM INSERTED i; EXEC msdb.dbo.sp_send_dbmail @profile_name = 'Notifications', @recipients = 'Use a valid e-mail address', @body = @ProductInformation, @subject = 'New product notification' GO |
This trigger will fire when an Insert statement is run against the Product table. The idea behind it is to collect basic information about a new product that is available like name and price and to wrap that information up in a simple e-mail message that will be sent to desired addresses using the Database Mail profile previously configured:
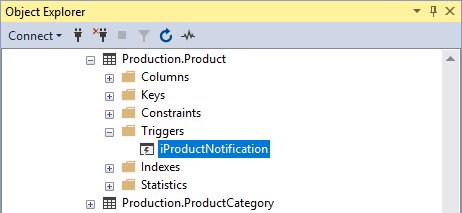
Once the trigger is created, refresh the ‘Triggers’ node under the ‘Product’ table just to make sure that the trigger is created on the right table:
Rather than typing the code for the Insert statement and because it’s easier, use the ‘Edit Top 200 Rows’ option from the right-click context menu on the table with the trigger. Fill in some information like working with Excel sheets. Once done, hit the Enter key to continue:
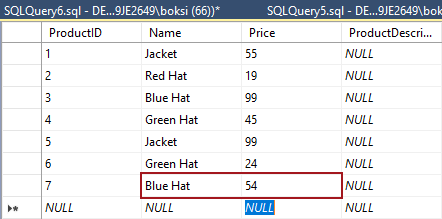
This will issue an Insert statement in the background and fire the trigger. As a result, the trigger will collect some information about the Insert statement, invoke the Database Mail profile, and use it send e-mail to the desired recipient:

Sending query results e-mail message
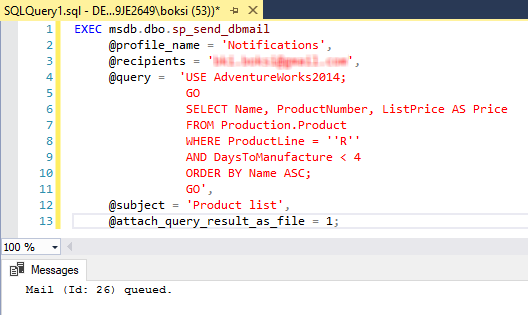
Another example could be sending an e-mail message that contains query results. Execute the following code:
|
1 2 3 4 5 6 7 8 9 10 11 12 13 |
EXEC msdb.dbo.sp_send_dbmail @profile_name = 'Notifications', @recipients = 'Use a valid e-mail address, @query = 'USE AdventureWorks2014; GO SELECT Name, ProductNumber, ListPrice AS Price FROM Production.Product WHERE ProductLine = ''R'' AND DaysToManufacture < 4 ORDER BY Name ASC; GO', @subject = 'Product list', @attach_query_result_as_file = 1; |
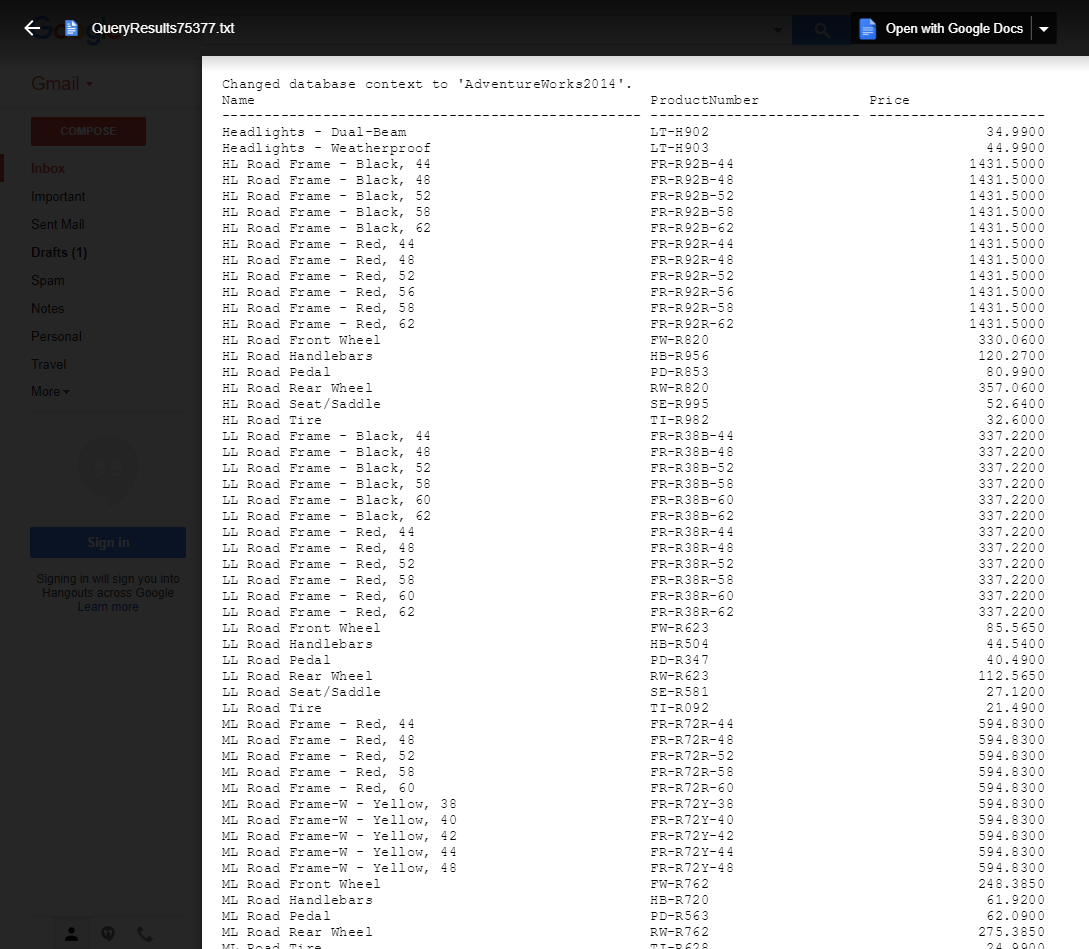
This SELECT statement returns a list of products with a specific condition in mind:
But more importantly, it sends an e-mail with results of that Select statement as an attachment to the e-mail recipients:

And if we open the attachment, there it is, the result of our query:
I hope you found this article helpful. Happy emailing!

He has written extensively on both the SQL Shack and the ApexSQL Solution Center, on topics ranging from client technologies like 4K resolution and theming, error handling to index strategies, and performance monitoring.
Bojan works at ApexSQL in Nis, Serbia as an integral part of the team focusing on designing, developing, and testing the next generation of database tools including MySQL and SQL Server, and both stand-alone tools and integrations into Visual Studio, SSMS, and VSCode.
See more about Bojan at LinkedIn
View all posts by Bojan Petrovic
- Visual Studio Code for MySQL and MariaDB development - August 13, 2020
- SQL UPDATE syntax explained - July 10, 2020
- CREATE VIEW SQL: Working with indexed views in SQL Server - March 24, 2020