
Starting with SQL Server 2016 and Windows Server 2016 there have been numerous cloud related enhancements, most of them are tightly related to Microsoft’s Azure like the ‘Cloud Witness’ but there are others that can be implemented within other public or private clouds.
One of this enhancements is the ‘Active Directory-Detached Cluster’ on top of which we will build our Availability Group. The ‘Active Directory-Detached Cluster’ works without depending on an Active Directory Domain Services (AD DS) for network names, instead it relies on Domain Name Service (DNS). No computer objects are created as well. If your project is not utilizing the Microsoft stack and you don’t require an Active Directory but you love (who doesn’t?) SQL Server this is a great approach to consider.
Let us cover all required steps from creating the virtual networks and the new VMs to configuring a fully functional Availability Group along with a listener.
You would need at least a trial account in Google Cloud Platform where you should simply create a new project and then start the Cloud Shell console.
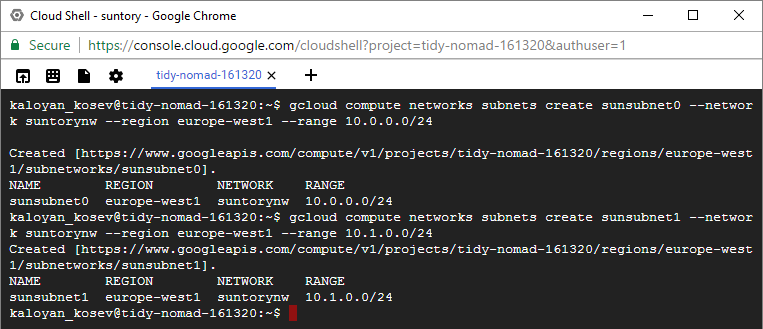
Let us start with creating a new network named ‘suntorynw’.
gcloud compute networks create suntorynw – – mode custom

And then add two subnets, the ‘sunsubnet0’ will be used for the first node, the ‘sunsubnet02’ will be used for the second one.
gcloud compute networks subnets create sunsubnet0 – -network
suntorynw – -region europe-west1 – -range 10.0.0.0/24
gcloud compute networks subnets create sunsubnet1 – -network
suntorynw – -region europe-west1 – -range 10.1.0.0/24
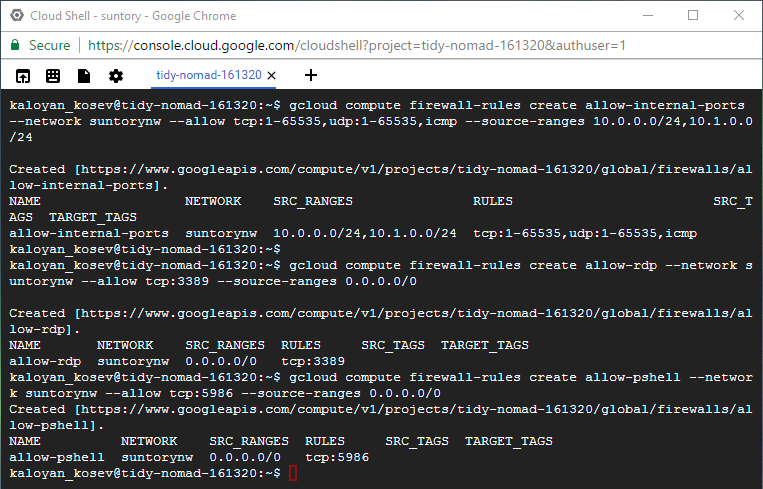
Configure the firewall rules to allow all communication between the networks.
gcloud compute firewall-rules create allow-internal-ports – -network
suntorynw –allow tcp:1-65535,udp:1-65535,icmp – -source-ranges
10.0.0.0/24,10.1.0.0/24
Allow RDP and PowerShell access to the machines from outside (from everywhere in our case, you should review the firewall and the security configurations if you are deploying this in Production).
gcloud compute firewall-rules create allow-rdp – -network suntorynw –
-allow tcp:3389 – -source-ranges 0.0.0.0/0
gcloud compute firewall-rules create allow-pshell – -network
suntorynw –allow tcp:5986 – -source-ranges 0.0.0.0/0
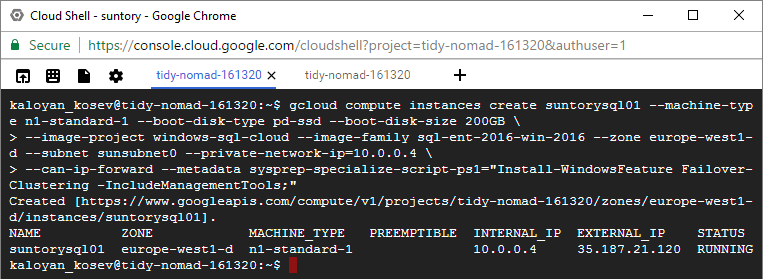
We will use relatively small virtual machines in our scenario with only a single disk, consider changing and optimizing the VMs for your needs.
Create the virtual machine using Windows Server 2016 and SQL Server 2016.
gcloud compute instances create suntorysql01 –machine-type n1-
standard-1 \
– -boot-disk-type pd-ssd –boot-disk-size 200GB \
– -image-project windows-sql-cloud –image-family sql-ent-2016-win-
2016 \
– -zone europe-west1-d –subnet sunsubnet0 –private-network-
ip=10.0.0.4 \
– -can-ip-forward –metadata sysprep-specialize-script-ps1=”Install-
WindowsFeature Failover-Clustering -IncludeManagementTools;”
Create the second virtual machine.
gcloud compute instances create suntorysql02 – -machine-type n1-
standard-1 \
– -boot-disk-type pd-ssd – -boot-disk-size 200GB \
– -image-project windows-sql-cloud – -image-family sql-ent-2016-win-
2016 \
– -zone europe-west1-d –subnet sunsubnet1 – -private-network-
ip=10.1.0.4 \
– -can-ip-forward –metadata sysprep-specialize-script-ps1=”Install-
WindowsFeature Failover-Clustering -IncludeManagementTools;”

Both of the virtual machines are now created and running, both of them have dynamic external IP we can use to connect to.
gcloud compute instances list
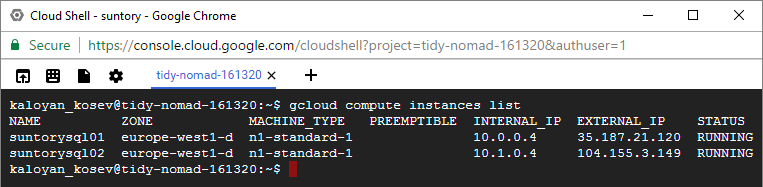
However both machines are created without any credentials being provided to us, we should use the ‘reset-windows-password’ utility provided from Google.
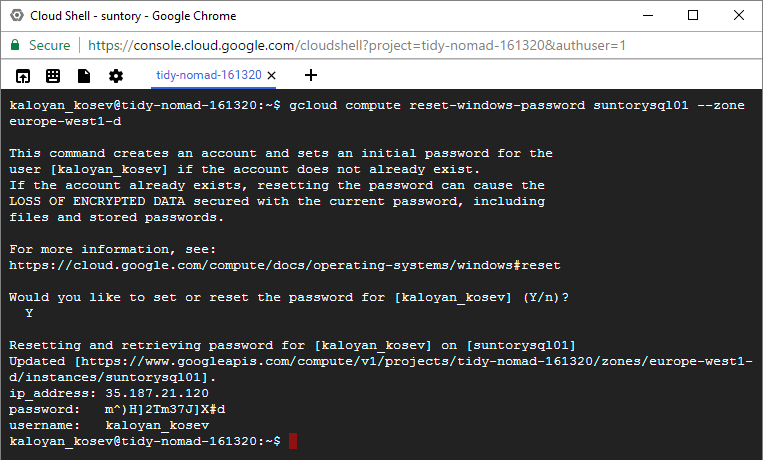
Reset the local administrators password for the first virtual machine suntorysql01.
gcloud compute reset-windows-password suntorysql01 – -zone europe-
west1-d
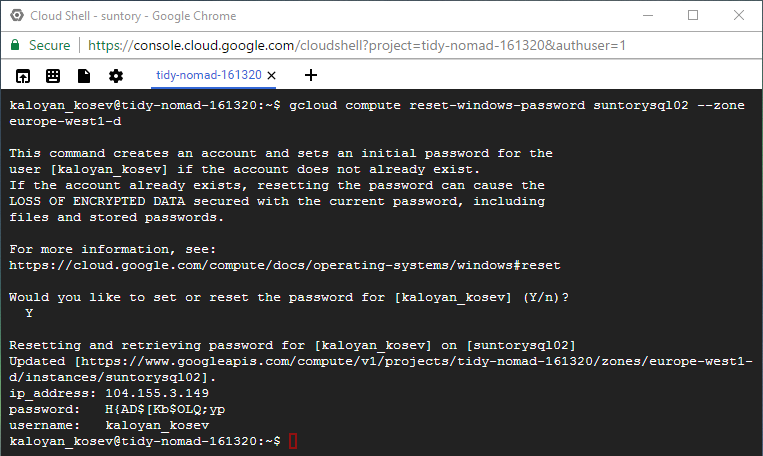
Next, reset the password for suntorysql02.
gcloud compute reset-windows-password suntorysql02 – -zone europe-
west1-d
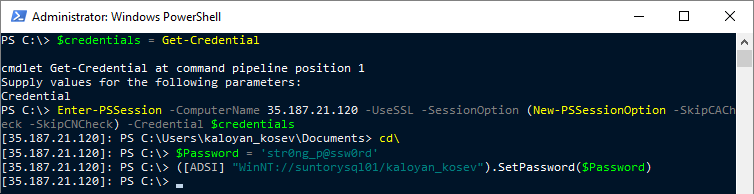
Now that we have account and randomly generated passwords we can connect to the virtual machines using PowerShell initiating the connection from our machine (my laptop in this scenario).
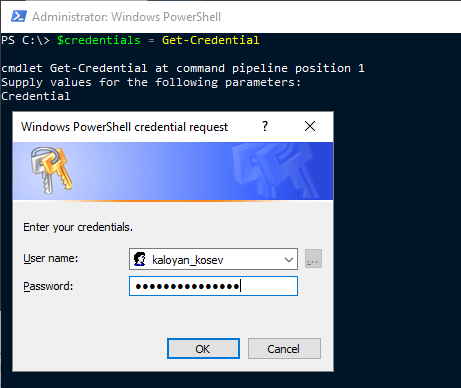
Start PowerShell and declare the $credentials variable, it will immediately ask you for username and password, use the one you have generated from the ‘reset-windows-password’ utility.
$credentials = Get-Credential

Then initiate a new PowerShell session towards the first virtual machine.
Enter-PSSession -ComputerName 35.187.21.120 -UseSSL -SessionOption
(New-PSSessionOption -SkipCACheck -SkipCNCheck) -Credential
$credentials
When connection is established, change the password to something more suitable, repeat the same for the second virtual machine.
$Password = ‘str0ng_p@ssw0rd’
([ADSI] “WinNT://suntorysql02/kaloyan_kosev”).SetPassword($Password)
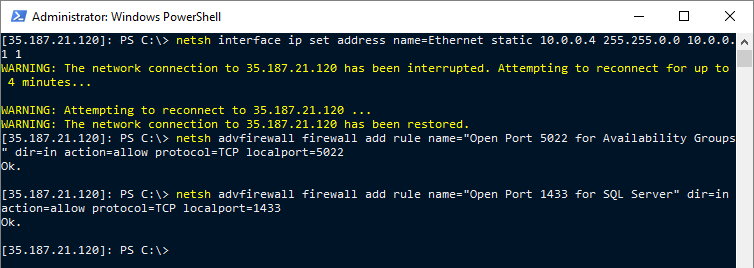
Now we can proceed with the network configuration of the first virtual machine – suntorysql01.
We are setting up a static IP address, mask and gateway, without DNS – we will configure this later.
netsh interface ip set address name=Ethernet static 10.0.0.4
255.255.0.0 10.0.0.1 1
netsh advfirewall firewall add rule name=”Open Port 5022 for
Availability Groups” dir=in action=allow protocol=TCP localport=5022
netsh advfirewall firewall add rule name=”Open Port 1433 for SQL
Server” dir=in action=allow protocol=TCP localport=1433
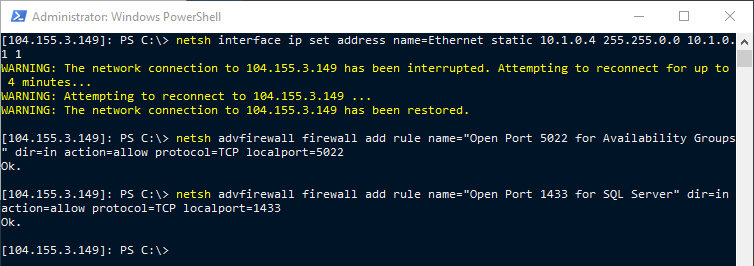
Configure the network settings for the second virtual machine – suntorysql02.
netsh interface ip set address name=Ethernet static 10.1.0.4
255.255.0.0 10.1.0.1 1
netsh advfirewall firewall add rule name=”Open Port 5022 for
Availability Groups” dir=in action=allow protocol=TCP localport=5022
netsh advfirewall firewall add rule name=”Open Port 1433 for SQL
Server” dir=in action=allow protocol=TCP localport=1433
We will name the cluster ‘sunclx’ and give it IPs 10.0.1.4 and 10.1.1.4;
The listener will be named ‘sunlistener’ and the IPs it will have are 10.0.1.5 and 10.1.1.5.
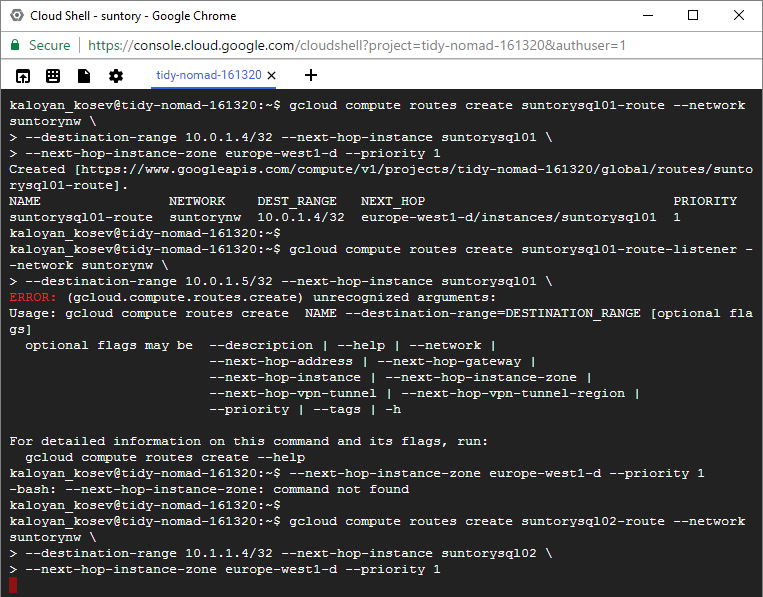
From the Cloud Shell console, we need to add routes for the Windows cluster and availability groups based on the IPs we will use for the cluster and the listener in the different subnets.
gcloud compute routes create suntorysql01-route – -network suntorynw \
– -destination-range 10.0.1.4/32 –next-hop-instance suntorysql01 \
– -next-hop-instance-zone europe-west1-d – -priority 1
gcloud compute routes create suntorysql01-route-listener – -network suntorynw \
– -destination-range 10.0.1.5/32 – -next-hop-instance suntorysql01 \
– -next-hop-instance-zone europe-west1-d – -priority 1
gcloud compute routes create suntorysql02-route – -network suntorynw \
– -destination-range 10.1.1.4/32 – -next-hop-instance suntorysql02 \
– -next-hop-instance-zone europe-west1-d –priority 1
gcloud compute routes create suntorysql02-route-listener – -network suntorynw \
– -destination-range 10.1.1.5/32 – -next-hop-instance suntorysql02 \
– -next-hop-instance-zone europe-west1-d – -priority 1
Leaving the command line utilities aside for the moment we would need to RDP to the machines in order to proceed with the required configurations.
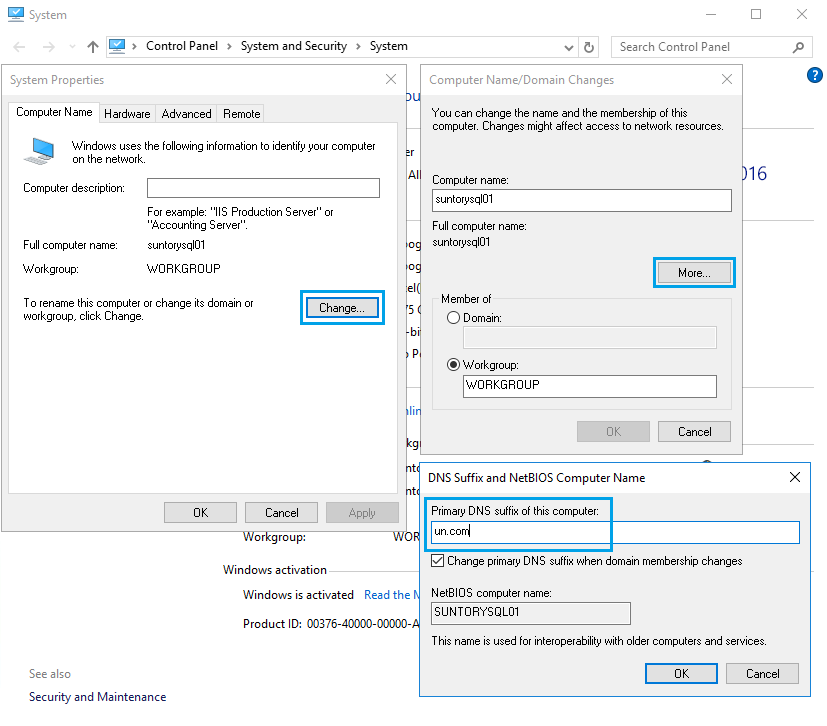
At the moment the virtual machines have the following settings, we need to add primary DNS suffix. An FQDN is a prerequisite for the Windows Cluster.
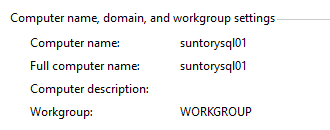
Do add the primary DNS suffix reach the System page from Control Panel > System and Security > System.
Open the System Properties window by clicking ‘Change settings’ > ‘Change’ > ‘More’.
Then add the desired DNS suffix of your chose – in our case it will be ‘un.com’.
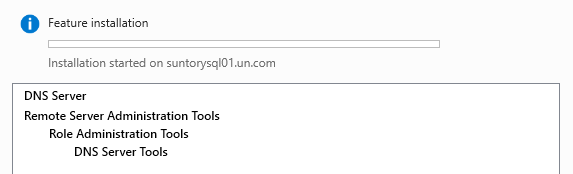
After performing this on both virtual machines and restarting them you will need to add a DNS service on one of the machines.
We will add it on suntorysql01.un.com from the ‘Add roles and features’ wizard. The installation does not require restart.
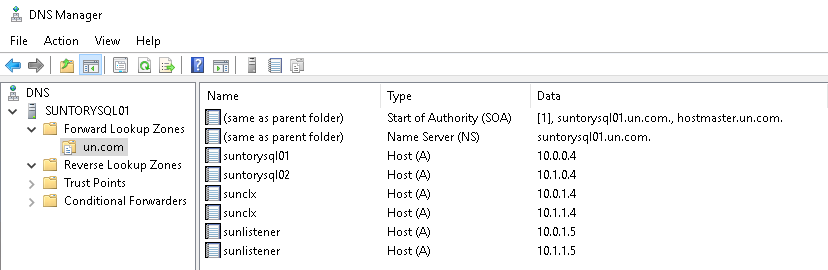
Once the DNS server is installed we would need to configure it and add the required records.
Create a new Forward Lookup Zone named after the DNS suffix.
Within the new zone add the records for both nodes, the two IPs for the cluster and the two IPs for the listener.
Note: If you are creating a Windows Cluster using the local administrative account you need to alter the following registry key. Within the Google Cloud Platform, the Windows images have it already enabled.
New-ItemProperty -Path
HKLM:\SOFTWARE\Microsoft\Windows\CurrentVersion\Policies\System –
Name LocalAccountTokenFilterPolicy -Value 1
Finish the network configuration for suntorysql02 by setting DNS server (execute locally in a PowerShell console):
netsh interface ip set dns Ethernet static 10.0.0.4
We are now ready to create the Windows Cluster.
In the PowerShell console on suntorysql01 we will use the New-Cluster cmdlet providing name for the cluster – ‘sunclx’, listing both nodes – ‘suntorysql01’ and ‘suntorysql02’, listing the two IP addresses. The most important parameter is the ‘–AdministrativeAccessPoint DNS’ which states we are creating a ‘Active Directory-Detached Cluster’.
New-Cluster -Name sunclx -Node suntorysql01, suntorysql02 -NoStorage
-StaticAddress 10.0.1.4, 10.1.1.4 –AdministrativeAccessPoint DNS


The cluster have been created, we have been prompt to review the report file for warnings. The following warning is listed as we haven’t configured a witness, so I advise to consider using File Share Witness.
An appropriate disk was not found for configuring a disk witness. The cluster is not configured with a witness. As a best practice, configure a witness to help achieve the highest availability of the cluster. If this cluster does not have shared storage, configure a File Share Witness or a Cloud Witness.
The next step is to enable the AlwaysOn feature on both SQL Server instances by executing the following PowerShell cmdlet locally on each virtual machine, you can use the GUI instead if you prefer.
Enable-SqlAlwaysOn -ServerInstance suntorysql01 -Force

Enable-SqlAlwaysOn -ServerInstance suntorysql02 -Force

Having the network, the virtual machines and the Windows Cluster prepared we can now move towards the SQL Server instances.
Let us start by creating a new user database in FULL recovery model.
Then we will setup a certificate based security as we restraining ourselves from the Active Directory and the domain accounts.
We will need to
Create a Database Master Key;
Create new security certificate;
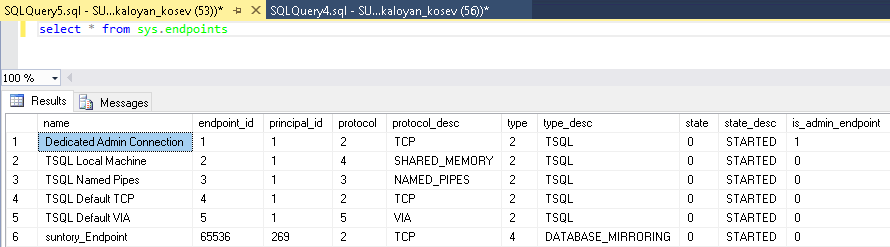
Create an endpoint to be used by the Availability Group
|
1 2 3 4 5 6 7 8 9 10 11 12 13 14 15 16 17 18 19 20 21 22 23 24 25 26 27 28 29 30 31 32 33 34 35 36 37 38 39 40 41 42 43 44 45 46 47 48 49 50 51 52 53 54 55 56 57 58 59 60 61 62 63 64 65 66 67 68 |
------------------------------------------------------------------------ -- The following steps are performed within SQL instance Suntorysql01 -- ------------------------------------------------------------------------ -- Creating a new user database CREATE DATABASE [SuntoryDB] GO ALTER DATABASE [SuntoryDB] SET RECOVERY FULL GO USE SuntoryDB GO EXEC dbo.sp_changedbowner 'sa' GO -- Creating a master key CREATE MASTER KEY ENCRYPTION BY PASSWORD = 'str0ng_p@ssw0rd' GO -- Creating a new certificate CREATE CERTIFICATE suntorysql01_prv_certificate WITH SUBJECT = 'suntorysql01_prv_certificate', START_DATE = '20170303' GO -- Backing up the certificate in a folder on host suntorysql01 BACKUP CERTIFICATE suntorysql01_prv_certificate TO FILE = 'C:\AlwaysOnShare\suntorysql01_prv_certificate.cert' GO -- Creating an endpoint using the certificate for authentication CREATE ENDPOINT suntory_Endpoint STATE = STARTED AS TCP (LISTENER_PORT = 5022) FOR DATABASE_MIRRORING (AUTHENTICATION = CERTIFICATE suntorysql01_prv_certificate, ROLE = ALL, ENCRYPTION = REQUIRED ALGORITHM AES) GO --------------------------------------------------------------------------------------------------------------- -- The following steps are performed within SQL instance Suntorysql02, in similar fashion as on the previous -- --------------------------------------------------------------------------------------------------------------- -- Creating a master key CREATE MASTER KEY ENCRYPTION BY PASSWORD = 'str0ng_p@ssw0rd' GO -- Creating a new certificate CREATE CERTIFICATE suntorysql02_prv_certificate WITH SUBJECT = 'suntorysql02_prv_certificate', START_DATE = '20170303' GO -- Backing up the certificate in a folder on host suntorysql02 BACKUP CERTIFICATE suntorysql02_prv_certificate TO FILE = 'C:\AlwaysOnShare\suntorysql02_prv_certificate.cert' GO -- Creating an endpoint using the certificate for authentication CREATE ENDPOINT suntory_Endpoint STATE = STARTED AS TCP (LISTENER_PORT = 5022) FOR DATABASE_MIRRORING (AUTHENTICATION = CERTIFICATE suntorysql02_prv_certificate, ROLE = ALL, ENCRYPTION = REQUIRED ALGORITHM AES) GO |
We can now see the endpoint created:
Create new accounts to be used for the communication between the two SQL Servers.
The account suntorysql02acc will be created on SQL Server suntorysql01 to provide access to SQL Server Suntorysql02.
The account suntorysql01acc will be created on SQL Server suntorysql02 to provide access to SQL Server Suntorysql01.
We will use the certificates we backed up on the filesystem and import them on the opposite nodes authorizing the created accounts.
|
1 2 3 4 5 6 7 8 9 10 11 12 13 14 15 16 17 18 19 20 21 22 23 24 25 26 27 28 29 30 31 32 33 34 35 36 37 38 39 40 |
----------------------------------------------------- -- Configure the required accounts on suntorysql01 -- ----------------------------------------------------- -- Create a login to be used by the second SQL instance CREATE LOGIN suntorysql02acc WITH PASSWORD = 'str0ng_p@ssw0rd' GO CREATE USER suntorysql02acc FOR LOGIN suntorysql02acc GO -- Import the public key of the certificate from the other node CREATE CERTIFICATE suntorysql02_prv_certificate AUTHORIZATION suntorysql02acc FROM FILE = 'C:\AlwaysOnShare\suntorysql02_prv_certificate.cert' GO -- Configure the required permissions GRANT CONNECT ON ENDPOINT::suntory_Endpoint TO suntorysql02acc GO ----------------------------------------------------- -- Configure the required accounts on suntorysql01 -- ----------------------------------------------------- -- Create a login to be used by the first SQL instance CREATE LOGIN suntorysql01acc WITH PASSWORD = 'str0ng_p@ssw0rd' GO CREATE USER suntorysql01acc FOR LOGIN suntorysql01acc GO -- Import the public key of the certificate from the other node CREATE CERTIFICATE suntorysql01_prv_certificate AUTHORIZATION suntorysql01acc FROM FILE = 'C:\AlwaysOnShare\suntorysql01_prv_certificate.cert' GO -- Configure the required permissions GRANT CONNECT ON ENDPOINT::suntory_Endpoint TO suntorysql01acc GO |
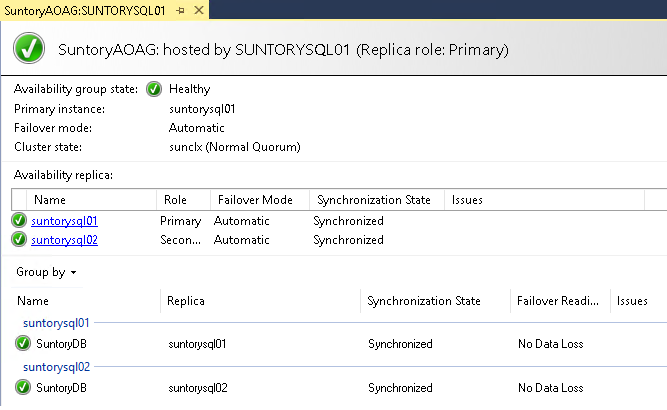
We will now create a standard Availability Group named ‘SuntoryAOAG’ using the created endpoints:
|
1 2 3 4 5 6 7 8 9 10 11 12 13 14 15 16 17 18 19 20 21 22 23 24 25 26 27 28 29 |
----------------------------------------------------- -- Create the availability group from suntorysql01 -- ----------------------------------------------------- -- Creating the Availability Group CREATE AVAILABILITY GROUP SuntoryAOAG WITH ( AUTOMATED_BACKUP_PREFERENCE = PRIMARY, DB_FAILOVER = OFF, DTC_SUPPORT = NONE) FOR DATABASE [SuntoryDB] REPLICA ON 'suntorysql01' WITH ( ENDPOINT_URL = 'TCP://suntorysql01.un.com:5022', FAILOVER_MODE = AUTOMATIC, AVAILABILITY_MODE = SYNCHRONOUS_COMMIT, SECONDARY_ROLE (ALLOW_CONNECTIONS = READ_ONLY) ), 'suntorysql02' WITH ( ENDPOINT_URL = 'TCP://suntorysql02.un.com:5022', FAILOVER_MODE = AUTOMATIC, AVAILABILITY_MODE = SYNCHRONOUS_COMMIT, SECONDARY_ROLE (ALLOW_CONNECTIONS = READ_ONLY) ) GO |
Create backups of the user database in order to restore it on the secondary instance:
|
1 2 3 4 5 6 7 |
-- Backup the user database BACKUP DATABASE SuntoryDB TO DISK = 'C:\AlwaysOnShare\SuntoryDB.bak' GO BACKUP LOG SuntoryDB TO DISK = 'C:\AlwaysOnShare\SuntoryDB.trn' GO |
Add the second SQL instance suntorysql02 to the Availability Group:
|
1 2 3 4 5 6 7 |
------------------------------------------------------ -- From suntorysql02 join to the availability group -- ------------------------------------------------------ ALTER AVAILABILITY GROUP [SuntoryAOAG] JOIN GO |
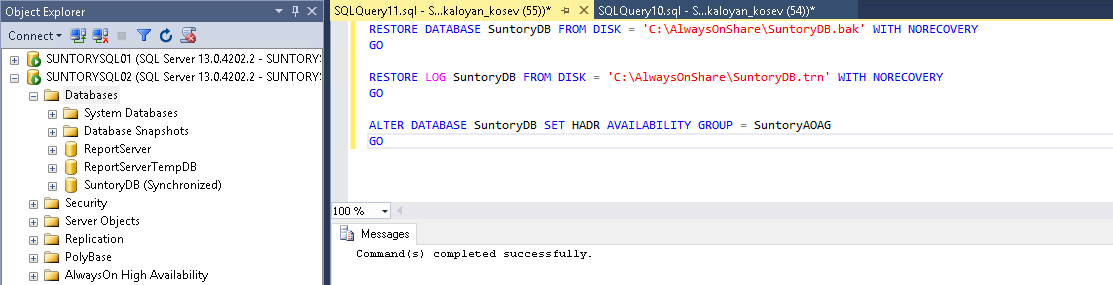
Restore the user database leaving it in restoring state:
|
1 2 3 4 5 6 |
-- Restore the user database with NORECOVERY RESTORE DATABASE SuntoryDB FROM DISK = 'C:\AlwaysOnShare\SuntoryDB.bak' WITH NORECOVERY GO RESTORE LOG SuntoryDB FROM DISK = 'C:\AlwaysOnShare\SuntoryDB.trn' WITH NORECOVERY GO |
And let’s add it to the availability group:
|
1 2 3 4 5 |
-- Add the database to the Availability Group ALTER DATABASE SuntoryDB SET HADR AVAILABILITY GROUP = SuntoryAOAG GO |
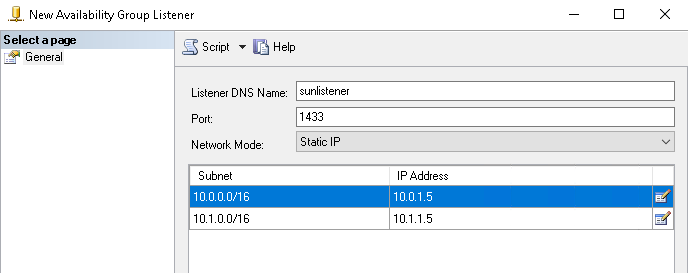
Create a new listener using the name we provided within the DNS, add the specified IPs from both subnets:
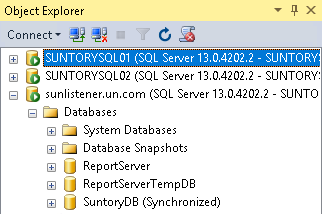
Testing a new connection true the listener and we are ready with our Always On Availability Group using certificate based authentication running on a Active Directory-Detached Cluster.
References
- Active Directory-Detached Cluster
- Start a Google Cloud Platform free trial
- Documentation for SQL Server on Google Cloud Platform

View all posts by Kaloyan Kosev
- Performance tuning for Azure SQL Databases - July 21, 2017
- Deep dive into SQL Server Extended events – The Event Pairing target - May 30, 2017
- Deep dive into the Extended Events – Histogram target - May 24, 2017