
Do you want to install a SQL Server 2014 clustered instance? Not sure how to proceed? What are the requisites? This series of articles will show this, step-by-step.
In this article I’m going to explain, step-by-step, how to install clustered SQL Server instance. The SQL Server version that we will be using is the 2014, or SQL Server 12, the latest SQL Server version, so far…
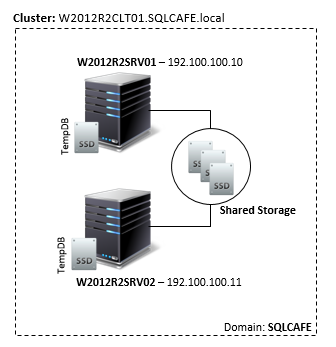
In this environment, we have a cluster with two nodes, based on Windows Server 2012 R2 operating systems. This cluster is based in a domain called SQLCAFE.
Regarding the cluster nodes, we have one network – 192.100.100.0/24 – connecting all the nodes and all other servers/computers. This is bases in my local lab, not a real production service. I opted to take advantage of the possibility to maintain a copy of the TempDB in a local disk, in order to have a batter performance, and added a SSD drive to each one of the nodes – local disk not shared. We also have more 4 shared storage, to support the data and log files, as well as the backups.
I tried to better simulate a real environment, during this installation I didn’t use a user without special permission in the domain, just to assure that we are following all the needed steps.
In the picture bellow you can find a schema of what we will have in this step-by-step guide. Even if you have a cluster with more nodes, you can follow this guide, as the step to add the clustered instance to other nodes is the same, so it doesn’t matters if you are dealing with a threes nodes cluster or a 8 nodes one, the procedure is always the same.
Note: I recommend the entire reading of the article before start with the actual installation, this way you can find out something that you are missing, or some constraint that may suspend the installation.
The following prerequisites are needed in order to achieve a successfully clustered SQL Server instance installation:
- SQL Server Engine service account: SQLCAFE\SVCSQLEngine
- SQL Server Agent service account: SQLCAFE\SVCSQLAgent
- Computer Name: SQLSRVCLT01
- Virtual IP (VIP): 192.100.100.50
Note: As a best practice, I create one service account for each SQL Server service, but this is not required. You can create one account to all the services if you want (SQL Server Engine, SQL Server Agent, SQL Server Integration Services, etc…).
You can have more than one VIP, if you have different subnets. For example, if you have a dedicate network to perform backups (great!) you can assign an IP for the backups network and the front-end IP to the same computer name.
The following should be assured for the SQL Server computer name:
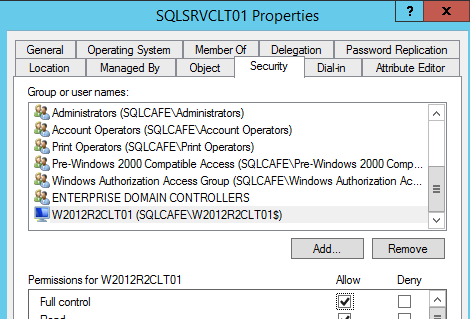
- The computer name “SQLSRVCLT01” was previously created in the domain and marked as disabled.
The cluster computer – W2012R2CLT01 – should have full access to the SQL Server computer account – SQLSRVCLT01.
In order to accomplish this, the following steps are needed in the domain level:
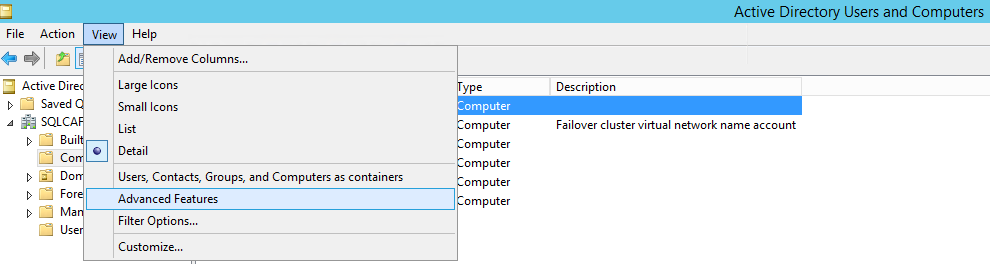
In the “Active Directory Users and Computers” tool, activate the “Advanced Features”, as shown:

Now go to the Computers folder, right click the created SQL Server Computer and add the permission in the “Security” tab:
Who is installing SQL Server?
I see people using the SQL Server service account to install the instance, in this case I’m using the domain user SQLCAFE\murilo to install the SQL Server clustered instance. This user is a normal user in the domain – not domain admin and has no special grants. The user SQLCAFE\murilo is part of the Administrators group on in both of the cluster’s node: W2012R2SRV01 and W2012R2SRV02. I didn’t set any permissions to both SQL Server service accounts any nodes of the cluster. We will see what is going to happen in the end of the installation…
Storage
For a clustered instance we need to use shared storage. The disk for the TempDB files and Buffer Pool Extension disk (if used) are exceptions. On both cases we need to have the local disks attached to each node and mapped to the same drive letter/mountpoint path.
For this instance, I’m creating the following disks:
- Assigned to drive letter E: Disk for SQL Server Binaries (local)
- Assigned to drive letter F: Disk for Data Files (shared)
- Assigned to drive letter G: Disk for Log Files (Shared)
- Assigned to drive letter H: Disk for Backups (Shared)
- Assigned to drive letter I: Disk for TempDB (local)
All the shared disks need to be shown as “Available Storage” in the Failover Cluster Manager, as you can see:

I formatted the SQL Server disks using an Allocation Unit of 64K, as the performance best practice states.
The Installation Process
Now that we have all the prerequisites, we can start the installation. As said, I’m using my personal domain account to log into the cluster nodes and start the SQL Server installation.
The approach to install the clustered instance is run the setup in the first node, and pick the option to install a new SQL Server clustered instance. After the initial installation, in the first node, we need to run the setup in all other nodes that we want to install the SQL Server clustered instance, and pick the option to add a node to an existing clustered SQL Server instance. We will walk through all of this in the continuation of this article.
Starting from the first node
I choose the node W2012R2SRV01 to start installing the instance. The reason for that? There’s no reason, only a matter of choice 🙂
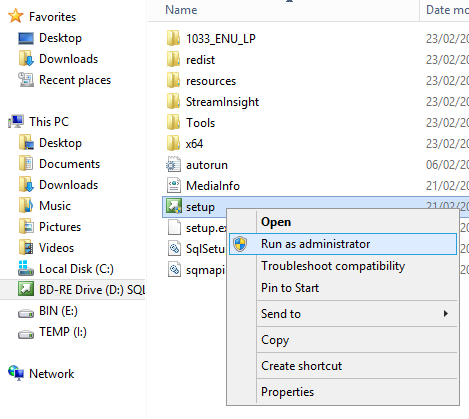
I mounted the SQL Server 2014 ISO and this is available for me in my drive D. So, the first step is run the Setup.exe as Administrator.
The “SQL Server Installation Center”, will be opened. And we need to go to the “Installation” option, in the menu on the left side, and click on “New SQL Server failover cluster installation” option (the second one).
Check the second part to find the next steps.

With experience working in Portugal, Holland, Germany and United Kingdom, he's always available to learn and share his knowledge, in order to contribute to SQL Server community,
View all posts by Murilo Miranda
- Understanding backups on AlwaysOn Availability Groups – Part 2 - December 3, 2015
- Understanding backups on AlwaysOn Availability Groups – Part 1 - November 30, 2015
- AlwaysOn Availability Groups – Curiosities to make your job easier – Part 4 - October 13, 2015