
Introduction
This article will teach you how to install PolyBase and will show you a simple example to start.
PolyBase is a new feature in SQL Server 2016. It is used to query relational and non-relational databases (NoSQL). You can use PolyBase to query tables and files in Hadoop or in Azure Blob Storage. You can also import or export data to/from Hadoop.
In this example, we will show how to query a CSV file stored in Azure Blob storage from SQL Server 2016 using PolyBase.
Requirements
- A subscription to Azure Portal.
- SQL Server installed.
- MASE installed.
- SQL Server Management Studio (SSMS) installed.
Getting Started
We will first show how to install PolyBase and next, we will show an example in Azure to query a CSV file from SSMS 2016.
Installation
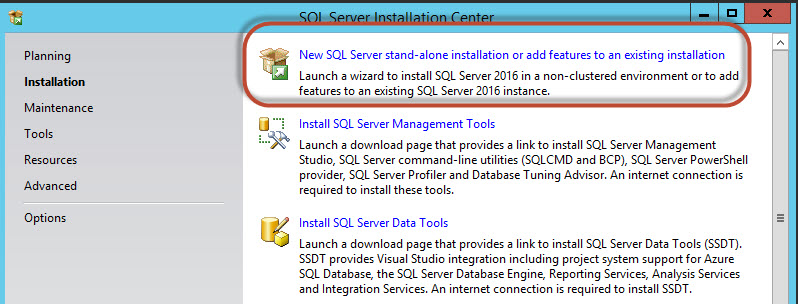
PolyBase is included in the SQL Server 2016 installer. It is a new feature. When you install it or when you want to add this feature, you need to select the New SQL Server stand-alone installation or add feature to an existing installation:
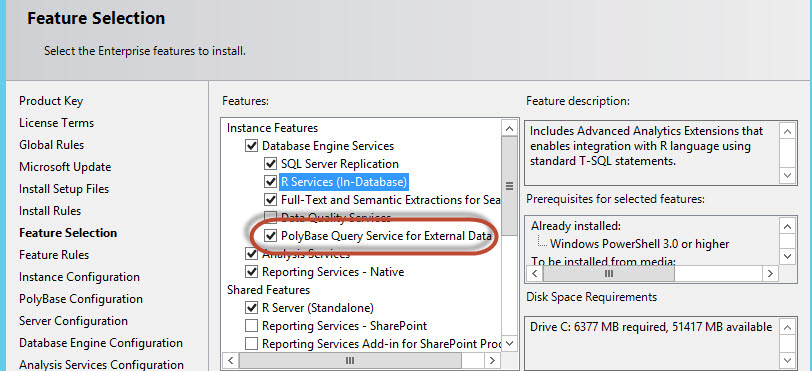
Run the installer until the Feature Selection and make sure that PolyBase Query Service for External Data is selected:
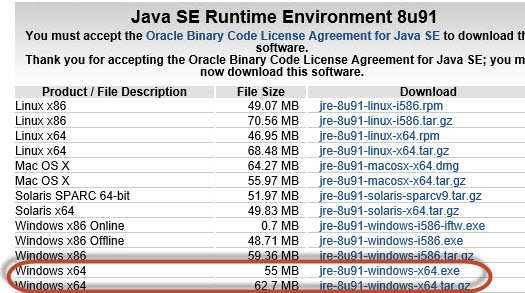
If it was not installed before, the setup will ask you the Oracle Java Runtime Environment 7. JR7 or later is required, because PolyBase uses Java to connect to Hadoop:
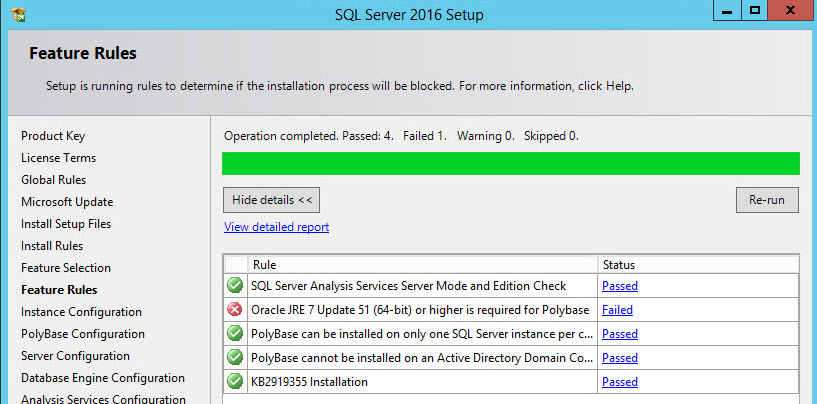
You can download JRE in the Oracle JRE page:
Server JRE (Java SE Runtime Environment) 8 Downloads
Download the Windows version for your machine with SQL Server:
Finally, to enable Polybase, use the following configuration sentence:
|
1 2 3 4 5 6 7 8 9 10 11 |
USE master; GO EXEC sp_configure 'show advanced option', '1'; RECONFIGURE; GO EXEC sp_configure 'hadoop connectivity', 4; GO RECONFIGURE; GO |
Show advanced option in 1 is used to enable advanced option and hadoop connectivity equal to 4, is used to connect to Hadoop in Windows Servers.
Querying a csv file in Azure
In this example, we are going to query a csv file that we will upload to Azure. We will query the csv file in our local SQL Server using PolyBase.
We created a file named customers.csv with the following content:
Name,Lastname,email
john,Rambo,jrambo@hotmail.com
john,connor,jconnor@hotmail.com
elvis,presley,epresley@hotmail.com
elmer,hermosa,ehermosa@gmail.com
It is just a file with the customers’ name, last name and email.
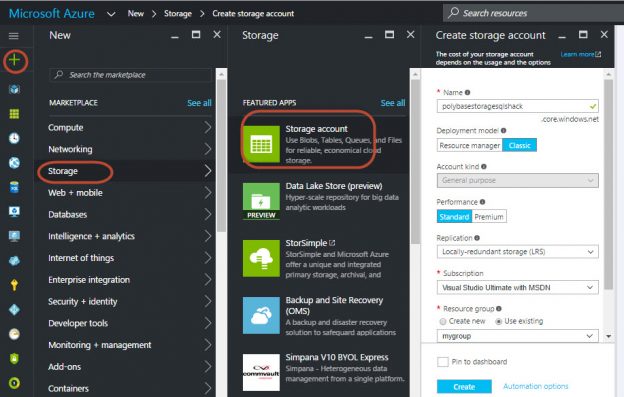
If you do not have a Storage account in Azure, go to the Azure Portal and add a new storage account. In this example, the storage account name is polybasestoragesqlshack:

If you need more information about creating storage accounts in Azure, please read our article about Storage accounts.
Connect to your Azure Subscription in MASE and right click on the Azure Account to create a container named mycontainer or any name of your preference:
If you need more explanations about Blob, containers and uploading files in Azure in MASE. Please read our article about uploading files to the Blob storage.
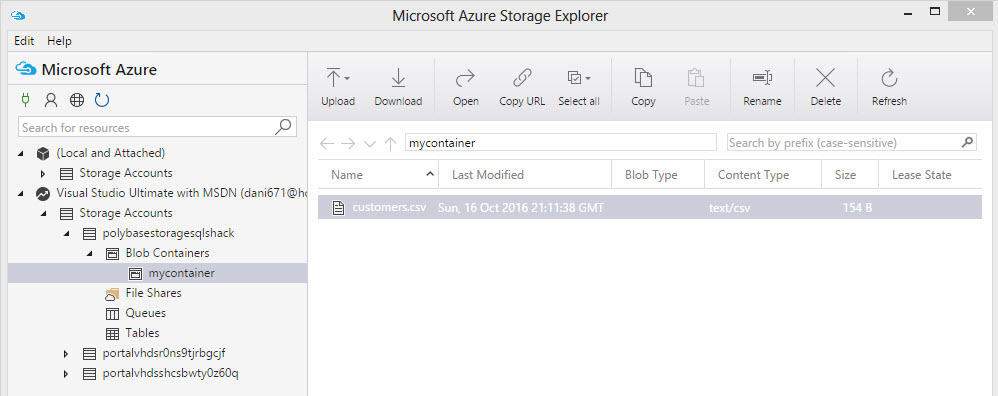
In the container created, upload the customers.csv file:

Once that you have the file in Azure, in your local machine, open SSMS and create a new T-SQL sentence in a database:
|
1 2 3 |
CREATE MASTER KEY ENCRYPTION BY PASSWORD='MyP@ssword123secretword'; |
A master key is a symmetric key used to protect private keys.
The next step is to create a credential. In this example, the database credential is named mycredential, but you can use any name. The identity is credential and it can also be any name. Secret is the key to access to the Azure Storage Account:
|
1 2 3 4 |
CREATE DATABASE SCOPED CREDENTIAL mycredential WITH IDENTITY = 'credential', Secret = 'VgqTsEqg1beXqhb+mO/wZh9OUZ+ByhKJJj7qc9pBne9e+BsdFo4Mfdl+u8Gh94tDqCR0/uNZ4KHr0r4WuK85lA==' |
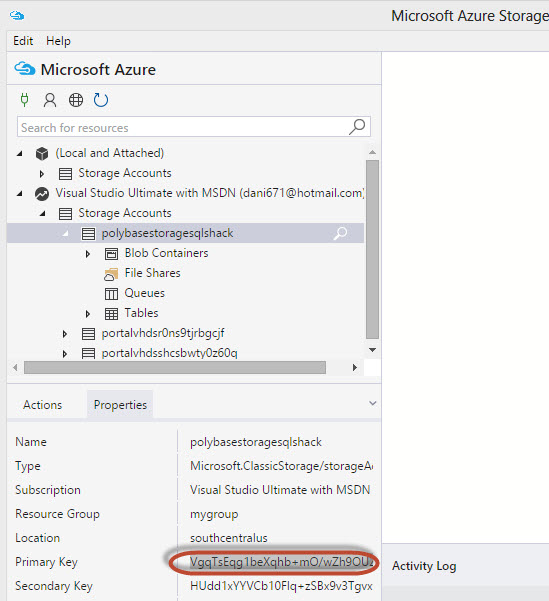
You can get the Secret key that can be the primary or secondary key in the Azure Account. You can copy these keys from the MASE:
We will then create external data. This will connect to our Azure Storage Account:
|
1 2 3 4 5 6 7 8 |
CREATE EXTERNAL DATA SOURCE mycustomers WITH ( TYPE = HADOOP, LOCATION = 'wasbs://mycontainer@polybasestoragesqlshack.blob.core.windows.net/', CREDENTIAL = mycredential ); |
Mycustomers is the name of the datasource and can be any name.
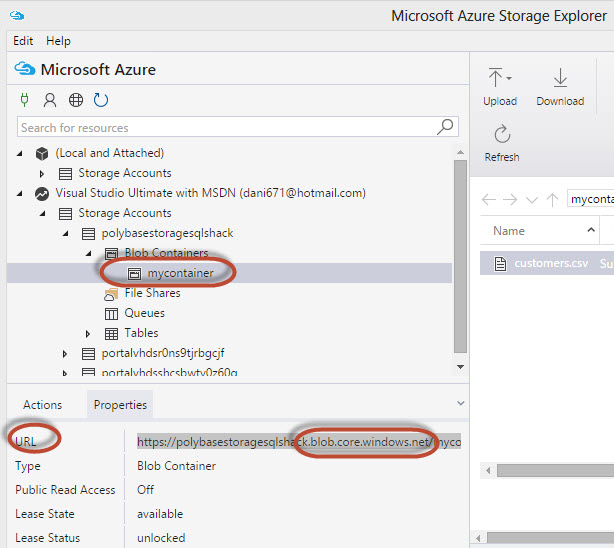
The type of the external data is Hadoop. Location is the location of the file stored. Mycontainer is the name of the container created in figure 5 and polybasesstoragesqlshack is the name of the Azure Storage Account created on step 4. Blob.core.windows.net is part of the address of the container that can be retrieved in MASE:
A typical error when you try to create external data is the following:
OLE DB provider “SQLNCLI11” for linked server “(null)” returned message “Login timeout expired”.
OLE DB provider “SQLNCLI11” for linked server “(null)” returned message “A network-related or instance-specific error has occurred while establishing a connection to SQL Server. Server is not found or not accessible. Check if instance name is correct and if SQL Server is configured to allow remote connections. For more information see SQL Server Books Online.”.
Msg 10061, Level 16, State 1, Line 9
TCP Provider: No connection could be made because the target machine actively refused it.
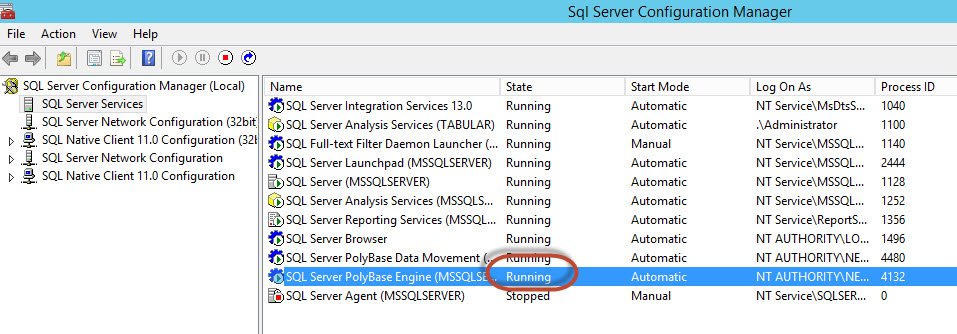
This error occurs because the SQL Server PolyBase Engine Service is down. Make sure that the PolyBase Services are running in SQL Server Configuration Manager or any tool of your preference to handle Windows Services:
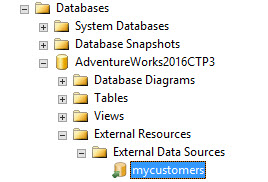
In SSMS, you will be able to see the external data source created in Database>External Resources>External Data Sources:
We have access to external data. In this case, the customer.csv file. We need to specify the format of the file. We will create a format for the external file:
|
1 2 3 4 5 6 7 8 9 |
CREATE EXTERNAL FILE FORMAT csvformat WITH ( FORMAT_TYPE = DELIMITEDTEXT, FORMAT_OPTIONS ( FIELD_TERMINATOR = ',' ) ); |
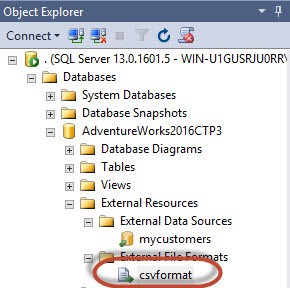
It is a CSV file, and then the delimiter is a comma. If the external file format is OK you will be displayed in SSMS, in Database>External Resources>External File formats:
We will create an external table to query the csv file like a SQL table:
|
1 2 3 4 5 6 7 8 9 10 11 12 13 14 15 |
CREATE EXTERNAL TABLE customerstable ( name VARCHAR(128), lastname VARCHAR(128), email VARCHAR(100) ) WITH ( LOCATION = '/', DATA_SOURCE = mycustomers, FILE_FORMAT = csvformat ) |
We use the sentence create external table specified a name of our preference. We define the customers of the file and the data type like any table in SQL Server.
LOCATION is the location of the csv file. If the customer.csv file were inside a folder named country and then inside a folder named city, the location would be LOCATION=/country/city. In this example, the file is on the root because it is not inside any folder in the container.
DATA_SOURCE is the data source created in figure 10 and FILE_FORMAT is the format created on figure 11.
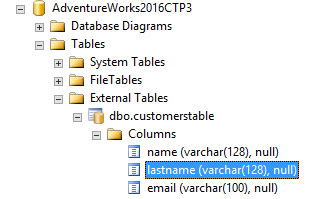
If everything is OK, you will be able to see the external table created in SSMS in Database>Tables>External tables:
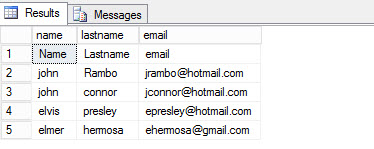
Now you can query the csv file like any table using T-SQL:
|
1 2 3 4 5 6 |
SELECT [name] ,[lastname] ,[email] FROM [AdventureWorks2016CTP3].[dbo].[customerstable] |
You will be able to see your data as if it were a SQL Server Table:
Conclusion
In this article, we explained how to install PolyBase and how to query a CSV file stored in an Azure Storage account.

He has worked for the government, oil companies, web sites, magazines and universities around the world. Daniel also regularly speaks at SQL Servers conferences and blogs. He writes SQL Server training materials for certification exams.
He also helps with translating SQLShack articles to Spanish
View all posts by Daniel Calbimonte
- PostgreSQL tutorial to create a user - November 12, 2023
- PostgreSQL Tutorial for beginners - April 6, 2023
- PSQL stored procedures overview and examples - February 14, 2023