
In this article, we are going to work on setting up your local development environment for creating serverless applications using the AWS SAM CLI. This article is a part of the three-article series “Develop and Deploy Serverless Applications with AWS SAM CLI”. If you already know about the working principle of the AWS SAM CLI, you may proceed with this; otherwise, I would highly recommend reading my previous article on the series, Getting started with the AWS SAM CLI, where I talk about the introduction to the AWS Serverless Application Model and its workflow.
Pre-requisites
In order to set up the local environment to develop serverless applications, you need to have the following requirements fulfilled. All the items mentioned below are a must if you want to create and test the application on your local machine before deploying it to the AWS environment.
- A valid AWS Account – For the sake of this article, we are going to build and deploy our serverless function to the AWS Lambda, so you must have a valid AWS account. If you are new and do not have an account yet, you can navigate to http://console.aws.amazon.com/ and signup for a new account
- Python – You can build your serverless functions with any language of your choice. There are quite a few languages supported by AWS Lambda, like Python, C#, Ruby, NodeJS, etc. For this tutorial, we are going to develop our application using python. So, you must have python installed on your machine before proceeding forward. You can download the latest version of python by visiting https://www.python.org/downloads/ and install the same based on the operating system you are using
- AWS CLI – In addition to building the serverless apps locally, we will also need to access the AWS services programmatically. This can be achieved by installing the AWS CLI or the command-line interface, using which you can perform many administrative activities on your AWS Account. There is a very good article, Learn AWS CLI: An Overview of AWS CLI (AWS Command Line Interface), on how to get the AWS CLI installed on your machine. Please follow this article if you do not have it installed yet
- AWS SAM CLI – In order to develop and test the applications locally, you need to install the AWS SAM CLI on your machine. The AWS SAM CLI will provide an AWS Lambda like execution environment using which you can run your code locally and get the output
- Docker – Finally, you also need to get Docker installed on your machine if you want to test the application locally. The AWS SAM CLI will use Docker to mount an image where the execution will be performed. You can install Docker by visiting https://docs.docker.com/desktop/
- Visual Studio Code – For developing the code, we are going to use the Visual Studio Code as the editor. You can download this from http://code.visualstudio.com/
Once you have installed all the pre-requisites on your machine, you can check the installed versions by running the following commands.
- Python – python –version
- AWS CLI – aws –version
- AWS SAM CLI – sam –version
- Docker – Docker –version

Figure 1 – All Pre-Requisites up and running
Set up the project structure
Once you have all the pre-requisites up and running, the next step is to go ahead and set up the local project structure. You can do this by running the “sam init” command. As a parameter, you need to pass the name of the runtime that you would be using for creating your function, which in our case would be “python 3.7” along with the name of the application that you want to create. This will create a directory for your application under which you can place all the functions and other services used by the application. Navigate to the directory under which you would like to create the serverless application and run the following command.
sam init –runtime python3.7 –name my-serverless-app
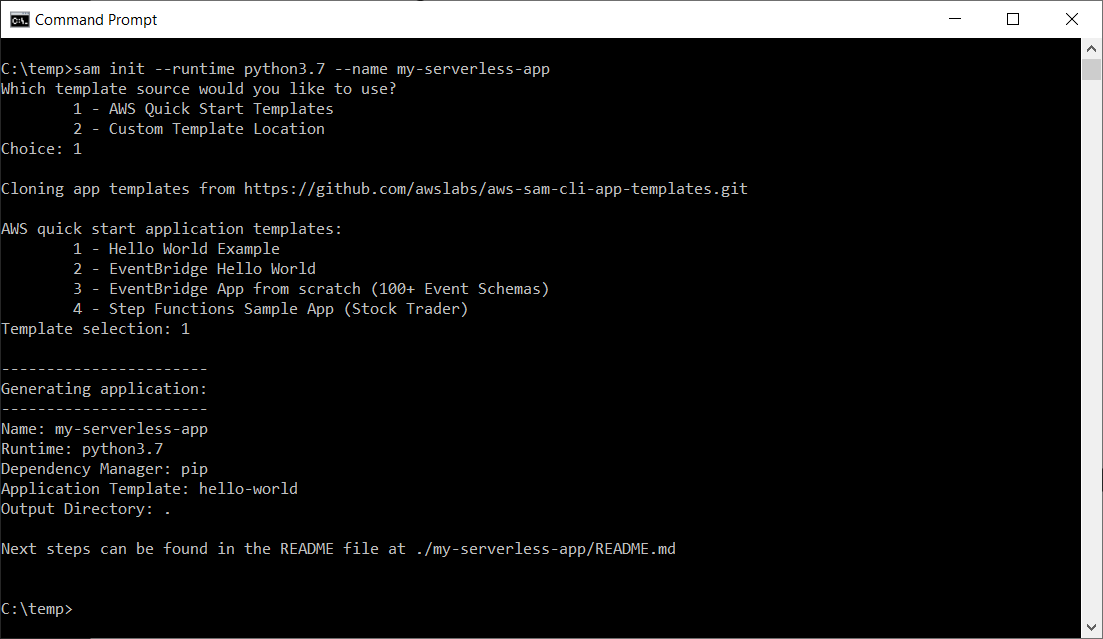
Figure 2 – Creating the Serverless Application
Once you run the above command, you will be provided with a list of options to choose your application template. Once done, you can see a directory has been created by the name of the application that you have specified. Navigate to the application directory and open Visual Studio Code from there.
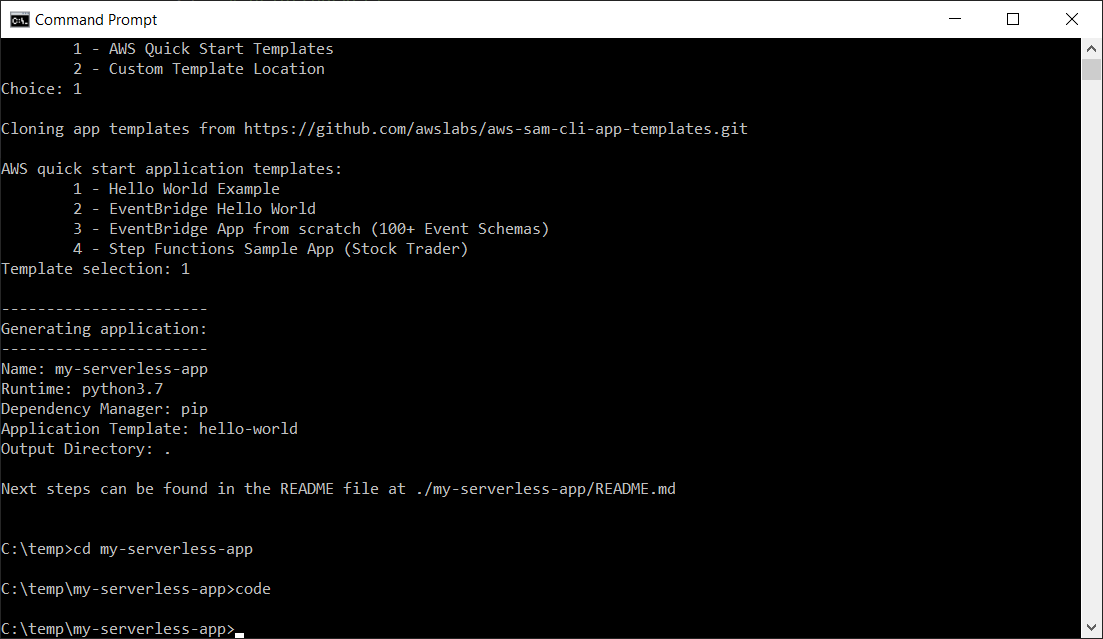
Figure 3 – Navigate to application directory and start VS Code
You can see Visual Studio Code has started, and the directory structure can be seen as follows.
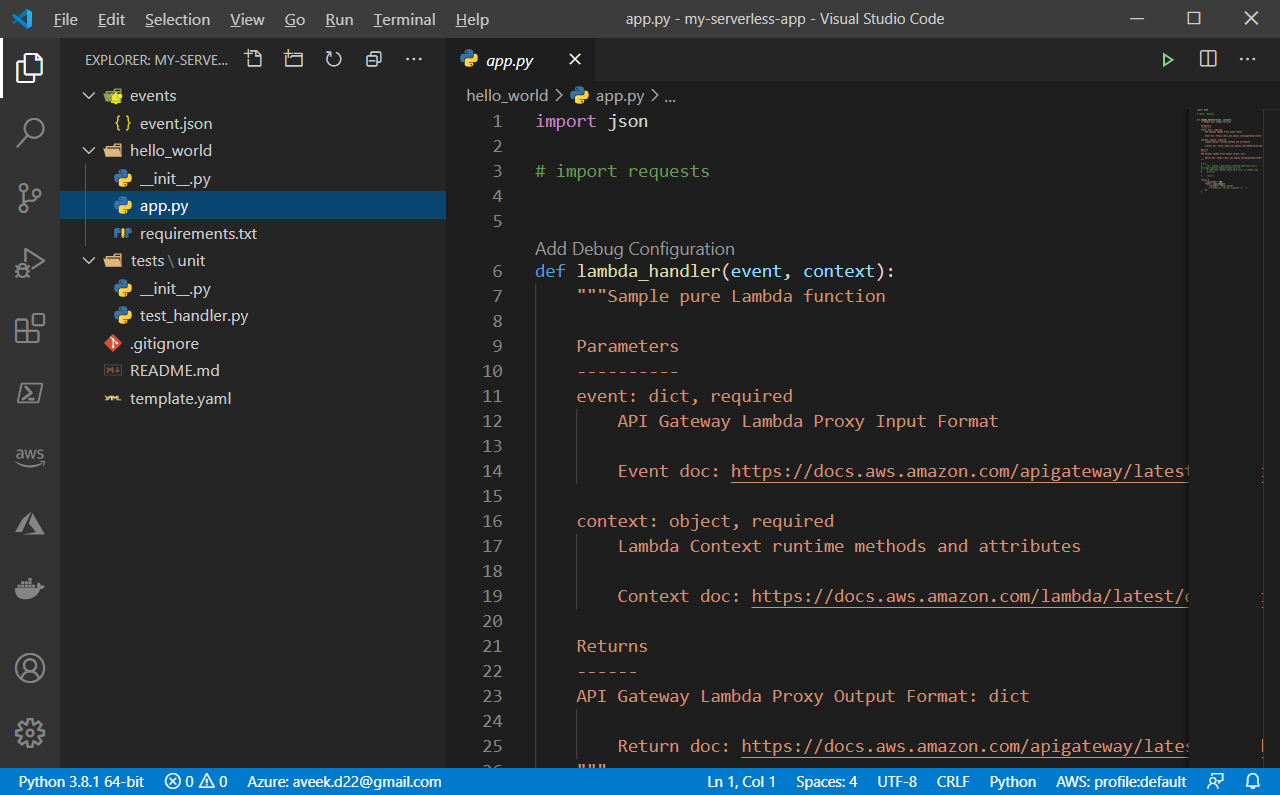
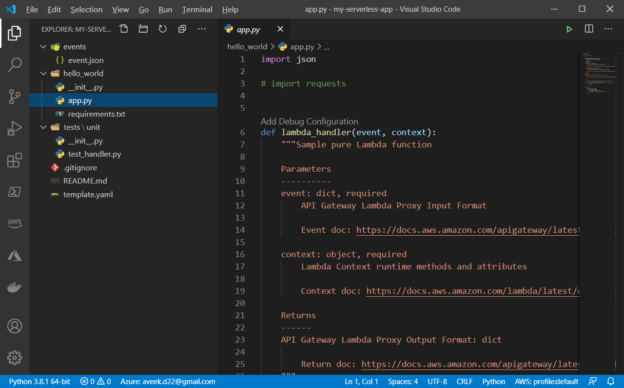
Figure 4 – Opening serverless app in VS Code
You can see there is a directory named “hello_world”, which is basically the name of the lambda function that is automatically generated by the SAM template. Also, you can see there is a file “template.yaml” which is the SAM template that we discussed in the SAM workflow. You can also define unit test cases for this application, but we will not be doing that here to keep things simple.
Creating the serverless function
Although the SAM template has provided a hello world function for us, we are not going to use it. Instead, I will write a small custom function that will give me a list of buckets available in my AWS S3. Let us go ahead and create a directory “get-s3-buckets” and create a “main.py” file under it.
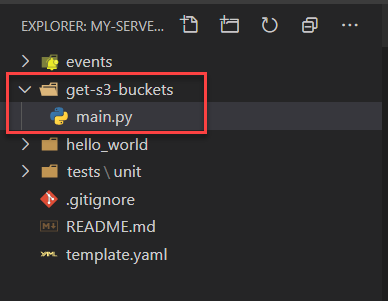
Figure 5 – Add function directory and file
Open the “main.py” file and insert the following code in it.
|
1 2 3 4 5 6 7 8 9 10 11 12 13 14 15 16 17 18 19 20 21 22 23 |
import boto3 import json # Creating the low level functional client client = boto3.client('s3') def lambda_handler(event,context): # Fetch the list of existing buckets clientResponse = client.list_buckets() # Print the bucket names one by one print('Printing bucket names...') bucketList = [] for bucket in clientResponse['Buckets']: bucketList.append(bucket["Name"]) print(f'Bucket Name: {bucket["Name"]}') return { "statusCode" : 200, "body" : json.dumps( {"message" : bucketList} ) } |
This is a simple code that imports the boto3 and JSON library and then creates a low-level functional client to fetch a list of existing buckets from the S3. Once the list of buckets is fetched, it adds the bucket names to a list and prints the name of the buckets on the list.
Configuring the SAM template file
Now that our code is ready, let us go ahead and configure the SAM template file, i.e., “template.yaml” file. Open this file in VS Code, and
in this file, we need to make a couple of modifications that I will be doing one by one.
Firstly, we will change the timeout of the function to 60 secs.
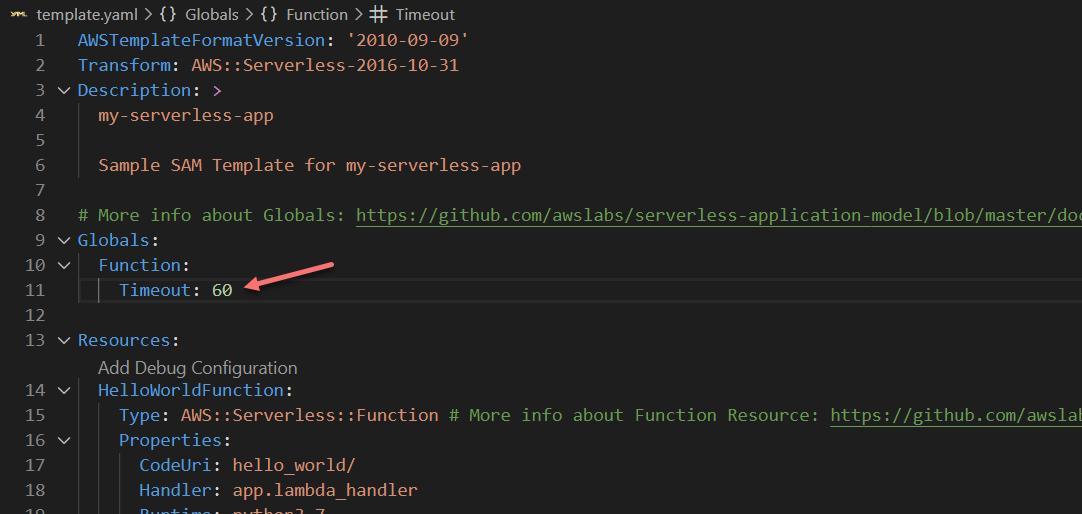
Figure 6 – Changing the timeout
Next, we will be making some changes to the Resources configuration. You can find the details below.
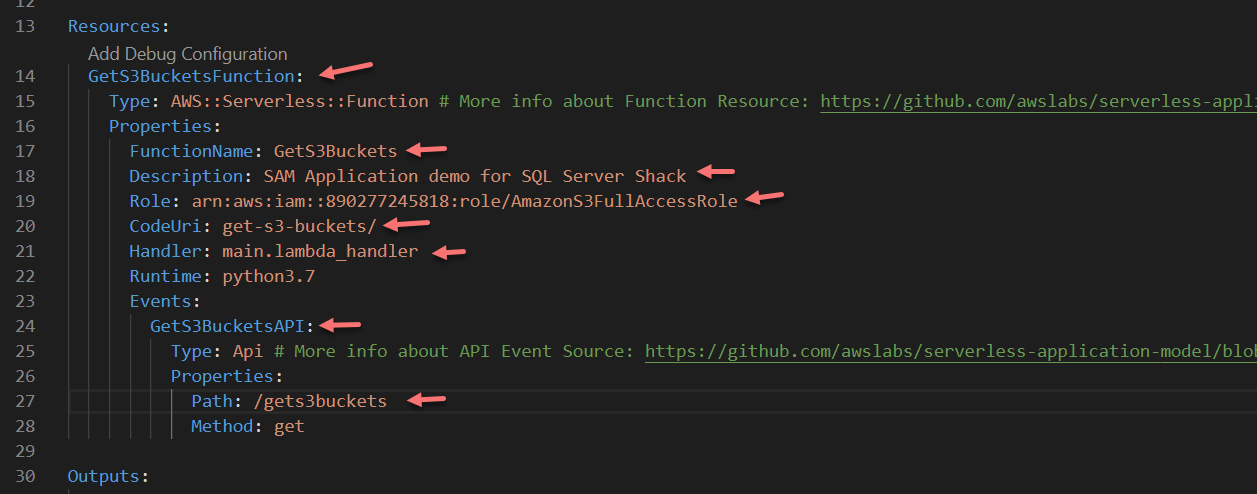
Figure 7 – Modifying the resources
List of modifications are mentioned below:
- GetS3BucketsFunction – The name of the serverless application
- FunctionName – The name of the lambda function to be created
- Description – A short description of your lambda function
- Role – AWS IAM role that has access to the S3 buckets
- CodeUri – The name of the directory for your lambda function
- Handler – The entry point to the lambda function. It follows the “fileName.methodName” naming convention
- GetS3BucketsAPI – Name of the API event that will trigger this lambda function
- Path – The route URL of the API
Once the resources are modified, the next step is to configure the output section. This section describes how we should model our Cloud Formation Stack.
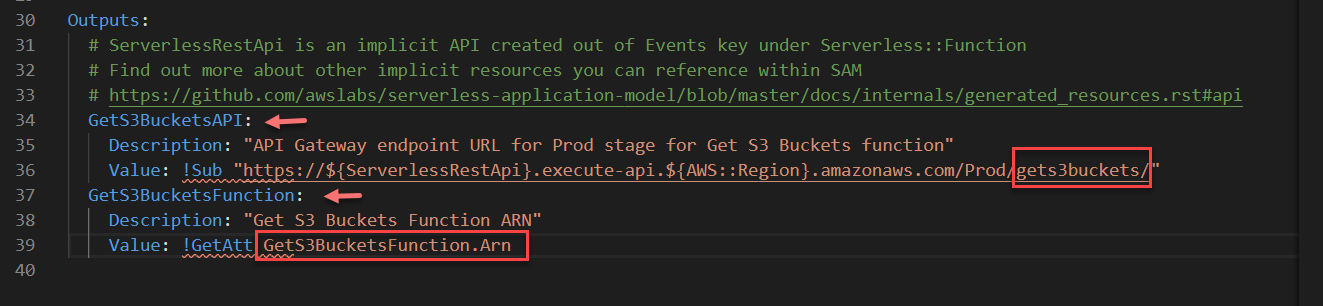
Figure 8 – Configuring the output
- GetS3BucketsAPI – The name of the API event that will be created
- Value – Modify the route to the correct address
- GetS3BucketFunction – The name of the application
- Value – The ARN of the application
- HelloWorldFunctionIamRole – We are not going to create any role for this application, so I have removed this part
Test the function locally
Now that we have configured most of the items, we can test the function locally. There are two ways to test the function, which are as follows.
- Using the terminal
- Simulating the API Gateway locally
Let us first try to test it using the terminal. An important point to keep in mind is that your docker service should be running before you start testing your function. You can use the following command to start the function.
sam local invoke GetS3BucketsFunction –no-event
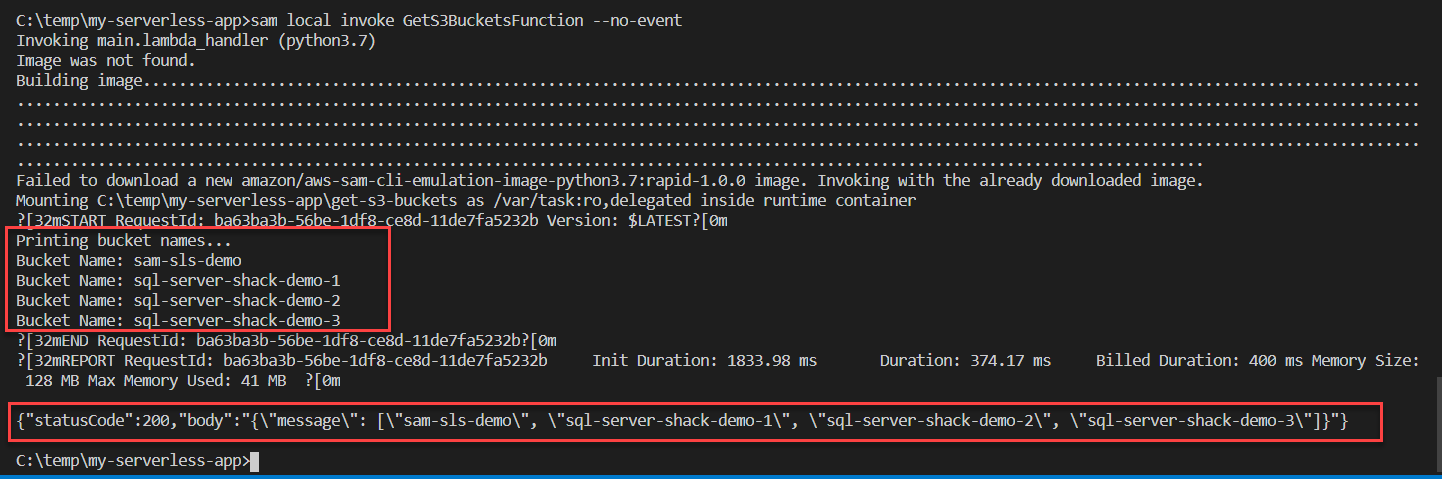
Figure 9 – Invoking the Lambda Locally using AWS SAM CLI
As you can see in the figure above, the function has been executed within the lambda execution environment, and it has returned the list of all the S3 buckets from the AWS S3. Now let us try and test the API Gateway. You can use the following command to start the API.
sam local start-api

Figure 10 – Local Server started
Copy the URL from the terminal and paste it to a browser.
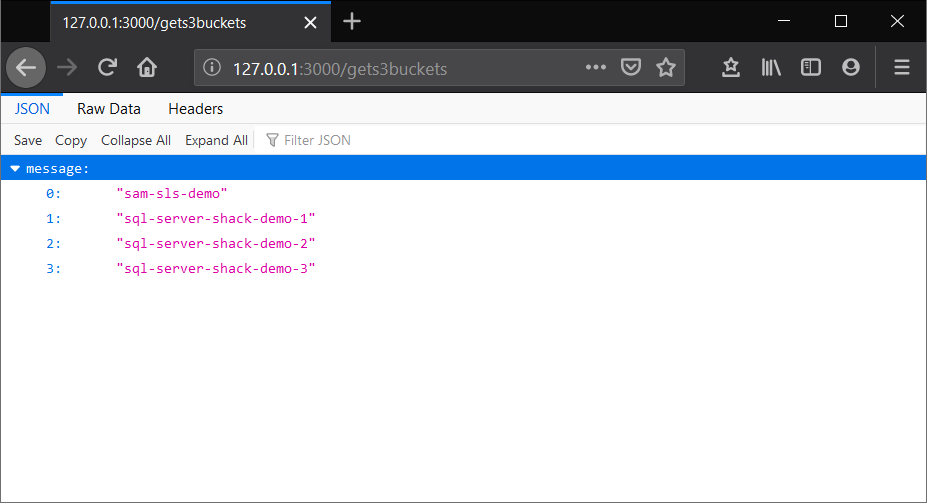
Figure 11 – Simulating the API Gateway from AWS SAM CLI
As you can see, we have tested our function successfully in our local environment.
Conclusion
In this article, we have learned how to set up the local environment for building serverless applications and also learned how to execute and test the functions locally. In the next part of the series, I will explain how to deploy the function that we created using the AWS SAM CLI, and then we can trigger the Lambda function directly from the API Gateway in AWS.
Table of contents
| Getting started with the AWS SAM CLI |
| Set up a local serverless environment using the AWS SAM CLI |
| Deploy serverless applications using the AWS SAM CLI |

He is a prolific author, with over 100 articles published on various technical blogs, including his own blog, and a frequent contributor to different technical forums.
In his leisure time, he enjoys amateur photography mostly street imagery and still life. Some glimpses of his work can be found on Instagram. You can also find him on LinkedIn
View all posts by Aveek Das
- Getting started with PostgreSQL on Docker - August 12, 2022
- Getting started with Spatial Data in PostgreSQL - January 13, 2022
- An overview of Power BI Incremental Refresh - December 6, 2021