
In this article, I am going to explain how we can refresh a SQL Database using the Maintenance plan. To demonstrate the process, I have configured two virtual machines. I have installed SQL Server 2016 on both. To refresh the SQL database on destination database server, we will generate a copy-only backup of the SQL database on source database server. I have created a network share directory. Both the source and destination server have the read-write permission on it. The backup file will be copied on a shared directory. Once the database is restored to the destination, we will delete the file from the network share directory.
Details are as following:
|
Host Name |
Role |
IP Address |
Note |
|
SQL01.DC.Local |
Source database server |
192.168.0.132 |
Source Database: AdventureWorks2017 |
|
SQL02.Dc.Local |
Destination database server |
192.168.0.133 |
Destination Database: AdventureWorks2017 |
|
Domain.Dc.Local |
Network share |
192.168.0.100 |
Network Share: \\Domain\Backups |
First, let us create a database maintenance plan:
Create a database maintenance plan to refresh the SQL database
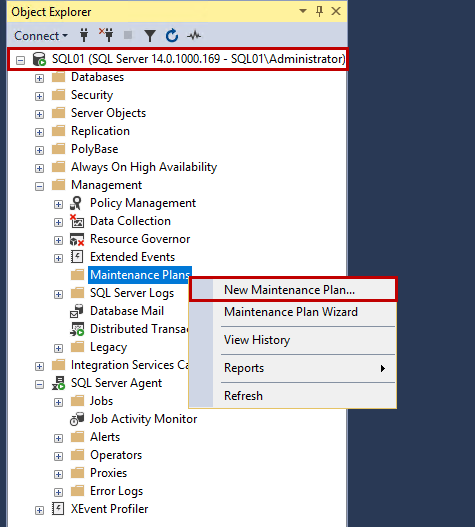
We will create a maintenance plan on SQL01.Dc.Local server. First, connect to the Database server → launch SQL Server Management Studio → Connect to the Database instance (SQL01) → Expand Database Engine → Expand Management → Right-click on Maintenance Plan → Select New Maintenance plan. See the following image:
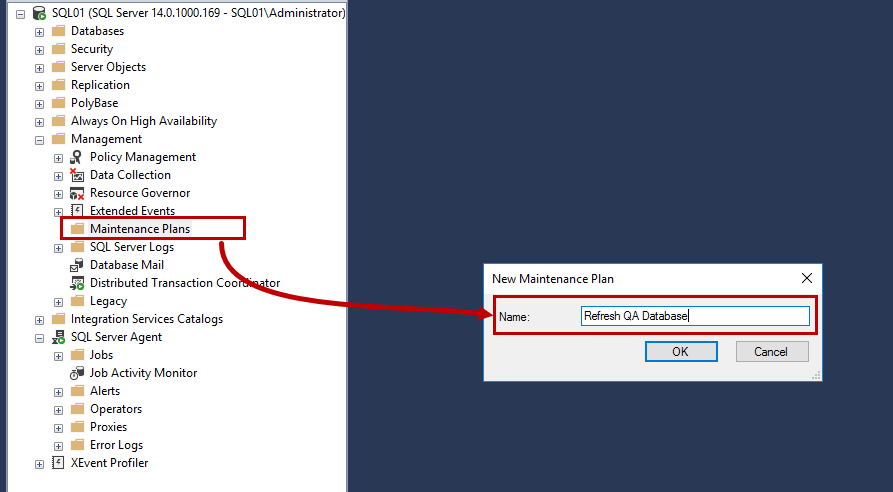
In the New Maintenance Plan dialog box, provide the desired name of the maintenance plan, and click OK.
Database Maintenance plan designer opens. Now, we will refresh the AdventureWorks2017 database of SQL02.DC.Local using the backup of the AdventureWorks2017 database of SQL01.DC.Local server. First, we must create a new connection that can be used to connect to the SQL02.DC.Local server and restore the database on it. To do that, click on Manage connections. See the following image:

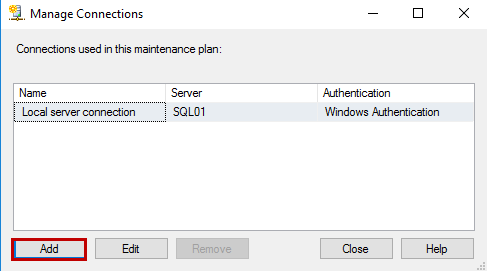
Dialog box Manage Connection opens. Click on Add. See the following image:
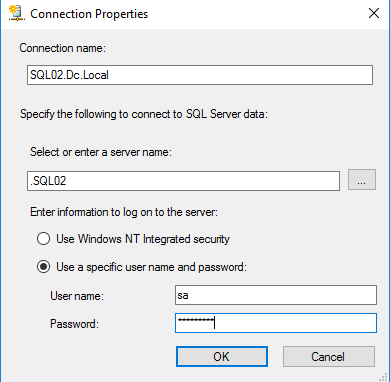
In dialog box Connection Properties opens, enter the desired connection name in Connection name text box, enter the hostname in select or enter a server name textbox. We will use SQL Server authentication, hence choose the Use a specific username and password option and enter the username and password. Click OK. See the following image:
Once the connection string is configured, let us configure the maintenance plan.
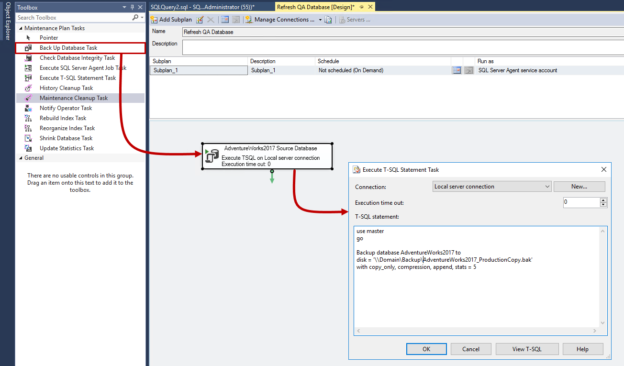
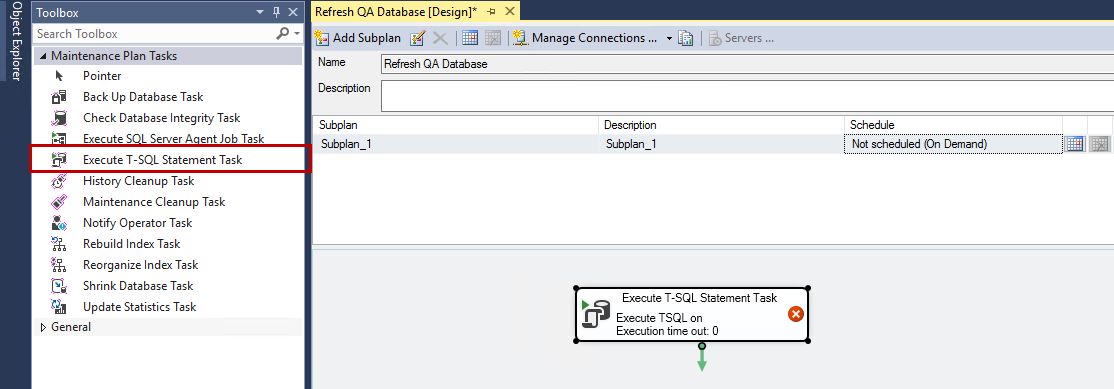
We will generate a backup using T-SQL Query. We can run queries on SQL Database by using the Execute T-SQL Statement task. To do that, drag and drop the Execute T-SQL Statement Task from the database maintenance plan toolbox in maintenance plan designer. See the following image:
Double-click on the Execute T-SQL Statement task. We are generating a backup of the AdventureWorks2016, which I have restored locally hence choose Local server connection from connection drop-down box. In the T-SQL Statement text box, enter the following T-SQL query. The query will generate a backup of the database and copy it to the network location:
|
1 2 3 |
use master go Backup database AdventureWorks2017 to disk = '\\Domain\Backup\AdventureWorks2017_ProductionCopy.bak' with copy_only, compression, append, stats = 5 |
See the following image:

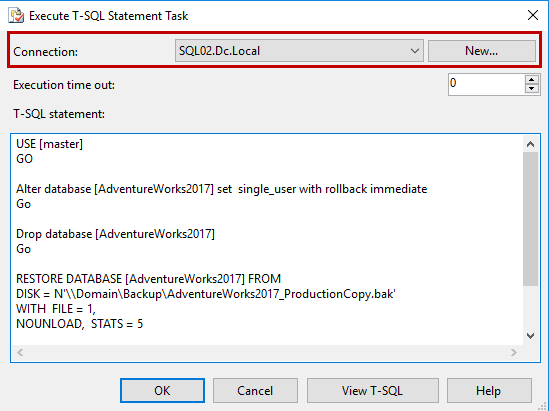
Click OK to close the window. As mentioned, we will restore the database on SQL02.DC.Local server. Before we restore the database, we must drop the existing database but, first, we will change the state of SQL database from multi_user to single_user to do that, we will use the following query:
|
1 2 3 4 |
USE [master] GO Alter database [AdventureWorks2017] set single_user with rollback immediate Go |
To drop the database, we will use the following query:
|
1 2 |
Drop database [AdventureWorks2017] Go |
To restore the database, we will use the following query.
|
1 2 3 |
USE [master] RESTORE DATABASE [AdventureWorks2017] FROM DISK = N'\\Domain\Backups\AdventureWorks2017_ProductionCopy.bak' WITH FILE = 1, NOUNLOAD, STATS = 5 GO |
Following is the entire code block:
|
1 2 3 4 5 6 7 8 9 |
USE [master] GO Alter database [AdventureWorks2017] set single_user with rollback immediate Go Drop database [AdventureWorks2017] Go USE [master] RESTORE DATABASE [AdventureWorks2017] FROM DISK = N'\\Domain\Backups\AdventureWorks2017_ProductionCopy.bak' WITH FILE = 1, NOUNLOAD, STATS = 5 GO |
Now, drag and drop the Execute T-SQL Statement Task, choose SQL02.DC.Local from connection drop-down box, and enter above code block and click OK. See the following image:
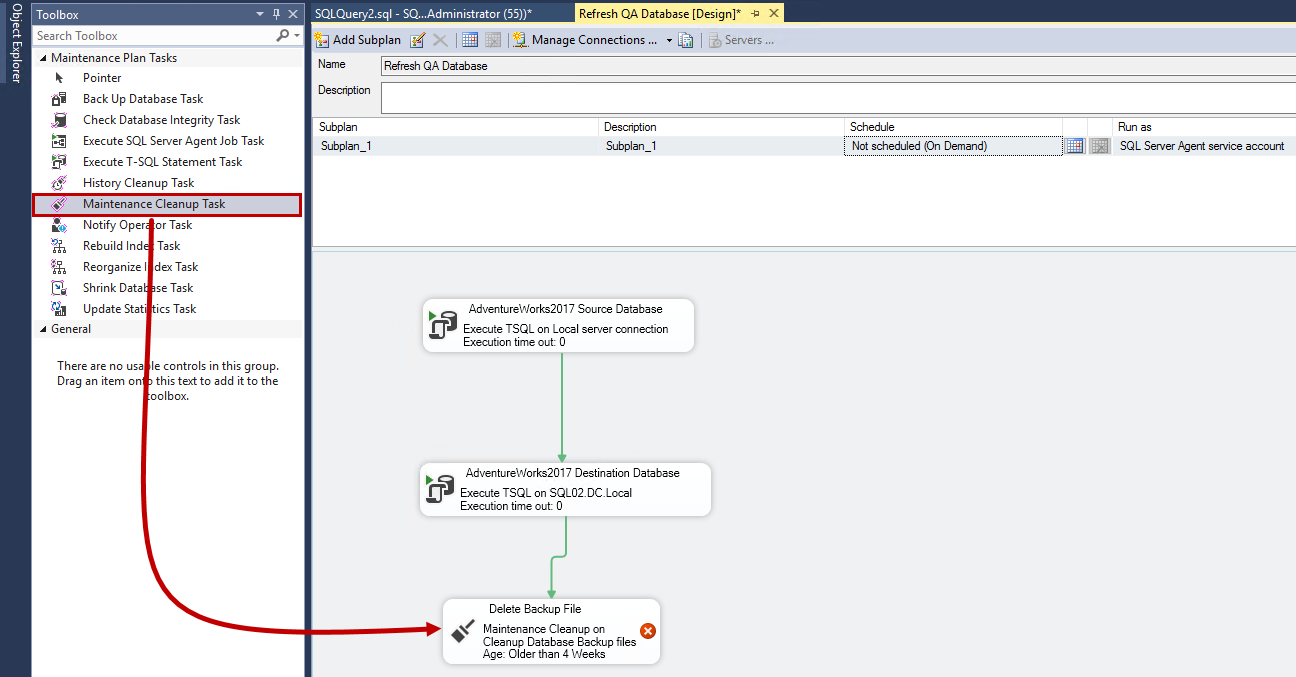
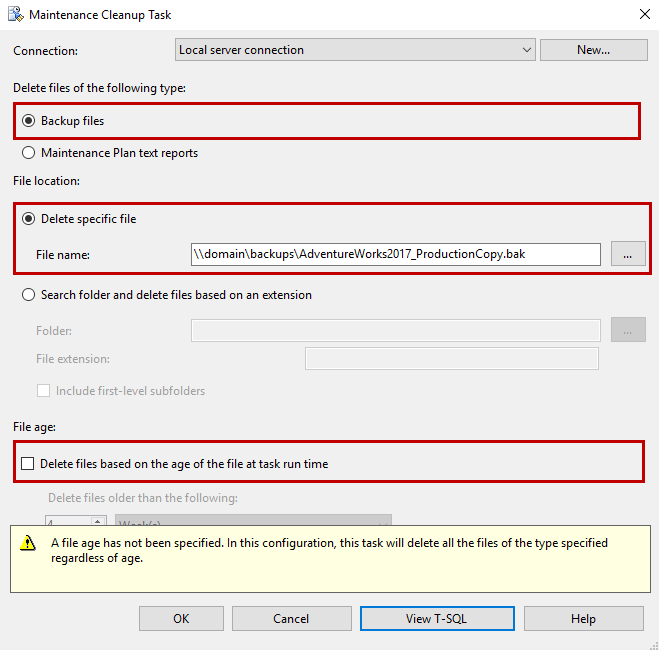
Once the database is restored, we must drop the backup file that is used to restore the database. To do that, we must use the Maintenance cleanup task. Drag and drop the maintenance cleanup task from toolbox to maintenance plan designer. See the following image:
To configure the Maintenance cleanup task, double click on it. Now, we want to delete a specific backup file located on the network share, so select the Backup files option, choose to Delete a specific file option, and provide the location of the backup file in File name textbox. We are not using any backup retention policy hence uncheck the Delete files based on the age of the file at task run-time option. Once all settings are completed, click OK to close the window. See the following image:
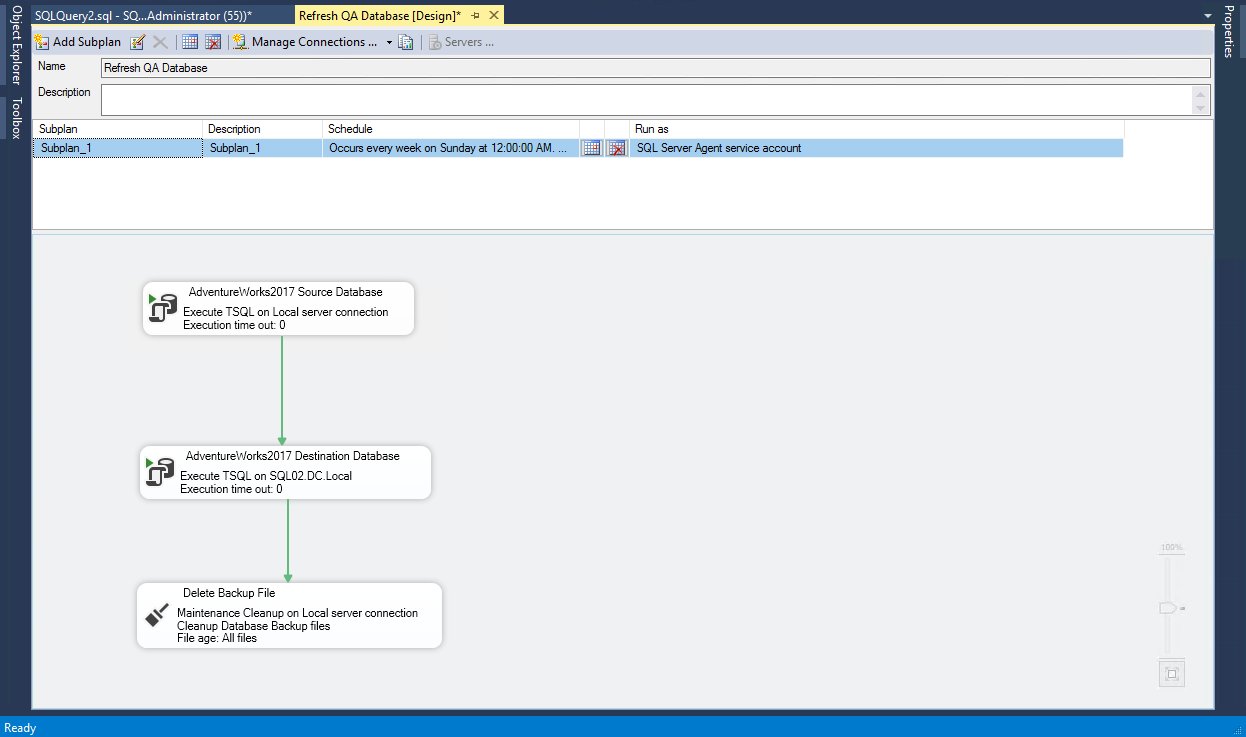
Once the entire maintenance plan designed, it looks like as following:
Save the maintenance plan.
Schedule the database refresh maintenance plan
Now, to schedule the maintenance plan, click on the calendar icon on top of the maintenance plan designer. See the following image:

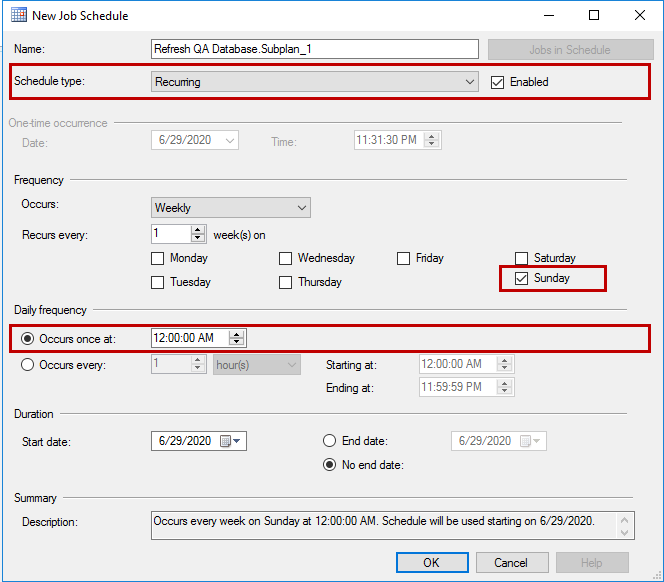
A dialog box opens. As mentioned, the maintenance plan should refresh the database every Sunday at 12:00 AM. The schedule can be configured as follows:
- Schedule type: Choose Recurring from Schedule type drop-down box
- Frequency: Choose Weekly from Occurs drop-down box and select Sunday from the list of days
- Time: Choose Occurs once at and enter 12:00:00 AM in the time text box
Once the schedule is configured, click OK to save the schedule. See the following image:
Save the maintenance plan.
Test the database refresh maintenance plan
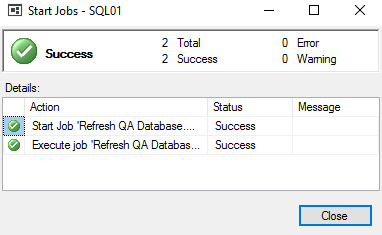
To test the job, right-click on the maintenance plan and click on Execute. The execution process maintenance plan will be started. Once the maintenance plan completes successfully, it looks like the following image:
Summary
In this article, I have explained how we can use the SQL Server maintenance plan to refresh a SQL database.

He has expertise in database design, performance tuning, backup and recovery, HA and DR setup, database migrations and upgrades. He has completed the B.Tech from Ganpat University. He can be reached on nisargupadhyay87@outlook.com
- Different ways to identify and change compatibility levels in SQL Server - July 22, 2024
- Copy SQL Databases between Windows 10 and CentOS using SQL Server data tools - October 19, 2022
- Changing the location of FILESTREAM data files in SQL Database - October 14, 2022