
Microsoft Azure SQL Database is a managed cloud database for programmers/developers to develop their products easier due to less involvement in maintenance allowing the customer to concentrate on their products, because, most of the data maintenance or infrastructure is taken care by the cloud service providers.
Advantages of a cloud database:
- Elastic in nature – increase or decrease your server capacity instantly.
- Availability – Geo replication becomes too easier. This makes the backup strategy very easy two or three clicks.
-
Multitenant facility – Cost wise, no need to invest more money in the initial stage.
Business scenario and justification:
SQL Server 2016 Licensing costs:
SQL Azure Costs:SQL Server
2016 editionsDescription or suitability of the product Licensing Details Channel availability Cost of the product (US$) Enterprise Comprehensive, Projects with high critical database and business intelligence requirements. The software provides high reliability and handles huge performance levels for Tier-1 workloads. Per core** Volume licensing, hosting $14,256*** Standard Core database management functionalities and business intelligence capabilities for non-critical workloads with minimal IT resources. Per core** Volume licensing, hosting $3,717*** Standard Core database management functionalities and business intelligence capabilities for non-critical workloads with minimal IT resources. Server + CAL****
(CAL – Client Access License)Volume licensing, hosting, retail FPP $931*** Developer Full-featured version of SQL Server software that allows developers to cost-effectively build, test, and demonstrate applications based on SQL Server software. Per user Free download Free Web Secure, cost effective and highly scalable data platform for public web sites. Available to third party software service providers only. – Hosting only See your hosting partner for pricing Express Free entry-level database that’s ideal for learning, as well as building desktop and small server data-driven applications of up to 10 GB. – Free download Free For basic level of SQL Azure is $4.99 per month.
Business Calculations:
For a small critical project, which lasts for 3 months of time,
Dedicated database A user needs to buy the Standard version which costs $3,717 (USD) Microsoft AzureSQL Database A user can opt any other Azure model for storing the data 3 * 4.99$ = 14.97$ Cost Savings $ 3702.03 (USD) After 3 months, I finished my project and no need for SQL Server. If we think above the cost savings, it is really huge.
Final Result : The above calculations demonstrates the advantages of Azure Computing in the modern era.
- The above justification clears an option of Pay as you go. How much you’ve used, pay for that.
- Easy firewall options to control, who can access the databases.
- SQL access with Virtual machines provides huge cost saving for the customers.
- Security patches – No need to think about updating the software’s, the cloud providers will take care of these things.
- Disk space – Maintaining the machine is the core part of the cloud providers. In case of disk filling, an automatic switch over of servers and everything is taken care by Microsoft.
- Moving databases between different servers to handle increased load – Everything is on simple clicks and the provider will take care of rest.
SQL Azure History:
SQL Azure was originally announced in 2009 and released in 2010.
SQL Azure Step by Step creation:
Step 1 : To access or create your Azure services or database. Go to -> Microsoft Azure
Step 2 : You need a Microsoft account to login. Use your credit card for initial registration. You’ve got 3 months of free access to Azure portal and afterwards, they will charge for your usage.
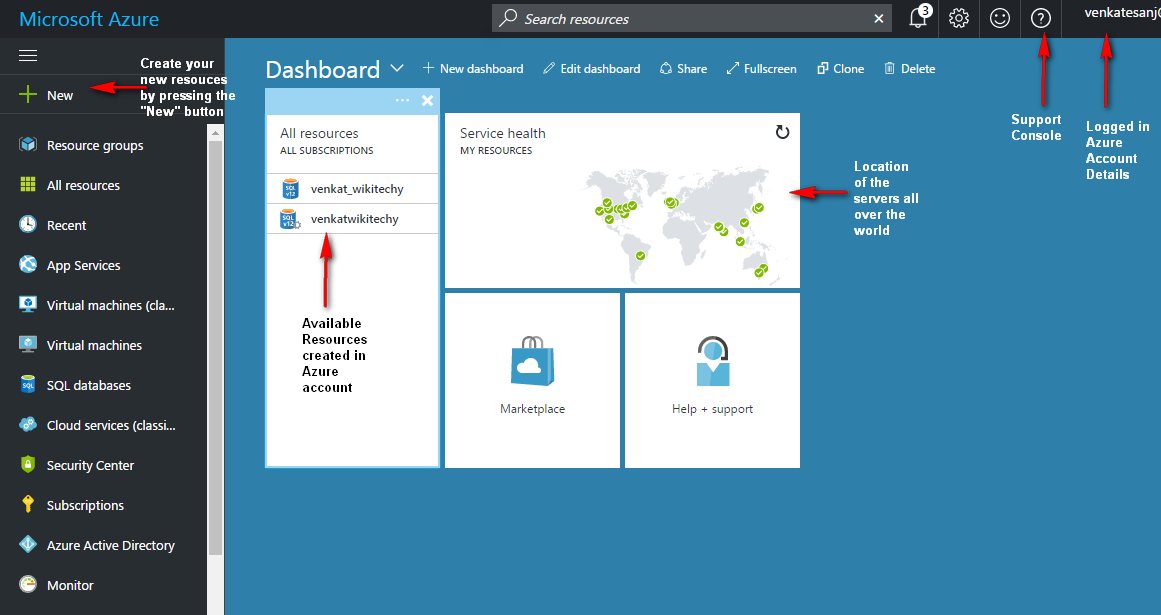
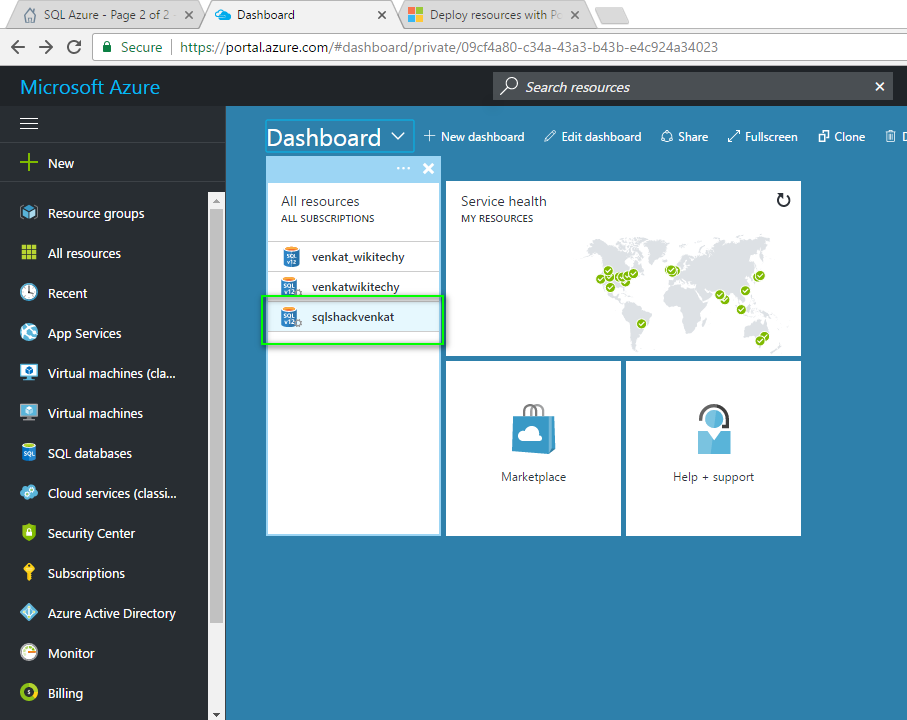
Step 3: Once you’ve registered and your account will get activated and you can see the initial portal of your Azure platform as below.
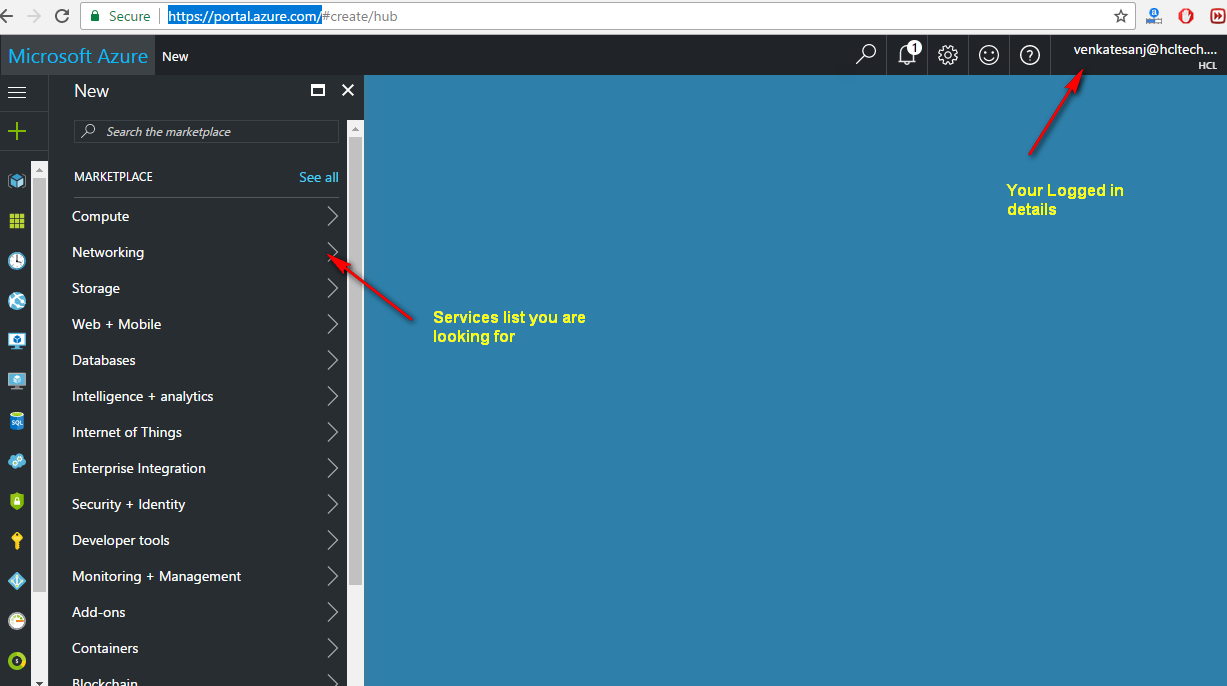
Step 4: You are able to see the dashboard of your Azure portal as below. Some of the important portions to note down.
- Option to create your new services
- List of already created available services
- List of datacenters in the globe for Microsoft Azure
- Support console to contact support team – You can raise your problems as tickets and the support team will respond with clear solutions – personally, I love their service
- Your logged in account details with logout option.
- Searching option for the objects and also help files.
- Indications near to search option. In case of any over usage of billing details everything.
- Billing summary information’s.
Step 5: Click “New” and Select “Databases” and you can click “SQL Database” to create your SQL Azure database.
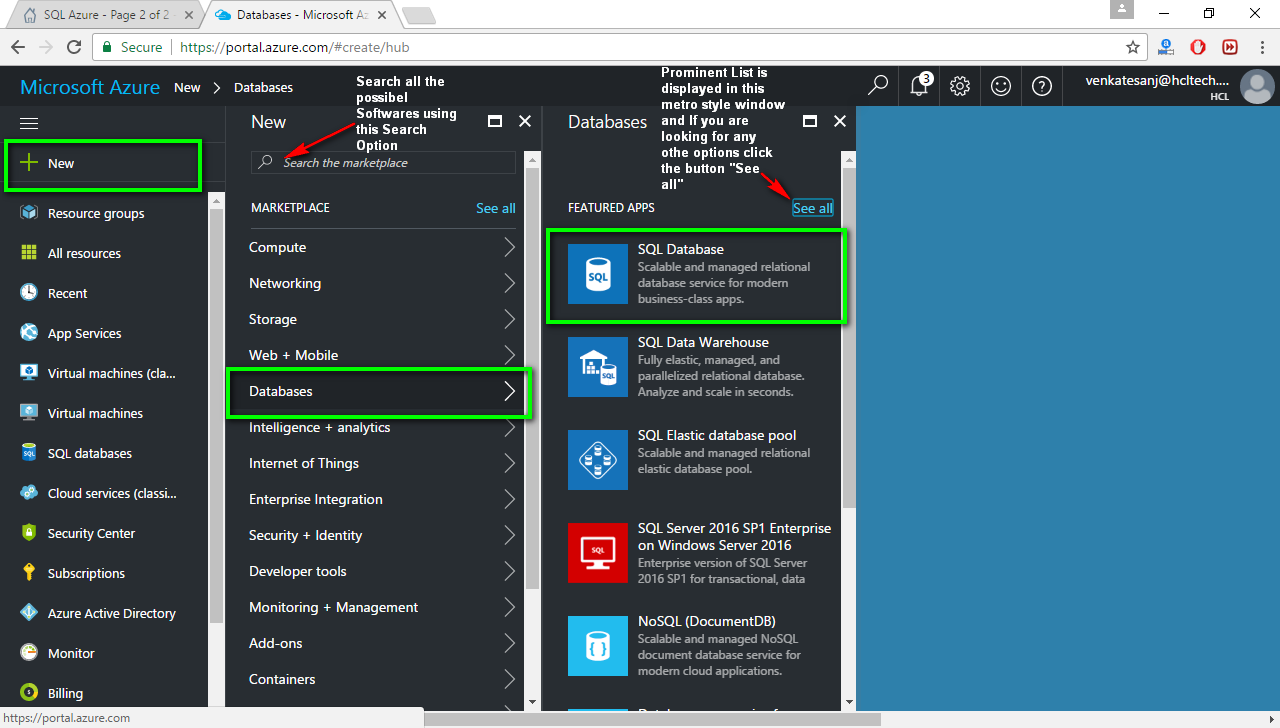
Step 6: Once you click the SQL Database, a SQL Database blade will appear in metro style with the below list:
- Database Name : Name of your SQL Azure database.
- Subscription Type : Under which subscription(payment model) you are trying to access or create database.
-
Resource Group : It’s a kind of container which will have all the resources logically group together for maintenance purpose. See, I want to give access to a specific set of resources. In that case, I can group together and provide access to that group. This makes easier for me to allocate resources to resource groups based on what makes the most sense for your organization. Azure provides an option of
- Creating new resource groups
- Amend to the existing resource groups
The option is yours to decide.
List of key points to note under resource group.
- resource – An easily manageable item that is available through Azure. Some of the common resources are:
- virtual machine,
- storage account
- web app
- database
- virtual network
- Makes our life easier, we can deploy, manage, and monitor all the resources for your solution as a group instead of handling them individually.
- Consistency maintenance – We can repeatedly deploy solutions throughout the project lifecycle with much more confidence on our deployment which is in consistent state.
- We can manage our infrastructure through declarative templates rather than scripts.
-
Deployment dependencies – Clearly define the dependencies between the resources. So that, they will be deployed in correct order.

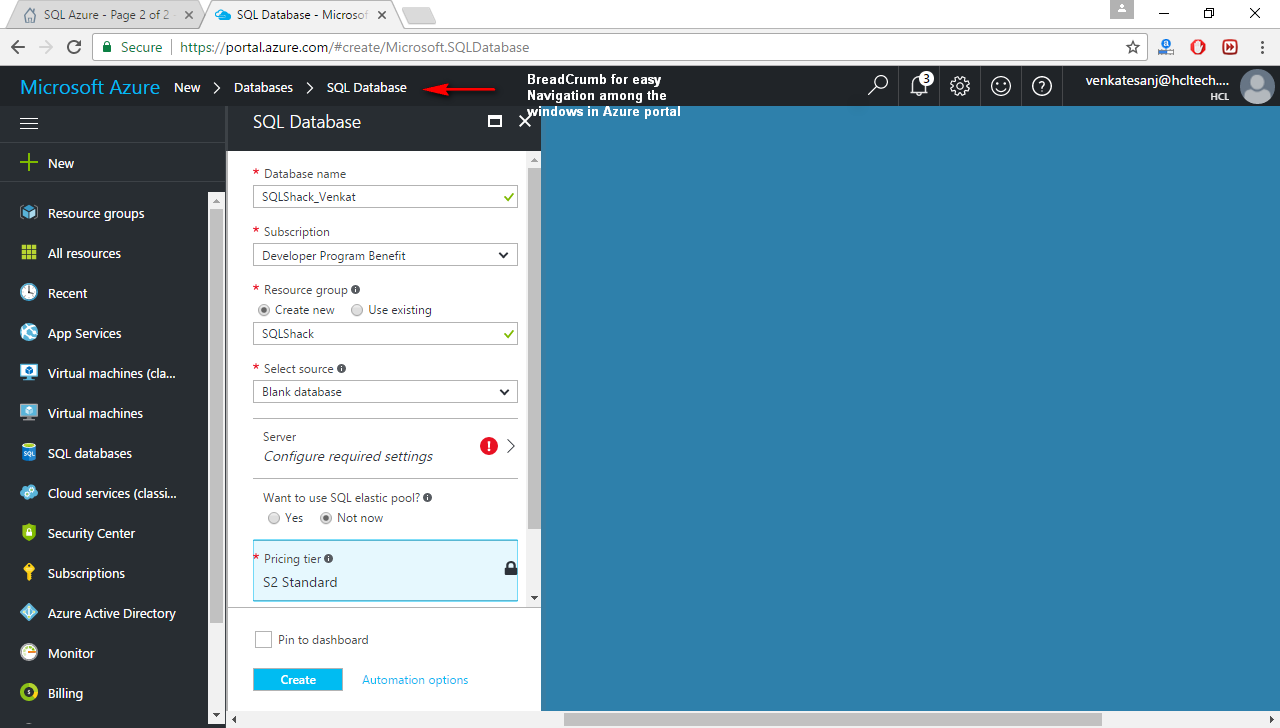
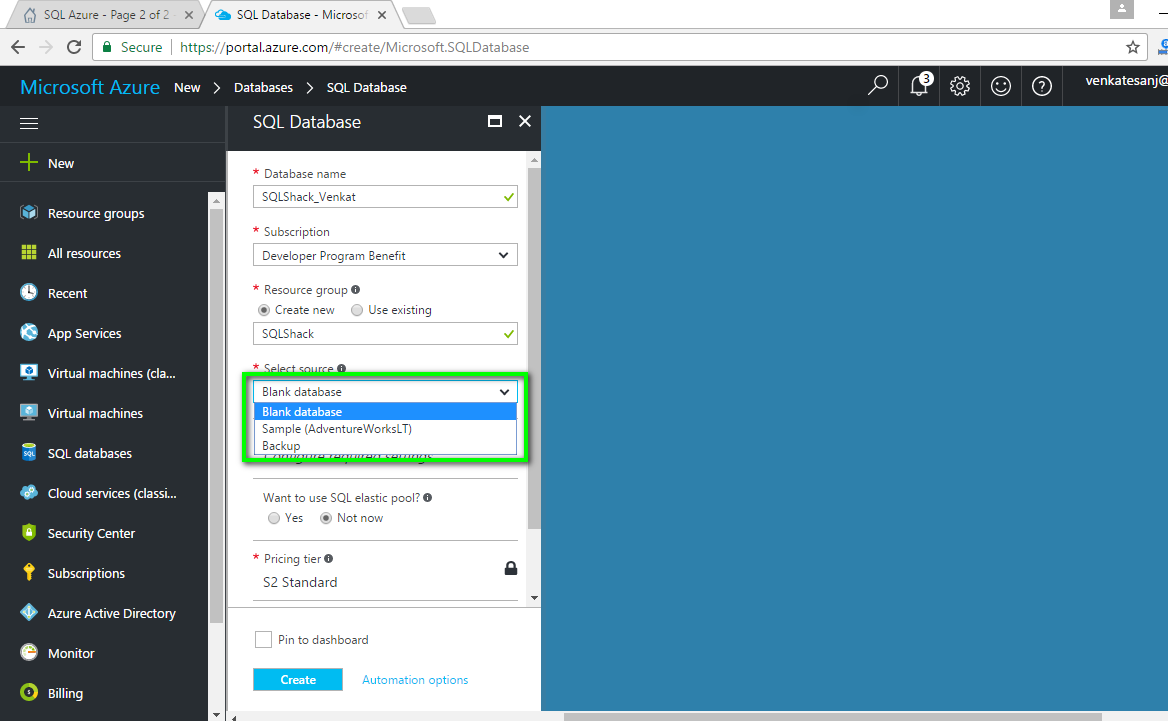
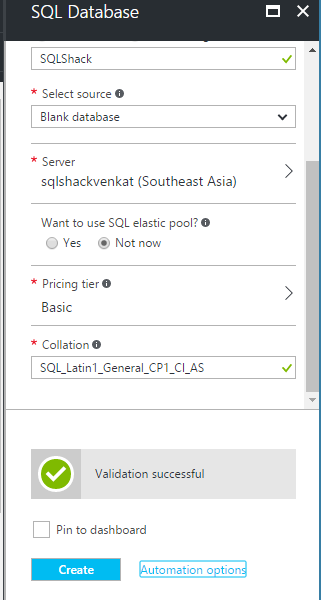
- Whether you want to create a blank database – No tables in it.
- Want to create a sample database – you can see AdventureworkLT. All the tables will be placed in your database. This will be used to work out some samples or quick check on your SQL databases.
- Backup – Whether this database is a backup database for already created databases (if any)
-
In my case, I need to create my tables by my own. So, I’ve created a blank database.
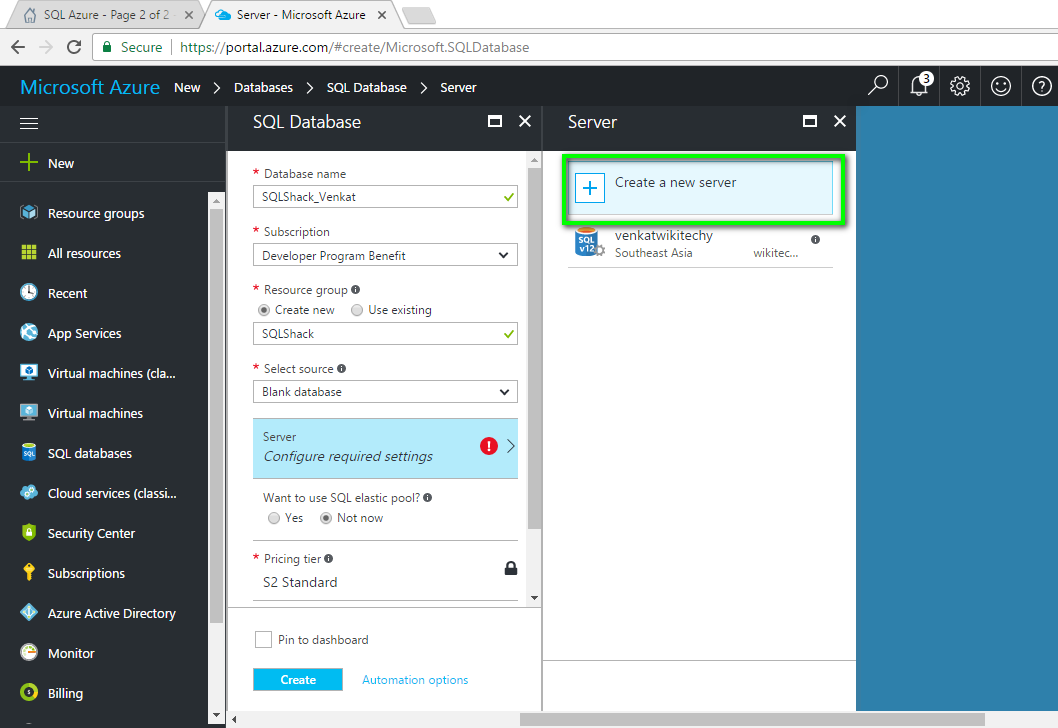
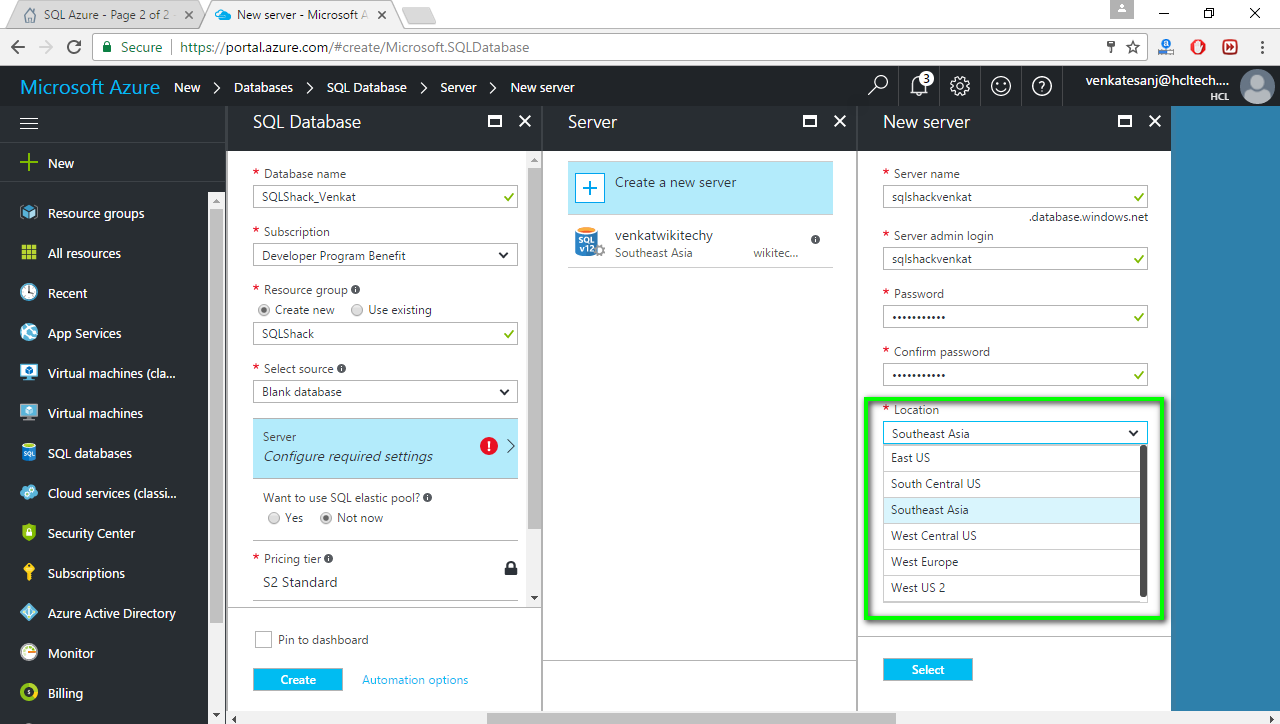
- On selecting this option, a new blade comes right to the existing windows asking for creating a new server or you need to put it in the existing server (if any).
-
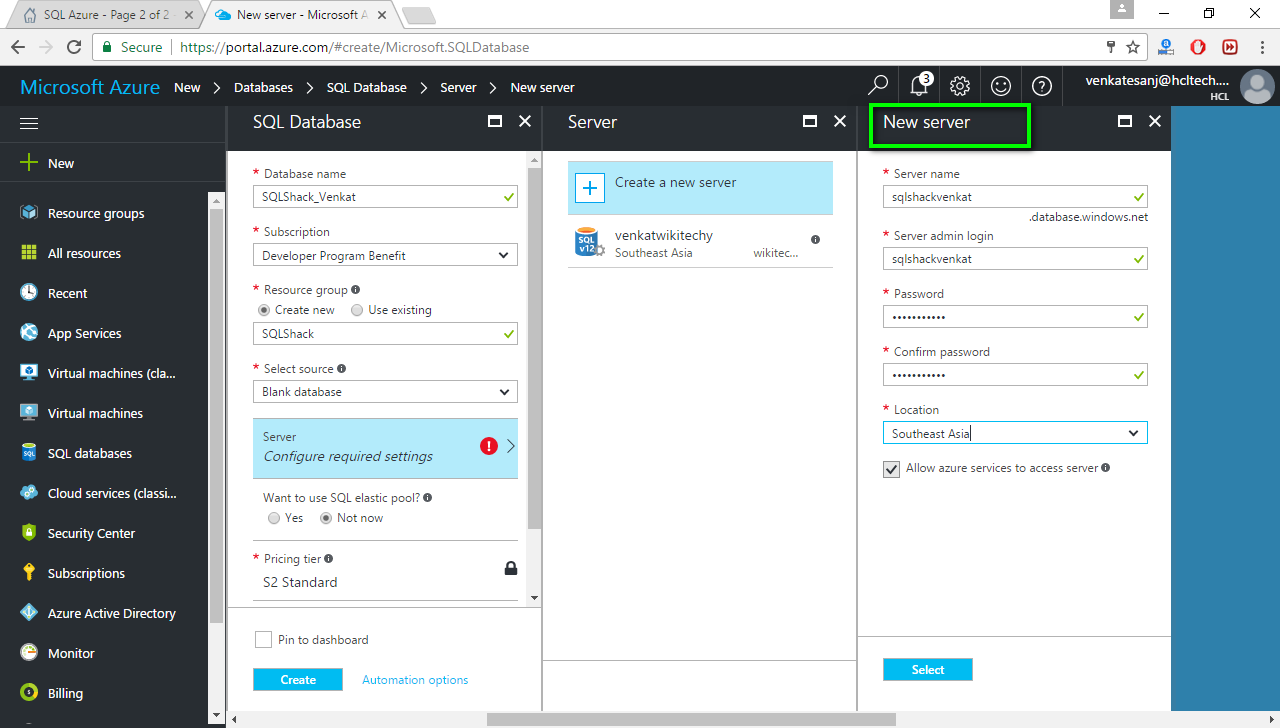
On clicking “create a new server” option, you are able to see multiple options to be provided by the user. Such as,
- Server name
- Server admin login
- Password to access the server
- Confirm password
- Location of the server you want. (List of available data centers will be provided in the drop down. You can select the server location based on your preference)
- An additional option is available like, allow Azure services to access server. If you want your Azure service to access, click and enable it.
- Click select button in the below window and finalize your option.
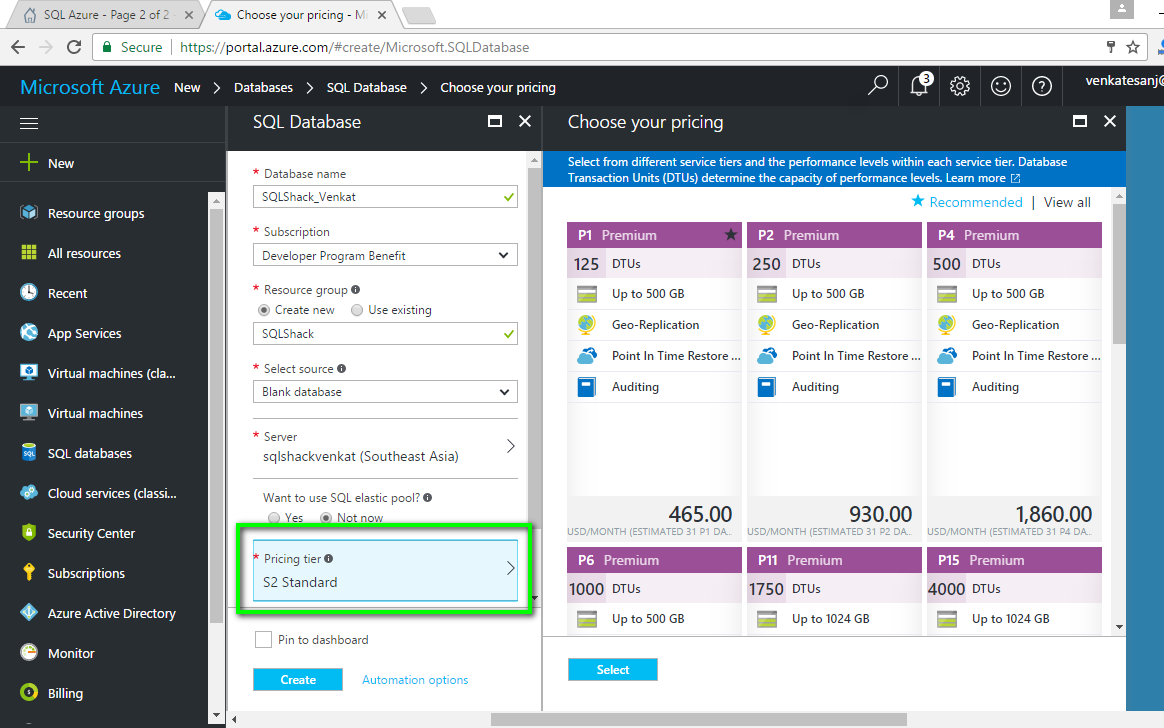
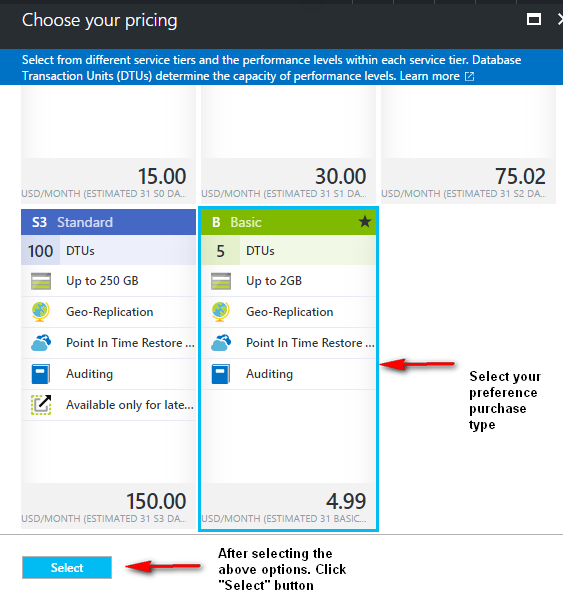
I’ve selected an option of Basic level for my SQL Azure database.
- case-sensitivity,
- accent marks
- kana character types and
-
character width too

Step 7: Below is the database creation blade for your reference.
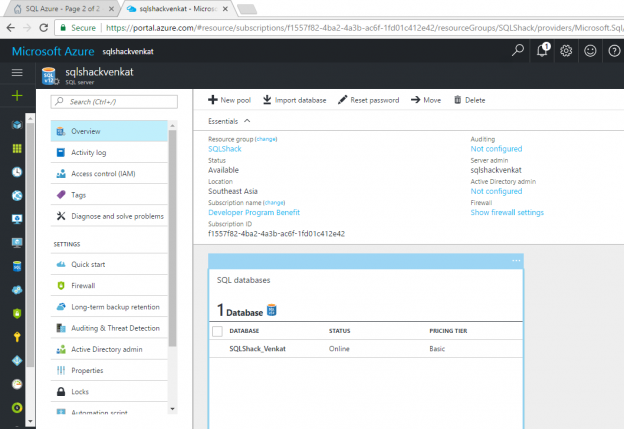
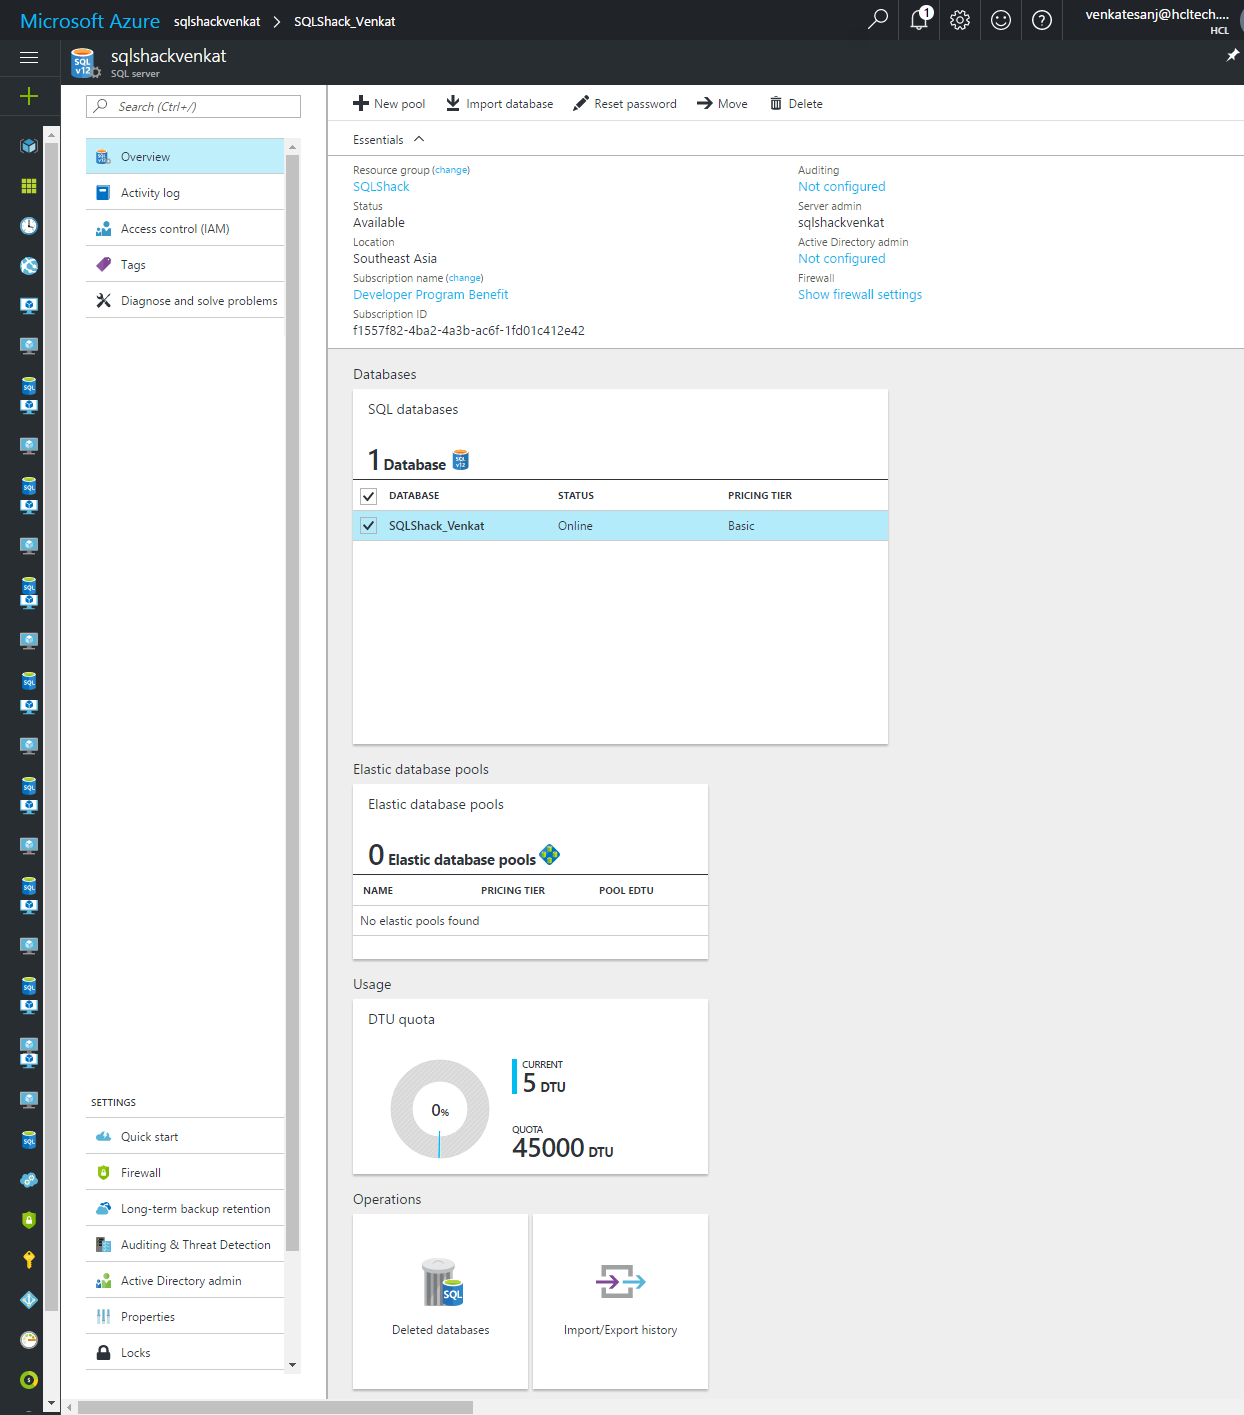
Step 8: You are able to see the database SQLShack database is created in the server sqlshackvenkat server. It is displayed in your dashboard as below,
Step 9: On clicking the newly created SQL Server “sqlshackvenkat” you are able to see all the internal details as below.

Final Step 10: Below is the overall features and details of our SQL Azure database created.

- Microsoft Azure SQL Database – Step by Step Creation tutorial - March 14, 2017