
This article will explore the importance of disk caching in Azure storage for SQL Server workloads.
Azure premium storage is used to store IO-intensive workloads like SQL Server database files to improve the performance and reduce latency time in single-digit milliseconds. Premium storage has made multiple customers move their database workloads to the Azure cloud environment. Today we will talk about one of the features of Azure premium storage caching which significantly improves data access performance.
As I explained in the last article that there 3 key measurements using which we can express disk performance.
- IOPS
- Throughput
- Latency
IOPS is the number of I/O operations in form of the read and write processes. Throughput is the size of data transferred from the disk or to the disk for any read or write operations and latency is the time a single unit of read or write operation will take to complete its execution.
There are some performance counters which we can use to measure all 3 performance indicators to decide how fast our Azure storage disk is performing. I would recommend reading my last article about such performance counters for each option.
Once you calculate the IOPS, throughput, and latency then it would be easier for you to choose the right set of VM SKU size, disk type, and its adequate size to serve SQL Server workload as per required IOPS and throughput.
We can further improve its performance by enabling disk caching on Azure storage disks. Caching in Azure storage is a feature that is used to improve disk performance and reduce latency while accessing the data. Azure premium storage uses Blobcache technology to create a pool of RAM and SSD storage to save cache data. Caching stores data that is being accessed the first time, in a combination of RAM and local SSDs for future uses. When you access that data next time it will not be accessed from a storage device rather it will be accessed directly from the cache. The write operation will first be done in cache data and then replicated this change to the storage system.
The Azure storage disk caching option allows us to choose any of the below 3 options.
- Read Only
- Read\write
- None
When we enable Read caching, it will improve the data access performance because data will be fetched from cache storage if that set of data will be present in the cache. If data is not in the cache, then it will be accessed from disk storage and saved into the cache for future data read transactions. One thing you must note is that Read caching is helpful only for data being accessed in sequential format if you access data randomly dispersed on multiple disks then this caching will not be much helpful.
Similarly, write caching improves the performance of write operations. When a write option will be performed on a data in cache it will be queued to write that operation to the disk.
No caching can be used for write-only or write-heavy workloads like for disks where you have stored SQL Server log files.
An Azure virtual machine requires OS disks, Data disks, and temporary disks. I have already explored these types of Azure storage disk requirements for an Azure virtual machine in my last article which is attached in the above paragraphs.
We can use the disk caching feature on OS and Data disks to increase their performance. If you want to leverage the disk caching facility, then you should plan it during Azure VM creation because caching does not support 4TB or more size of disk storage. It is recommended to plan and provision adequate VM type which can use disk caching facility. Disk caching for any Azure storage disks is configured or managed by choosing the appropriate option for Host Caching setting for disk storage.
We can use any disk caching option (Read, Read\write, None) for OS and data disks whereas temporary disk does not use any type of disk caching. The default setting for disk caching for OS disk is Read\write whereas the default setting for data disk is Read caching.
Let’s assume you have a SQL Server instance running on an Azure virtual machine with database files hosted on separate data drives then the ideal scenario for this system in terms of disk caching is, you should enable
- Read\write disk caching for OS disk
- Read-only disk caching for all data file drives and
- No caching for log file drives
Manage Disk Caching of Azure storage disk attached to Azure VM
This section will explain the steps about changing the disk caching setting for specific disks attached to an Azure virtual machine that is running SQL Server workload. The OS disk caching is configured with its default value i.e. Read\write while provisioning a new virtual machine. You can change it later once the virtual machine will be deployed whereas you can configure your desired value for data disks while attaching them to the Azure virtual machine.
Here, I will show you how to change the disk caching of OS disk and data disk of an Azure virtual machine.
Point to consider
Please consider the below points while managing disk caching of Azure virtual machine disks.
- It is strongly recommended to perform a POC on a lower life cycle before making any changes to production systems
- Understand the disk performance requirement and the nature of your workload before deciding the right disk caching option
- Make sure you have all disk sizes equal to or less than 4TB as disk caching is not supported to be bigger than this size
- Finalize disk caching options for your OS and data disks based on the above step. The best practice is to keep Read\write caching for OS disk, Read-only caching for data disks, and No caching for data drive which has log files stored
- Make sure to shutdown SQL Server service before making any changes in disk caching options
- VM will restart if you change host caching for OS disk and disk will detach and again reattach in case of data disks
- Shutdown all applications running on that Azure storage disk to prevent any kind of data corruption because of this change
Change Disk Caching of Azure storage disks
I assume you have already created an Azure virtual machine. Let’s change the OS and data disk caching settings for this virtual machine.
- Login to Azure portal
- Search Virtual Machines and go to the virtual machines page
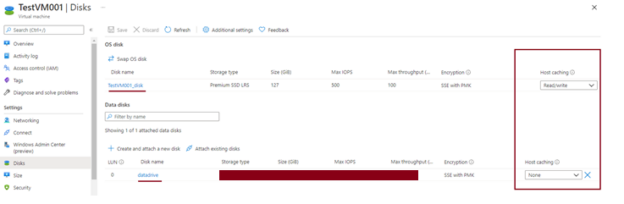
- Search your identified virtual machine on which we will be changing caching settings for OS and Data disks. The name of the virtual machine is TestVM001 in our testing case
-
Click at the identified virtual machine to jump to its Overview page. Click at the Disks tab given under Settings in the left side pane of this virtual machine page. You can see all attached Azure storage disks to this virtual machine in the right-side pane. You can see our demo virtual machine has 2 disks one is for OS disk and the other is for Data disks. The data disk is standard HDD as it is for the demo to save cost but the process to change the Host caching settings for premium data disks are the same. I have hidden the disk type to avoid any confusion.

-
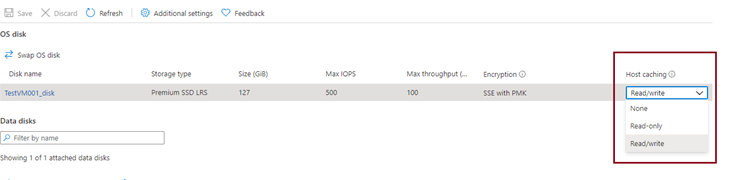
Now, we need to change the Host caching setting for the OS disk. We can see it is set as Read\write under Host caching setting in the dark red rectangle. This is the default value for the OS disk. You can leave it as it is but if it is not set as Read\Write then you can click at its drop-down to see all options. We can see all 3 options there as shown in the below image. You should choose any option as per your desired requirement, if it is not set as Read\write then choose the Read\write option from the drop-down. Once you will choose any option, the Save button given top side will be enabled.
-
I have chosen the Read-only option for setting host caching just to demonstrate this setting change process. You can see Save button is enabled to proceed. Click on it to deploy it on OS disk. I have discarded this as I don’t want to set OS disk host caching as read-only. You can do it in case you need to change it from its existing value to any other value.
-
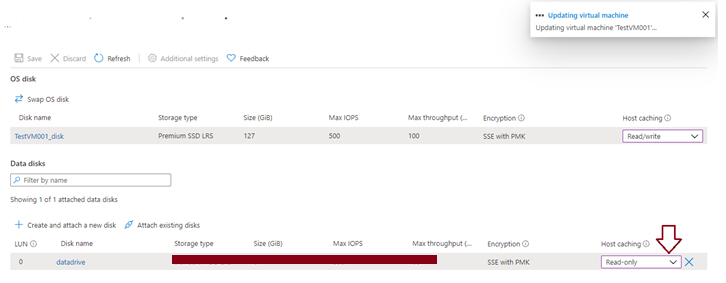
We can see host caching settings for data disk is set as None, let’s follow the same process as I described above to change it to Read-only as per best practices. I have selected Read-only from the data disk drop-down for the host caching setting and clicked on the Save button. Deployment has started processing as per the below image. This deployment will take some time as the Azure storage disk will be detached and then will reattach followed by the VM restart process. You will be notified here on the same screen once caching setting will be changed successfully.
-
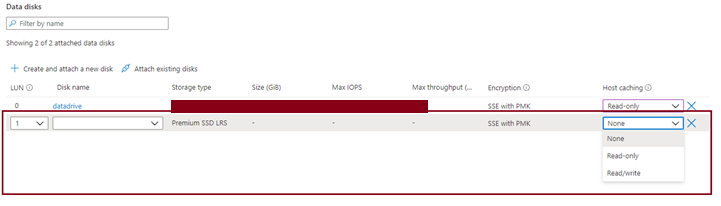
If you are attaching a new data disk to this virtual machine, then you can configure caching settings for that Azure storage disk by selecting the appropriate value to the Host caching setting shown in the dark red rectangle of the below image. Make sure to fill in other details shown for this disk attachment.


Conclusion
I have explored the host cashing setting of Azure storage disks attached to virtual machines in this article. We generally call it disk caching as well. Disk caching improves disk performance of IO-intensive workloads like SQL Server. We should carefully plan and implement caching for each type of disk attached to the Azure virtual machine.

He loves to talk and write about database technologies. He has lead and delivered many projects from designing to deployments on Migrations to the cloud, heterogeneous migrations, Database consolidations, upgrades, heterogeneous replication, HA / DR solutions, automation, and major performance tuning projects.
You can also find him on LinkedIn
View all posts by Manvendra Singh
- Configure backup storage redundancy for Azure Cosmos DB account - May 15, 2024
- Difference between SQL SELECT UNIQUE and SELECT DISTINCT - January 16, 2024
- How to do a group by clause - April 12, 2023