
This article will explore various Azure disk storage available for SQL Server workload running on Azure virtual machines. Suppose you have been tasked to migrate your on-premises SQL Server workload to the Azure cloud. Your client does not want significant change in architecture so you have decided to migrate with IaaS (Infrastructure as a service) approach where SQL Server will be running on Azure virtual machines.
We know SQL Server is an IO-intensive application, so you need to carefully choose the right set of storage systems in the cloud environment to store SQL Server binaries and database files. If you will not choose an adequate disk type, then your application can face severe performance issues. Today I will explain how to choose an optimal storage subsystem for your SQL Server workload running on Azure virtual machines.
We need to understand the below points before choosing the right set of storage devices for SQL Server workload.
- Understand your requirement in terms of what all data needs to be stored on Azure disk storage of that virtual machine such as system binaries, database files, tempdb files, backup files, etc
- Understand all the Azure disk storage options available in the Azure cloud and choose the appropriate one for your workload
- Understand the types and sizes offered by Azure disk storage
- Gather your IOPS and throughput requirement and accordingly choose the right set of disk type
Let’s understand our requirements first. Azure virtual machines use virtual disks to store system and user data. We can categorize data to be stored on virtual disks of a virtual machine into 3 categories and based on that we can choose the right set of Azure disk storage for each category.
We need an operating system for an Azure virtual machine so the first category will be an OS disk to save system and OS binaries. The second category is Data disk on which we can consider storing user data or database files. The third category is used to store temporary data which is not critical. This is known as a Temporary disk. We can choose the optimal disk type based on these requirements. A disk system can take any of these 3 roles like OS disk, Data disk, or temporary disk.
Disk Options
Above are disk requirements for an Azure virtual machine. Now, let’s discuss how many options are available as Azure disk storage. The Azure disk storage offers the below options for your virtual machine in the Azure cloud.
- Ephemeral Disks
- Managed Disks
- Unmanaged Disks
Each Azure disk storage options have their benefits and specific requirements to consider for the virtual machine.
The ephemeral OS disk is used to store data locally on virtual machine storage. Generally, Azure virtual machines use remote storage to store data but when you use an ephemeral disk, it is stored on the local virtual machine. It is non-persistence so anything written to disk might be lost and you need to reimage your virtual machine from a fresh copy.
Ephemeral OS disks are used for a faster boot process as they are SSD disks locally stored on the virtual machine. Windows virtual desktops are one of the great use cases where we can use ephemeral OS disk where we don’t need to store any data on the local drive as your login profile and data drive uses remote storage attached to that virtual desktop. You don’t need to pay any cost for ephemeral OS disks, so this is one of the cost-effective solutions with better performance because it is hosted on underline SSD storage.
Managed disks are very popular options for Azure virtual machines because it is each to set up and self-managed. Azure manages its underline hardware infrastructure and presents us to use it as the virtual hard disk. Users just need to provision the managed disk and attach it to Azure virtual machines.
The underlying storage infrastructure for managed disks in Azure blob storage. Virtual hard disks are stored as a page blob in the Azure blob storage account. You don’t need to create an Azure blob storage account to provide a managed disk. Azure does it internally when you provision a managed disk. Azure-managed disk offers multiple benefits like easy scalability, Azure role-based access control support, Azure backup support, encryption, integration with availability sets and zones, and high availability from any disruptions.
Unmanaged disks also use the same underlying infrastructure as managed disks but here all these underlying physical infrastructures will be managed by you and that is the reason this option is not popular. You need to manage its scalability and high availability, so it is quite complex to manage if you are choosing an unmanaged disk option.
Disk Type
You understood the disk roles required for a virtual machine and what all options are available for Azure disk storage, now we will discuss the types of disks available in the Azure cloud.
Disk type can be selected based on our minimum acceptable performance statistics required for our workload. We need to calculate the required disk performance statistics which we can use to choose the appropriate disk type. Each disk type has different performance characteristics and costs associated with it. We should carefully evaluate our workload to understand which type of disk we need considering it cannot hamper the SQL Server workload and should also fit in the budget.
Disk performance can be calculated in 3 key measurements IOPS, Latency, and Throughput. The IOPS stands for Input-Output Operations Per Second. It is the number of IOPS in the form of reading and writes operations that a disk can complete per second. You can measure it by combining the numbers of performance counter disk reads\sec and disk writes\sec values. If you have high IOPS workload then you need high-performance disks like ultra-disks, premium SSDs, or standard SSDs.
The Latency is the time a single request can take to complete its execution. If you need better performance, then latency should be as low as possible. Latency can be measured by gathering performance counter average disk second\read and average disk second\write.
The Throughput is the amount of data read from the disk or write to the disk. It is measured in MBPS (megabytes per second). This can be gathered by collecting performance counter disk read bytes\sec and disk write bytes\sec.
If you have a high throughput requirement, it means you need a high data transfer rate then you should consider high-performance disk types like ultra-disk, premium, or standard SSDs.
We learn how to understand the acceptable disk performance, now we will understand all disk type options available in the Azure cloud and accordingly can choose the optimal type of Azure disk storage for our SQL Server instance.
There are 4 types of Azure disk storage available in the Azure cloud.
- Ultra disks
- Premium SSDs (Solid-state devices)
- Standard SSDs
- Standard HDD
Ultra disks are the fastest Azure disk storage available in the Azure cloud. You can provision an ultra-disk from 4GB to 64TB of disk size. The limit of IOPS and throughput will keep on increasing in case you choose a disk size in increasing order like a 4GB ultra disk supports up to 1200 IOPS and 300 MBPS throughput whereas a 32 GB ultra-disk supports up to 9600 IOPS and 2000 MBPS throughput. The IOPS and throughput will keep on increasing if you choose the bigger size. One benefit of having ultra-disks is you don’t need to detach the existing Azure disk storage to adjust the IOPS and throughput.
You can choose ultra disk if you need high IOPS, throughput, and low latency for your workload. You should only choose ultra disk if you have an extensive workload that premium ssds cannot handle.
One thing you should also consider while opting for the ultra disk is that it has various limitations as well like:
- Disk encryption is not supported on Ultra disks
- Ultra disk can only be used for VMs that are in Availability zones
- Ultra disk doesn’t support Azure backup and disk snapshots
- It can only be created as the empty disk that can be used for data disks only
- They are also not supported by Virtual machine images and Azure site recovery
The next Azure disk storage type is Premium SSDs which is the most popular disk storage deployment option for critical SQL Server workloads. It is faster than other disks like standard SSDs and standard HDD but has slower performance than Ultra disks. Premium disks are popular because they do not have any limitations like Ultra disks. These disks are available in all regions and can support other Azure services like Azure Backup, Azure site recovery, disk encryption, etc. Premium disks need to be detached in case you need to adjust their IOPS and throughput.
Premium disks are further divided into multiple sizes which you can choose based on your IOPS and throughput requirement. It starts with P1, P2, P3, P4, P6, P10, P15, P20, P30, P40…P80. Each size has a different disk size, IOPS, and throughput. I would recommend you read the attached Microsoft article to understand more details about each disk size.
Premium SSD size P1 has 4 GB of disk space with 120 IOPS per disk and its throughput is 25MBPS whereas its biggest size P80 disk size allows 32,767 GB of disk space with 20000 IOPS and 900 MBPS of throughput. Read the attached article to understand such details of all disk size types.
You should also consider another aspect of having the number of disks for your virtual machine. You can choose one P30 disk of 1 TB or 4 P15 disks of 256 GB size. Azure virtual machines also have a limitation to attaché the number of disks, it depends on the type of VM you have provisioned so consider this point if you are choosing multiple disks for a single VM.
Premium SSDs also support disk caching which can be used to improve its performance significantly. It uses multi-tier BlobCache technology which uses a combination of RAM and local SSD for caching. Note, disk caching feature is not supported for disks that have size 4TB or more but if you use multiple disks with less than 4TB you can use this feature on disks. Also, be cautious while enabling disk caching this can lead to data corruption if you do it without planning. The default setting for disk caching for OS disk is READ-WRITE whereas for data disks it should be READ ONLY.
Next, another type of Azure disk storage is Standard SSD, this also gives a good performance like premium SSDs if you are running small to medium applications with low IOPS. This is a cost-effective storage option if you need consistent performance lower than premium disks. You will have a severe performance impact if you consider this disk for your medium to large applications. Consider premium ssds for such applications.
Standard SSDs are suitable for web servers, low IOPS workloads, or lower life cycle environments. Standard SSD sizes are available in various sizes starting from E1, E2, E3, E4, E6, E10, E15, E20, E30…E80. The details of IOPS and throughput of each disk size can be seen in the above attached Microsoft article.
The last disk type is Standard HDD which uses conventional hard disk drives, it has the lowest performance among all 4 disk types. It is a low-cost solution for your non-critical workload. Standard HDD sizes are available from S4, S6, S10, S15, S20…S80. Choose any depending on your requirement. I would suggest don’t consider it for your production SQL Server workload.
We have understood the disk requirement, disk options available in the cloud, how to choose a disk type, and all available disk types in the cloud. Now, let’s choose disk systems using a use case that will make your underling clearer.
Attach Azure Disk storage to Azure virtual machine
This section will describe how to attach Azure disk storage to a virtual machine.
- Login to Azure portal
- Search your virtual machine
- Click on this VM to jump to its overview page
- Click on the Disks options showing Settings from the left side pane as shown in the below image
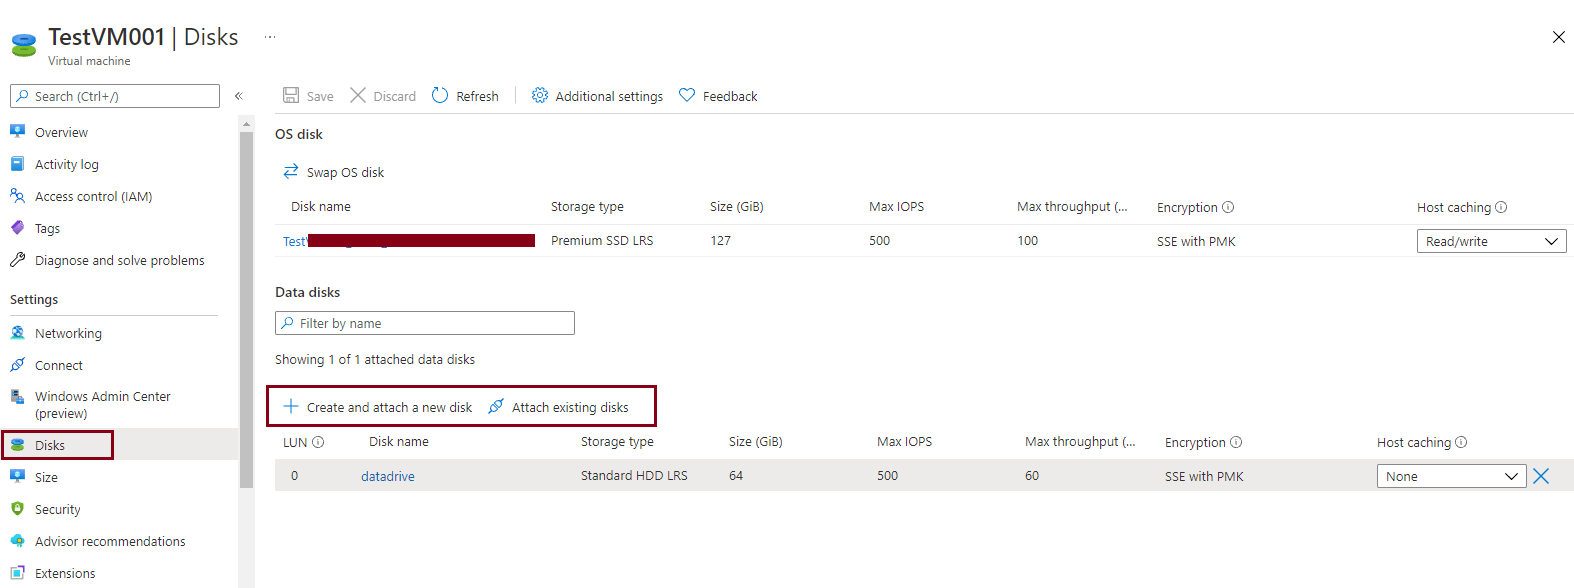
- Here, you can click on +Create and attach a new disk or Attach existing disks options. If you have already created a disk, then you can choose Attach existing disks option otherwise if you must create it, in that case, go with the first option
- You can see an additional row is added after clicking on +Create and attach a new disk, here you can choose storage type from the dropdown as per your requirement
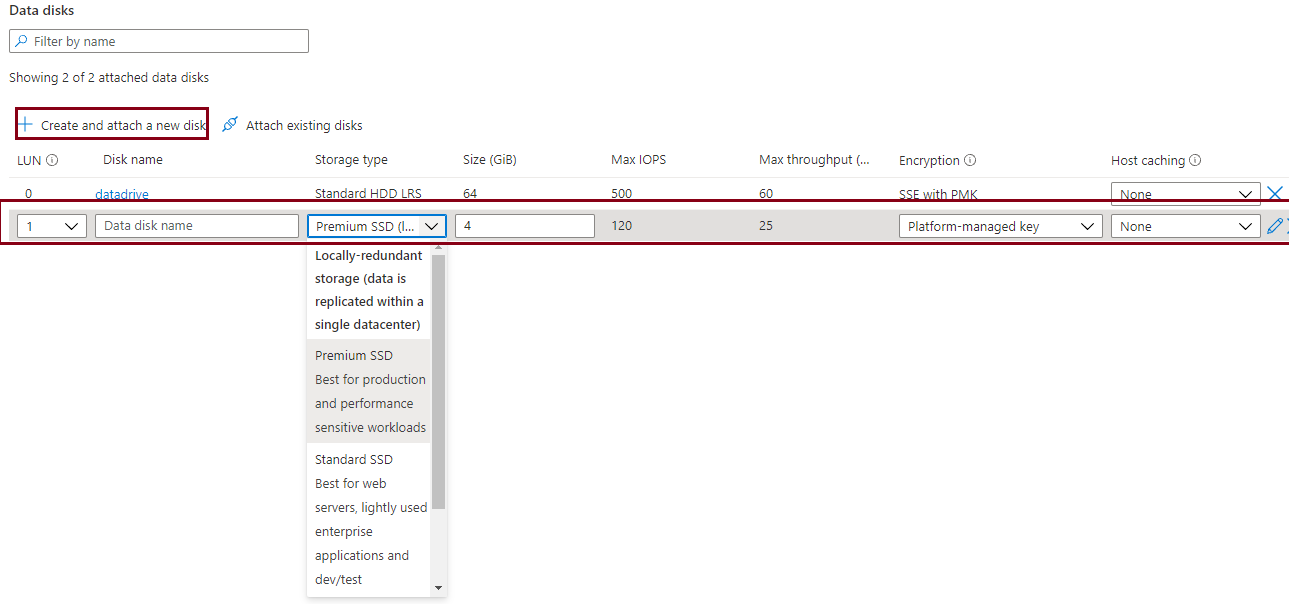
- Choose other options based on your disk type selection and click at save button
You can also create Azure disk storage directly through the Azure portal.
- Login to Azure portal
- Search Disks and click on Disks options
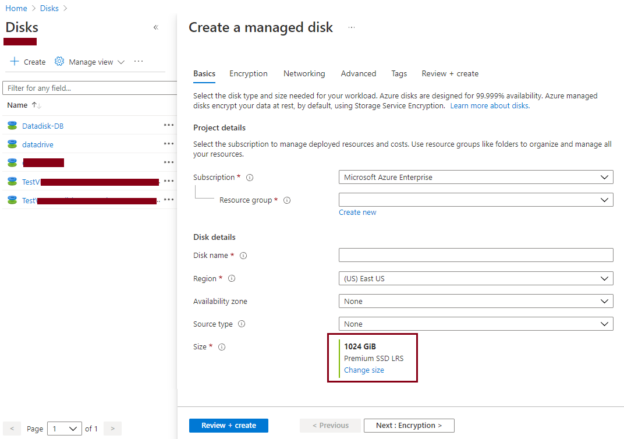
- You will get the below page. Click at +Create option shown in the below image to open the disk creation window

- You can see that Create a managed disk window will open once you click on the +Create option. Look at the Size option showing in the dark red rectangle, here you can choose your desired Azure disk storage type. Right now, it is selected as premium SSD with 1 TB of size, let’s change it to 4GB of size which is the size of P1 storage
- When I click on the Change size option of the above image, I got the below screen
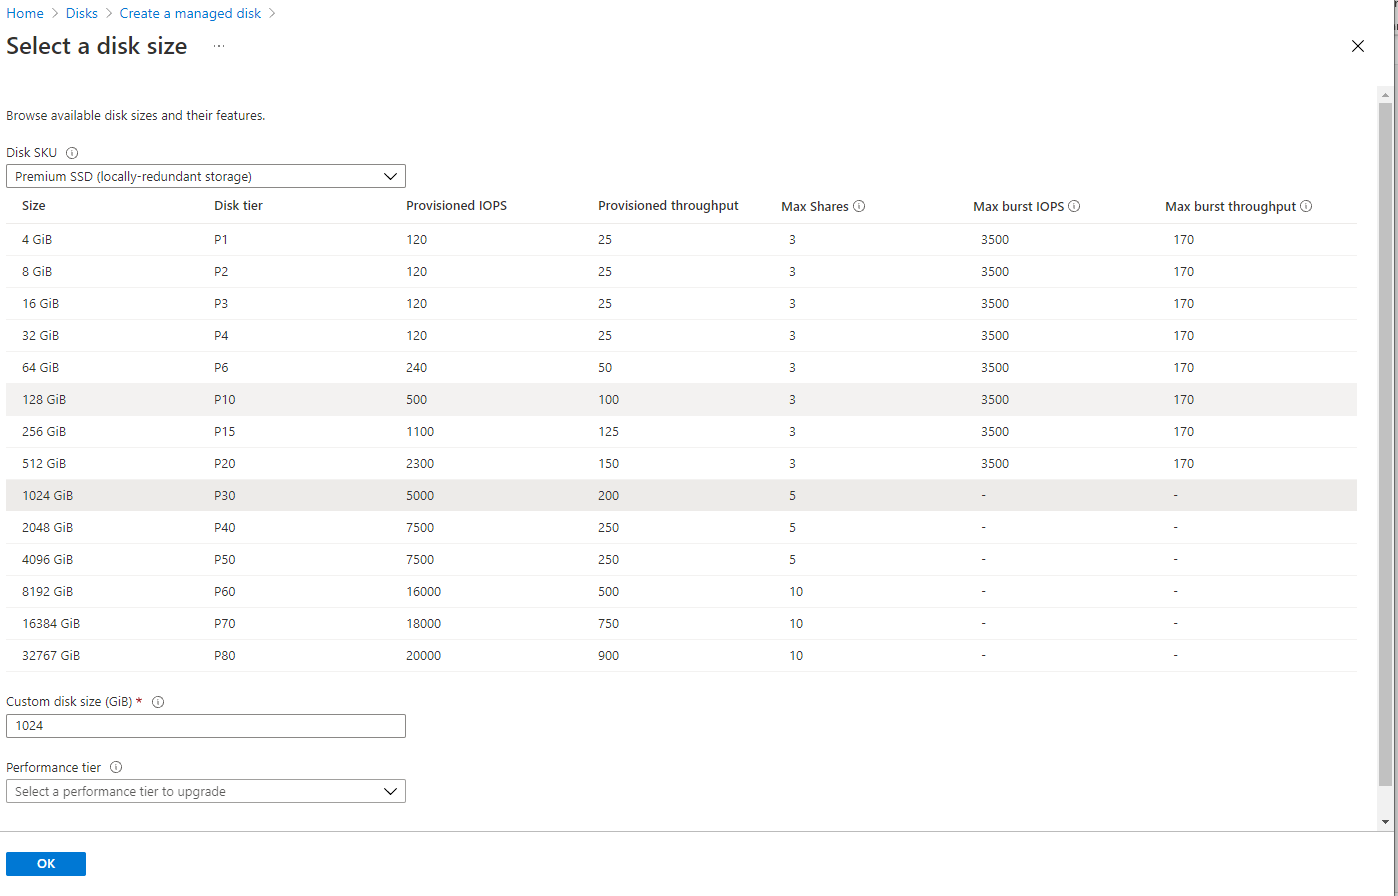
- Here, you can choose your desired Azure disk storage size based on acceptable IOPS and throughput. Even you can change disk type from premium SSD to standard from Disks SKU dropdown showing on top of the above image. Click on the OK button post selecting your desired type and size of Azure disk storage
- Follow other instructions of Create a managed disk to create it
- Once it is created, you can choose to Attach the existing disks option from the Azure virtual machine page to attach this disk to that virtual machine
You have added a disk to your virtual machine now you need to initialize this attached disk on the virtual machine. Follow the below steps to initialize this newly added disk.
- Log in to the Azure virtual machine
- Launch disk management console
- You can see the newly added disk is uninitialized in the disk management console
- Select this newly added disk and initialize it. Now disk will appear as unallocated
- Right-click on the disk and click at New select volume, follow the instructions displayed in its wizard
- The last option will come to format this disk. Once formatting will be done you are ready to use this disk
Use Case
Suppose you have to migrate one of the critical business systems to the Azure cloud. This system is running an OLTP database with DR-enabled instances on another server in a different region. It has 2 servers one is hosting a production database whereas another is hosting its DR replica.
Clients want to reduce administrative work as much as possible for their Azure-hosted systems so here it’s an obvious choice to go with managed disks options.
Databases are being accessed globally and are heavily utilized so they require higher IOPS and throughput. The team has analyzed the on-premises performance counter to understand its peak and average IOPS and throughput to make an appropriate decision on choosing the optimal Azure disk storage. The team has analyzed and found that these systems need approx. 20000 IOPS with 600MBPS throughput. This data has made our work easy. We know Premium disk P70 and P80 have maximum IOPS as 18000 and 20000 and its maximum throughput as 750MBPS and 900MBPS so we have 2 options to go with. I would go with P70 and if any performance improvement is needed later then will upgrade it to P80 premium SSD disk type.
If this IOPS requirement is more than 20000 and its throughput is more than 900MBPS then you can consider choosing ultra disks but ultra disks have some limitations which must be taken care of during this planning.
Although we should keep DR and primary systems identical if you have cost pressure then you can choose either lower size of premium SSDs or even you can choose standard SSDs for DR system as most of the time this system will be ideal from a user access prospect. We can upgrade this storage later after a failover if the business asks to optimize the performance.
Conclusion
I have explained the Azure disk storage overview and how to choose an optimal disk type for your SQL Server workload running on the Azure cloud. It is difficult to cover all aspects of Azure disks in one article, so I kept all details crisp. I would recommend you learn the above attached Microsoft article to learn more about each type and size of Azure disk storage. I would strongly recommend you do proper testing in the lower life cycle before making any decision on disk options, type, and sizes.

He loves to talk and write about database technologies. He has lead and delivered many projects from designing to deployments on Migrations to the cloud, heterogeneous migrations, Database consolidations, upgrades, heterogeneous replication, HA / DR solutions, automation, and major performance tuning projects.
You can also find him on LinkedIn
View all posts by Manvendra Singh
- Configure backup storage redundancy for Azure Cosmos DB account - May 15, 2024
- Difference between SQL SELECT UNIQUE and SELECT DISTINCT - January 16, 2024
- How to do a group by clause - April 12, 2023