As SQL professionals, we often have to deal with XML data in our databases. This article will help you walk through several examples of using ‘FOR XML PATH’ clause in SQL Server.
We get the requirement to display the data from the relational SQL table in various formats. Sometimes developers want to retrieve data in the XML format from the SQL tables holding relational data in regular data types. SQL Server supports XML data using the FOR XML clause. We can easily convert existing data into the XML format using this. We have the following modes available in the FOR XML clause. We can use the FOR XML clause to join or concatenate multiple columns into a single row output as well.
We use the FOR XML PATH SQL Statement to concatenate multiple column data into a single row
- RAW
- Auto
- EXPLICIT
- PATH
Example 1: Basic use of the FOR XML PATH clause
Let’s use the WideWorldImporters sample database for this part of the article. Execute the following query, and it retrieves the data in a grid format.
|
1 2 3 4 5 6 7 8 9 10 11 12 |
SELECT [CustomerID], [CustomerName], [CustomerCategoryName], [PrimaryContact], [AlternateContact], [PhoneNumber], [FaxNumber], [BuyingGroupName], [WebsiteURL], [DeliveryMethod] FROM [WideWorldImporters].[Website].[Customers] WHERE CustomerID < 3; |
Click on the Result to Text in the SSMS toolbar and rerun the query.

It gives the same result in a text format. In the following screenshot, we do not see the complete results because you have to scroll the bar in SSMS to see other columns.
Let’s use the FOR XML PATH clause in previous query and get results in a grid format.
To use Grid format, you can click on Results to Grid in the SSMS menu bar as shown below.

|
1 2 3 4 5 6 7 8 9 10 11 12 |
SELECT [CustomerID], [CustomerName], [CustomerCategoryName], [PrimaryContact], [AlternateContact], [PhoneNumber], [FaxNumber], [BuyingGroupName], [WebsiteURL], [DeliveryMethod] FROM [WideWorldImporters].[Website].[Customers] WHERE CustomerID < 3 FOR XML PATH; |
We get the XML output as a hyperlink.

Click on the hyperlink and you get the results in a new window.
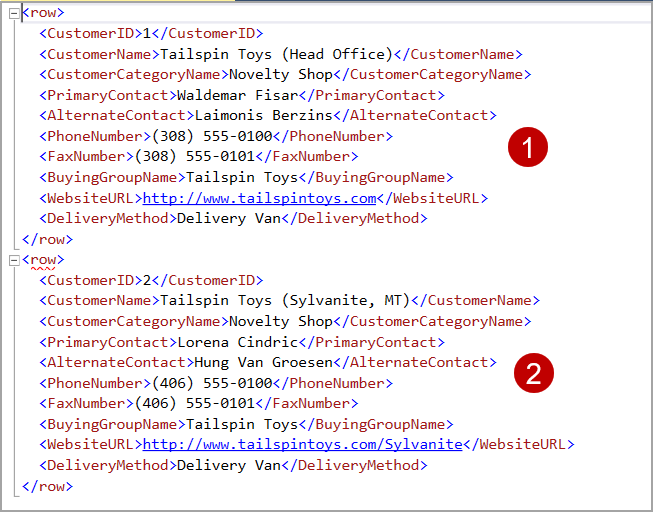
You can note the following in this screenshot.
- Each row is embedded into <row> and </row> clause
- In each row, each column value is embedded into <ColumnName> and </ColumnName> clauses
Example 2: Use of an Elements directives with FOR XML PATH
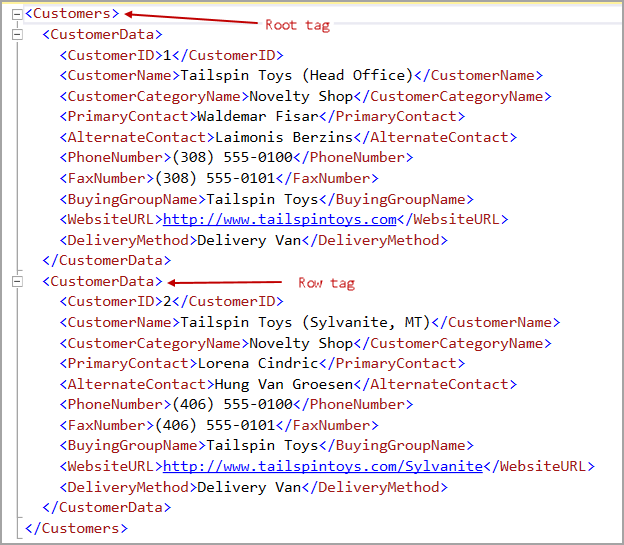
We can use ELEMENTS directives to replace <row> clauses with each row. Previously, we did not specify the ELEMENTS directive, so it returns the default value.
Suppose we want to define root element as Customers. Each row data should be embedded between <CustomerData> and </CustomerData tag>.
In the following query, we added the parameters as following.
- FOR XML PATH(‘CustomerData’) for each row data
- ROOT(‘Customers’) for the root tag
|
1 2 3 4 5 6 7 8 9 10 11 12 |
SELECT [CustomerID], [CustomerName], [CustomerCategoryName], [PrimaryContact], [AlternateContact], [PhoneNumber], [FaxNumber], [BuyingGroupName], [WebsiteURL], [DeliveryMethod] FROM [WideWorldImporters].[Website].[Customers] WHERE CustomerID < 3 FOR XML PATH('CustomerData'), ROOT('Customers'); |
Example 3: Column Alias in the XML output
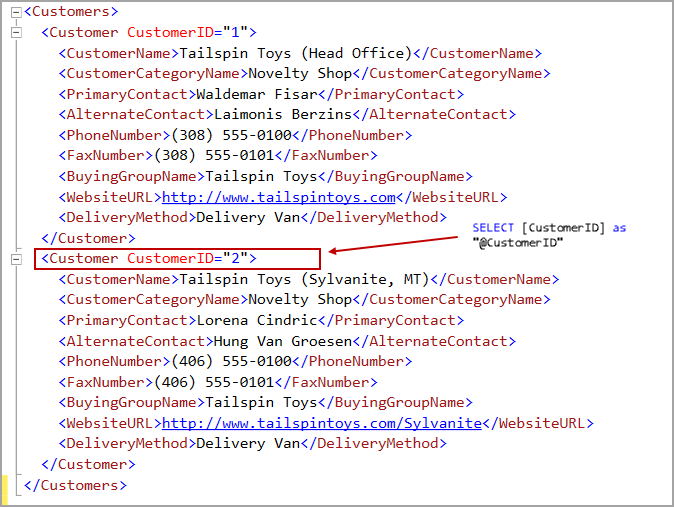
Let’s say we want to use CustomerID attribute instead of the <Customerdata> meta data tag. To do so, we can add an alias in the Select statement and use an alias with the @ parameter.
In the following query, We use @CustomerID in the select statement to show the CustomerID as well in the row tag.
|
1 2 3 4 5 6 7 8 9 10 11 12 |
SELECT [CustomerID] as "@CustomerID", [CustomerName], [CustomerCategoryName], [PrimaryContact], [AlternateContact], [PhoneNumber], [FaxNumber], [BuyingGroupName], [WebsiteURL], [DeliveryMethod] FROM [WideWorldImporters].[Website].[Customers] WHERE CustomerID < 3 FOR XML PATH('Customer'), ROOT('Customers'); |
Example 4: NULL values and the XML output
Let’s further customized the output using the FOR XML CLAUSE. In the further output, we will use the following data set.
You can get this data using the following query in the AdventureWorks database.
|
1 2 3 4 5 |
SELECT TOP 5 [PersonType], [FirstName], [MiddleName], [LastName] FROM [AdventureWorks2017].[Person].[Person]; |
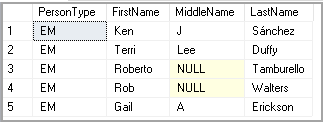
Let’s view this data in the XML format with the FOR XML PATH clause and alias in the FirstName column.
|
1 2 3 4 |
SELECT TOP 5 [FirstName] AS '@FirstName', [MiddleName], [LastName] FROM [AdventureWorks2017].[Person].[Person] FOR XML PATH('Person'), ROOT('Employee'); |
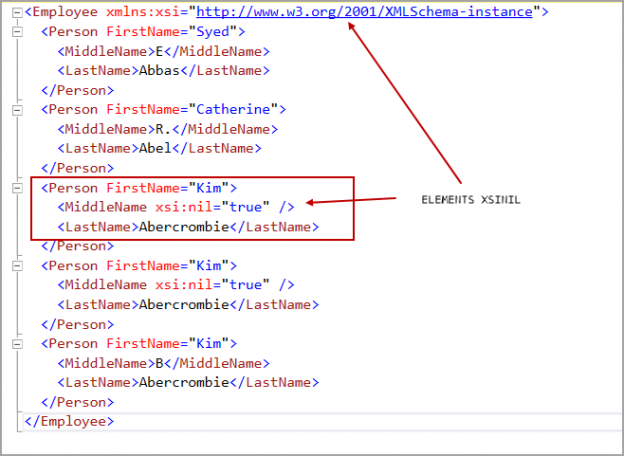
In this output, You can notice that Kim does not have a middle name therefore, you do not get this column in the XML output.
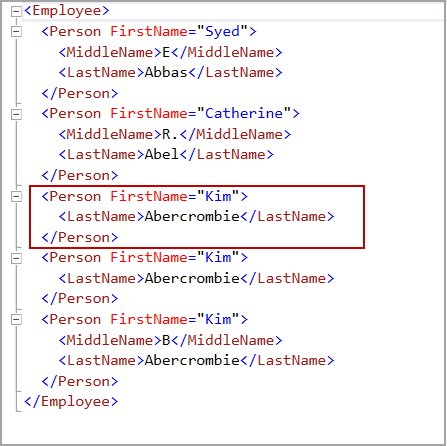
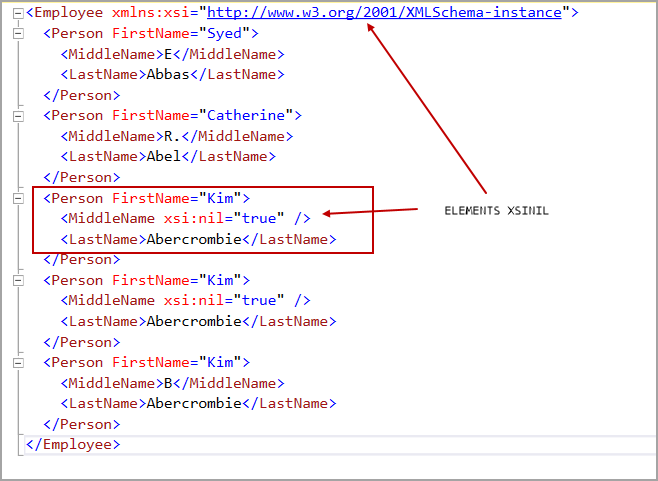
We can use the ELEMENTS XSINIL parameter to display NULL values as well in the XML output.
|
1 2 3 4 |
SELECT TOP 5 [FirstName] AS '@FirstName', [MiddleName], [LastName] FROM [AdventureWorks2017].[Person].[Person] FOR XML PATH('Person'), ROOT('Employee'), ELEMENTS XSINIL; |
It adds the following things in the output.
- xsi:nil=”true” for the NULL values
-
It also add XML definition in the root element
<Employee xmlns:xsi=”http://www.w3.org/2001/XMLSchema-instance”
Example 5: Column Alias on columns other than the individual row tag
Suppose we want to add an alias to columns other than the alias for the individual row tag. In the following query, we defined alias on the middle name and the last name column.
|
1 2 3 4 |
SELECT TOP 5 [FirstName] AS '@FirstName', [MiddleName] as 'Person/MiddleName', [LastName] as 'Person/LastName' FROM [AdventureWorks2017].[Person].[Person] FOR XML PATH('Person'), ROOT('Employee'), ELEMENTS XSINIL; ; |
In the following screenshot, we get both the MiddleName and LastName column are enclosed in the <person> tag along with the alias we defined for individual columns.
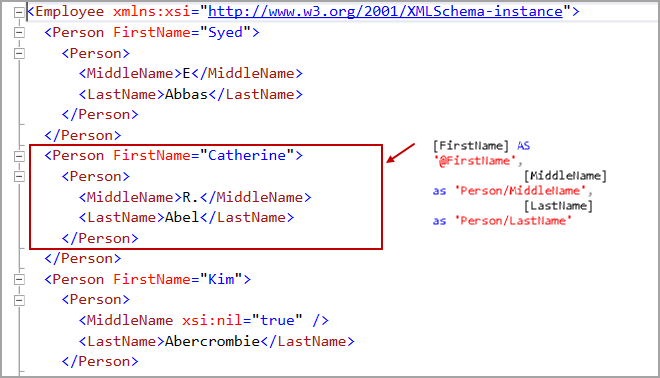
Let’s add a new column in the SELECT statement. We need to be careful in the order of the select statement.
The correct order is to use the new column after the alias columns.
|
1 2 3 4 5 |
SELECT TOP 5 [FirstName] AS '@FirstName', [MiddleName] AS 'Person/MiddleName', [LastName] AS 'Person/LastName', EmailPromotion FROM [AdventureWorks2017].[Person].[Person] FOR XML PATH('Person'), ROOT('Employee'), ELEMENTS XSINIL; |
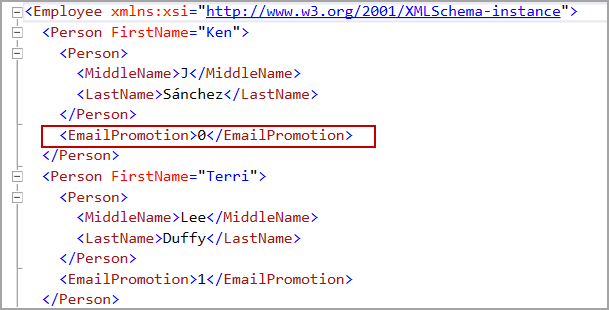
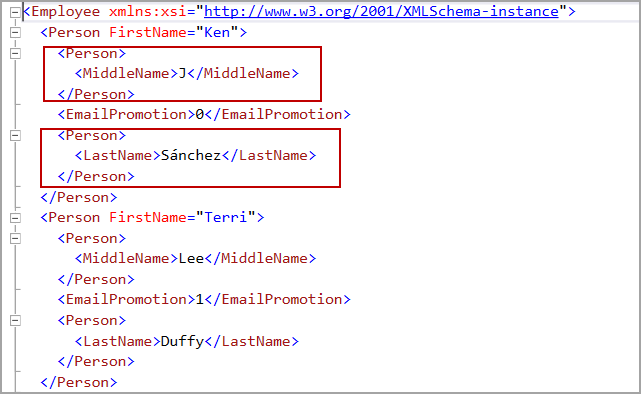
If we use this new column in between the alias columns, you still get the output, but it might complicate the XML as shown in the following screenshots.
|
1 2 3 4 5 |
SELECT TOP 5 [FirstName] AS '@FirstName', [MiddleName] AS 'Person/MiddleName', EmailPromotion, [LastName] AS 'Person/LastName' FROM [AdventureWorks2017].[Person].[Person] FOR XML PATH('Person'), ROOT('Employee'), ELEMENTS XSINIL; |
In this screenshot, we get different <person> meta tag for each column with the alias. It might make it complicated to interpret the XML, especially for large data sets.
Example 6: Use of the Wildcard character
We can use the wildcard character * with the FOR XML PATH as well. Once we specify a wildcard with a specific column, in the output, we get that column without the column name.
In the following query, we specified the wildcard character for all columns. In the output, we can see it does not return the column name in the XML.
|
1 2 3 4 |
SELECT TOP 5 [FirstName] "*", [MiddleName] "*", [LastName] "*" FROM [AdventureWorks2017].[Person].[Person] FOR XML PATH('Person'), ROOT('Employee'), ELEMENTS XSINIL; |

Let’s remove the wildcard character for the FirstName column.
|
1 2 3 4 |
SELECT TOP 5 [FirstName], [MiddleName] "*", [LastName] "*" FROM [AdventureWorks2017].[Person].[Person] FOR XML PATH('Person'), ROOT('Employee'), ELEMENTS XSINIL; |
In the output, you get the column name tag for the Firstname because it does not contain the wildcard character. For other columns, it does not give the column name tag.
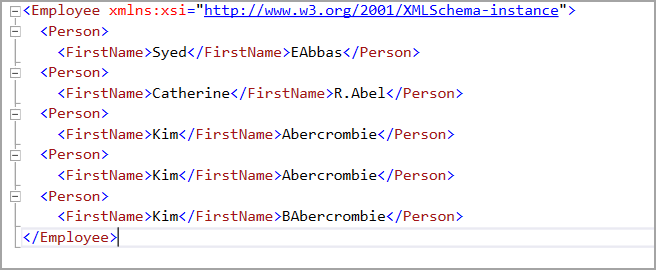
Similarly, in the below query, we use wildcard characters only for the Lastname column.
|
1 2 3 4 |
SELECT TOP 5 [FirstName], [MiddleName], [LastName] "*" FROM [AdventureWorks2017].[Person].[Person] FOR XML PATH('Person'), ROOT('Employee'), ELEMENTS XSINIL; |
You can notice the difference in the output. It does not show column name tags only for the LastName column because it contains the wildcard character.
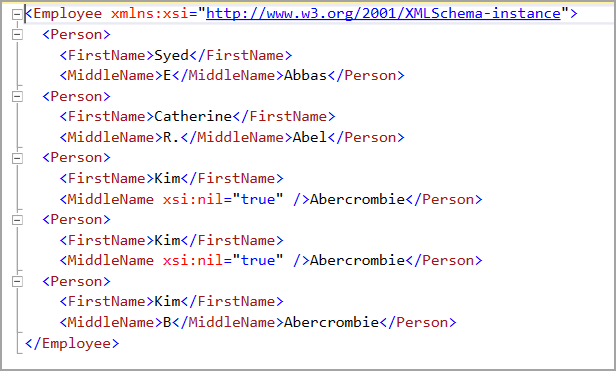
Example 7: Use of a XMLNAMESPACE for the XML output
We can use XMLNAMESPACE with the FOR XML PATH to declare a namespace and use it in the Select statements. In the following example, we specified XMLNAMESPACE. We call it in the select query.
|
1 2 3 |
WITH XMLNAMESPACES('SQLShack' as URL) SELECT 'https://www.sqlshack.com/' as 'URL' FOR XML PATH |
You get the following output with XMLNAMESPACE query.

Example 8: Create a comma-separated string using the FOR XML PATH clause
We can use FOR XML PATH to prepare a comma-separated string from the existing data. Let’s create an Authors table and insert a few records into it.
|
1 2 3 4 5 6 7 8 |
declare @Authors Table(ID int,AuthorName varchar(20)) Insert @Authors(ID,AuthorName) Values (1,'Rajendra'),(1,'Raj') ,(2,'Sonu'),(2,'Raju') ,(3,'Akshita'),(3,'Akshu') ,(4,'Kashish'),(4,'Kusum') select * from @Authors |
In the data, we can see we have an ID column and the AuthorName column. If we just select the records, it gives the output in the following format.
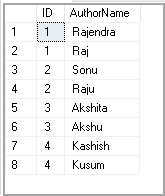
Assume, we need to combine the data based on the ID column and display list of authors in a comma-separated view.
We can use FOR XML PAH and get the output using the following query.
|
1 2 3 4 5 6 7 8 9 10 |
SELECT DISTINCT ID, ( SELECT SUBSTRING( ( SELECT ',' + AuthorName FROM @Authors WHERE ID = t.ID FOR XML PATH('')), 2, 200000) ) AS AuthorName FROM @Authors t; |
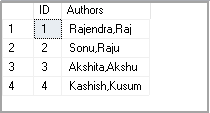
Alternatively, we can use the STUFF function in SQL Server along with the FOR XML PATH to retrieve the same result.
We use the STUFF function to replace a part of a string with substring at a specified position. The STUFF function makes it easy to write the above query and get the same result set.
|
1 2 3 4 5 6 7 8 9 |
SELECT DISTINCT ID, STUFF( ( SELECT ',' + AuthorName FROM @Authors A1 WHERE A1.ID = A2.ID FOR XML PATH('') ), 1, 1, '') AS Authors FROM @Authors A2; |
Conclusion
In this article, we demonstrated FOR XML PATH clause and its usage with different examples. We further learned to customize the XML output. If you have any comments or questions, feel free to leave them in the comments below.
- Understanding PostgreSQL SUBSTRING function - September 21, 2024
- How to install PostgreSQL on Ubuntu - July 13, 2023
- How to use the CROSSTAB function in PostgreSQL - February 17, 2023

