

Introduction
The SSIS Script Task is a very powerful component to use in a SSIS package, and most of the time you can achieve with it what you want. Still, I have faced a few situations where a Script Task was not the best solution. In those cases I made a .NET Console application and executed it from within a SSIS package.
Reasons you might want to do this also include:
- You want to use the functionality in multiple SSIS packages and do not want to copy (the code inside a) a Script Task over and over again.
- Your C# application becomes more complex than a single script, and developing it outside the SSIS package allows you to create it with a better structure (tiers, namespaces, classes).
- You do not want to (or company policy does not allow you to) register an .NET assembly in the Global Assembly Cache of a server on which SQL Server/SSIS is installed.
Both sides of the story: Console app and SSIS Package
To demonstrate you how this works I have to tell you both sides of the story: first how to develop your .NET console application to accept command line parameters and to return feedback and errors, and then how to call this console application in a SSIS Package and intercept the return code and (error) messages.
Side A: develop the .NET Console application
For developing the console application I used Visual Studio 2017 Community Edition.
As this post is not about any specific application, I have made a generic example, in which the console application (which I have called “ExampleConsoleApp”, sorry for that, no inspiration for a more interesting name) accepts three required string parameters and one optional boolean parameter.
If you want to rebuild the example, just follow the steps:
To create a new empty Console application in Visual Studio select File > New > Project from the menu. Then from the project templates, choose
Installed > Templates > Visual C# > Windows Classic Desktop > Console App (.NET Framework)
when using Visual Studio 2017 or
Installed > Templates > Visual C# > Windows > Classic Desktop > Console Application
when using Visual Studio 2015.
I’ll walk you through the code for the application, which is underneath. I have added a method CheckArgs which checks if the application is called with command line parameters. If not, a help text is shown for 30 seconds, that describes which command line parameters are required and optional.
Otherwise the application continues by parsing the command line parameters in method ParseArgs. Furthermore, the inline comment should help you to understand the concept. In the console application replace the entire contents of Program.cs by this (please note that at the bottom of the article a link will be provided to download all the source code):
|
1 2 3 4 5 6 7 8 9 10 11 12 13 14 15 16 17 18 19 20 21 22 23 24 25 26 27 28 29 30 31 32 33 34 35 36 37 38 39 40 41 42 43 44 45 46 47 48 49 50 51 52 53 54 55 56 57 58 59 60 61 62 63 64 65 66 67 68 69 70 71 72 73 74 75 76 77 78 79 80 81 82 83 84 85 86 87 88 89 90 91 92 93 94 95 96 97 98 99 100 101 102 103 104 105 106 107 108 109 110 111 112 113 114 115 116 117 118 119 120 121 122 123 124 125 126 127 128 129 130 131 132 133 134 135 136 137 138 139 140 141 142 143 144 145 146 147 148 149 150 151 152 153 154 155 156 157 158 159 160 161 162 163 164 165 166 167 168 169 170 171 172 173 174 175 176 177 178 179 180 181 182 183 184 185 186 187 188 189 190 191 192 193 194 195 196 197 198 199 200 201 202 203 204 205 206 207 208 209 210 211 |
using System; using System.Threading; namespace ExampleConsoleApp { class Program { /// <summary> /// Main is changed from a void (without returnvalue) to a method returning an int /// </summary> /// <param name="args"></param> /// <returns></returns> static int Main(string[] args) { if (!CheckArgs(args)) { return -2; } try { string param1 = string.Empty; string param2 = string.Empty; string param3 = string.Empty; bool param4 = true; ParseArgs(args, out param1, out param2, out param3, out param4); // TODO Add your own application logic here. // For the demo only. You can remove it: Console.WriteLine("(.. For debug only .. let's see what we've got ..)"); Console.WriteLine("==============================================="); Console.WriteLine("The following parameter values have been provided:"); Console.WriteLine("==============================================="); Console.WriteLine(string.Format("param1: {0}", param1)); Console.WriteLine(string.Format("param2: {0}", param2)); Console.WriteLine(string.Format("param3: {0}", param3)); Console.WriteLine(string.Format("param4: {0}", param4.ToString().ToLower())); Thread.Sleep(10000); // 10 seconds to read the output. // Force an error when param1 has a certain value. // This is for the demo only. You can remove it: if (param1 == "testerror") { int zero = 0; int i = 1 / zero; } // If the application has finished successfully, return 0 return 0; } catch (Exception ex) { // Write the error to the StandardError output. Console.Error.WriteLine(ex.ToString()); // Optionally write the error also to the StandardOutput output. Console.WriteLine(ex.ToString()); // Get the errorcode of the exception. // If it would be 0 (the code for success), just return -1. // Otherwise return the real error code. int errorCode = ex.HResult; return (errorCode == 0 ? -1: errorCode); } } /// <summary> /// Checks if the application is called with command line parameters. /// If not a message is shown on the command line for 30 seconds. /// A more detailed check of the command line arguments is done in private static void ParseArgs. /// </summary> /// <param name="args"></param> /// <returns></returns> private static bool CheckArgs(string[] args) { if (args.Length == 0) { Console.WriteLine("(.. You have 30 seconds to read this help text ..)"); Console.Error.WriteLine("==============================================="); Console.Error.WriteLine("This application needs command line parameters."); Console.Error.WriteLine("==============================================="); Console.Error.WriteLine("Required parameters:"); Console.Error.WriteLine("-param1, followed by the value of parameter 1"); Console.Error.WriteLine("-param2, followed by the value of parameter 2"); Console.Error.WriteLine("-param3, followed by the value of parameter 3"); Console.Error.WriteLine("Optional parameters:"); Console.Error.WriteLine("-param4, followed by the value of parameter 4. If not value provided, the default value 'true' will be used."); Console.Error.WriteLine("==============================================="); Console.Error.WriteLine("Example of use:"); Console.Error.WriteLine("ExampleConsoleApp.exe -param1 Value 1 with space -param2 Value2WithoutSpace -param3 Value 3 with space again -param4 false"); // Use Sleep, so that: // - if ran interactively, give time to read the message. // - if ran from SSIS Package, prevent that console application stays open and waits for user input (would be the case when using Console.ReadKey();) Thread.Sleep(30000); return false; } return true; } /// <summary> /// Parses the command line parameters. /// In a real console application you would give your parameters more /// meaningful names instead of numbering them as param1, param2, etcetera. /// </summary> /// <param name="args"></param> /// <param name="param1">Output parameter with value for param1.</param> /// <param name="param2">Output parameter with value for param2.</param> /// <param name="param3">Output parameter with value for param3.</param> /// <param name="param4">Output parameter with value for param4.</param> private static void ParseArgs(string[] args, out string param1, out string param2, out string param3, out bool param4) { // Set the parameter values to default values first. param1 = string.Empty; param2 = string.Empty; param3 = string.Empty; param4 = true; // In case a parameter value contains spaces, it is spread over multiple // elements in the args[] array. In this case we use lastArg to concatenate // these different parts of the value to a single value. string lastArg = string.Empty; // If the next parameter is not found, the value must be of lastArg. bool foundNext = false; // paramCount is used to check that all required parameter values are provided. int paramCount = 0; // Loop through the args[] array. for (int i = 0; i <= args.GetUpperBound(0); i++) { foundNext = false; // Create an if statement for each parameter that is provided on the command line. if (args[i].ToLower() == "-param1") { i++; paramCount++; foundNext = true; lastArg = "-param1"; // Check if there is a value, otherwise keep the default. if (i > args.GetUpperBound(0)) break; param1 = args[i]; } if (args[i].ToLower() == "-param2") { i++; paramCount++; foundNext = true; lastArg = "-param2"; // Check if there is a value, otherwise keep the default. if (i > args.GetUpperBound(0)) break; param2 = args[i]; } if (args[i].ToLower() == "-param3") { i++; paramCount++; foundNext = true; lastArg = "-param3"; if (i > args.GetUpperBound(0)) break; param3 = args[i]; } if (args[i].ToLower() == "-param4") { i++; // Optional parameter, so do not count it! paramCount++; foundNext = true; lastArg = "-param4"; // Check if there is a value, otherwise keep the default. if (i > args.GetUpperBound(0)) break; param4 = (args[i].ToLower() == "true" ? true : false); } if (!foundNext) { // In case a parameter value contains spaces, it is spread over multiple elements in the args[] array. // In this case we use lastArg to concatenate these different parts of the value to a single value. switch (lastArg) { case "-param1": param1 = string.Format("{0} {1}", param1, args[i]); break; case "-param2": param2 = string.Format("{0} {1}", param2, args[i]); break; case "-param3": param3 = string.Format("{0} {1}", param3, args[i]); break; // -param4 is not listed here because it is a boolean // so spaces in the value should not occur. default: break; } } } if (paramCount < 3) { string message = string.Format("Invalid arguments provided: {0}", String.Join(" ", args)); throw new ArgumentException(message); } } } } |
In Visual Studio select menu option Build > Build Solution or Rebuild Solution. Copy the ExampleConsoleApp.exe and ExampleConsoleApp.exe.config files from the bin subfolder to a folder of your choice. I used C:\Temp.

Side B: develop the SSIS Package
In the SSIS Package we use an Execute Process Task to execute our example console application. There are a few different ways to handle the execution result (return code) of the console application, which I will show you in a minute.
But first, execute the following steps:
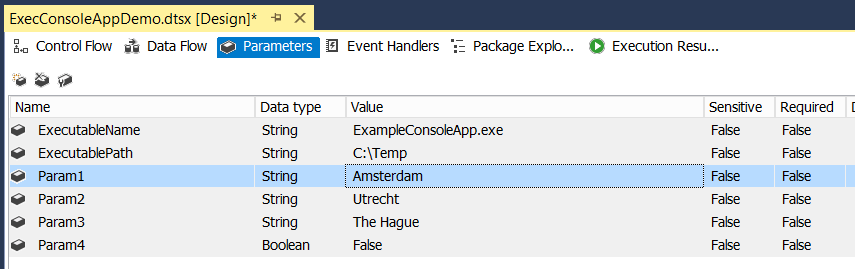
Step 1 – Add parameters
Add a number of parameters to the package: ExecutableName, ExecutablePath, Param1, Param2, Param3 and Param4, as shown in the picture below. Optionally this can also be variables, when the values do not need to be configurable after the SSIS package is deployed.
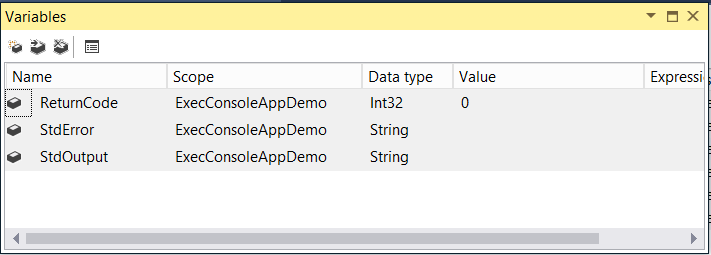
Step 2 – Add variables
Add a number of variables to the package: ReturnCode, StdError and StdOutput, as shown in the picture below. These variables are needed to store the information- and error messages and execution result of the console application.
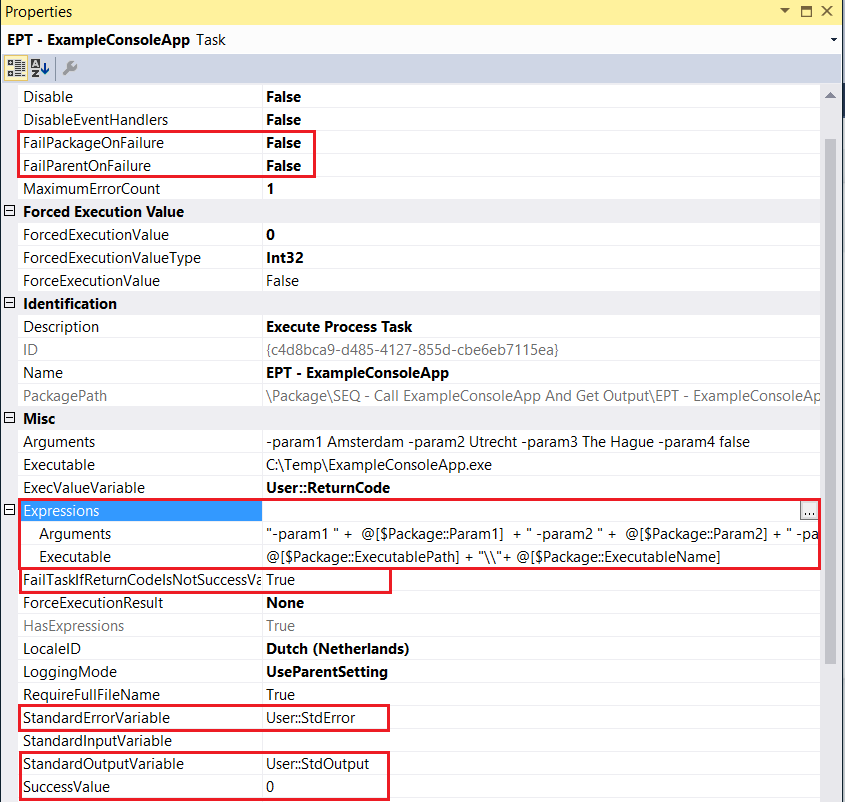
Step 3 – Add an Execute Process Task to the Control Flow
Add a Execute Process Task and configure its properties as follows:
| Property | Value |
| FailPackageOnFailure | False |
| FailParentOnFailure | False |
| Expressions – Arguments | “-param1 ” + @[$Package::Param1] + ” -param2 ” + @[$Package::Param2] + ” -param3 ” + @[$Package::Param3] + ” -param4 ” + LOWER((DT_WSTR, 5)@[$Package::Param4]) |
| Expressions – Executable | @[$Package::ExecutablePath] + “\\”+ @[$Package::ExecutableName] |
| ExecValueVariable | User::ReturnCode |
| StandardErrorVariable | User::StdError |
| StandardOutputVariable | User::StdOutput |
| SuccessValue | 0 |
| FailTaskIfReturnCodeIsNotSuccessValue | True |
The final result should look as follows:
Step 4 – Handle the console application return code and proceed with the package
Now you can use an Execute SQL Task or a Script Task to do something with the ReturnCode, StdError or StdOutput values. This is optional. If you do not intend to use the values of StdError or StdOutput, for instance for logging, no extra task is needed.
Handle the error – option A
Add a Script Task.
Add the following variables to the ReadyOnlyVariables list:
User::ReturnCode,User::StdError,User::StdOutput
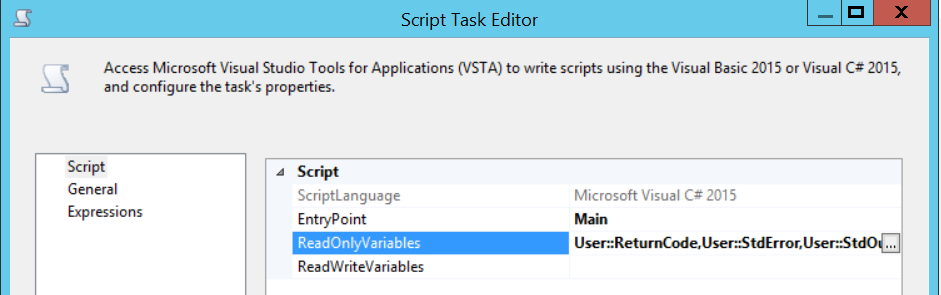
Then add this code to public void Main()
|
1 2 3 4 5 6 7 8 9 10 11 12 13 14 15 16 17 18 |
string errorOutput = Dts.Variables["User::StdError"].Value.ToString(); string standardOutput = Dts.Variables["User::StdOutput"].Value.ToString(); int returnCode = int.Parse(Dts.Variables["User::ReturnCode"].Value.ToString()); // Check for the returnCode is not strictly necessary because the returnCode will // be not equal to 0. This is defensive programming, and the same script would also // work when it is executed after successful execution of the console app. if (returnCode == 0) { Dts.TaskResult = (int)ScriptResults.Success; } else { // Add code to do something with the values of errorOutput and optionally standardOutput, e.g. logging. Dts.TaskResult = (int)ScriptResults.Failure; } |
Handle the error – option B
Add an Execute SQL Task.
Configure the Parameter mapping as shown in the picture below:
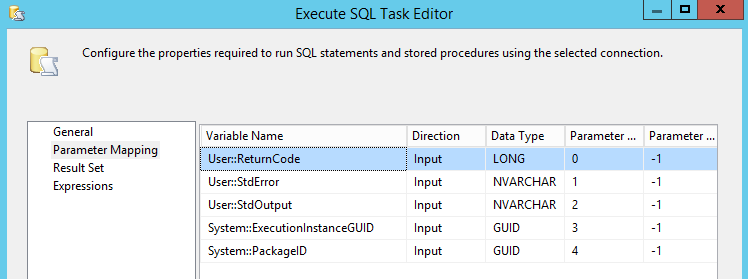
On the General pane, make sure SQLSourceType is set to Direct input.
Add a connection, for the demo it does not really matter to which database.
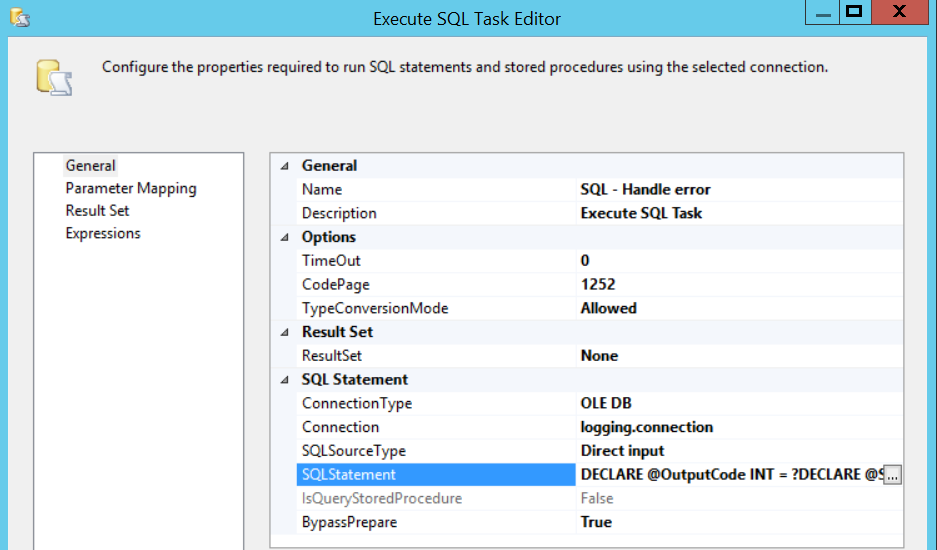
Edit the SQLStatement by pasting the code below:
|
1 2 3 4 5 6 7 8 9 10 11 12 13 14 15 16 17 18 19 20 21 22 23 24 25 26 27 28 29 30 31 32 33 34 35 36 37 |
DECLARE @OutputCode INT = ? DECLARE @StdError NVARCHAR(MAX) = ? DECLARE @StdOutput NVARCHAR(MAX) = ? DECLARE @ExecutionGuid uniqueidentifier = ? DECLARE @SourceGuid uniqueidentifier = ? DECLARE @Event sysname = 'OnError' DECLARE @Source nvarchar(1024) = 'ExecConsoleAppDemo_B' DECLARE @StartTime datetime2(7) = GETUTCDATE() DECLARE @EndTime datetime2(7) = GETUTCDATE() DECLARE @MessageClass tinyint = 1 DECLARE @RetentionClass tinyint = 1 DECLARE @Message nvarchar(2048) -- Just a simple example of logging the return code and standard error output (using my plug and play logging solution): IF @OutputCode != 0 BEGIN SET @StdError = @StdError + N' (return code ' + CONVERT(NVARCHAR, @OutputCode) + N')' ; SELECT @Message = LEFT(@StdError, 2048); EXECUTE [logdb].[log].[spAddLogEntry] @Event ,@Source ,@SourceGuid ,@ExecutionGuid ,@StartTime ,@EndTime ,@MessageClass ,@RetentionClass ,@Message RAISERROR(@StdError, 16, 1); END |
The end result should be similar to this:
Finally the demo package should look as follows when a Script Task is used ..
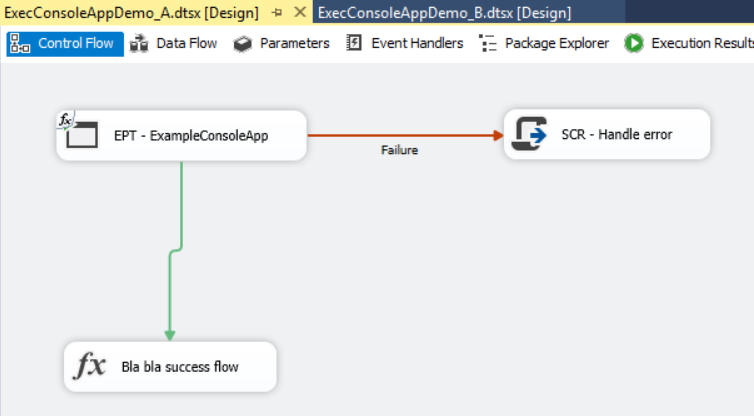
.. or as follows when a Execute SQL Task is used:

We still have time for a little demo ..
I will just run the package with the Execute SQL Task, because it contains the code for logging, so we can check the error message later. As you might have noticed in the code snippets, if Param1 is given the value testerror, a divide by zero error will occur, as it is deliberately programmed in the console app.
So let’s run the package with this parameter value and see the error occur!

The expected error occurs ..
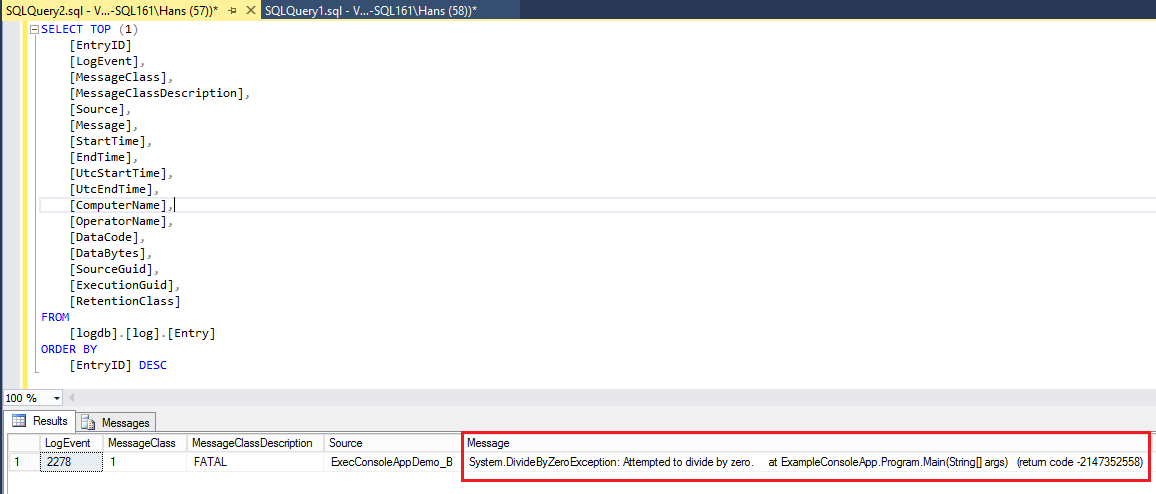
… and yes, it is the error that occurred in the console application and which was added to the error output stream of the console application.
Conclusion / Wrap up
In this blog post I explained:
- Why it can sometimes be useful to execute a console application instead of using a Script Task in a SSIS package.
- How you can create your own C# console application that can be executed with command line parameters.
- How this console application can be executed from within a SSIS Package.
- How the Return Code, Standard Error and Standard Output streams can be captured in SSIS Variables.
- How these variables can be used in a Script Task or an Execute SQL Task.
Downloads
Download the source code of the examples here:
Resources on the web
- Execute Process Task Editor (Process Page) on docs.microsoft.com
- Command-Line Arguments (C# Programming Guide) on MSDN
- A Plug and Play Logging Solution (blog post on hansmichiels.com)
- Related: SSIS and PowerShell – Execute process task (on SQLShack)

He works in the software industry since 1996, with SQL Server since the year 2001, and since 2008 he has a primary focus on data warehouse and business intelligence projects using Microsoft technology, preferably a Data Vault and Kimball architecture.
He has a special interest in Data warehouse Automation and Metadata driven solutions.
* Certified in Data Vault Modeling: Certified Data Vault 2.0 Practitioner, CDVDM (aka Data Vault 1.0)
* Certified in MS SQL Server: MCSA (Microsoft Certified Solutions Associate) SQL Server 2012, - MCITP Business Intelligence Developer 2005/2008, MCITP Database Developer 2005/2008, MCITP Database Administrator 2005/2008
His web site and blog is at www.hansmichiels.com, where you can find other contact and social media details.
View all posts by Hans Michiels
- Executing your own .NET console application from SSIS - April 24, 2017
- How to mimic a wildcard search on Always Encrypted columns with Entity Framework - March 22, 2017
- Temporal Table applications in SQL Data Warehouse environments - March 7, 2017