
Considering BI environment, when comparing Multidimensional Vs Tabular model databases, both of them have their own advantages and purpose in data analytics and business intelligence.
The best way to learn about SSAS Tabular model databases is to perform research, experiment a bit and build one, yourself. In this article, we’ll do just that and I’ll provide detailed information on building simple and modestly populated Tabular database for testing/personal usage.
1. Requirements
SQL Server 2012 or higher, with installed Analysis Services instance in Tabular mode
Quick note: In SQL Server 20xx installation, Analysis Services instance deploys Multidimensional mode by default.
SQL Server Data Tools (SSDT) 2013 or higher
Deployed AdventureWorksDW sample database 2012 version or higher (this article regards the 2014 version) as data source
SQL Server Management Studio (SSMS) 2014 or higher;
2. Creating a blank project in SSDT
To start building a Tabular model database, the first step is to create a project file (Analysis Services Tabular Project), giving the name to the project (in this article, it is MyFirstTabularDatabase), define the custom location or leave the default, and the Solution name will be the same as the name of the project, by default.
Note: The solution name can be defined independently from the project name.
After that, this dialog will appear:
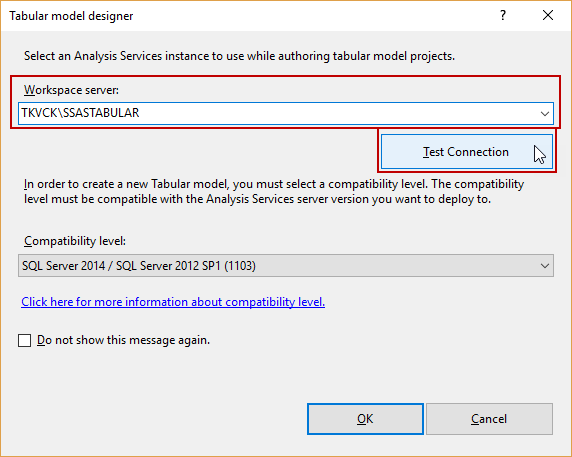
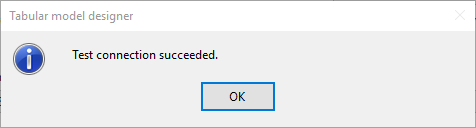
The exact name of the SSAS Tabular instance must be input into the Workspace server text field, otherwise, it won’t be possible to create a project. To make sure the connection is valid, press ‘Test Connection’ button. After validation, if successful, message states:
Also, the Compatibility level must comply with installed version of Analysis Services instance.
When a blank project file is made, the environment looks like this:
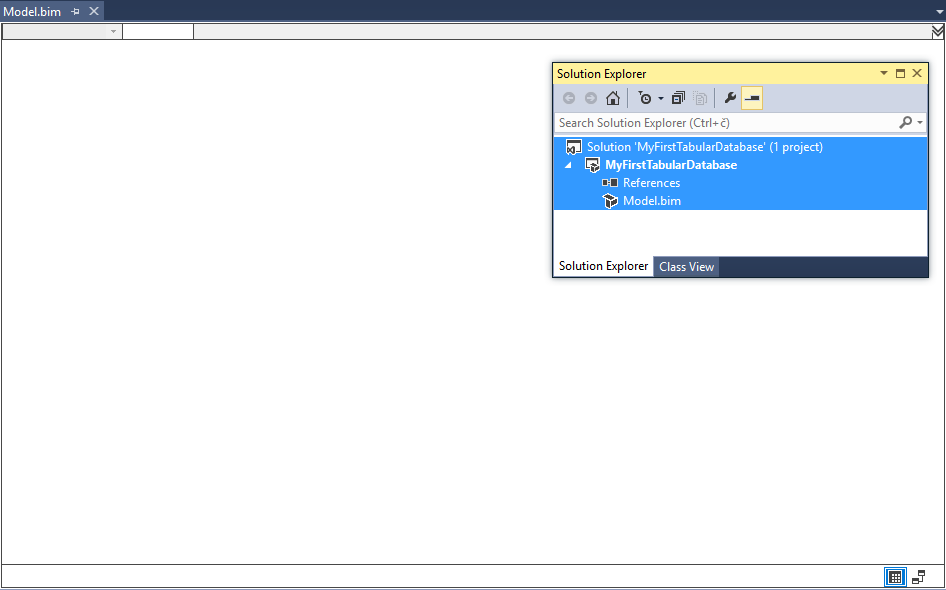
The most important part of this project is Model.bim, which is the skeleton of the future SSAS Tabular model database. In further steps, this file will be populated with necessary elements and, in the end, deployed into Analysis Services instance.
Note: Because of certain number of steps and actions, every change performed should be saved with Save All (instead of Save)
3. Importing data into the SSAS Tabular model database
To begin, populate the Tabular model; importing data into the project is the next step. That means selecting the data source (mentioned in Requirements), as a preparation, rename and filter objects (tables) within data source and import prepared tables into the model.
Select the option ‘Import from Data Source’, placed in Model menu, and Table Import Wizard shows. In this article, the source connection will be Microsoft SQL Server.
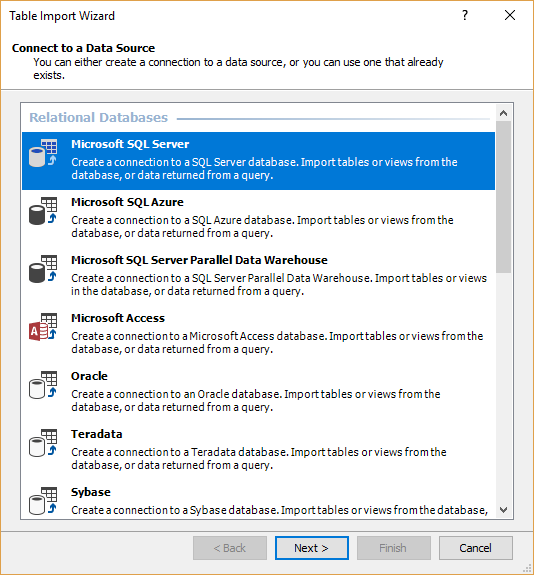
Info: There are numerous internal and external sources besides mentioned (Oracle, Teradata databases etc.), and that is one of the advantages of deploying and using SSAS Tabular databases, compared with only-internal OLE DB sources support for Multidimensional model databases.
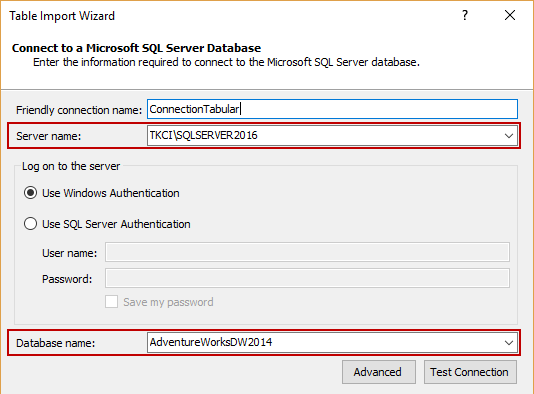
In the Server name text field, select the proper Database Engine instance, where data source is deployed. After selecting, the list of databases will appear in Database name drop-down menu. This connection must be also validated.
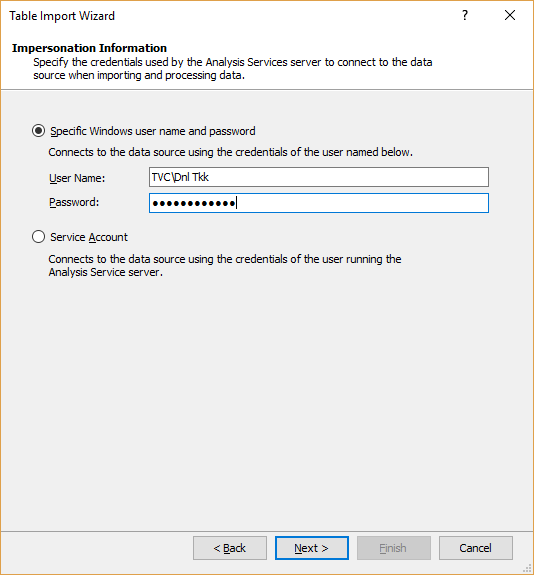
Note: This article will use Windows authentication, although there is option to select Service Account. This method is Impersonation.
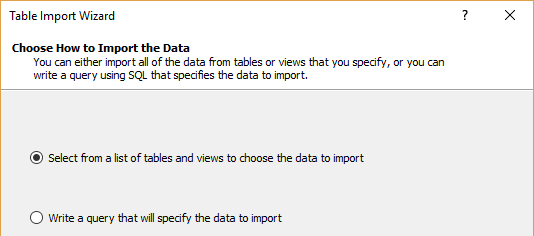
In picture above, there are two methods of importing data, through querying the tables (intermediate knowledge of T-SQL is required) or selecting from the tables list (easier and used in this article).
3.1. Filtering and renaming the tables
Next step is filtering and renaming the necessary tables from the data source, and finalizing the process of data importing:
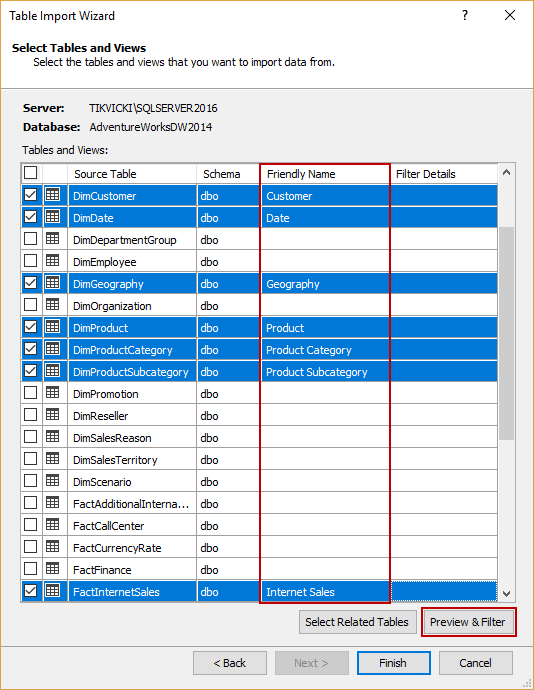
Check the tables as shown in the picture (tables are selected for illustrating reasons). Renaming tables performs by double-clicking particular cells in Friendly Name column; in the other words, simplifying the table names, de-normalizing, in sense of CamelCase or pascalCase normalization.
All of the selected tables must check with Preview & Filter function:
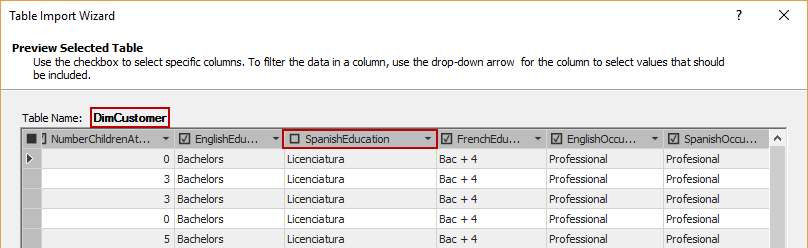
As shown in this picture above, the table DimCustomer needs filtering (the friendly name for this table will be applied later), by unchecking the redundant columns. In this case, the redundant columns are related to translated columns that resembles the column e.g. EnglishEducation (like SpanishEducation, HebrewDescription etc.). This applies for all of the tables, separately. The purpose of filtering is reducing the size of the future Tabular database, which will improve its performance.
Table FactInternetSales (with Friendly Name Internet Sales) needs removal of particular columns: OrderDateKey, DueDateKey, ShipDateKey.
Important notice: Until the tables are reviewed, properly renamed and filtered, ‘Finish’ button should not be pressed, because there will be a lot of redundant data, and the Tabular model database itself may be larger than expected.
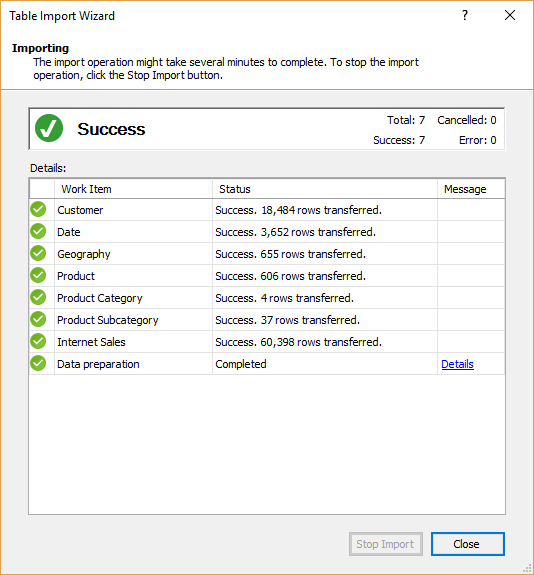
After clicking ‘Finish’, and importing process is done, this information should appear:
Troubleshoot: if error occurs, check the Impersonation option again, and make sure that Windows authentication credentials are valid, or provide the necessary Login object within AW2014 database.
3.2. Renaming the columns and verifying a Date dimension table
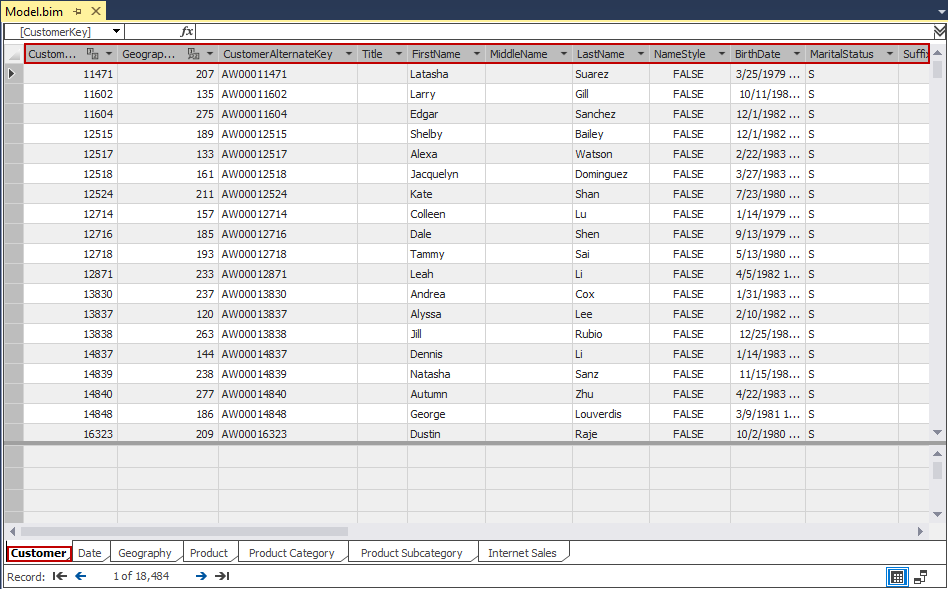
After renaming and importing the tables into Model.bim, the columns in these tables also must get the Friendly Names. Imported tables are placed in tabs, as shown in the picture.
Perform these steps in order to correctly rename all columns in every table:
Renaming of the columns is performing by double-clicking the header of the particular column (as shown in the picture), or by change the Column Name field in Properties (column FirstName -> First Name e.g.).
Columns that contain “-Key” in title should be changed with “Id” (CustomerAlternateKey -> Customer Alternate Id, e.g.)
Some of the columns must get specific names:
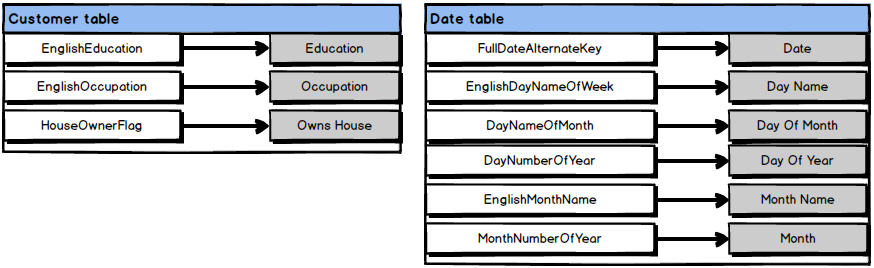
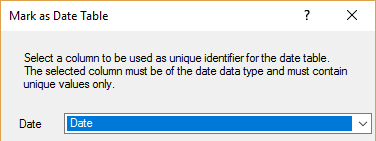
Note: FullDateAlternateKey column in Date table must get title “Date”, because if doesn’t, the structure of the Tabular model database will be compromised.
While renaming of the columns is in process, creation of the Date dimension table can also take place. Make sure that Data type of Date column (formerly FullDateAlternateKey) is like shows in Properties:

After that, select the Date column (if not checked) and click the option Mark as Date table (in Table menu). Make sure that column as a unique identifier is Date in following dialog:
At this moment, there are now populated Tabular model databases with a verified Date dimension table.
Next steps are creating the particular elements of Tabular database: Relationships, Calculated column, Measures, KPIs, Perspective, Hierarchies, Partitions, administrative Role, and finally, deploy the SSAS Tabular model database.
4. Creating the specific elements of SSAS Tabular model database
For certain steps in process, it is necessary to switch to Diagram View (Model View option in Model menu), as shown in picture below:

Note: there are two small icons in the right-down corner, for switching these two views
4.1 Creating Relationships
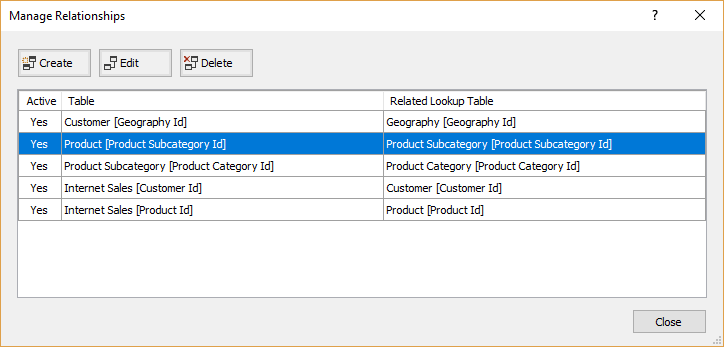
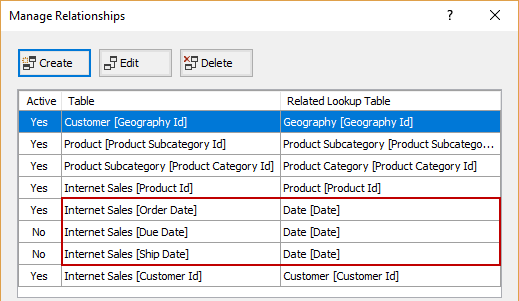
Notice that some relationships already exists in this table, and they must be checked through Manage Relationships option (in Table menu):
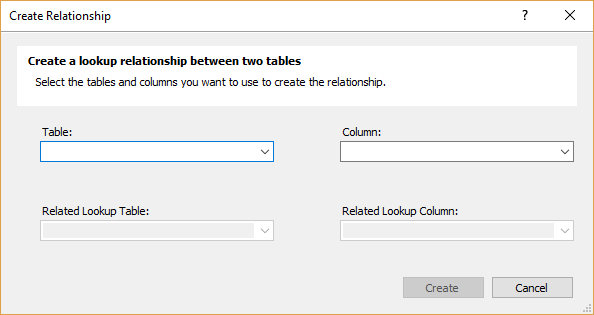
If some of these relationships are missing, add them within Manage Relationships modal dialog, clicking the Create button, where the related tables and columns define:
or with drag-and-drop method, as shown:
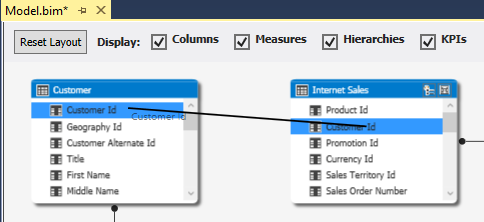
Note: the particular column must be selected at first, and then dragged to related column.
With the chosen method, create three new relationships, in this particular order (tables are with bigger font, and columns are with smaller):
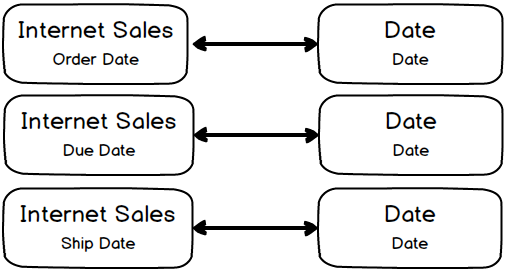
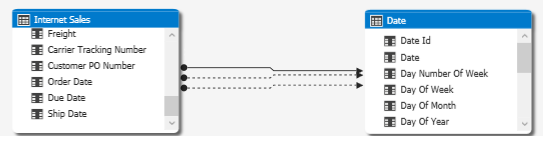
After creating these relationships, one full and two dotted line will appear (because of specified order):
Verify that all of the relationships are here:
4.2. Adding Calculated column
To add a Calculated column, select back the Data View, instead of Diagram View. Create a new column in Date table, as shown in picture:
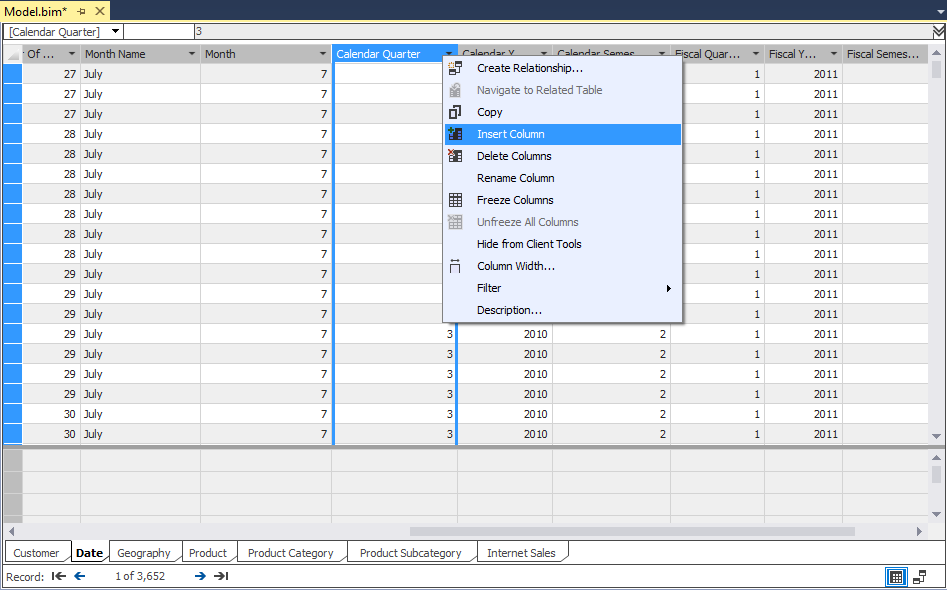
The “Calculated Column 1” will appear on the left, and then input the formula (all of the formulas present in the article are the simple DAX formulas), as shown:


The populated column should appear when finished with input, and rename the column into Month Calendar.
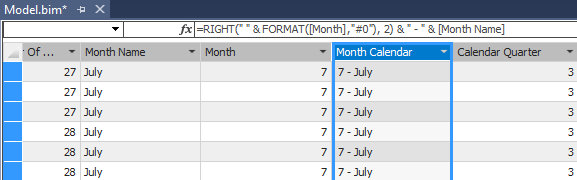
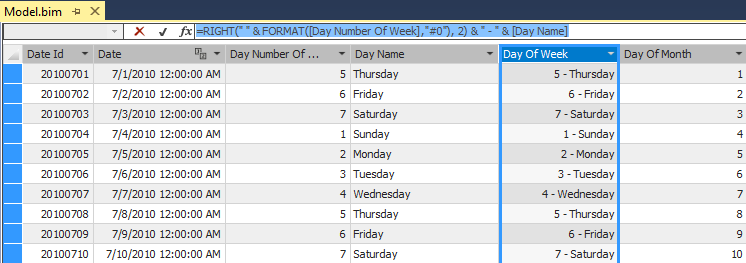
After this, create Day of Week calculated column, with repeating previous steps on Day of Month column:

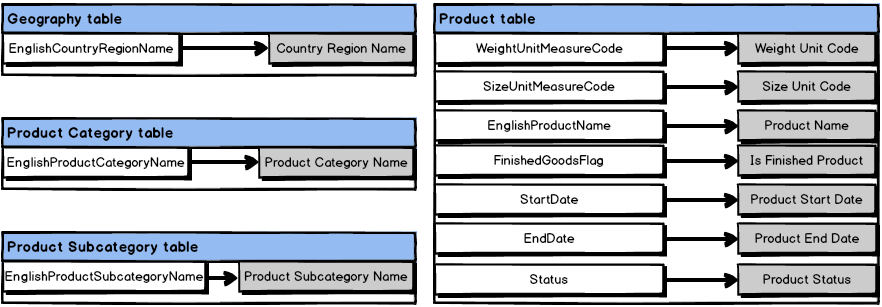
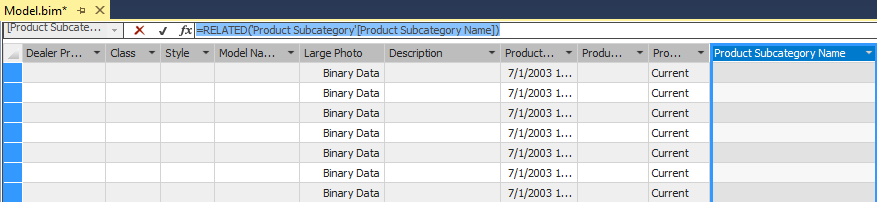
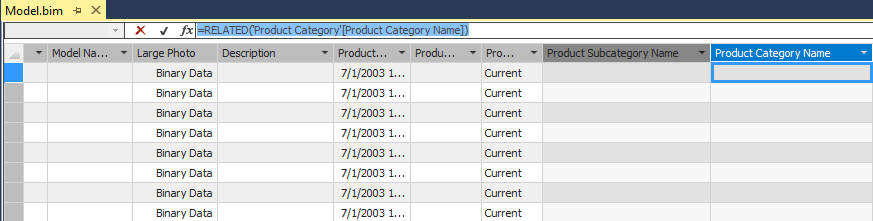
In Product table, create two calculated columns, with corresponding formulas:
Product Subcategory Name:

Product Category Name:

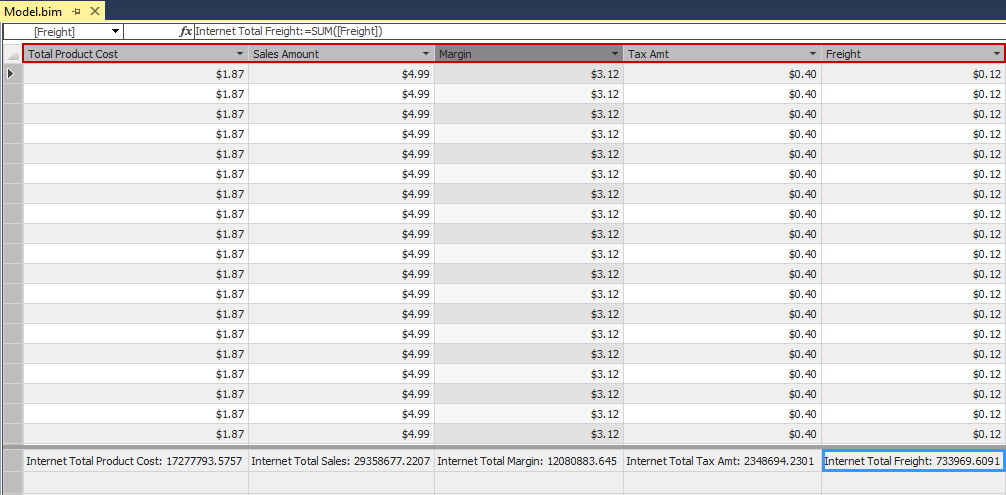
In Internet Sales table, create Margin calculated column, besides Tax Amt column:
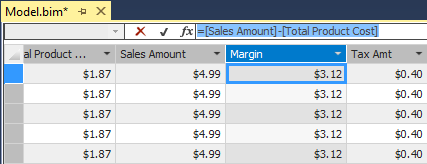

Note: The reason for this particular placing of calculated columns is because of related data between the columns
4.3. Adding Measures
To add measures, Measures grid should be enabled (grey table area) beneath every selected table:
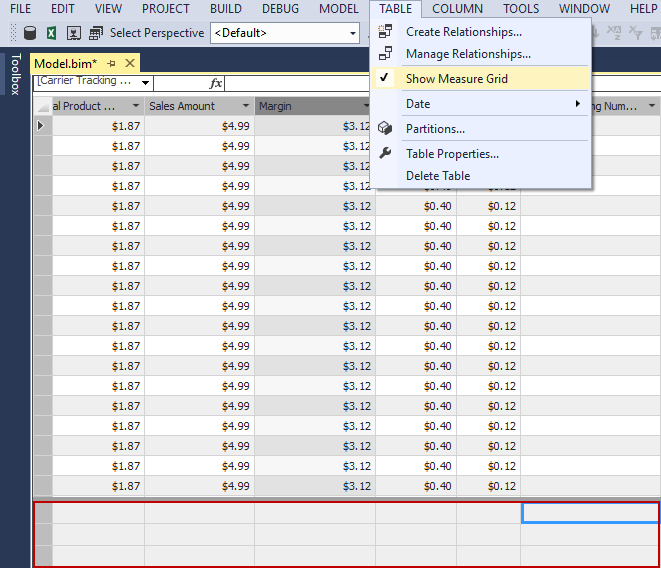
Then, click the single cell in Measures grid, and specify an input in the formula bar – the measure will be created.
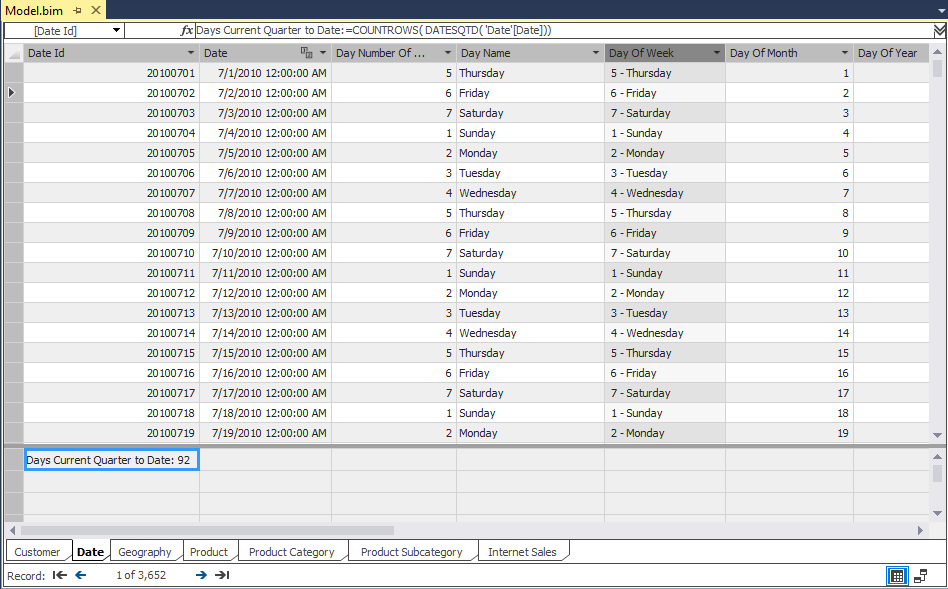
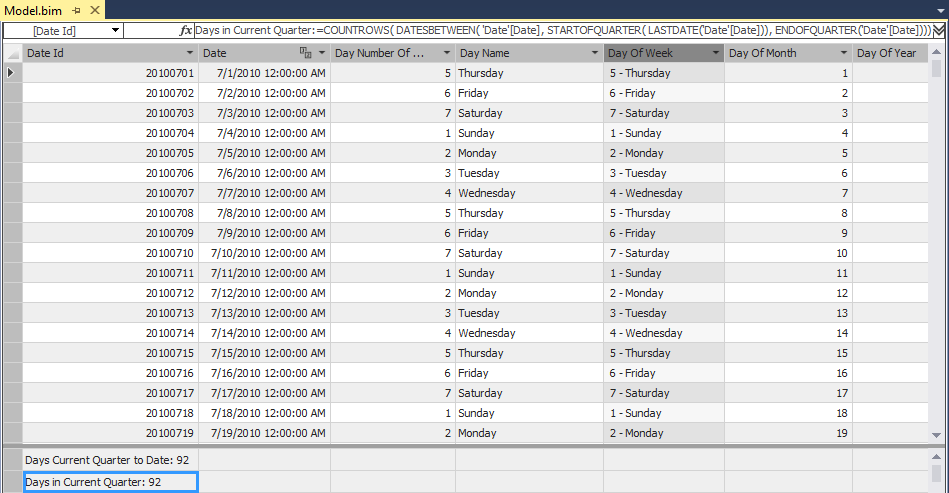
This is Days Current Quarter to Date measure, as shown in picture:

Note: The following steps share all of the formulas for the measures, in all tables.
Create one more measure in the Date table, Days in Current Quarter, with corresponding formula, placed under the previous measure:

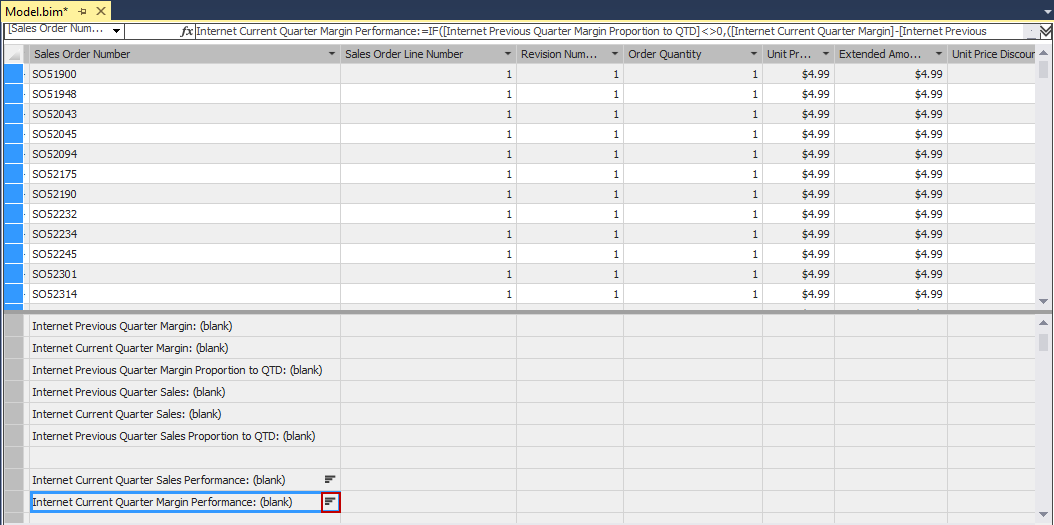
In the Internet Sales table, several measures will be created, with performing the following steps:
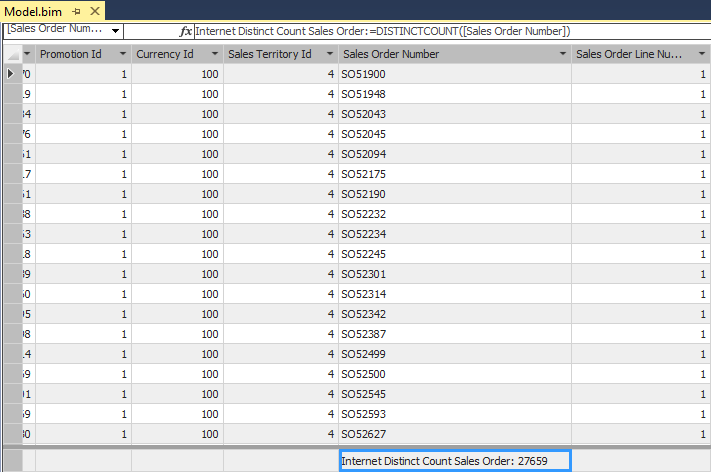
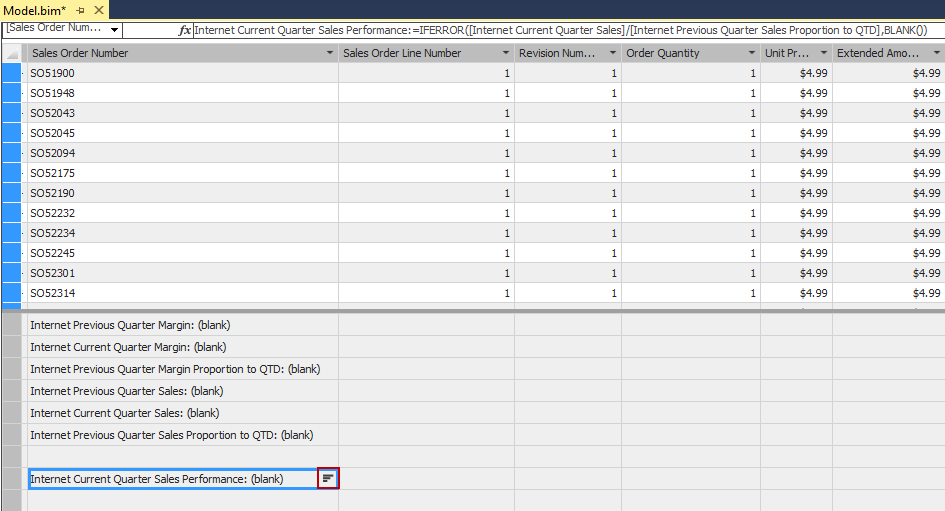
Click a cell in the measure grid beneath Sales Order Number, and apply the following formula, as shown:

-
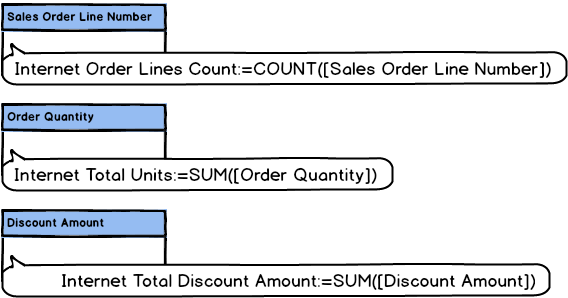
Under particular column, apply related formulas in specified order into the empty measures grid cells beneath:


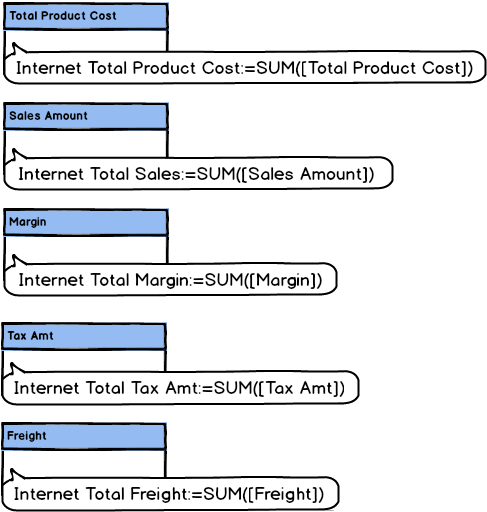
These measures can be created anywhere in the grid, but still in the particular order:


4.4. Creating KPI
To create KPIs, use the same method as for creating measure (any cell in the measure grid), with this input in formula bar:

Then, right-click on created measure and select Create KPI.

Apply the values as seen on picture:

After creating this Key Performance Indicator, the icon should appear in the cell for verification:
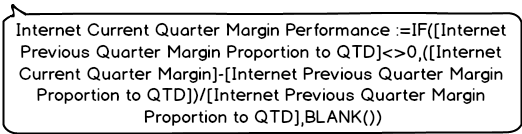
Create one more KPI, repeating method from the previous one, with this formula:
Apply these values, as shown:
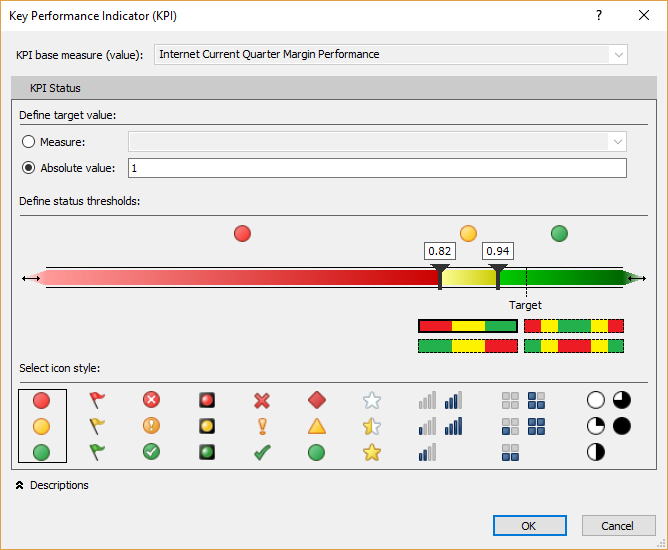
Verify that the second KPI is present:
4.5. Creating Perspective
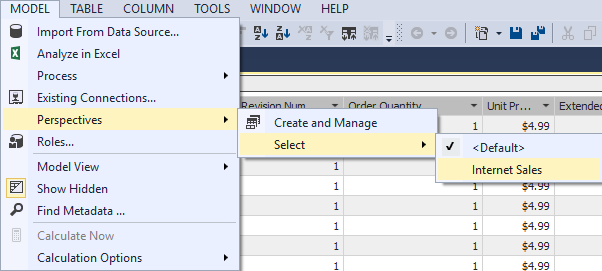
For this database, create one Perspective, titled Internet Sales, through Create and Manage option (in Model ➜ Perspectives menu)
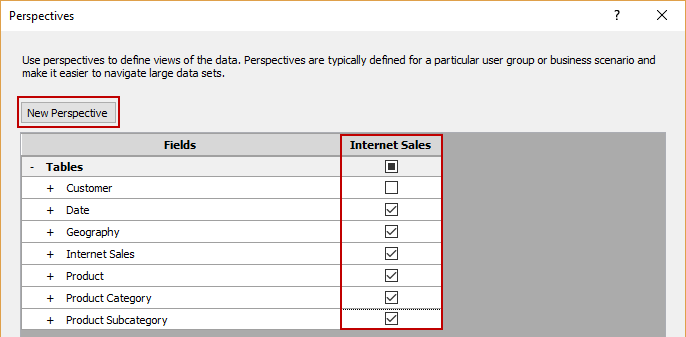
As displayed, select all tables except Customer. After that, verify that Perspective is present:
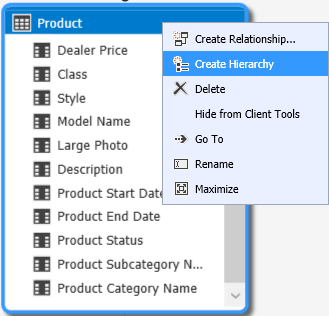
4.6. Creating Hierarchies
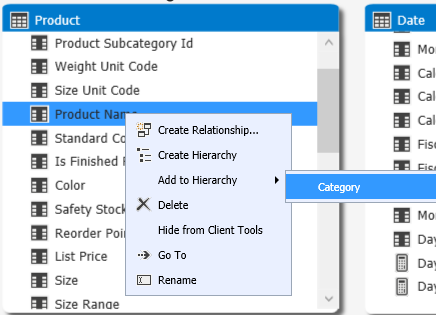
First, change the environment to the Diagram View. Create the first Hierarchy with right-click on the table Product, like shown:
Title the hierarchy as Category, right-click the following columns and add them to this hierarchy in specified order: Product Category Name, Product Subcategory Name, Model Name and Product Name:
After addition, rename the columns in Category hierarchy as seen in the picture (with a double-click on it). The table should look like this:
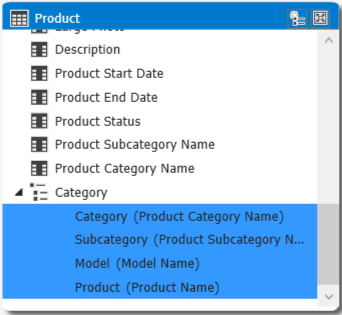
Note: Renamed columns still have old titles in brackets
Create Calendar hierarchy in Date table, and add columns, following the order:
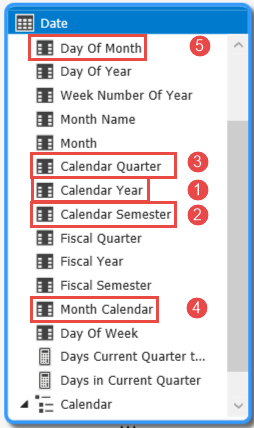
Rename the columns after addition, as displayed:
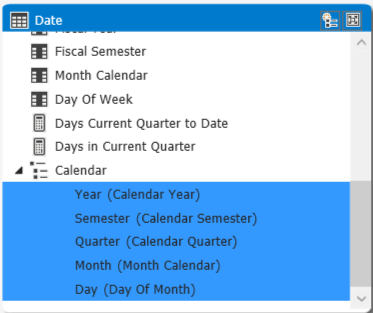
Create also the Fiscal and Product Calendar hierarchies, repeating the previous methods:
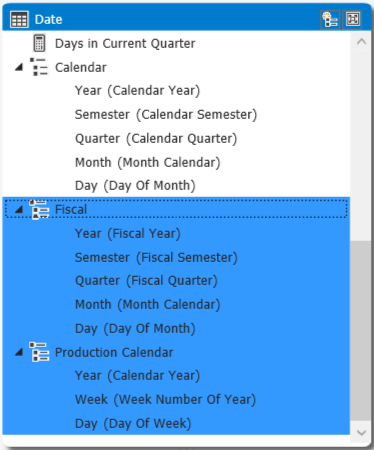
Note: Pay attention to the order of columns addition, and don’t forget to rename after addition
4.7. Creating Partitions
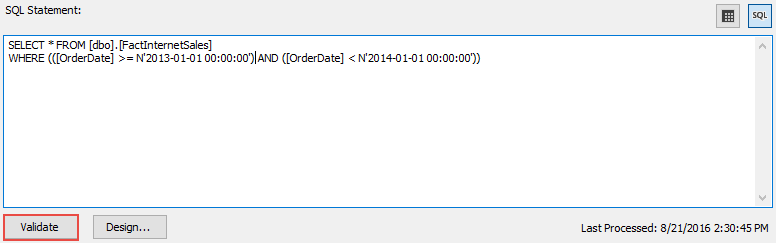
To create Partitions, select the Internet Sales table, and select the Partitions option (in Table menu). Check the Table (that Internet Sales is selected) and customize Partition name (add ‘2013’).

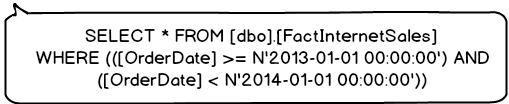
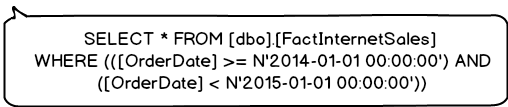
After that, click the ‘SQL’ button, add the following T-SQL code into the text box, and validate the code:
Confirmation message should appear ( ), otherwise make sure the code is typed without errors.
Copy the existing partition, change its name, and change the particular part of the code, in order to create Internet Sales 2014 partition:
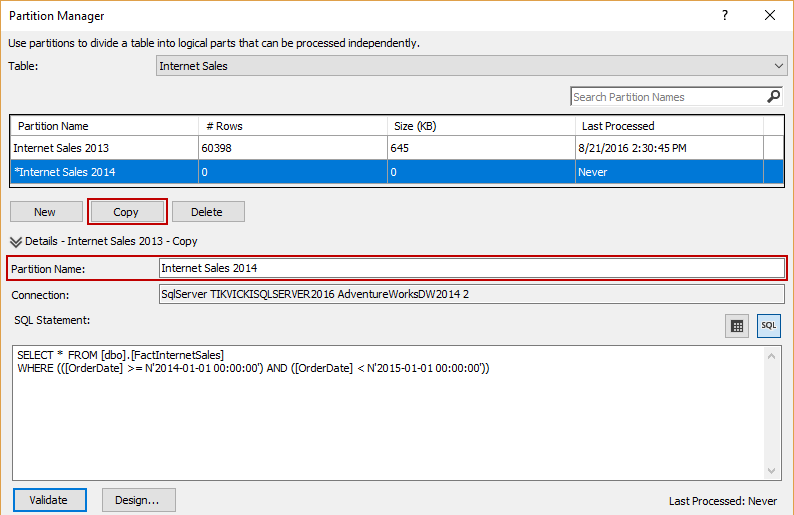
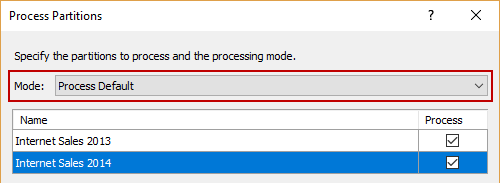
After input, the partitions must be processed:
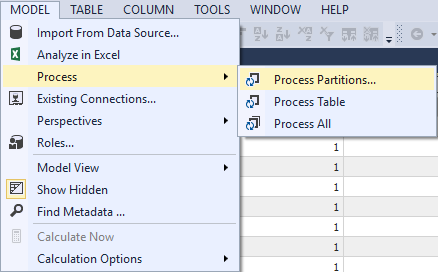
Select default mode and confirm the dialog:
Impersonation Credentials dialog will appear, input the necessary fields. After that, this should show:
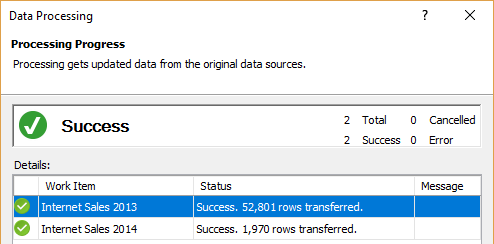
Note: Use the credentials which are previously input in Impersonation information
4.8. Creating Role
Create the Administrator role, by selecting Roles… (in Model menu):
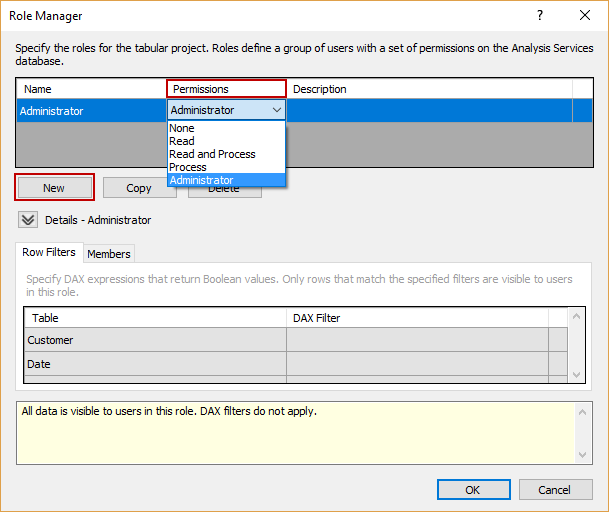
Set the permission of the role to Administrator (as shown).
Note: For making sure that Tabular database will be fully accessible, add the current Windows user within Members tab:

5. Deploying the Tabular model
Finally, deploy the Tabular model database into the Analysis Services instance.
Right-click on the project in the Solution Explorer, select Properties, and change the marked fields, as shown:
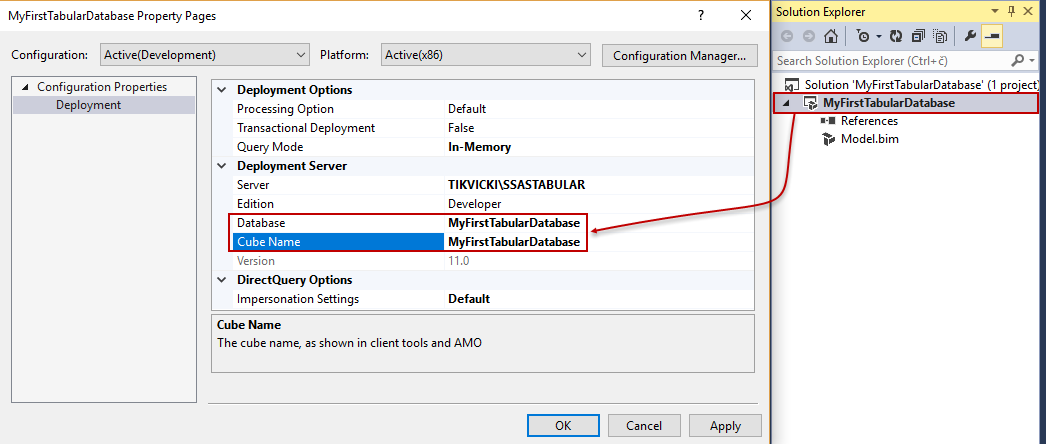
Also, verify that the server instance for deploying is correct.
Note: Database and Cube Name can be customized, just make sure to name it properly, using CamelCase normalization.
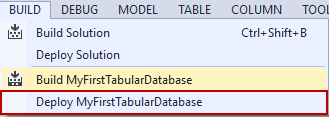
Build the database first, and then, deploy it:
This message should appear after deploying process:

To make sure that new SSAS Tabular model database is deployed, check for it in SSMS. After connecting on Analysis Services Tabular instance, select the new database (for this time, the Tabular database in this article is named ‘AW Tabular’), and query it. This docked window should appear:
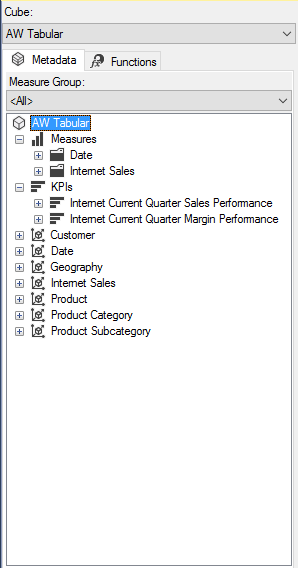
As can be seen, all of the elements are here. That means: a new, fresh Tabular model database is ready to roll!

Daniel is currently working for ApexSQL LLC as Software sales engineer where he specializes for the BI environment.
- How to monitor the SQL Server tempdb database - July 6, 2017
- How to monitor total SQL Server indexes size - June 12, 2017
- How to set and use encrypted SQL Server connections - May 8, 2017