

There are often situations I want to test a piece of software or the latest version of SQL Server for a proof of concept, maybe even the new Power BI Report Server. I could install these locally, where I’ve likely got previous SQL installs or an already burgeoning system. You could be lucky that you have access to Virtual Machines that you can build out for the task. Now add a few hours to setup Windows or even just the applications themselves. Those VMs may be in Azure, or AWS, now add a few £’s or $’s every time you want to work on something. Did you remember to turn them off?
I’d like to show you a PowerShell solution to that problem. AutomatedLab is a set of PowerShell modules that you can use to create and manage a group of virtual machines in Hyper-V. Depending on your requirements, you could have a script for a single VM with SQL Server installed, all the way to a full Active Directory domain with a domain controller, file Server, SQL Server etc. A full set of AD accounts, sample DBs, and installed tools automatically deployed. You can then delete the full “Lab” with a single command.
I’ll run through what’s required to build a few different SQL lab configurations with some custom additions. There’s also a great getting started guide & a wealth of information over on the AutomatedLab Wiki page to get you started & carry you further too.
Prerequisites
You can install Hyper-V as a feature if you have Windows 10 Professional or Enterprise, otherwise, you’ll need a Windows Server or Hyper-V Server to deploy your VMs to. You can use the AutomatedLab module in Azure but that is a topic for another post.
Installing Hyper-V on Windows 10
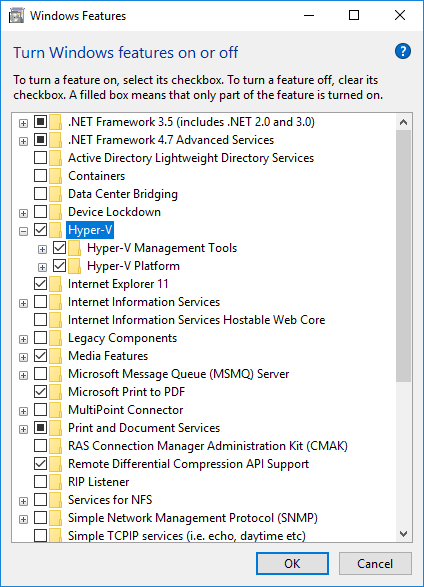
From the Control Panel, search for or navigate to Turn Windows features on or off. Check the Hyper-V feature to install all sub-features & click OK. You’ll likely need your install media for this
Once you’ve installed the Hyper-V feature you can follow the Installation guide on the GitHub Wiki
The installation MSI contains everything you need to get started, including some sample scripts to give you an idea of what’s possible.
Alternatively, you can install the PowerShell module using the following command:
|
1 2 3 |
Import-Module AutomatedLab |
This won’t give you all the required folder structures, sample scripts and post-Installation scripts so you’re best using the MSI.
Getting Started
Once you’ve installed the AutomatedLab components you can continue to their Getting Started guide for what you need next but to summarize, we need to get the software & operating systems we want to use inside the VMs.
If you’re not lucky enough to have a TechNet subscription you can pick up Evaluation copies for everything we need from Microsoft’s evaluation center
Unfortunately, your version choices are often limited to recent releases here. I.e. SQL Server 2014, 2016 & 2017 RTM. Here are the direct links to get us started with Windows Server 2016 & SQL Server 2016:
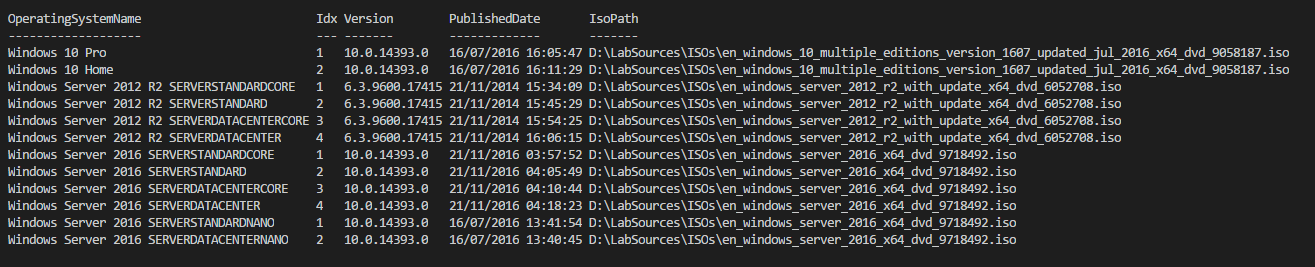
Once you have these ISO files, place them in the LabSources\ISOs folder. You can test these ISOs have been picked up by AutomatedLab using the following command (described in their wiki), replacing the drive letter with your own relevant one:
|
1 2 3 |
Get-LabAvailableOperatingSystem -Path D:\LabSources |
The output will look something like this:
Using your own databases
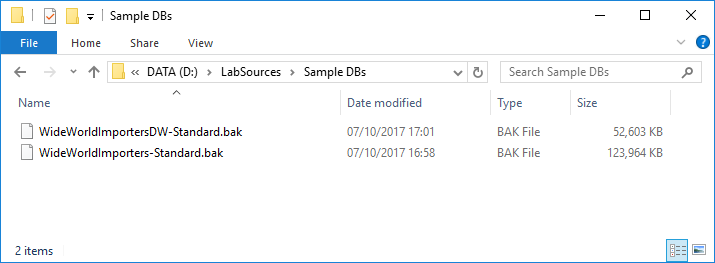
AutomatedLab has the functionality to install the AdventureWorks sample databases with some post-installation steps but to demonstrate how to do it with your own databases I’ll use the new WorldwideImporters database & Data Warehouse.
The first thing we want to do is to prepare our sample databases. I’ve used the Worldwide Importers database & data warehouse but this may be where you want to reference your own databases.
Method 1
The first method I use for this requires a beta version of AutomatedLab (4.3.1) as a small bug in the Send-ModuleToPSSession was blocking the use of the dbatools module. If you update to 4.3.1 using this Beta MSI you can then execute the rest to deploy your databases.
Once you’ve updated the version, you can run the following code block to move & restore the databases with dbatools.
|
1 2 3 4 5 6 7 8 9 10 |
#Copy DBs to VM Copy-LabFileItem -Path 'D:\LabSources\Sample DBs\' -ComputerName ($LabName + "SQL2") -DestinationFolderPath C:\ #Move dbaTools module to Server Send-ModuleToPSSession -Module (Get-Module -Name dbatools -ListAvailable) -Session (New-LabPSSession -ComputerName ($LabName + "SQL2")) -IncludeDependencies #Invoke dbatools command Invoke-LabCommand -ActivityName 'Restore DBs' -ScriptBlock { Restore-DbaDatabase -SqlServer $env:COMPUTERNAME -Path C:\Sample DBs\ } -ComputerName ($LabName + "SQL2") -PassThru |
Method 2
This is just a workaround for the bug described above & simply involves giving the target lab server internet access to install the module directly from the PowerShell Gallery.
First, we create the Virtual switch, connected to our Ethernet port:
|
1 2 3 |
Add-LabVirtualNetworkDefinition -Name External -HyperVProperties @{ SwitchType = 'External'; AdapterName = 'Ethernet' } |
Then we add this to our machine definition
|
1 2 3 4 5 |
$netAdapter = @() $netAdapter += New-LabNetworkAdapterDefinition -VirtualSwitch $labName $netAdapter += New-LabNetworkAdapterDefinition -VirtualSwitch External -UseDhcp |
We then add the -NetworkAdapter flag to our Add-LabMachineDefinition command:
|
1 2 3 |
Add-LabMachineDefinition -Name $sql1 -Memory 2GB -Roles SQLServer2016 -NetworkAdapter $netAdapter |
This will attach a second network connection to the machine you create, allowing Internet access. Our Database restore script block above is then altered to install dbatools from the PowerShell Gallery like so:
|
1 2 3 4 5 6 7 8 9 10 |
#Copy DBs to VM Copy-LabFileItem -Path 'D:\LabSources\Sample DBs\' -ComputerName $sql1 -DestinationFolderPath C:\ #Install dbaTools module on Server Invoke-LabCommand -ActivityName 'Install dbatools' -ScriptBlock { Install-Module -Name dbatools -ErrorAction SilentlyContinue } -ComputerName $sql1 -PassThru #Invoke dbatools command Invoke-LabCommand -ActivityName 'Restore DBs' -ScriptBlock { Restore-DbaDatabase -SqlServer $env:COMPUTERNAME -Path C:\Sample DBs\ } -ComputerName $sql1 -PassThru |
With this method, you will be prompted twice, to accept the installation of PowerShellGet and install dbatools from an untrusted source (PowerShell Gallery). To prevent the second warning change its InstallationPolicy value by running the Set-PSRepository cmdlet on the target Lab server.

Method 3
An alternative is to simply run the dbatools command directly from your local machine. This would require passing a SQL credential though which we have not setup as part of the lab creation but this could be created manually via SQL Server Management Studio. You would then execute this command from the host machine:
|
1 2 3 4 |
$sql1 = 'SQLServerName' Restore-DbaDatabase -SqlServer $sql1 -Path 'C:\Sample DBs' -SqlCredential NewLogin |
For all methods, I have created a folder where my database backups are stored.
We can then add these database steps to the main Lab creation code. For these lab scripts, I have used the second Method, to retrieve the dbatools module from the PowerShell Gallery as it’s the easiest to demonstrate and doesn’t require the beta version of the module.
A Basic Lab
The quickest way to get up & running is to just create a single SQL Server Lab:
Internet Connected Lab:
|
1 2 3 4 5 6 7 8 9 10 11 12 13 14 15 16 17 18 19 20 21 22 23 24 25 26 27 28 29 30 31 32 33 34 35 36 37 38 39 40 41 42 43 44 45 46 47 48 49 50 51 52 53 54 55 56 57 58 59 60 61 62 63 |
#---------------------------------------- # Author: Craig Porteous # Date: 20/10/2017 # This creates a basic SQL Lab & restores # Sample DBs using the dbatools module #---------------------------------------- # Prerequisites #---------------------------------------- # Install dbatools module locally # > Install-Module dbatools #---------------------------------------- #Define the Lab name $labName = 'BasicLab' #create an empty lab template and define where the lab XML files and the VMs will be stored New-LabDefinition -Name $labName -DefaultVirtualizationEngine HyperV #Define the network range Add-LabVirtualNetworkDefinition -Name $labName #Define an External, Internet connection Add-LabVirtualNetworkDefinition -Name External -HyperVProperties @{ SwitchType = 'External'; AdapterName = 'Ethernet' } #Set installation user Set-LabInstallationCredential -Username pInstall -Password Somepass1 #Read all ISOs in the LabSources folder and add the SQL 2014 ISO Add-LabIsoImageDefinition -Name SQLServer2016 -Path $labSources\ISOs\en_sql_server_2016_standard_with_service_pack_1_x64_dvd_9540929.iso #defining default parameter values, as these ones are the same for all the machines $PSDefaultParameterValues = @{ 'Add-LabMachineDefinition:Network' = $labName 'Add-LabMachineDefinition:ToolsPath'= "$labSources\Tools" 'Add-LabMachineDefinition:OperatingSystem' = 'Windows Server 2016 SERVERSTANDARD' } #Define Network adapter $netAdapter = @() $netAdapter += New-LabNetworkAdapterDefinition -VirtualSwitch $labName $netAdapter += New-LabNetworkAdapterDefinition -VirtualSwitch External -UseDhcp #Create VM $sql1 = ($LabName + "SQL1") Add-LabMachineDefinition -Name $sql1 -Memory 2GB -Roles SQLServer2016 -NetworkAdapter $netAdapter Install-Lab Show-LabDeploymentSummary -Detailed #Copy DBs to VM Copy-LabFileItem -Path 'D:\LabSources\Sample DBs\' -ComputerName $sql1 -DestinationFolderPath C:\ #Move dbaTools module to Server #Send-ModuleToPSSession -Module (Get-Module -Name dbatools -ListAvailable) -Session (New-LabPSSession -ComputerName $sql1) -IncludeDependencies #Install dbaTools module on Server Invoke-LabCommand -ActivityName 'Install dbatools' -ScriptBlock { Install-Module -Name dbatools -ErrorAction SilentlyContinue } -ComputerName $sql1 -PassThru #Invoke dbatools command Invoke-LabCommand -ActivityName 'Restore DBs' -ScriptBlock { Restore-DbaDatabase -SqlServer $env:COMPUTERNAME -Path C:\Sample DBs\ } -ComputerName $sql1 -PassThru |
The creation of this Basic lab took just under 25 minutes to complete (on my Windows 10 laptop), meaning you can execute the script and get on with something else while your lab is being created.
Domain Lab
We can make our lab more complex by creating a dummy domain, giving us the ability to use domain accounts & test AD security without impacting your company or organisation’s Active Directory accounts. I’ll also create 2 SQL servers and restore the sample database to SQL1 and the sample Data Warehouse to SQL2.
|
1 2 3 4 5 6 7 8 9 10 11 12 13 14 15 16 17 18 19 20 21 22 23 24 25 26 27 28 29 30 31 32 33 34 35 36 37 38 39 40 41 42 43 44 45 46 47 48 49 50 51 52 53 54 55 56 57 58 59 60 61 62 63 64 65 66 67 68 69 70 71 72 73 74 75 76 77 78 79 |
#---------------------------------------- # Author: Craig Porteous # Date: 16/10/2017 # This creates a domain with 2 SQL Servers # & restores Sample DBs using the dbatools # module #---------------------------------------- # Prerequisites #----------------------------------- # Install dbatools module locally # > Install-Module dbatools #----------------------------------- #Define the Lab name $labName = 'DomainLab' #Domain based on Lab name $domainName = "$labName.com" #create an empty lab template and define where the lab XML files and the VMs will be stored New-LabDefinition -Name $labName -DefaultVirtualizationEngine HyperV #Define the network range Add-LabVirtualNetworkDefinition -Name $labName #Define an External, Internet connection Add-LabVirtualNetworkDefinition -Name External -HyperVProperties @{ SwitchType = 'External'; AdapterName = 'Ethernet' } #Set installation user Set-LabInstallationCredential -Username pInstall -Password Somepass1 #Create domain definition with the domain admin account Add-LabDomainDefinition -Name $domainName -AdminUser pInstall -AdminPassword Somepass1 #Read all ISOs in the LabSources folder and add the SQL 2014 ISO Add-LabIsoImageDefinition -Name SQLServer2016 -Path $labSources\ISOs\en_sql_server_2016_standard_with_service_pack_1_x64_dvd_9540929.iso #defining default parameter values, as these ones are the same for all the machines $PSDefaultParameterValues = @{ 'Add-LabMachineDefinition:Network' = $labName 'Add-LabMachineDefinition:ToolsPath'= "$labSources\Tools" 'Add-LabMachineDefinition:DomainName' = $domainName 'Add-LabMachineDefinition:OperatingSystem' = 'Windows Server 2016 SERVERSTANDARD' } #the first machine is the root domain controller. Everything in $labSources\Tools gets copied to the machine's Windows folder Add-LabMachineDefinition -Name ($LabName + "DC1") -Memory 512MB -Roles RootDC #Define Network adapter $netAdapter = @() $netAdapter += New-LabNetworkAdapterDefinition -VirtualSwitch $labName $netAdapter += New-LabNetworkAdapterDefinition -VirtualSwitch External -UseDhcp #Create VM $sql1 = ($LabName + "SQL1") Add-LabMachineDefinition -Name $sql1 -Memory 2GB -Roles SQLServer2016 -NetworkAdapter $netAdapter #Create VM $sql2 = ($LabName + "SQL2") Add-LabMachineDefinition -Name $sql2 -Memory 2GB -Roles SQLServer2016 Install-Lab Show-LabDeploymentSummary -Detailed #Copy DBs to SQL1 VM Copy-LabFileItem -Path 'D:\LabSources\Sample DBs\' -ComputerName $sql1 -DestinationFolderPath C:\ Copy-LabFileItem -Path 'D:\LabSources\Sample DWs\' -ComputerName $sql1 -DestinationFolderPath C:\ #Install dbaTools module on SQL1 Invoke-LabCommand -ActivityName 'Install dbatools' -ScriptBlock { Install-Module -Name dbatools -ErrorAction SilentlyContinue } -ComputerName $sql1 -PassThru #Restore Database on SQL1 Invoke-LabCommand -ActivityName 'Restore DBs' -ScriptBlock { Restore-DbaDatabase -SqlServer $env:COMPUTERNAME -Path 'C:\Sample DBs' } -ComputerName $sql1 -PassThru #Restore Data Warehouse DB on SQL2 from SQL1 Invoke-LabCommand -ActivityName 'Restore DWs' -ScriptBlock { Restore-DbaDatabase -SqlServer $sql2 -Path 'C:\Sample DWs' } -Variable (Get-Variable -Name sql2) -ComputerName $sql1 -PassThru |
At the end of the Domain Lab, I am only connecting _SQL1 to the internet. This is where I am executing the Restore command to both servers.
More Complex Solutions
From this basic domain lab, we can start getting more complex. The sample scripts provided with the AutomatedLab install demonstrate examples for adding dummy AD accounts, subdomains, file servers, exchange servers, etc. We can setup several SQL Servers to demonstrate High availability scenarios for example.
References
- AutomatedLab Github
- AutomatedLab Wiki
- Microsoft’s Eval Center
- Windows Server 2016 Evaluation
- SQL Server 2016 Evaluation
- AutomatedLab v4.3.1 on GitHub
- dbaTools

View all posts by Craig Porteous
- How to secure Reporting Services with Group Managed Service Accounts (GMSA) - November 7, 2018
- Contribute, contribute, contribute! - June 20, 2018
- Top 10 things you must document in SQL Server Reporting Services (SSRS) - February 26, 2018