
Introduction
A few days back I encountered an interesting challenge. The client wanted to have copies of the nightly backups of the transactional databases restored on a warehouse server, to be utilized to update the warehouse.
The over all process
Prior to the pushing the daily backup to the warehouse server, the previous days restore is deleted. The important point being that the “SQLShackFinancial” database is no longer present on the warehouse server. Having been deleted, downloading of the backup file begins and the restore of the current backup version begins. Normal warehouse processing then ensues and so the cycle continues.
The interesting part of the challenge was to automate the restore process and to have the SQL Server Agent run the job each morning at 3:00 AM. This is what we shall be looking at in today’s “get together”.
Let’s get started.
Getting Started
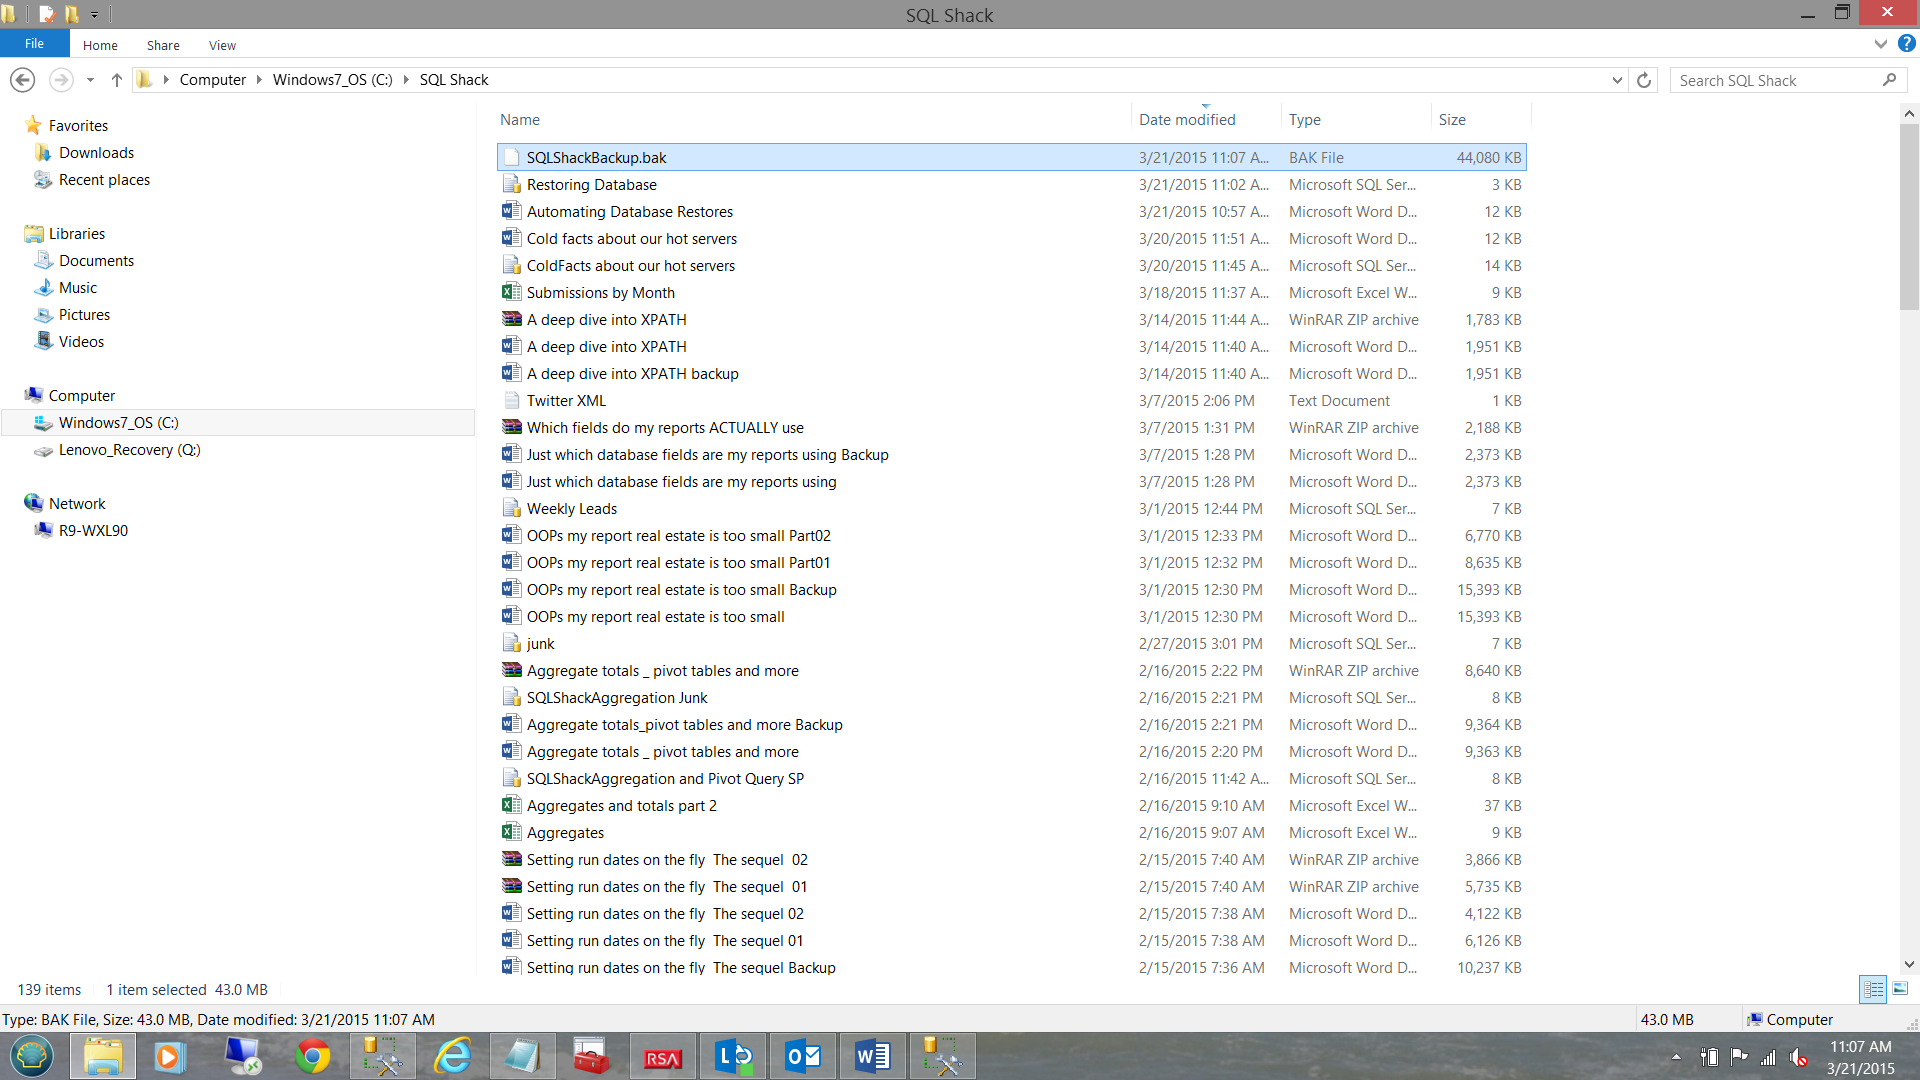
To begin, we require a bit of knowledge of the backup that we have been charged to restore. In our case, it is the “SQLShackFinancial.bak” backup and the backup has been placed at the following location.
We begin by opening SQL Server Management Studio and opening a new query.

We create a small temporary table which will hold the incoming backup’s properties and respective values, thus insuring that the restored database is exactly similar to the copy on the production server. We also create a variable called @path which will contain the path to the backup (see below).
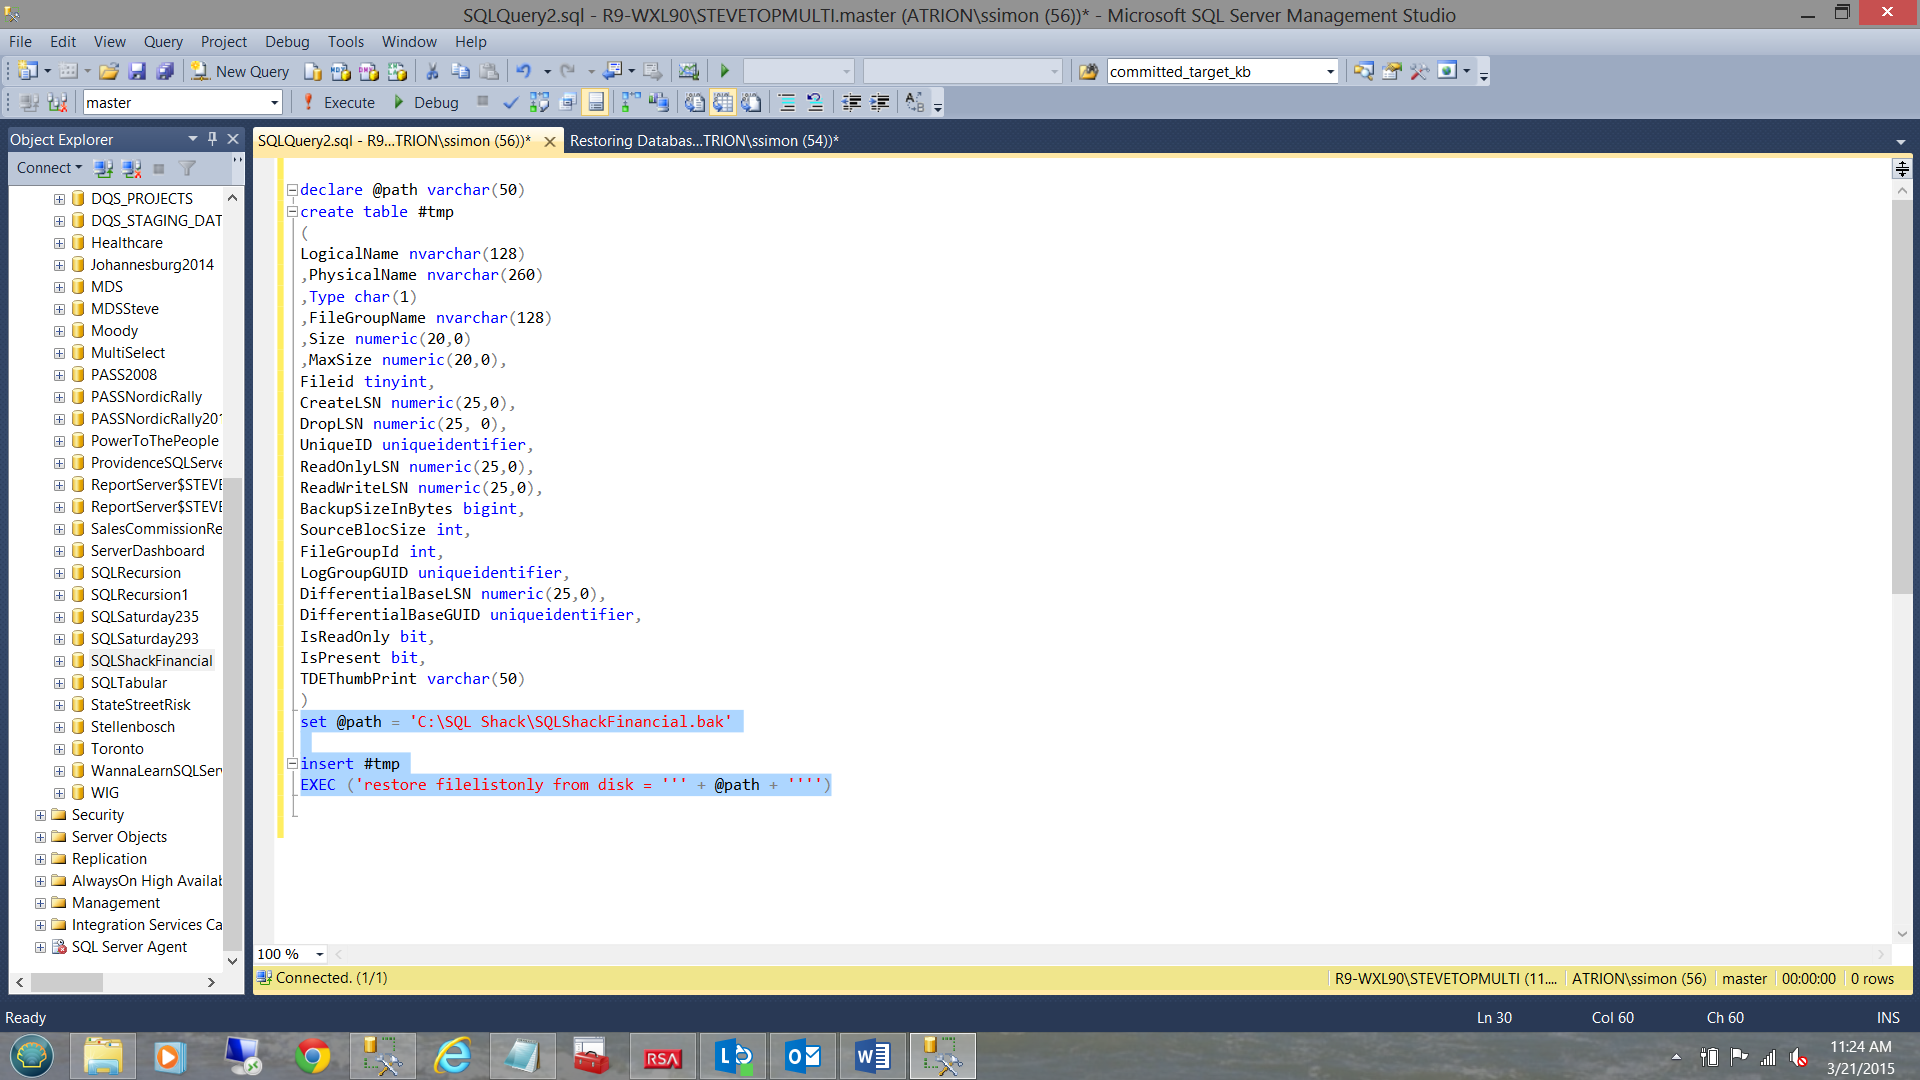
I have taken the liberty of hardwiring this path to make it easier to grasp, however in a real production environment, this would be set by an environmental variable or the like.

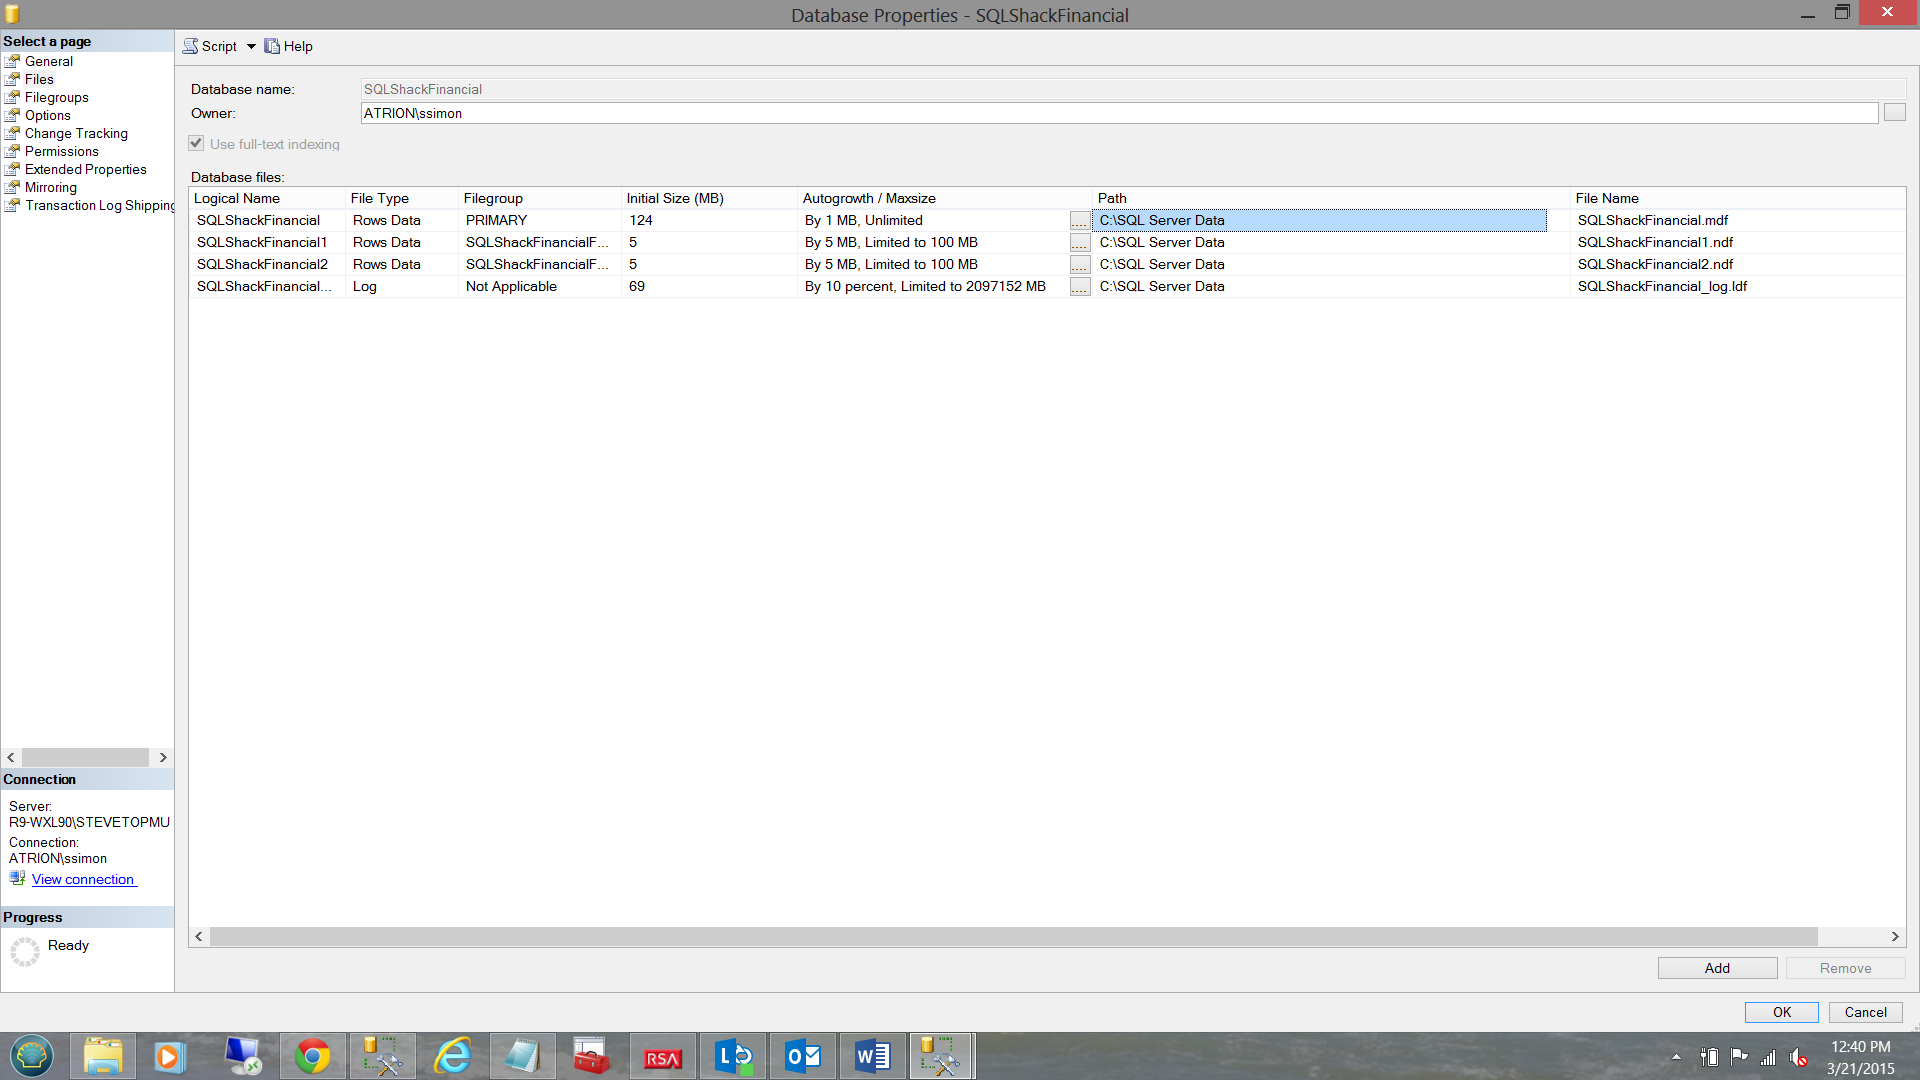
As a “sanity check”, in SQL Server Management Studio and PRIOR to pushing the latest backup down to our server, we bring up the database properties window for the “SQLShackFinancial” database. We note that there is one primary file with two secondary files and finally the log file (see above). We now delete the database as the most current version of the database will be restored from the current backup.
Meanwhile back in the query that we are constructing, we can execute the code that we have thus far and see the contents of the backup file (see below).
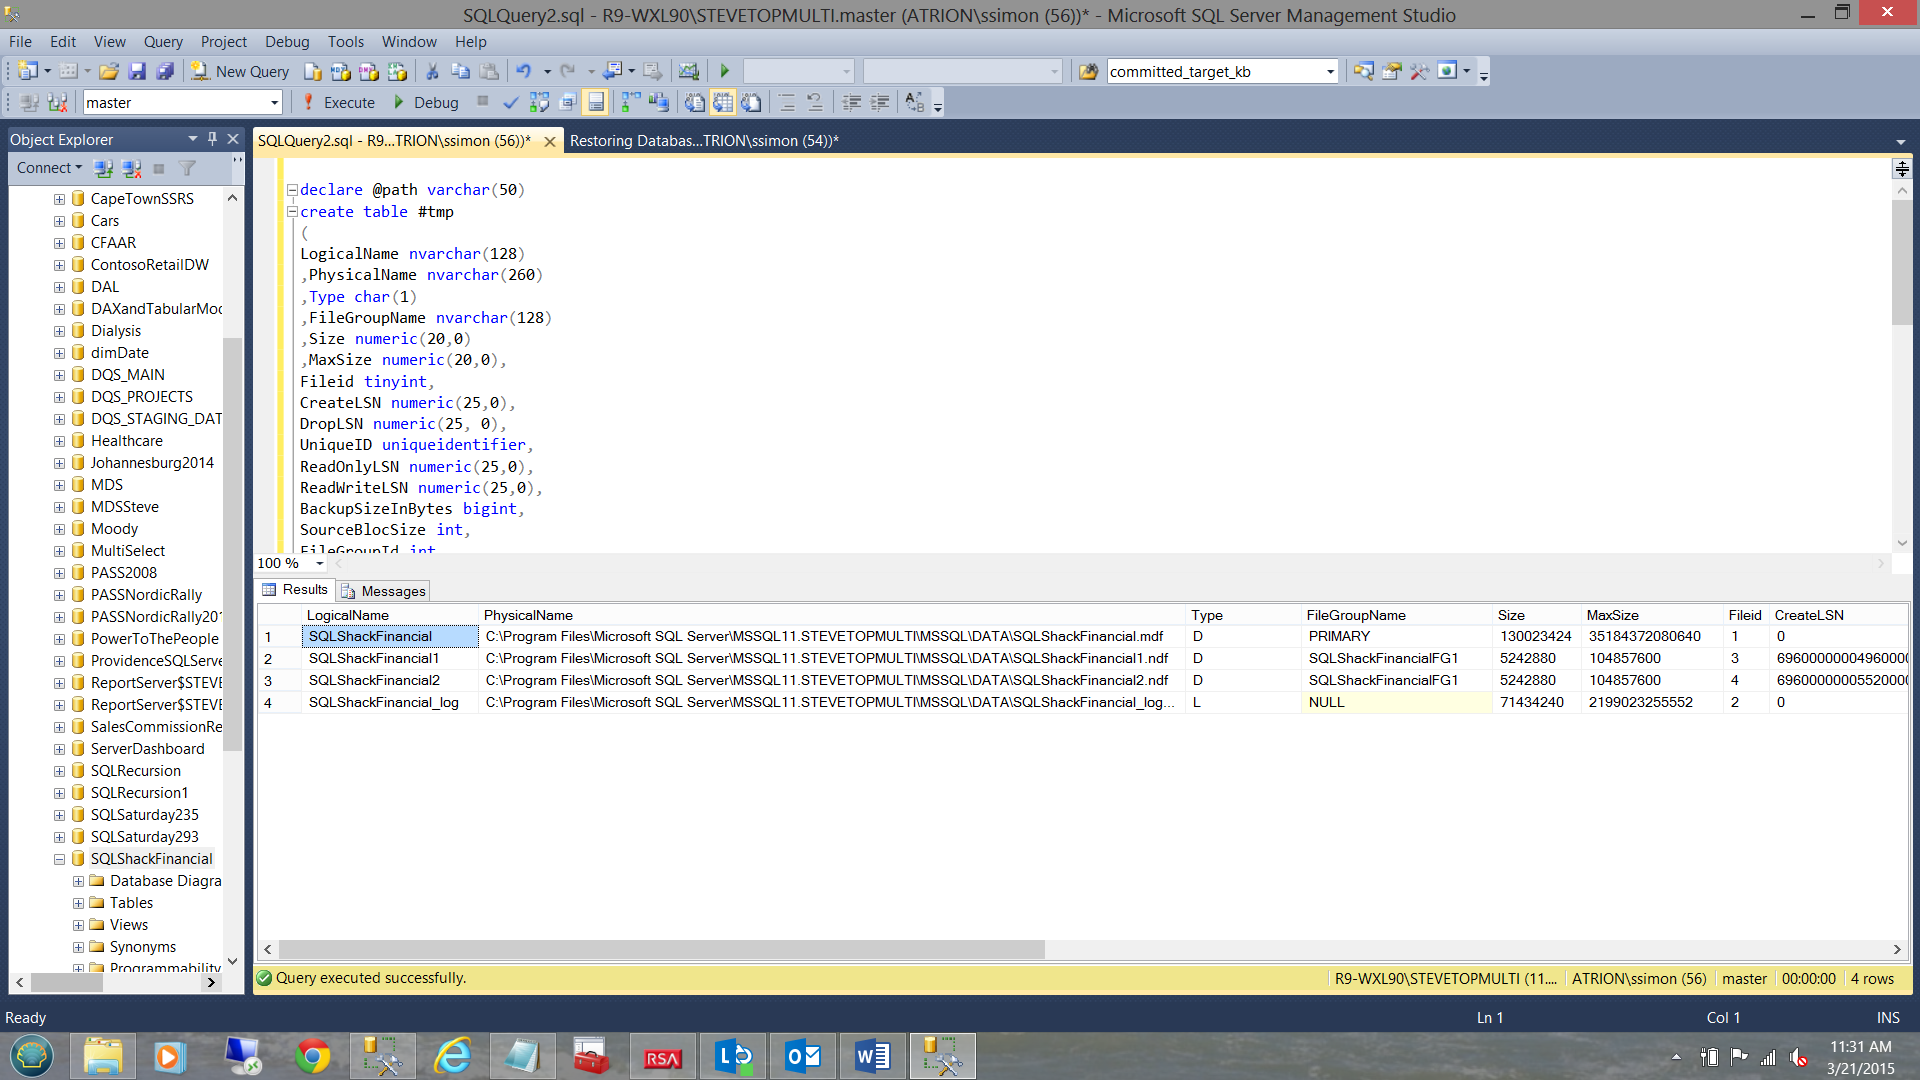
We note that the statistics are fairly similar.
The one important point to note is that the
|
EXEC (‘restore filelistonly from disk = ''' + @path + '''')
|
command first lists the primary data file, then the secondary data files and lastly the log file is listed.
It is this premise that we base the rest of this exercise upon, and the reasons for which we shall see in due course.
We now declare a few variables and count the number of rows in #tmp. This is a critical activity as we wish to track the rows one by one, as we iterate through the rows in the temporary table. Note that @counter is set to 1.
|
Declare @RestoreString as Varchar(max)
Declare @NRestoreString as NVarchar(max)
DECLARE @LogicalName as varchar(75)
Declare @counter as int
Declare @rows as int
set @counter = 1
select @rows = COUNT(*) from #tmp
|
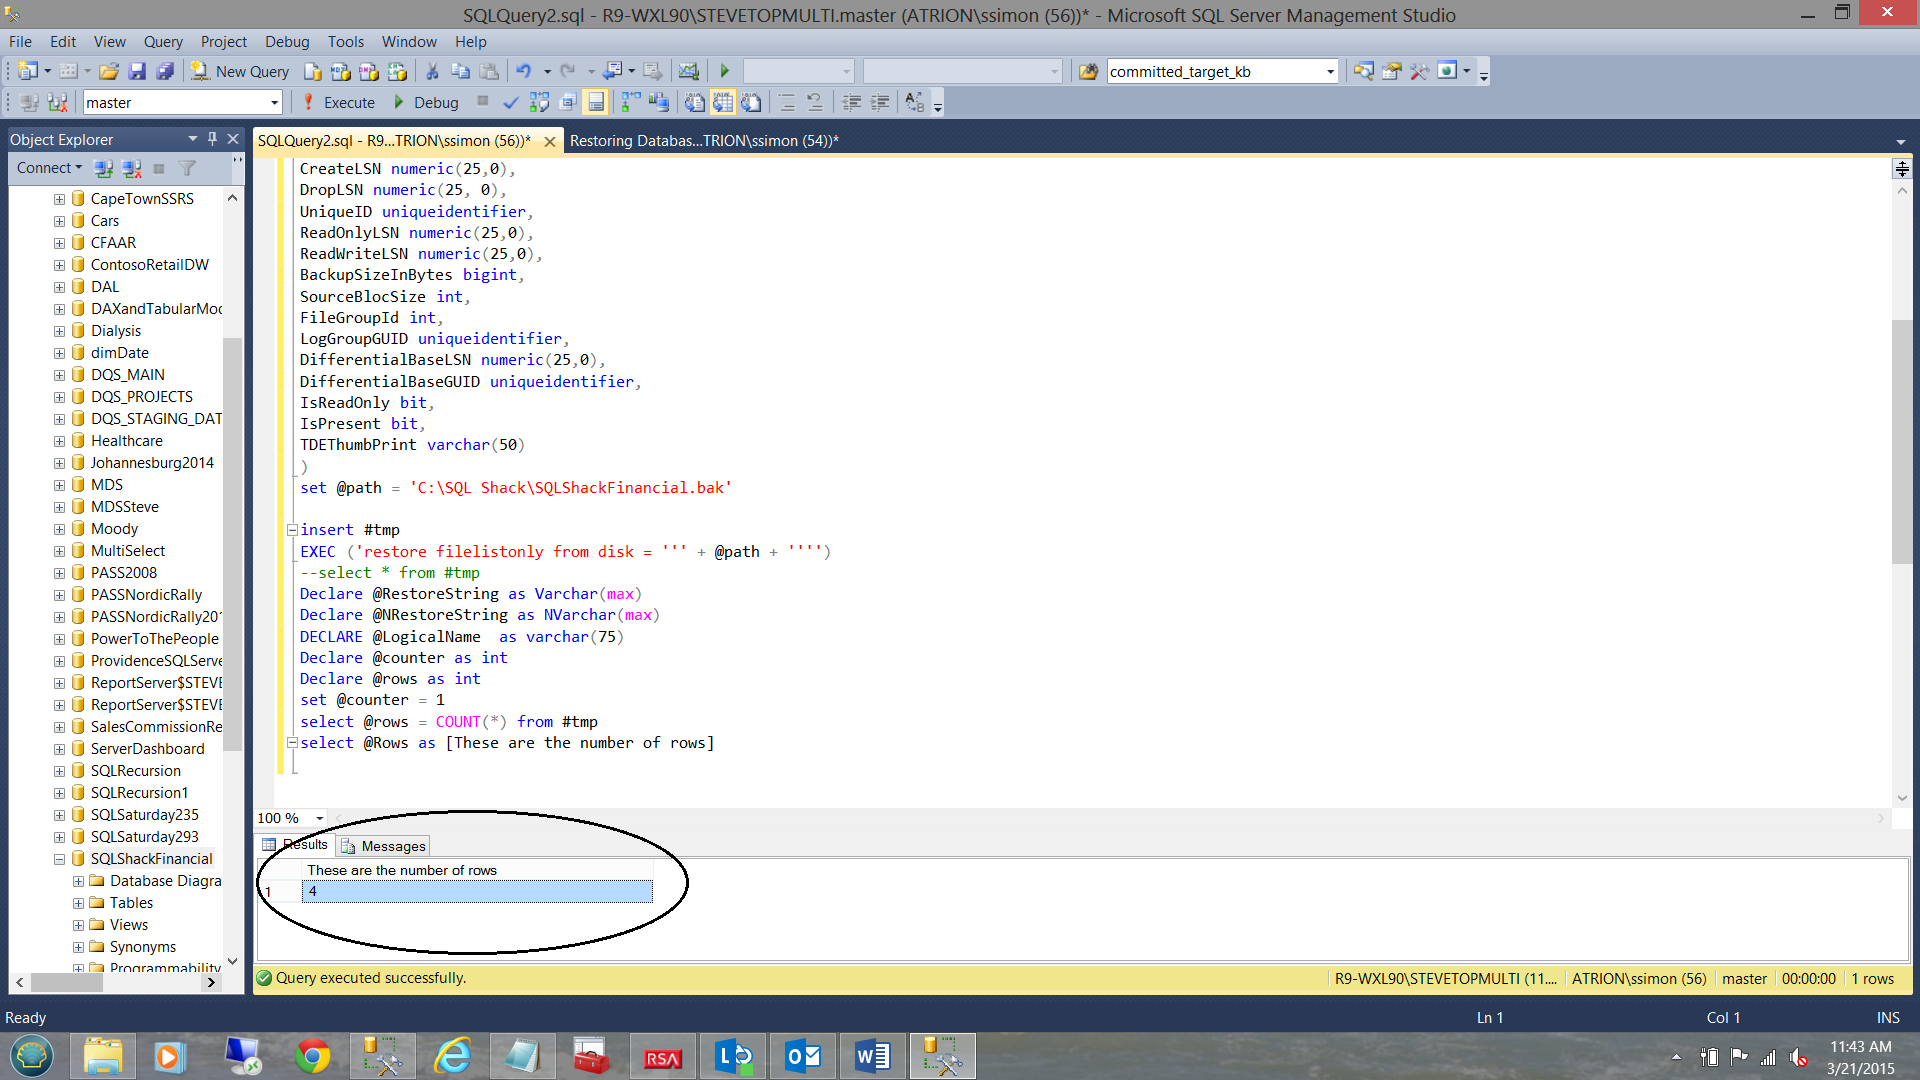
As we note in the screen dump above, that we have four rows.
At this point in time, we are going to become “SQL Server Outlaws” and real naughty folks as we are going to do a “no-no” and utilize a cursor. As the source data comes from a temporary table, we shall not lock up any physical tables. I therefore have no qualms in utilizing the cursor.
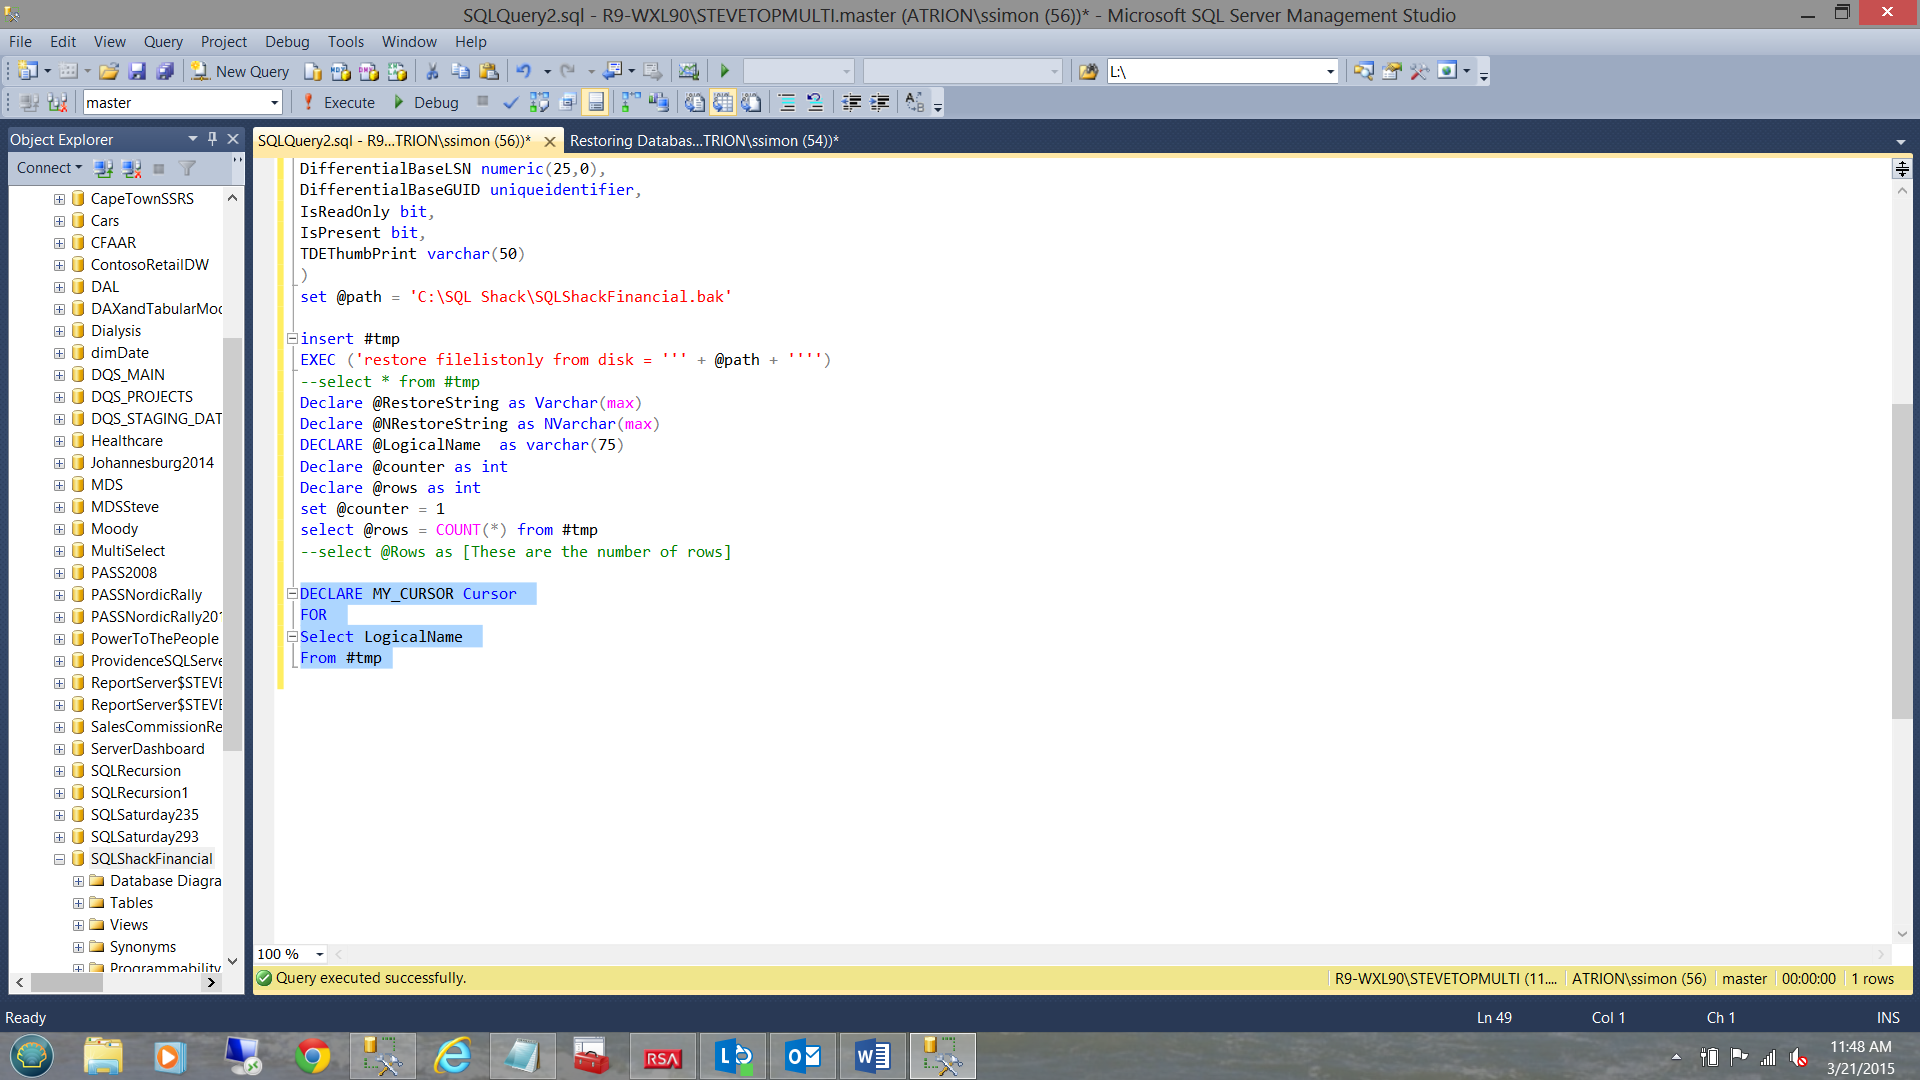
We continue by declaring our cursor (see above highlighted in blue).
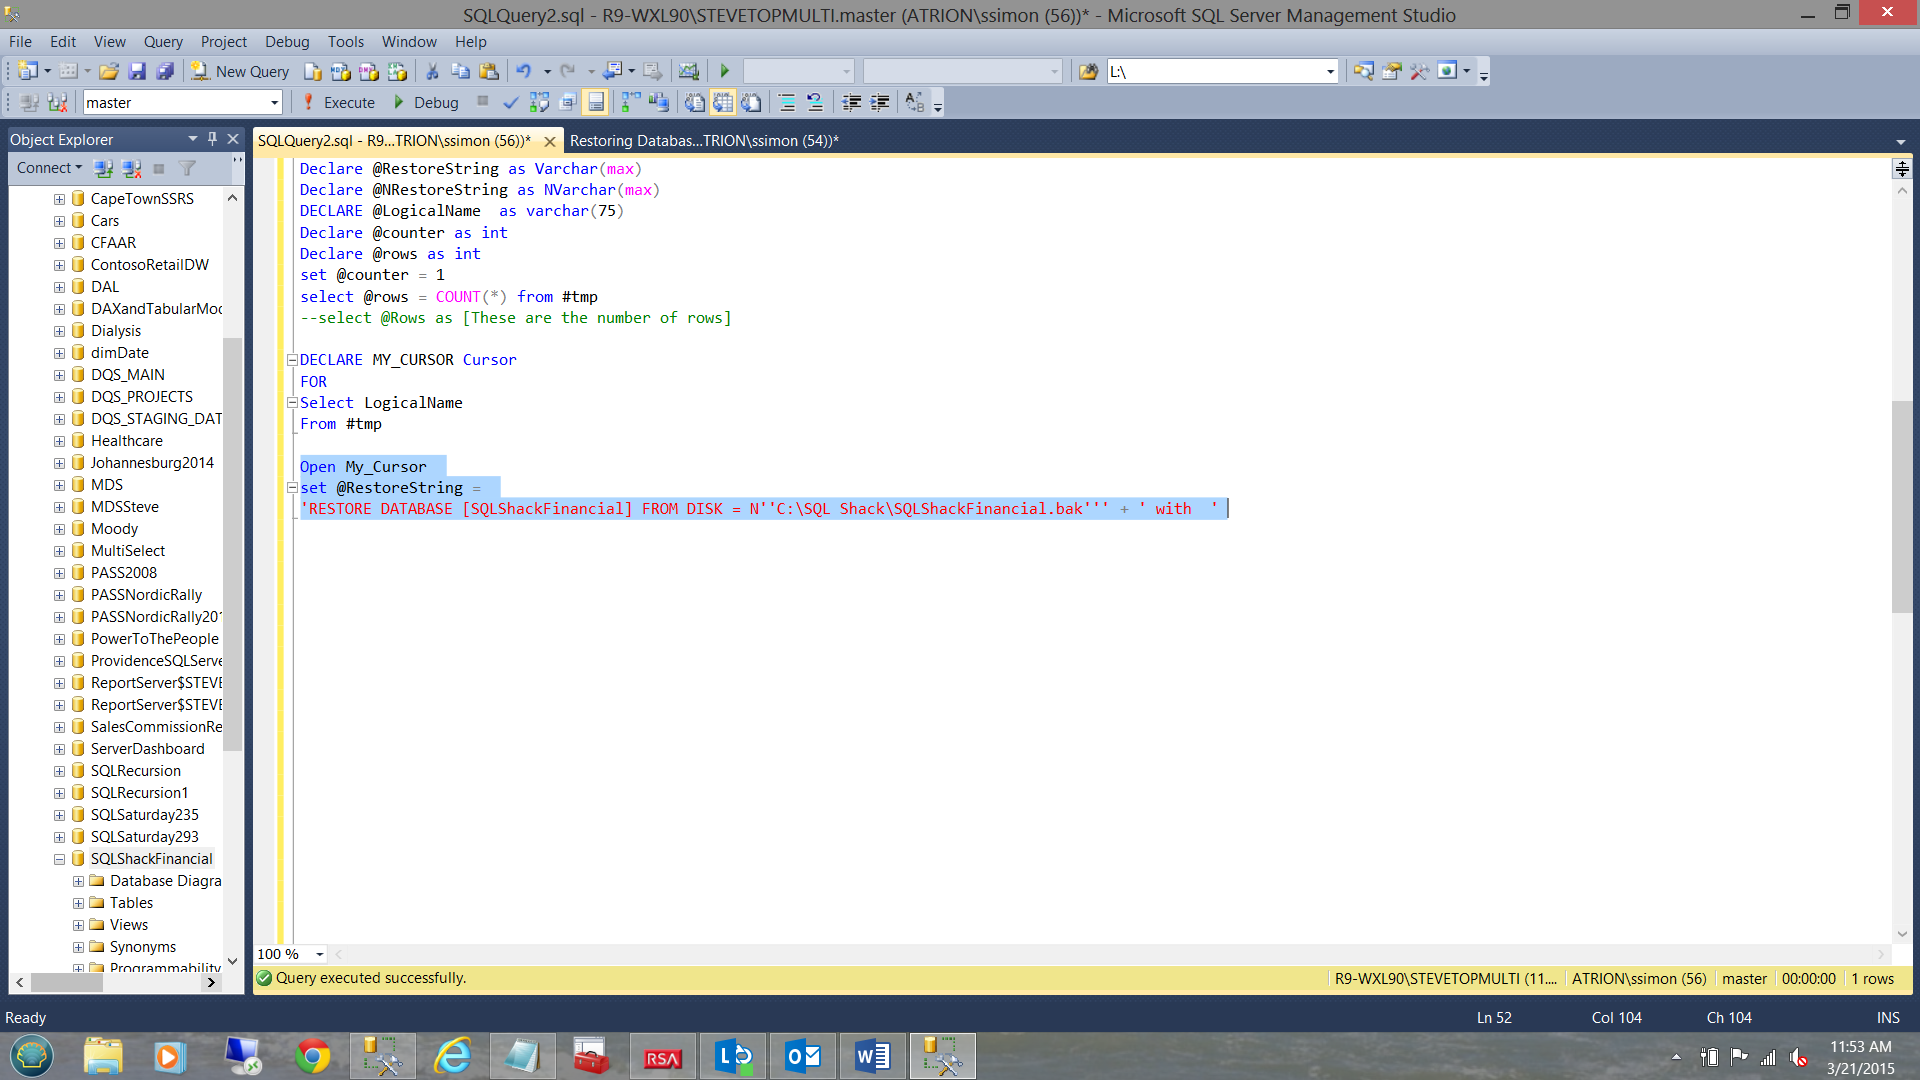
Opening the cursor, we set our @RestoreString variable as follows:
|
set @RestoreString =
'RESTORE DATABASE [SQLShackFinancial] FROM DISK = N''C:\SQL
Shack\SQLShackFinancial.bak''' + ' with '
|
We now iterate our way through the rows within the temporary table, utilizing the cursor code shown below:
|
Fetch NEXT FROM MY_Cursor INTO @LogicalName
While (@@FETCH_STATUS <> –1)
BEGIN
IF (@@FETCH_STATUS <> –2)
select @RestoreString =
case
when @counter = 1 then
@RestoreString + 'move N''' + @LogicalName + '''' + ' TO N''C:\SQL Server Data\'+
@LogicalName + '.mdf' + '''' + ', '
when @counter > 1 and @counter < @rows then
@RestoreString + 'move N''' + @LogicalName + '''' + ' TO N''C:\SQL Server Data\'+
@LogicalName + '.ndf' + '''' + ', '
WHen @LogicalName like '%log%' then
@RestoreString + 'move N''' + @LogicalName + '''' + ' TO N''C:\SQL Server Data\'+
@LogicalName + '.ldf' +''''
end
–select @RestoreString
set @counter = @counter + 1
FETCH NEXT FROM MY_CURSOR INTO @LogicalName
END
|
This code requires some explanation. While there are still rows to be read within the temporary table we shall continue with the outer “while loop”. When there are records to be read, the value of @@FETCH_STATUS will be 0. After the last record is read, @@FETCH_STATUS returns -1 which will cause the code to break out of the loop. As long as there are no missing records, the @@FETCH_STATUS should never be -2 thus the second loop is a “safety valve” and is totally dependent upon the outer loop.
Details of the return codes may be found at the following URL:
https://msdn.microsoft.com/en-us/library/ms187308.aspx
Above I had mentioned that routinely the way that the physical files are rendered when utilizing the “restore file list only” command are that the first file pulled is the primary data file, then come the secondary files and last the log file. The fact that this is so makes our task all the easier.
Looking at the code snippet below (extracted from the code above), when the counter is “1” then we create the physical primary file name from the logical file name plus the hardwired path and give the file name an extension of “mdf”. All of this is concatenated to @ReportString (see code in green below).
|
case
when @counter = 1 then
@RestoreString + 'move N''' + @LogicalName + '''' + ' TO N''C:\SQL Server Data\'+
@LogicalName + '.mdf' + '''' + ', '
when @counter > 1 and @counter < @rows then
@RestoreString + 'move N''' + @LogicalName + '''' + ' TO N''C:\SQL Server Data\'+
@LogicalName + '.ndf' + '''' + ', '
WHen @LogicalName like '%log%' then
@RestoreString + 'move N' + @LogicalName + '''' + ' TO N''C:\SQL Server Data\'+
@LogicalName + '.ldf' +''''
End
set @counter = @counter + 1
|
When the value of @counter is greater than one BUT less than the total count of rows then we KNOW that we are dealing with secondary data files and perform the same naming process however this time the file name extension will be “.ndf” (see the code in purple below):
|
case
when @counter = 1 then
@RestoreString + 'move N''' + @LogicalName + '''' + ' TO N''C:\SQL Server Data\'+
@LogicalName + '.mdf' + '''' + ', '
when @counter > 1 and @counter < @rows then
@RestoreString + 'move N''' + @LogicalName + '''' + ' TO N''C:\SQL Server Data\'+
@LogicalName + '.ndf' + '''' + ', '
WHen @LogicalName like '%log%' then
@RestoreString + 'move N''' + @LogicalName + '''' + ' TO N''C:\SQL Server Data\'+
@LogicalName + '.ldf' +''''
End
set @counter = @counter + 1
|
When the value of @counter is equal to the total count of rows then we KNOW that we are dealing the log file see the code in brown below:
|
case
when @counter = 1 then
@RestoreString + 'move N''' + @LogicalName + '''' + ' TO N''C:\SQL Server Data\'+
@LogicalName + '.mdf' + '''' + ', '
when @counter > 1 and @counter < @rows then
@RestoreString + 'move N''' + @LogicalName + '''' + ' TO N''C:\SQL Server Data\'+
@LogicalName + '.ndf' + '''' + ', '
WHen @LogicalName like '%log%' then
@RestoreString + 'move N''' + @LogicalName + '''' + ' TO N''C:\SQL Server Data\'+
@LogicalName + '.ldf' +''''
end
set @counter = @counter + 1
FETCH NEXT FROM MY_CURSOR INTO @LogicalName
|
The astute reader will note that regardless of which option, the “case” turns out to be, @counter is incremented by 1 (with each pass) and the next row is retrieved from the cursor.
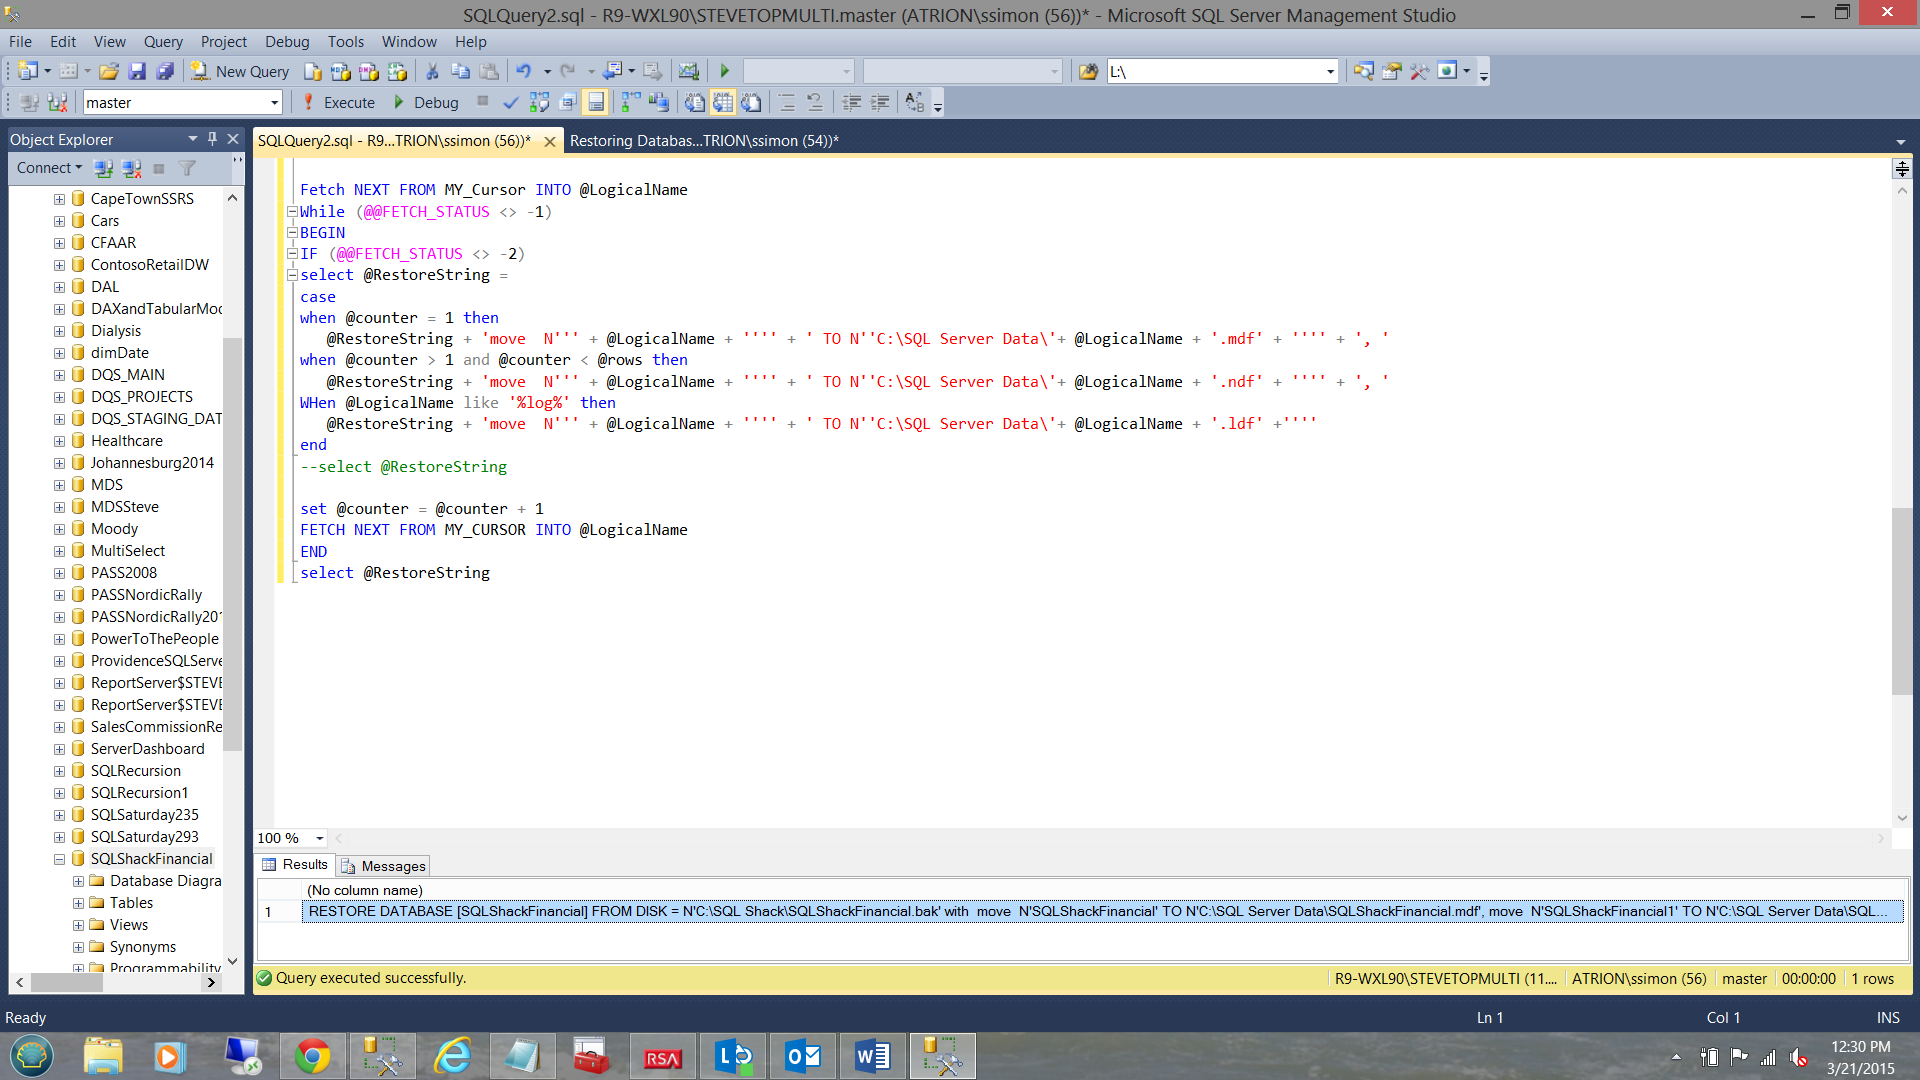
Running what we have thus far, we can see the string that we have created by concatenating all the file names (see above).
Our final task is to execute the string and close and de-allocate the cursor. The code that achieves this may be seen below:
|
set @NRestoreString = @RestoreString
EXEC sp_executesql @NRestoreString
CLOSE MY_CURSOR
DEALLOCATE MY_CURSOR
|
We set the value of @NRestoreString to the value of @RestoreString.
“ sp_executesql “ requires the string to be in NVARCHAR() format.
The reader will remember that @NRestoreString is NVARCHAR(max). We could have utilized @NRestoreString right from the outset.
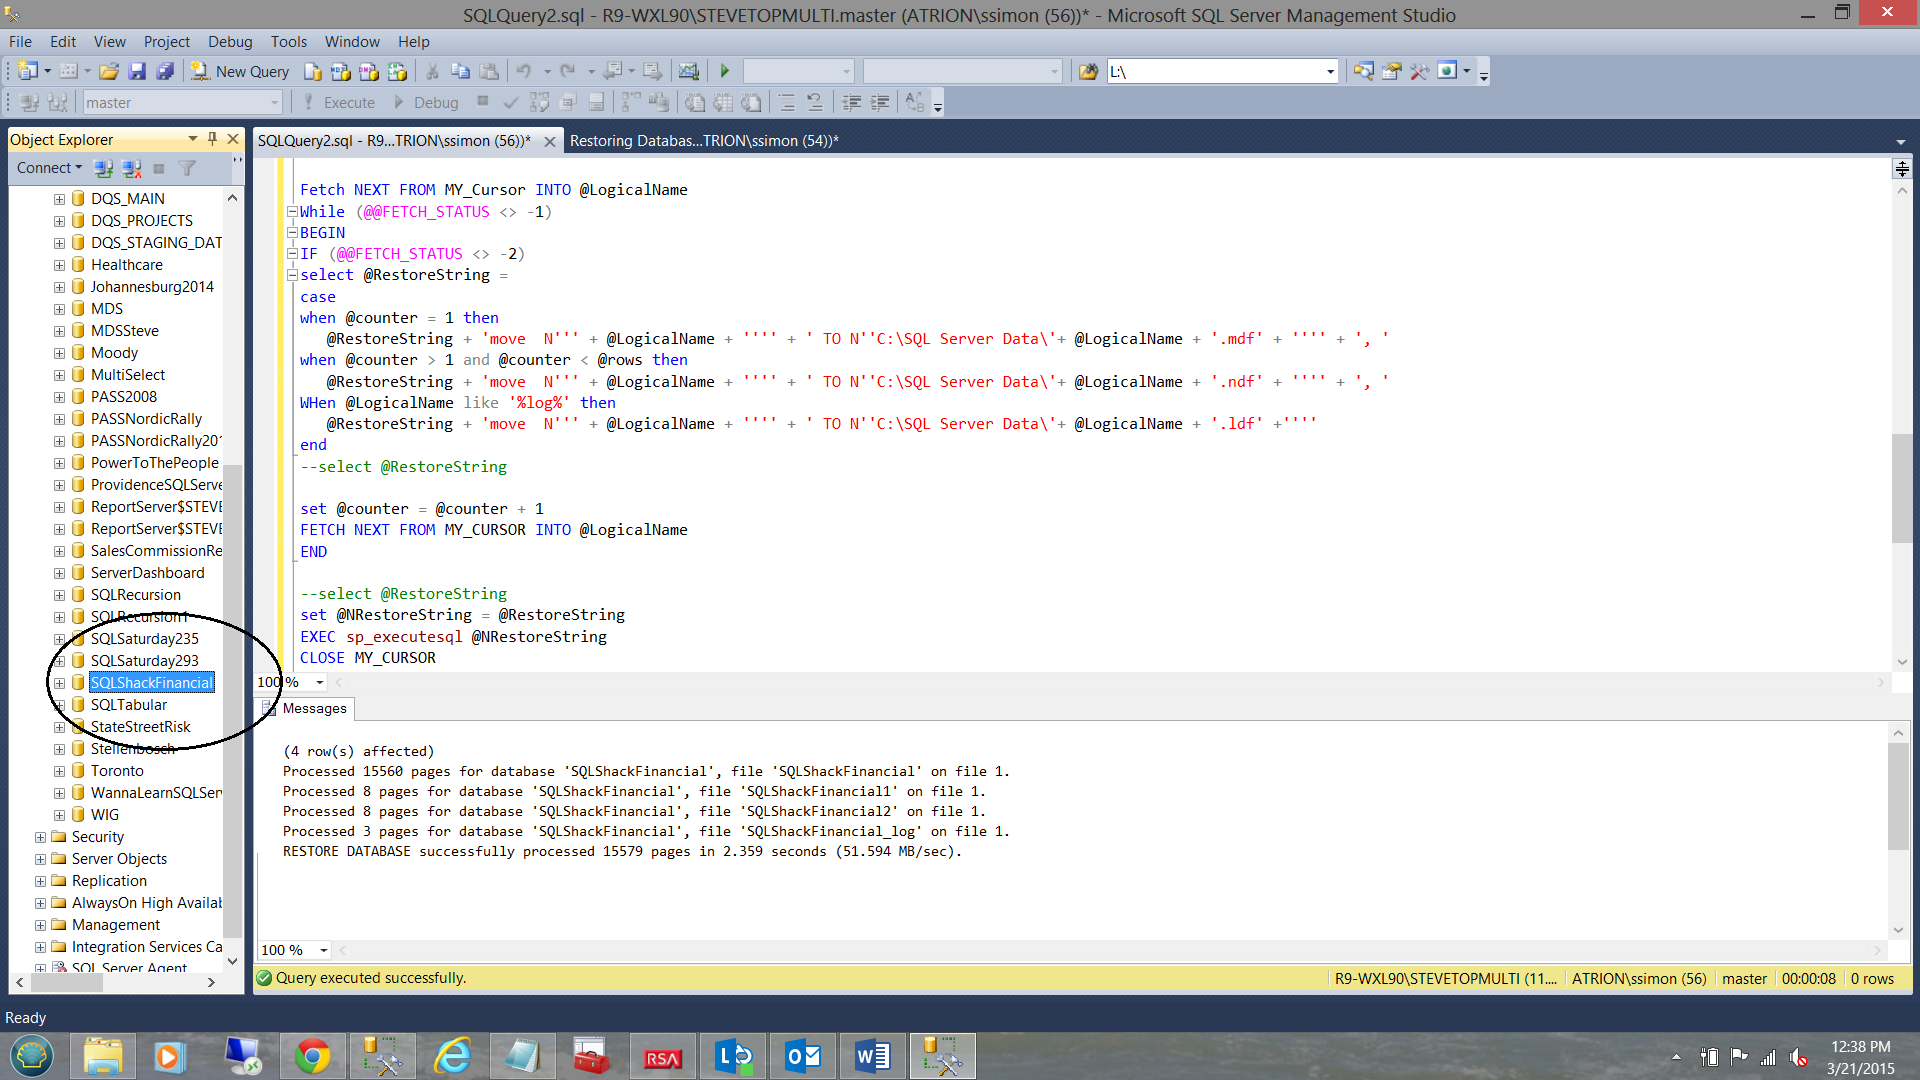
Utilizing sp_executesql we now execute @NRestoreString. The results of the execution may be seen below.
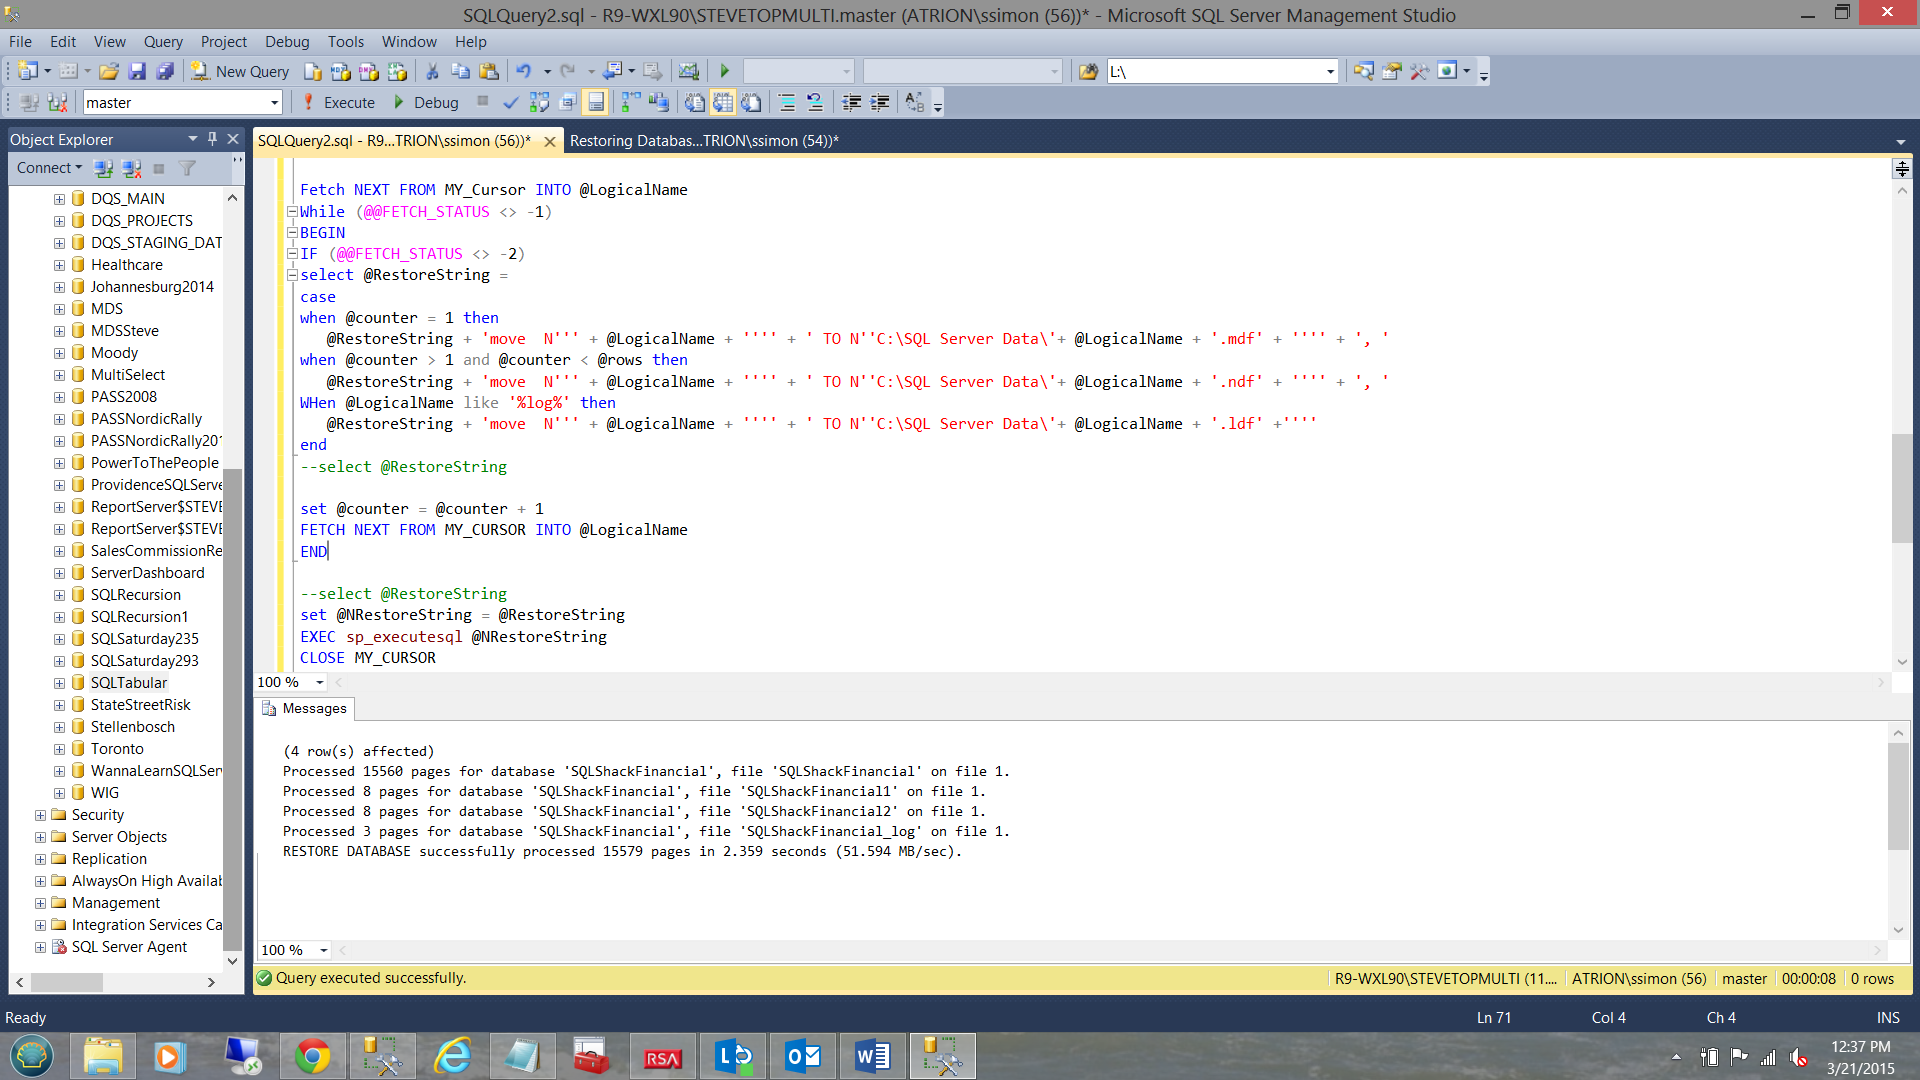
We note that SQLShackFinancial has been restored (see below and to the left).
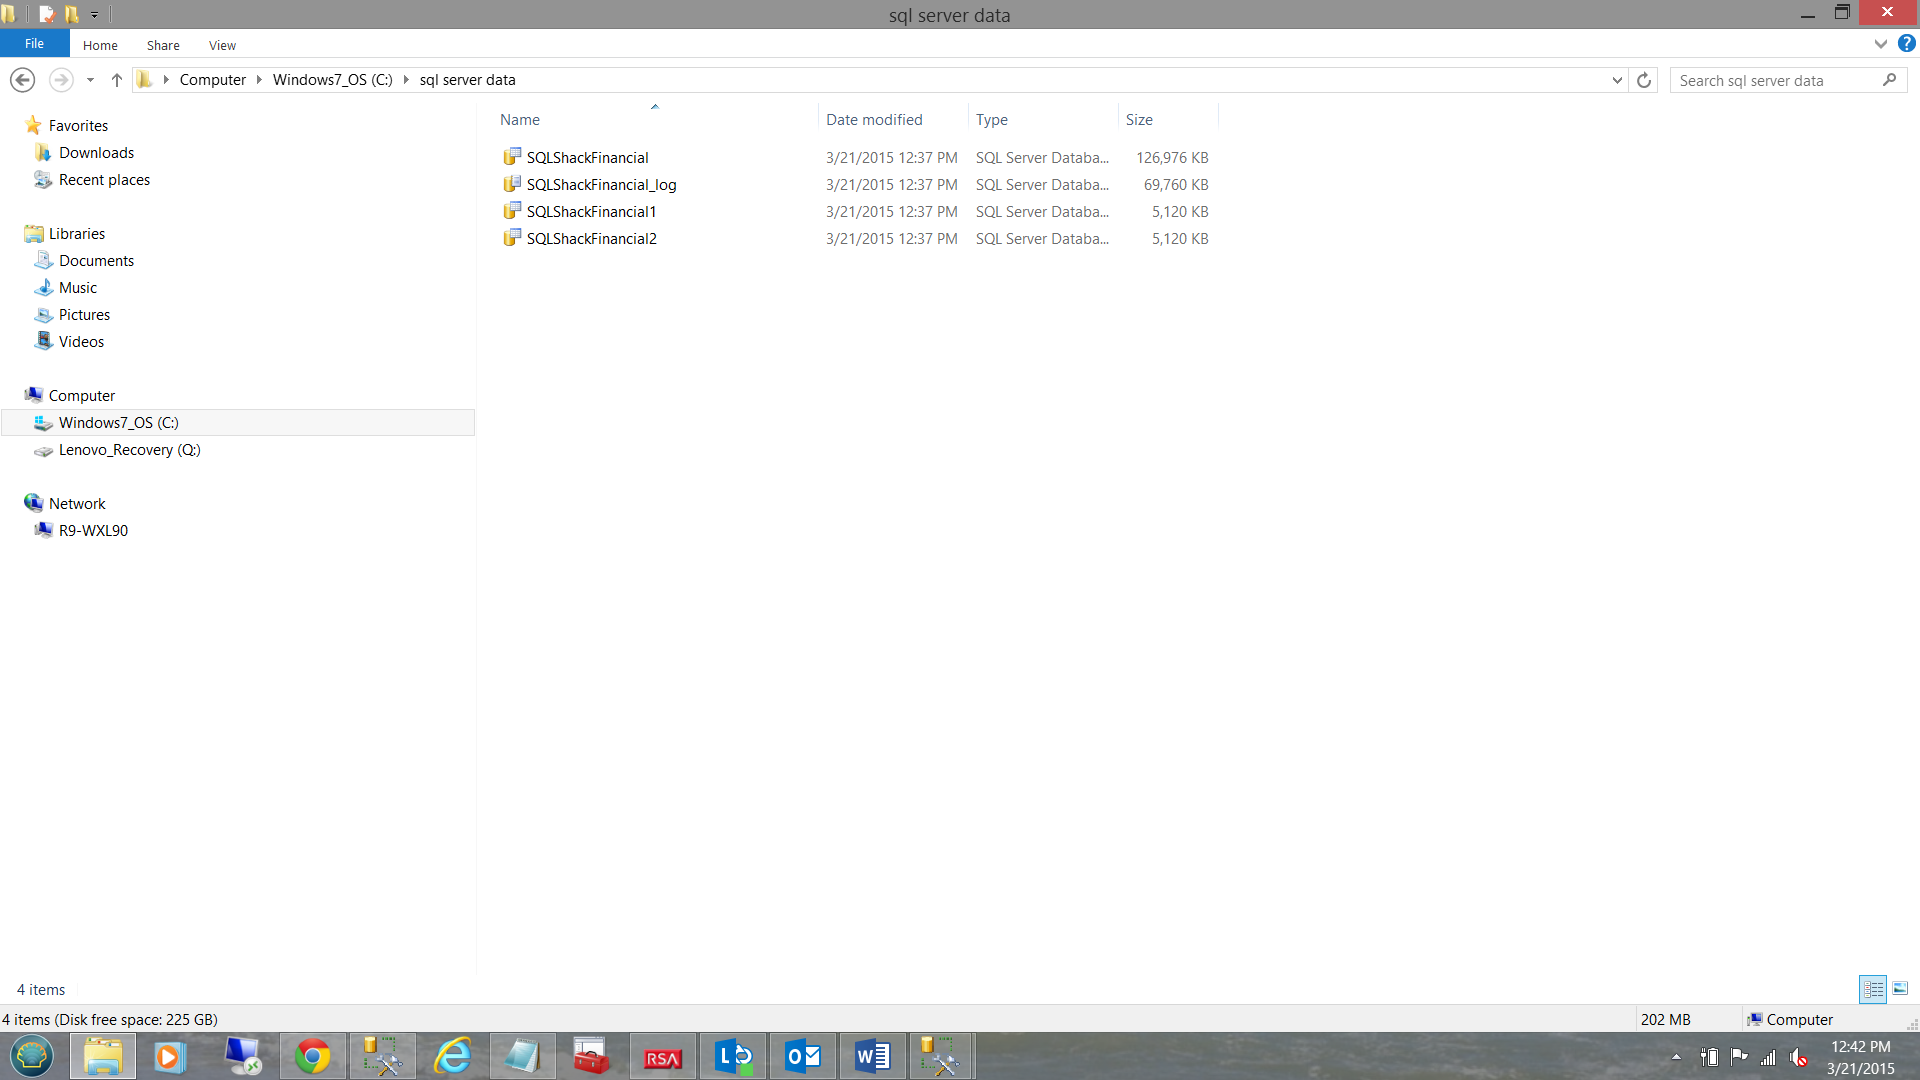
Looking at the location of the physical files, we find that the data files were actually restored to where we had requested (see below).
It should be noted at this point that I deliberately restored the database to the directory “SQL Server Data” for this exercise. Normally these files are located in the proper SQL Server 11 Data Directory.
Looking our “SQL Server Data” directory, we note our four files.
Conclusion
It is often said that necessity is the mother of invention. Whilst the techniques shown in this code are far from “Rocket Science”, they are techniques that we often never think of. Restoring databases on a cyclical basis is par for the course in many enterprises.
Thus we come to the end of another “get together”. As a reminder, the code that we worked with in today’s session may be found below in Addenda 1.
As always, should you have any questions or concerns, please feel free to contact me.
In the interim, happy programming!!
Addenda 1
|
IF OBJECT_ID(N’tempdb..#tmp') IS NOT NULL
BEGIN
DROP TABLE #tmp
END
go
declare @path varchar(50)
create table #tmp
(
LogicalName nvarchar(128)
,PhysicalName nvarchar(260)
,Type char(1)
,FileGroupName nvarchar(128)
,Size numeric(20,0)
,MaxSize numeric(20,0),
Fileid tinyint,
CreateLSN numeric(25,0),
DropLSN numeric(25, 0),
UniqueID uniqueidentifier,
ReadOnlyLSN numeric(25,0),
ReadWriteLSN numeric(25,0),
BackupSizeInBytes bigint,
SourceBlocSize int,
FileGroupId int,
LogGroupGUID uniqueidentifier,
DifferentialBaseLSN numeric(25,0),
DifferentialBaseGUID uniqueidentifier,
IsReadOnly bit,
IsPresent bit,
TDEThumbPrint varchar(50)
)
set @path = 'C:\SQL Shack\SQLShackFinancial.bak'
insert #tmp
EXEC ('restore filelistonly from disk = ''' + @path + '''')
–select * from #tmp
Declare @RestoreString as Varchar(max)
Declare @NRestoreString as NVarchar(max)
DECLARE @LogicalName as varchar(75)
Declare @counter as int
Declare @rows as int
set @counter = 1
select @rows = COUNT(*) from #tmp
–select @Rows as [These are the number of rows]
DECLARE MY_CURSOR Cursor
FOR
Select LogicalName
From #tmp
Open My_Cursor
set @RestoreString =
'RESTORE DATABASE [SQLShackFinancial] FROM DISK = N''C:\SQL Shack\SQLShackFinancial.bak'''
+ ' with '
Fetch NEXT FROM MY_Cursor INTO @LogicalName
While (@@FETCH_STATUS <> –1)
BEGIN
IF (@@FETCH_STATUS <> –2)
select @RestoreString =
case
when @counter = 1 then
@RestoreString + 'move N''' + @LogicalName + '''' + ' TO N''C:\SQL Server Data\'+
@LogicalName + '.mdf' + '''' + ', '
when @counter > 1 and @counter < @rows then
@RestoreString + 'move N''' + @LogicalName + '''' + ' TO N''C:\SQL Server Data\'+
@LogicalName + '.ndf' + '''' + ', '
WHen @LogicalName like ‘%log%’ then
@RestoreString + 'move N' + @LogicalName + '''' + ' TO N''C:\SQL Server Data\'+
@LogicalName + '.ldf' +''''
end
–select @RestoreString
set @counter = @counter + 1
FETCH NEXT FROM MY_CURSOR INTO @LogicalName
END
–select @RestoreString
set @NRestoreString = @RestoreString
EXEC sp_executesql @NRestoreString
CLOSE MY_CURSOR
DEALLOCATE MY_CURSOR
|
Steve has presented papers at 8 PASS Summits and one at PASS Europe 2009 and 2010. He has recently presented a Master Data Services presentation at the PASS Amsterdam Rally.
Steve has presented 5 papers at the Information Builders' Summits. He is a PASS regional mentor.
View all posts by Steve Simon
- Reporting in SQL Server – Using calculated Expressions within reports - December 19, 2016
- How to use Expressions within SQL Server Reporting Services to create efficient reports - December 9, 2016
- How to use SQL Server Data Quality Services to ensure the correct aggregation of data - November 9, 2016