
The Partition feature was introduced in the SQL Server 2005. This article is to cover how partitioning can be useful when it comes to archiving of SQL Server data in a database. Please note that this article does not cover how partitioning works and its configurations in detail.
Database administrators face quite a few challenges during data archiving tasks. One major challenge in archiving is the impact to the databases and other requests. For example, let’s assume that you need to archive the year 2012 data from orders table. Since this is order table, you will have billions of records and year 2012 may have few millions of rows. When deleting those records, obviously it takes considerable time to delete as each delete will be a physical operation on the table. During this operation, lock escalation will occur at the table level and there will be a table lock. This means that the table will be locked during the deletion of all the records. This results that the users will not be able to access the table during this time. Therefore, in most of the cases, database administrators need special approvals and off peak time to perform this so that impact to the system is limited.
What is Partitioning in SQL Server?
To overcome this types of issues, the SQL Server partition feature will be helpful to perform data archiving in an effective manner. Typically, partitioning is used to improve reading performs. It will separate rows into different “buckets”. Actually, “partitioning” represents database operations where very large tables are divided into several parts. By dividing a large table into multiple tables, queries that access only a fraction of the data can run much faster than before, because there is fewer data to scan in one partition.
The main of objective of partitioning is to aid in the maintenance of large tables and to reduce the overall time to read and load data for particular user operations.
How partitions are created?
Let’s create the partition first. As stated before, details of partition creation will not be discussed in detail and in the case of a need you can refer to the URLs stated in the references at the end of this article.
First, you need to create the partition function. The partition function will decide on the range of the data for each partition:
|
1 2 3 4 5 |
CREATE PARTITION FUNCTION pf_FactInternetSales_Year (int) AS RANGE RIGHT FOR VALUES (20090101,20100101, 20110101, 20120101, 20130101,20140101,20150101); |
Next, the partition schema is created, referring to the partition function created before. In real world implementation, the partition schema will allocate to different file groups. For the purpose of this article, only PRIMARY file group will be used for the simplicity:
|
1 2 3 4 5 |
CREATE PARTITION SCHEME ps_FactInternetSales AS PARTITION pf_FactInternetSales_Year TO ([PRIMARY], [PRIMARY], [PRIMARY], [PRIMARY], [PRIMARY], [PRIMARY], [PRIMARY], [PRIMARY]); |
Next, create a table specifying partition schema and partition column. In this example, OrderDateKey is the partition key:
|
1 2 3 4 5 6 7 8 9 10 11 12 13 |
CREATE TABLE [dbo].[FactSales]( [ProductKey] [int] NOT NULL, [OrderDateKey] [int] NOT NULL, [DueDateKey] [int] NOT NULL, [ShipDateKey] [int] NOT NULL, [CustomerKey] [int] NOT NULL, [PromotionKey] [int] NOT NULL, [CurrencyKey] [int] NOT NULL, [SalesAmount] [money] NOT NULL, ) ON ps_FactInternetSales([OrderDateKey]) |
If you take a close look at the above script, file group is the partition schema.
In the case of data warehousing, datekey is derived as a combination of year, month and day. Unlike other dimensions where surrogate keys are just incremental numbers, date dimension surrogate key has a logic. Main reason to have a logic to date key is so that partition can be incorporated into these tables.
Next, populate new table with data for the demonstration purposes.
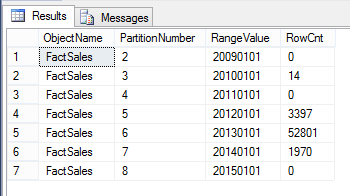
After populating data, let us verify data population in the partitioned table using the following query:
|
1 2 3 4 5 6 7 8 9 10 11 12 13 14 15 16 |
SELECT OBJECT_NAME(p.object_id) AS ObjectName ,p.Partition_Number AS PartitionNumber ,PRV.Value AS RangeValue ,Rows AS RowCnt FROM sys.partitions AS p INNER JOIN sys.indexes AS i ON p.object_id = i.object_id AND p.index_id = i.index_id INNER JOIN sys.partition_schemes ps ON i.data_space_id=ps.data_space_id INNER JOIN sys.partition_functions PF ON PF.function_id = ps.Function_ID INNER JOIN sys.partition_range_values PRV ON PRV.Function_ID = Ps.Function_ID AND CASE WHEN PF.boundary_value_on_right = 1 THEN boundary_id + 1 ELSE boundary_id END = p.Partition_Number WHERE OBJECT_NAME(p.object_id) = 'FactSales' ORDER BY Partition_Number; |
Following is the output in which it shows a number of rows for each partition along with the range value for the partition.

By examining above data set, let us assume that we need to archive data for the year 2011 which has around 2000 records. A traditional way of doing this is executing a delete statement where OrderDateKey is between 20110101 and 20111231. As discussed before, this will lead to various other issues thus it will not be a popular decision.
Archiving SQL Server data
Another way of doing this is by using the SWITCH command in the partition.
To archive data using the SWITCH command, you need to create same table structure in same file group as the partition that you are about to archive as shown below.
|
1 2 3 4 5 6 7 8 9 10 11 12 |
CREATE TABLE [dbo].[FactSales_Archive]( [ProductKey] [int] NOT NULL, [OrderDateKey] [int] NOT NULL, [DueDateKey] [int] NOT NULL, [ShipDateKey] [int] NOT NULL, [CustomerKey] [int] NOT NULL, [PromotionKey] [int] NOT NULL, [CurrencyKey] [int] NOT NULL, [SalesAmount] [money] NOT NULL, ) ON [PRIMARY] |
Next is to switch data to newly created table.
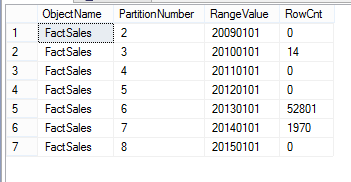
Let us examine the data distribution again as we did before using the same query.
From the above image, it is clear that records for the year 2011 were deleted. With the SWITCH statement, there won’t be any table locks as there won’t be any physical data deletes. The SWITCH statement will be a meta-data change which will take less than one second to complete.
In case you have a column store index for the partitioned table, which is quite normal in data warehouse, you need to disable the column store index before switching the partition. You need to enable the column store index until the partition switching is completed.
Since this partition table data is moved to the newly created table, though the data is archived from the original table, the database still has the data. Some database administrators still favor this approach as it can be kept as temporary data store so that you can recover the data in case of a need.
What’s new in SQL Server 2016?
In SQL Server 2016, in addition to the SWITCH command, there is an option of truncating a partition without using an additional table. In case of partition truncating, there is no requirement to disable or enable column store indexes.
|
1 2 3 |
TRUNCATE TABLE FactSales WITH ( PARTITIONS (5)) |
With the above statement, the fifth partition will be truncated.
Also, you have the luxury of truncating multiple adjacent partitions as shown in below statement.
|
1 2 3 |
TRUNCATE TABLE FactSales WITH ( PARTITIONS ( 6 TO 7)) |
However, you need to remember that there won’t be a backup of the archived data when you perform a partition truncation. Though there is no perform gain with the truncate statement with compared to switch statement, it is much simpler as no need for disabling column store indexes and much cleaner as you don’t need to create another temporary table.
Other Information
In SQL Server Analysis Service (SSAS) cubes also has the partition option. If you can match the SSAS partitions to the database partitions, you can improve cube process as well.

View all posts by Dinesh Asanka
- Testing Type 2 Slowly Changing Dimensions in a Data Warehouse - May 30, 2022
- Incremental Data Extraction for ETL using Database Snapshots - January 10, 2022
- Use Replication to improve the ETL process in SQL Server - November 4, 2021