
Azure SQL Database is a Platform-as-a-Service (PaaS) solution that offers managed database service. Azure DB provides many features such as automatic database tuning, vulnerability assessment, automated patching, performance tuning, alerts. It provides a 99.995% availability SLA for the Zone redundant database in the business-critical service tier.
This article explores Transparent Data Encryption (TDE) using the customer-managed key in Azure SQL Database.
Introduction
In an on-premise SQL Server instance, database administrators can enable Transparent Data Encryption (TDE) for securing the data and log files of a database. It is helpful to protect you from a malicious threat by encrypting data at rest. You get real-time encryption of the database, transaction log files and associated backup files without any configuration changes at the application end.
The high-level steps for implementing the TDE encryption are as below.
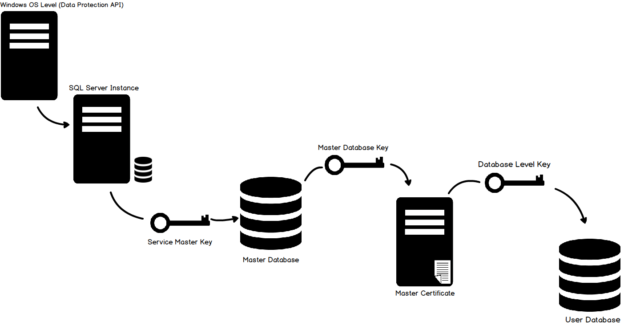
- Create Master Key
- Configure a Certificate protected by the master key
- Create Database Encryption Key
- Enable Encryption
- Backup Certificate
- Restoring a Certificate

In the following image, we can visualize the TDE hierarchy. If you are new to TDE, you can refer to the following articles to get familiar with TDE.
- How to configure Transparent Data Encryption (TDE) in SQL Server
- Transparent Data Encryption for SQL Server Always On Availability Groups
Azure SQL DB TDE using Service Managed Key
If you migrate your on-premise databases to Azure SQL Database, TDE is enabled by default. You can connect to the Azure portal and verify the configuration. It uses an Azure service managed key. It is Azure responsibility to manage the key without any user intervention. Microsoft automatically uses its internal security policy for rotating these certificates. It protects the certificate root key using its internal secret store.
As shown below, my [labazuresql] database is encrypted using the Transparent data encryption.

Suppose we store sensitive data such as financial or personal identification information (PII) data. In that case, we might not be comfortable in handling all these encryption mechanisms using Azure auto-managed keys and certificates. Therefore, Azure gives you an option – Bring Your Own Key (BYOK) for customer-managed Transparent data encryption.
Bring your own key (BYOK) for TDE in Azure SQL Database
In this method, the customer is responsible for key management and operations for encryption purposes. It also involves responsibilities such as backing up the keys, key rotation, key usage audit. You require the following steps for BYOK for TDE in Azure databases.
- Creating an Azure Key Vault with enabled soft-delete
- Configure the key protector to use for Transparent Data Encryption (TDE)
Creating an Azure Key Vault
Azure key vault is an external key management system for storing the asymmetric key for storing the Database Encryption Key (DEK) encryption. The key is also known as the TDE Protector. In the Azure portal, search for Key Vaults service.
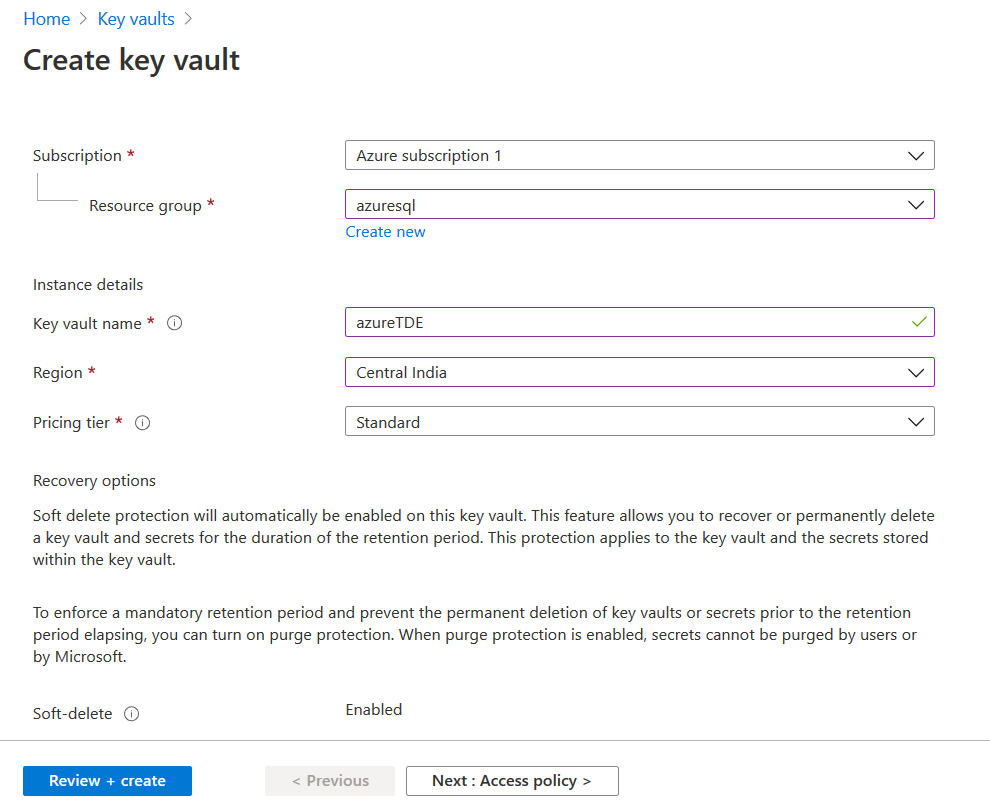
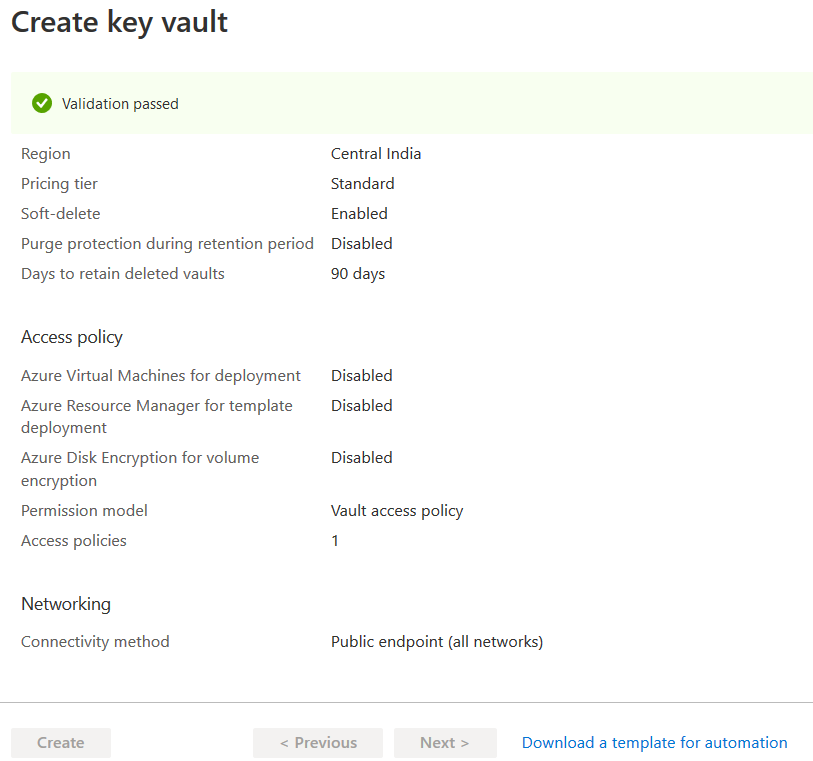
In the Create key vault, enter the following details.
- Resource Group name
- Key vault name
- Region
- Pricing tier
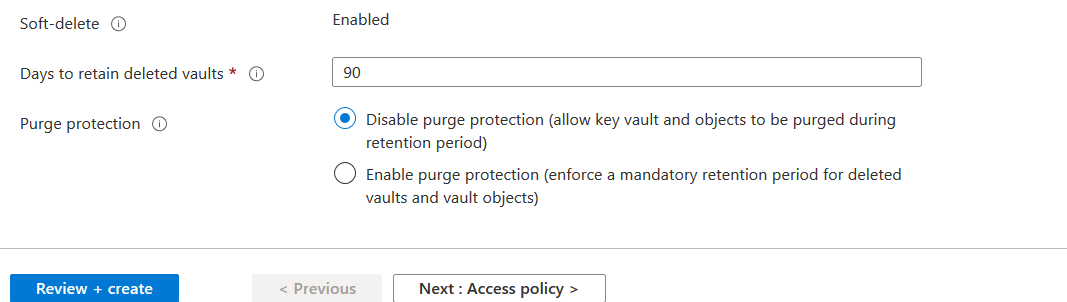
By default, soft deletion protection is enabled for the Azure Key Vault. It protects you from accidental data loss due to accidental key deletion.
Note: You cannot enable the soft delete protection from the Azure portal once it is created. You can use Azure PowerShell or CLI for this. In the soft-delete, Azure retains soft-delete resources for 90 days. By default, purge protection is disabled.
Click on Review + Create, and it performs validations for resource deployment.
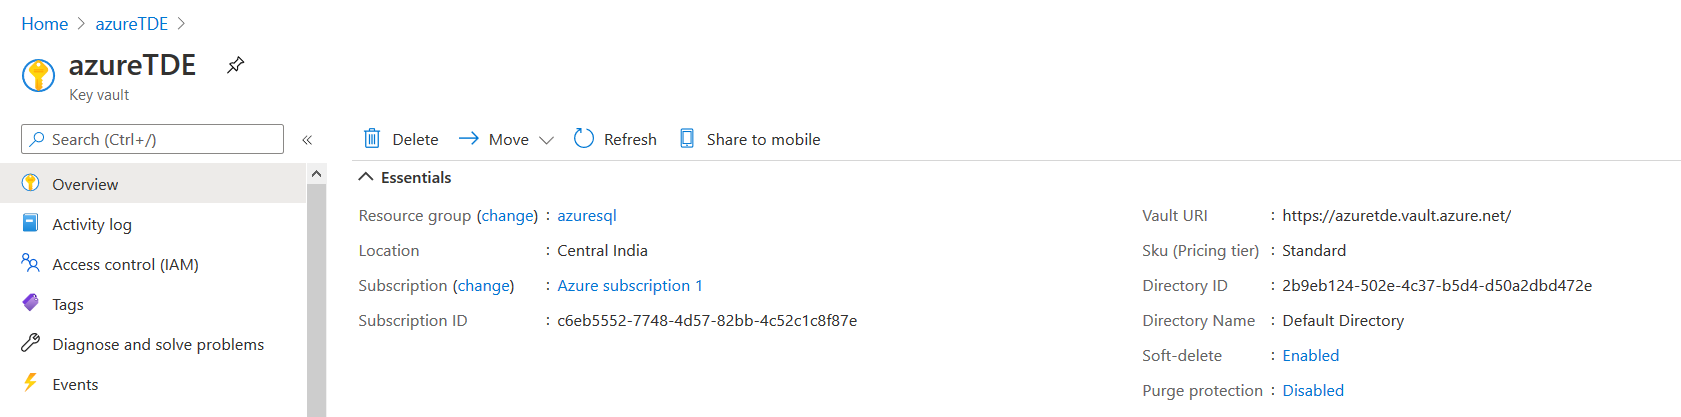
It creates the Azure Key Vault and takes you to its dashboard.
Configuring the TDE protector using Customer Managed Key
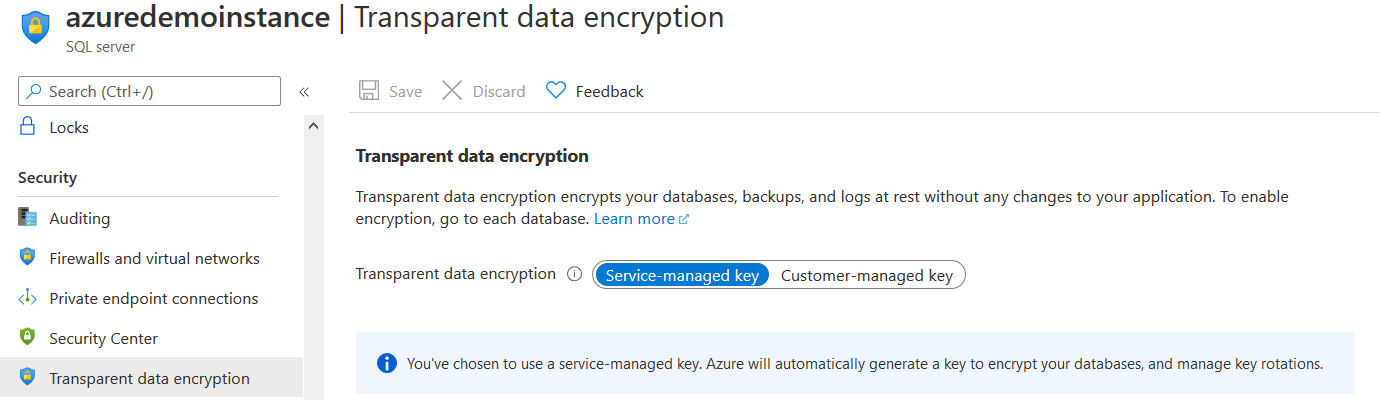
In an Azure SQL Database, the TDE protector is configured at the server level. All databases in the server inherit the same encryption key. In the Azure portal, view your Azure SQL Server configuration and navigate to Transparent data encryption. As shown below, currently Azure SQL Server instance is configured using the Service-managed key.
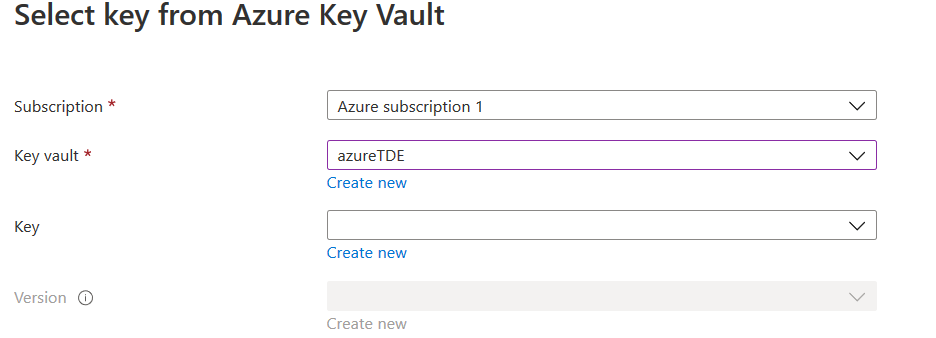
To use BYOK, click on the customer-managed key. Further, it gives you an option to select the key.
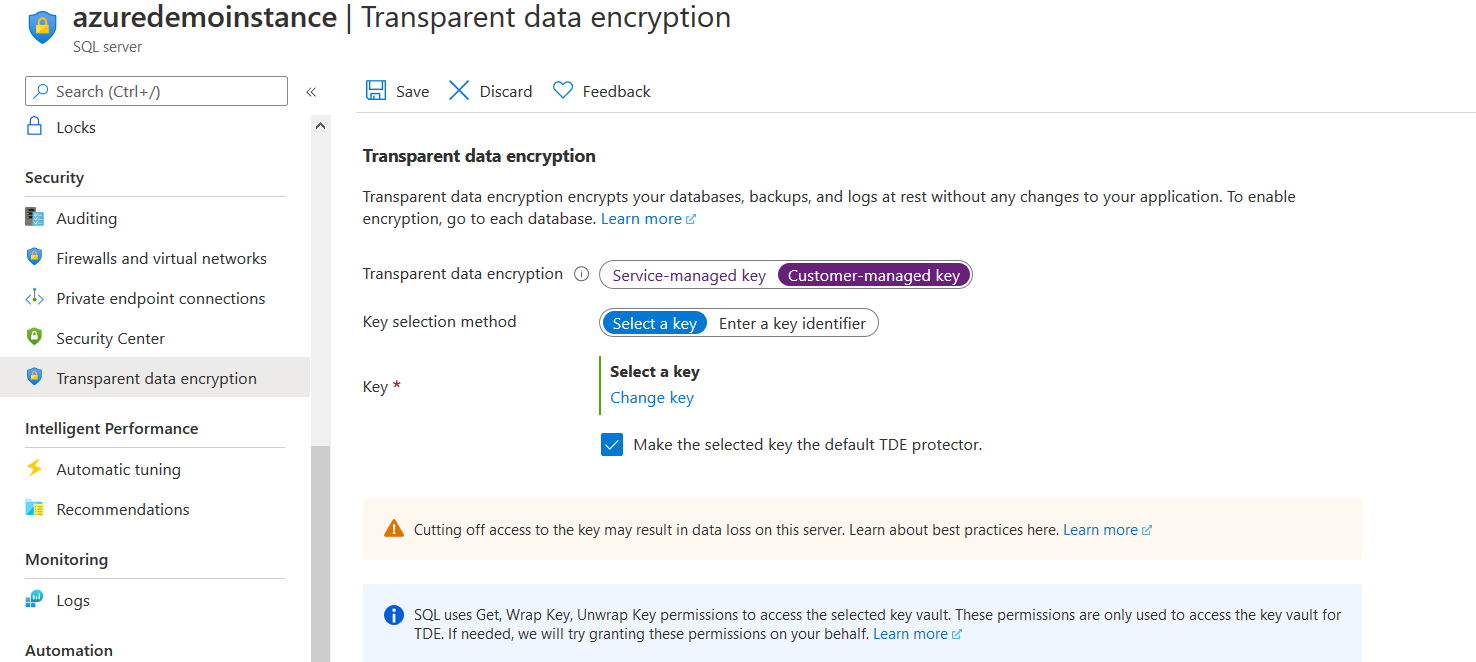
Click on Change a key. On the next page, you need to create a new Azure Key Vault (AKV) or select an existing AKV. We already created the AKV in the previous section. Therefore, we will select it from the drop-down.
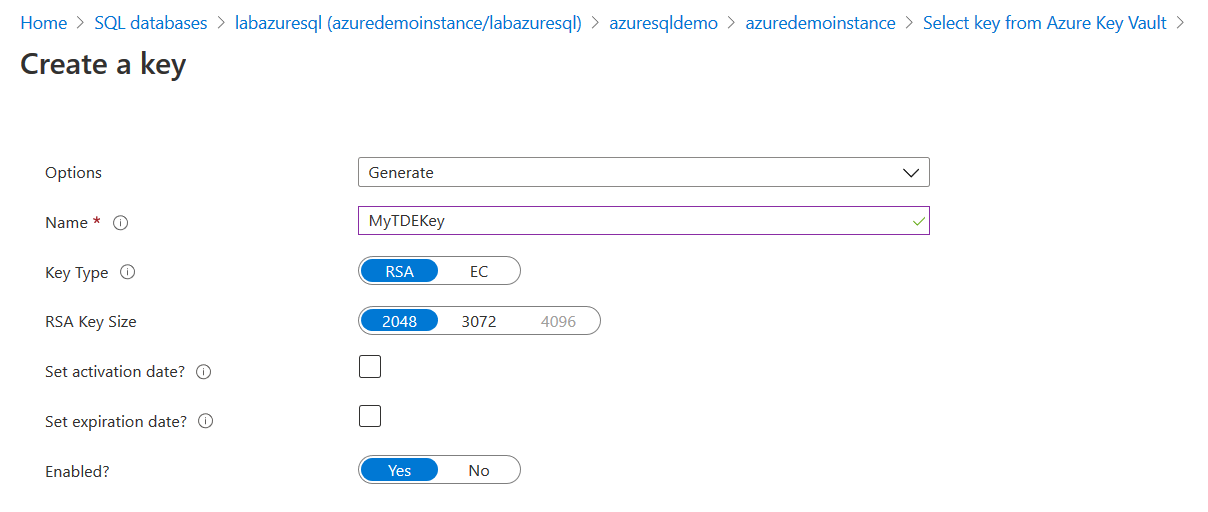
In the key field, click on Create new. It redirects you to a page, as shown below. On this page, enter the key name, select key type as RSA and use the default RSA key size as 2048.
- The supported TDE protector key type is 2048 and 3072 bytes
- If you use the key activation date, it must be set in the past. Similarly, the expiry date must be of a future date
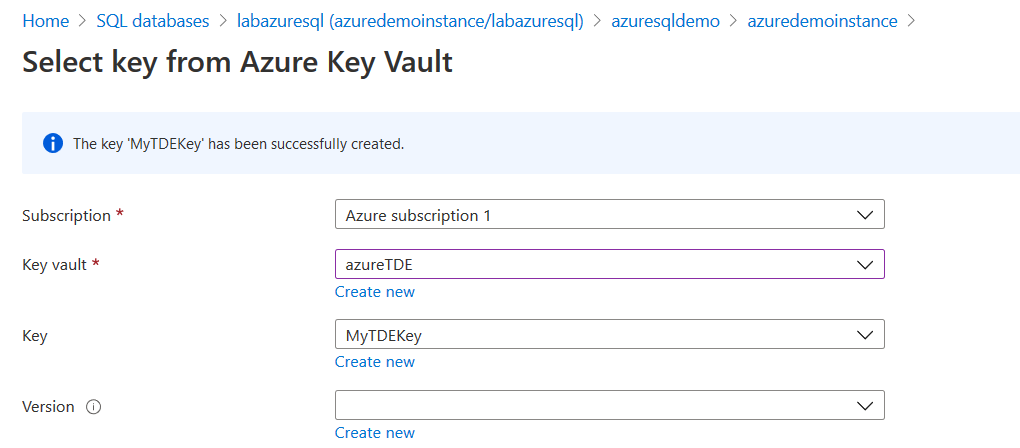
It creates a key in the AKV, as shown below.
In the next step, we select the key version. If you have multiple versions, you can choose a specific key version.
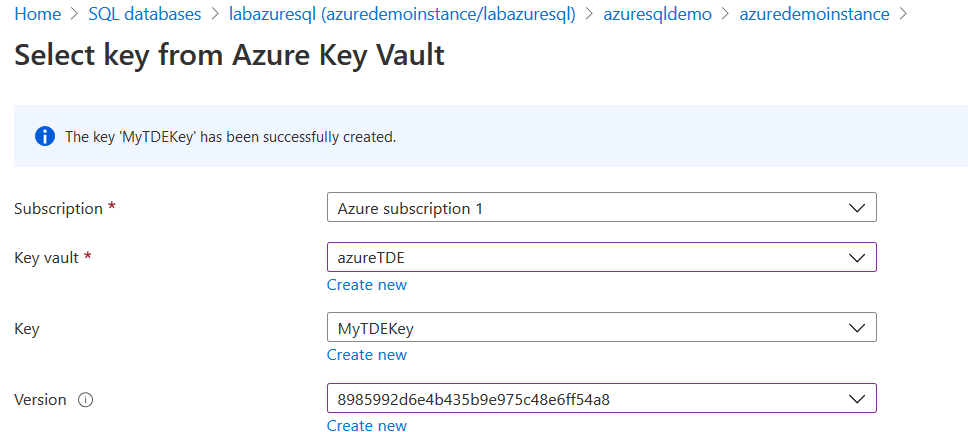
Click on Select, and you can view the key configurations in the customer-managed key selection.
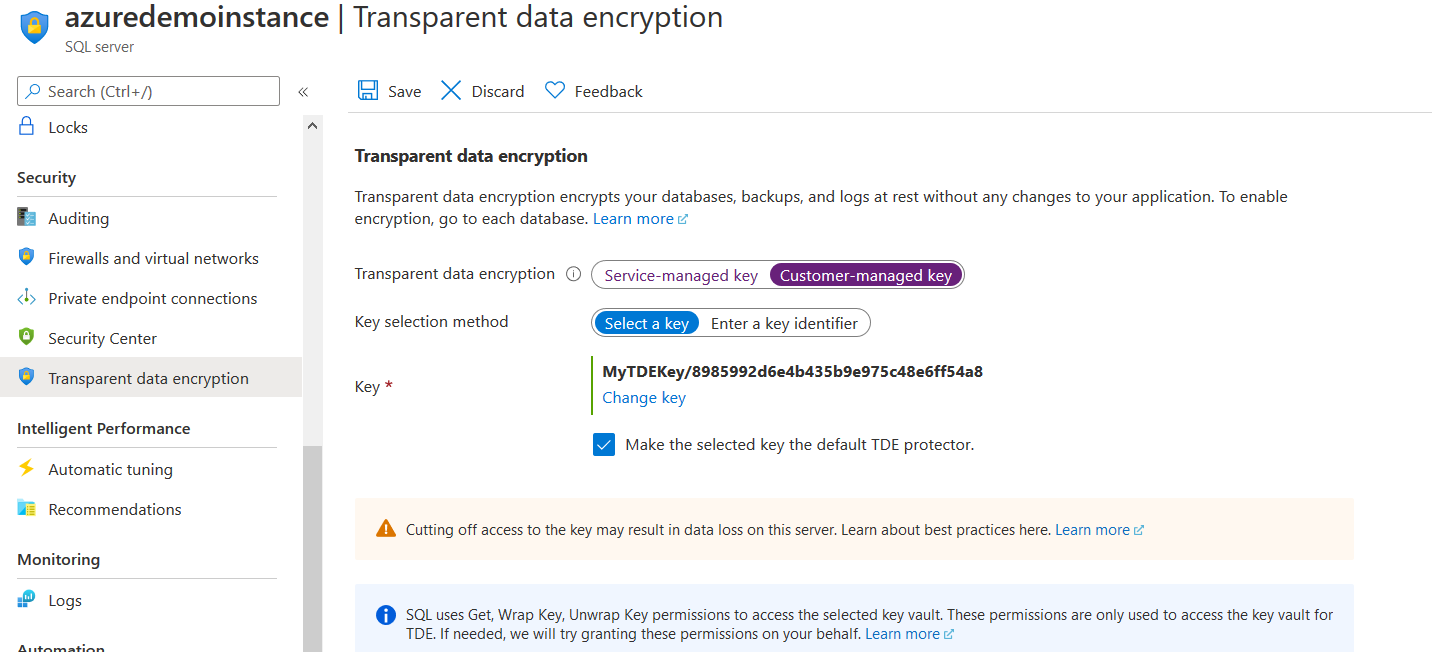
At the bottom, it gives a message, “SQL uses Get, Wrap Key, Unwrap Key permissions to access the selected key vault. These permissions are only used to access the key vault for TDE. If needed, we will try granting these permissions on your behalf”.
- Get: It retrieves the key properties and public parts from the key vault
- wrapkey: It is required to encrypt the database encryption key (DEK)
- unwrapkey: It is required to decrypt the database encryption key (DEK)
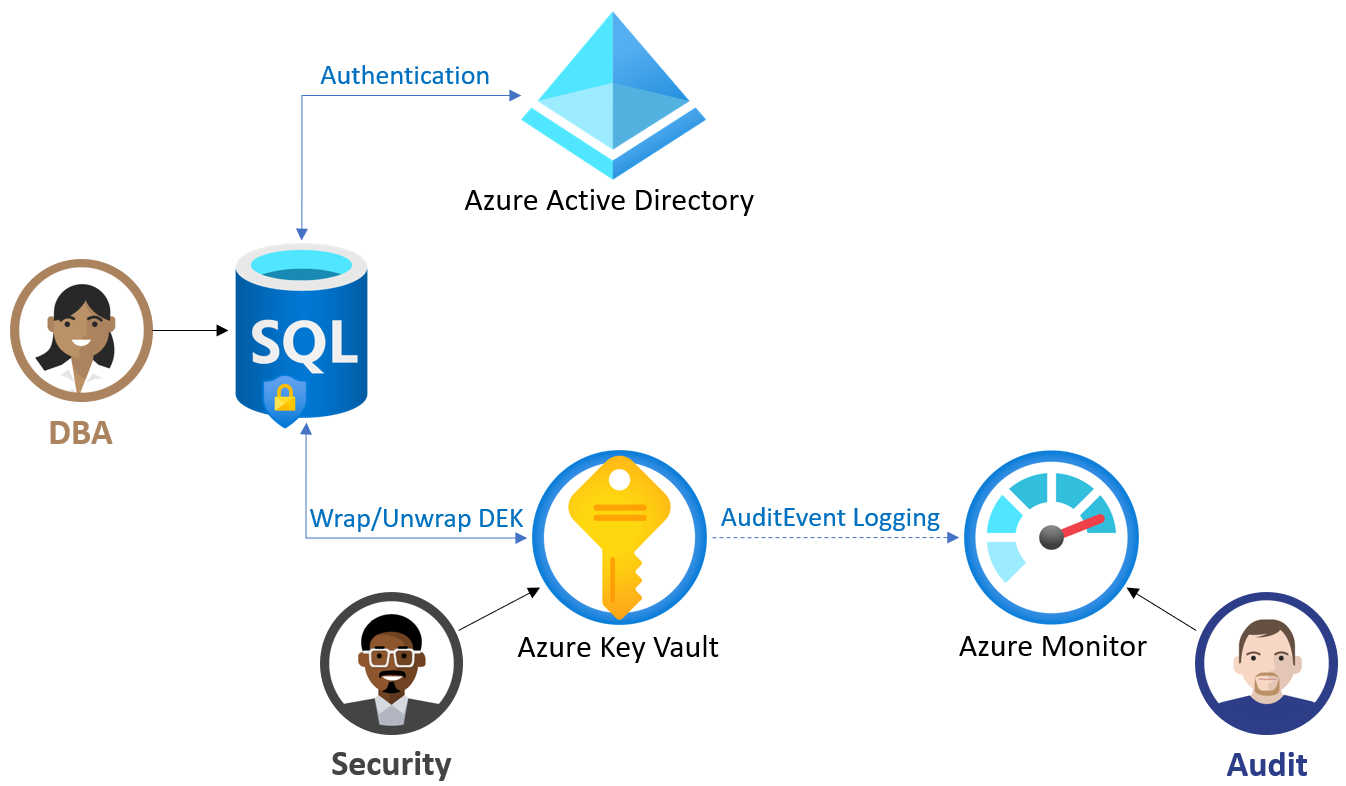
In the following image (reference: Microsoft docs), you get an overview of customer-managed TDE work.
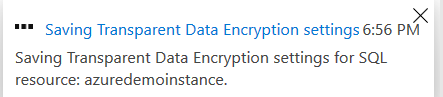
Once you have reviewed the customer-managed key configuration, click on Save. On the notification page, you get a message “Saving Transparent Data Encryption settings for SQL resource”.
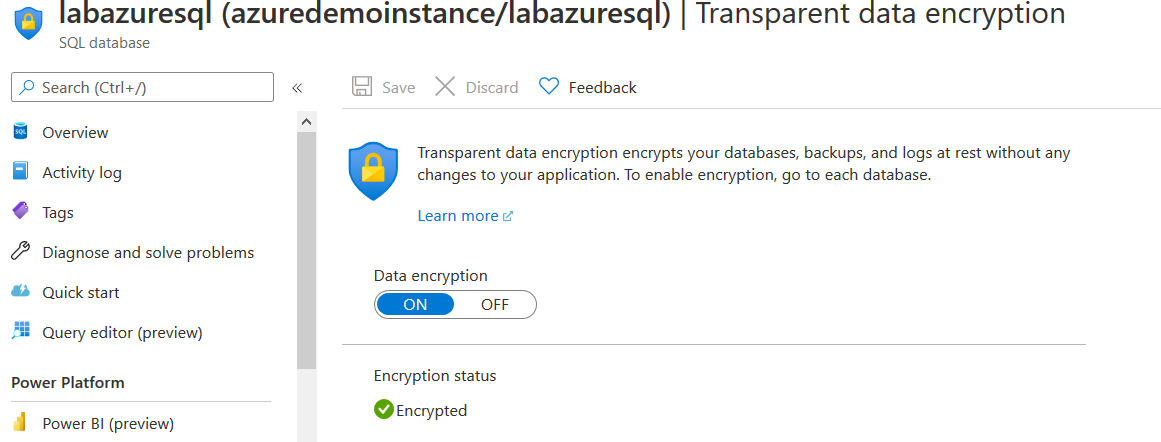
Now, navigate to Transparent data encryption for the Azure SQL Database, and the database is showing as Encrypted.
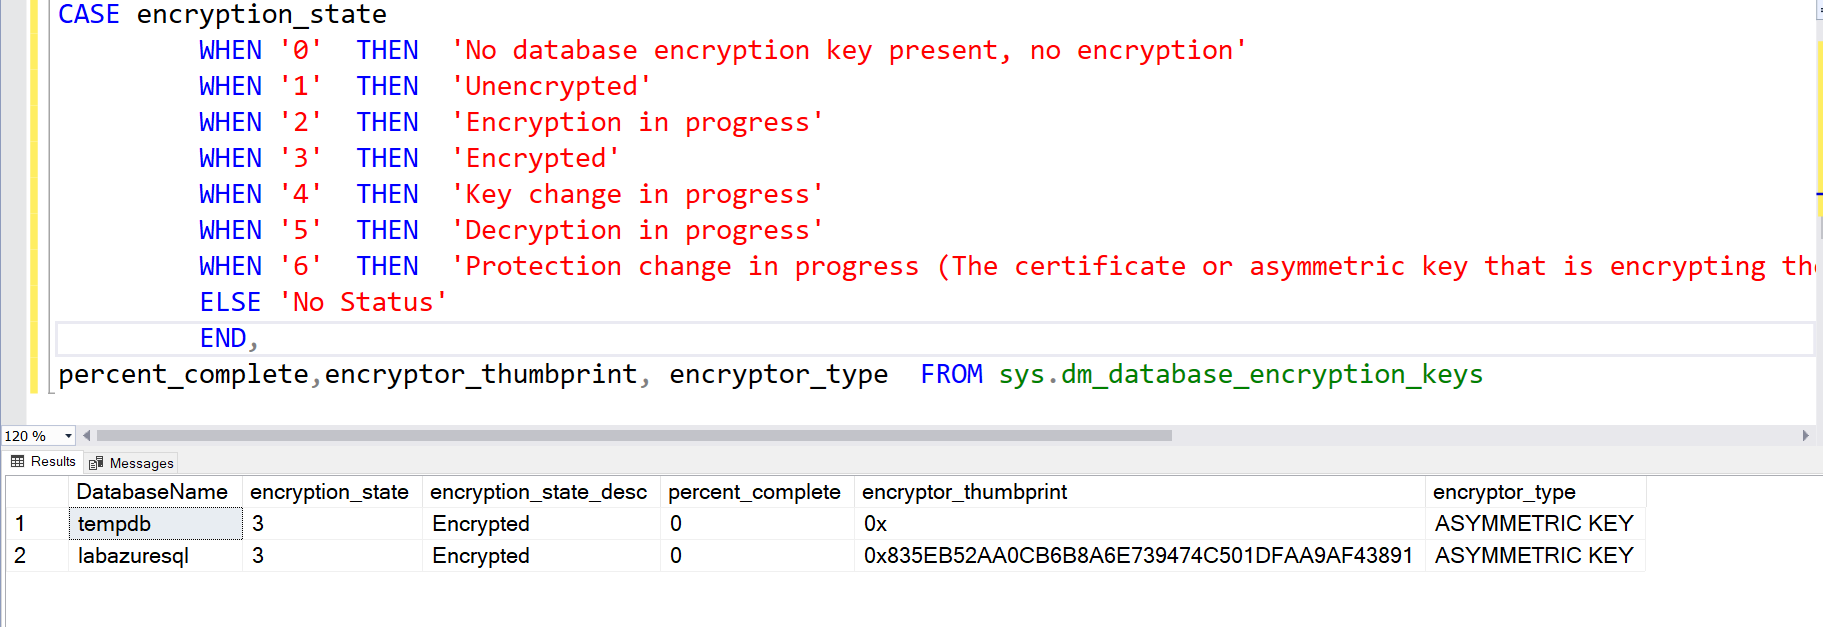
Connect to Azure SQL Database using the SSMS or Azure Data Studio. Here, we use the dynamic management view sys.dm_database_encryption_keys for tracking TDE status for the database.
|
1 2 3 4 5 6 7 8 9 10 11 12 13 |
SELECT DB_NAME(database_id) AS DatabaseName, encryption_state, encryption_state_desc = CASE encryption_state WHEN '0' THEN 'No database encryption key present, no encryption' WHEN '1' THEN 'Unencrypted' WHEN '2' THEN 'Encryption in progress' WHEN '3' THEN 'Encrypted' WHEN '4' THEN 'Key change in progress' WHEN '5' THEN 'Decryption in progress' WHEN '6' THEN 'Protection change in progress (The certificate or asymmetric key that is encrypting the database encryption key is being changed.)' ELSE 'No Status' END, percent_complete,encryptor_thumbprint, encryptor_type FROM sys.dm_database_encryption_keys |
It returns the encryption state and percent complete for the Azure SQL Database. Once the status is encrypted, you get the value 0 in the percent_complete column.
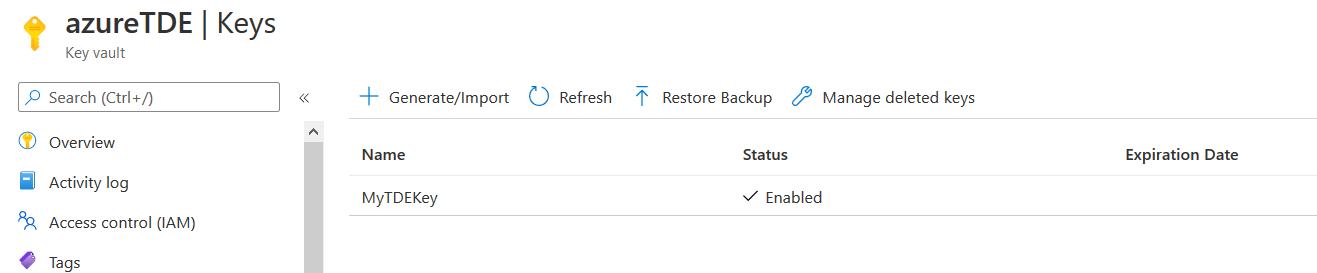
View asymmetric key in the Azure Key vault
Once you have configured a key for your Azure SQL Database TDE, you can navigate to AKV and view the key. We did not set the key expiration date; therefore, it is blank in the screenshot below.
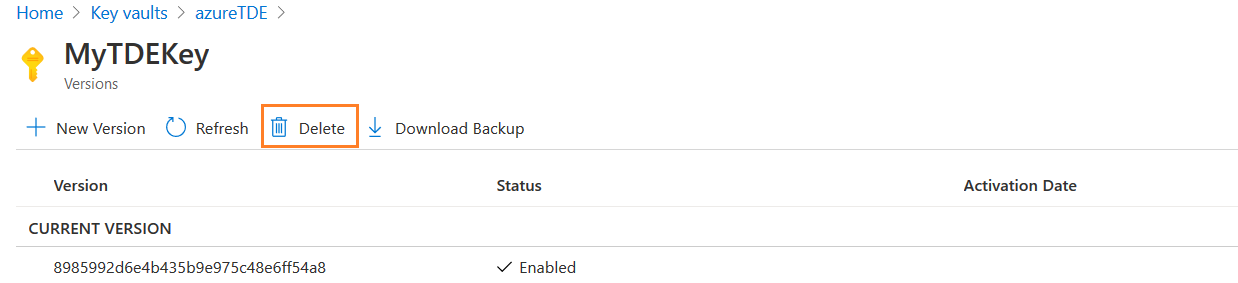
Click on the key ‘MyTDEKey’, and you get an option- Download Backup.

It downloads the key backup in your local directory. You can restore the key in the Azure Key Vault within the same subscription.

Click on Download, and it downloads a KEYBACKUP file, as shown below.


Delete the key
In the key vault, go to the key and click on Delete, as shown below.
Click on Yes if you wish to proceed with deleting the key.

You get a notification for the key deletion.

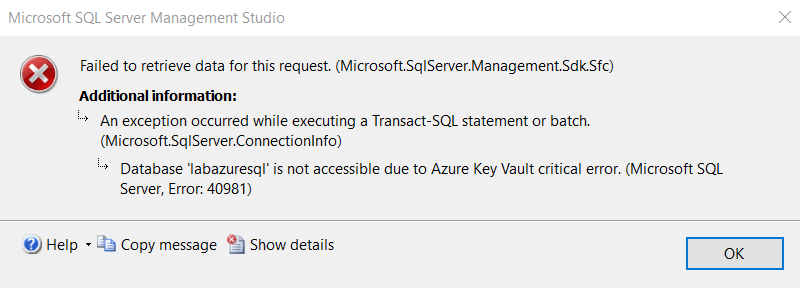
Refresh your Azure SQL Database SSMS connection. The database is not accessible due to an Azure key vault critical error. It gives an error id 40981.
We enabled the soft-delete earlier. Therefore, to fix the issue, click on Manage deleted keys, select your deleted key and click on Recover.
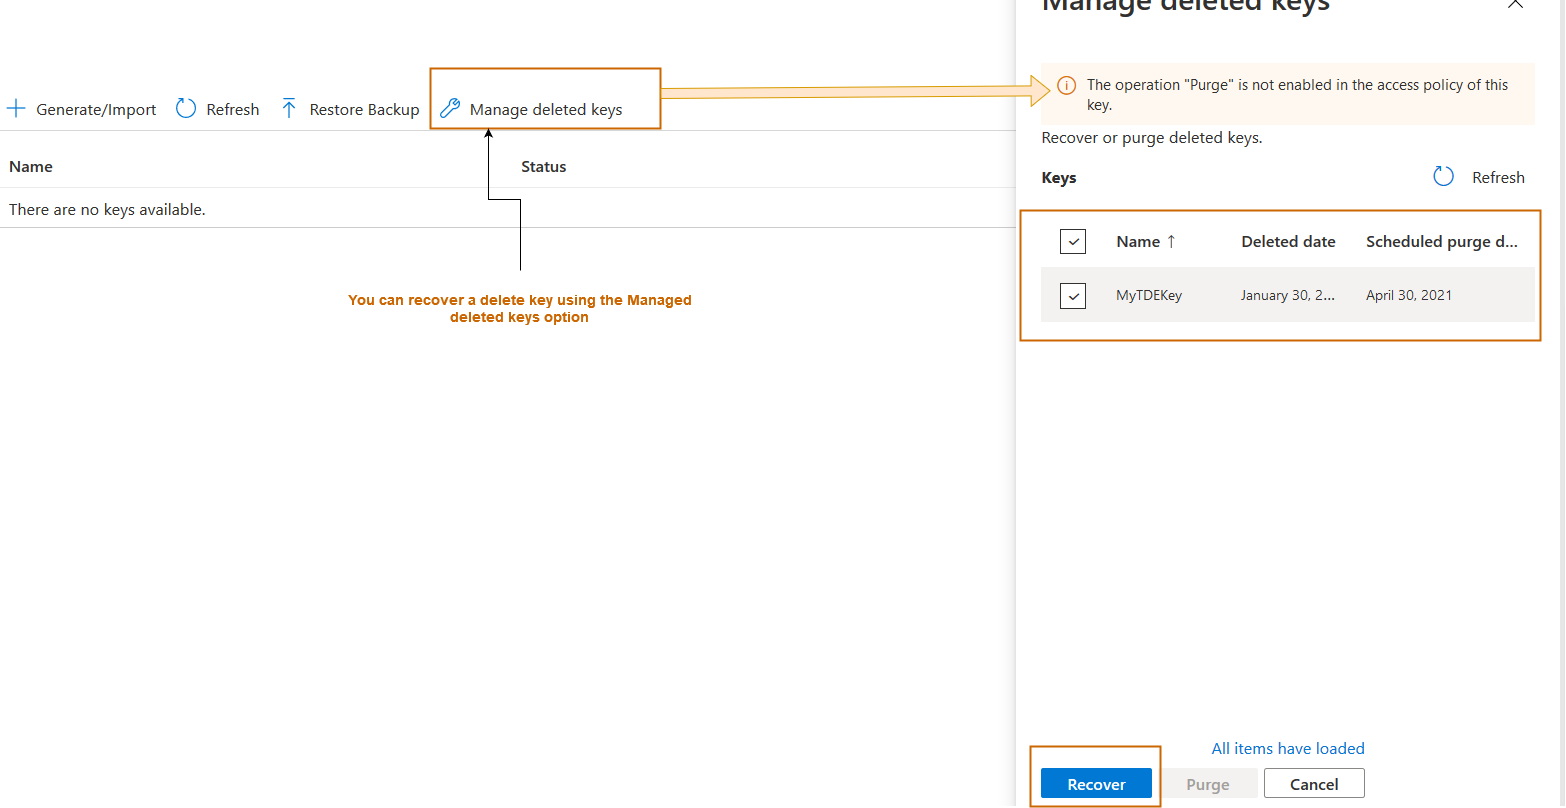
It restores the deleted key in the Azure key vault, as shown below.
The key is visible again in the Azure key vault.

- If you restore the key access within 8 hours, the database auto-heal works within the next hour
- If you restore the key access after 8 hours, Azure auto-heal is not possible. You need to revalidate the key manually in the Azure portal. It might take a longer time for the database to become available, depending on your database size
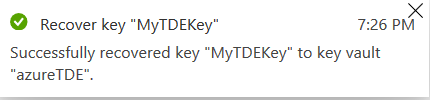
I recovered the key in the Azure key vault in my demo, and Azure SQL Database was accessible within a few minutes.
Important considerations about BYOK TDE
- It is recommended to take regular backups of your keys in the Azure Key Vault. Although we can recover a key using a soft-delete configuration, it is always a best practice to backup keys in a customer-managed key for TDE
- If you use a customer-managed key from the key vault, all newly generated backup is also encrypted with the new TDE protector
- In case we use a new key for Azure Key Vault for TDE, the old backup still uses the old TDE protector. Therefore, you should not remove the old version of keys if you want to use the old backups for any work

I am the author of the book "DP-300 Administering Relational Database on Microsoft Azure". I published more than 650 technical articles on MSSQLTips, SQLShack, Quest, CodingSight, and SeveralNines.
I am the creator of one of the biggest free online collections of articles on a single topic, with his 50-part series on SQL Server Always On Availability Groups.
Based on my contribution to the SQL Server community, I have been recognized as the prestigious Best Author of the Year continuously in 2019, 2020, and 2021 (2nd Rank) at SQLShack and the MSSQLTIPS champions award in 2020.
Personal Blog: https://www.dbblogger.com
I am always interested in new challenges so if you need consulting help, reach me at rajendra.gupta16@gmail.com
View all posts by Rajendra Gupta
- Understanding PostgreSQL SUBSTRING function - September 21, 2024
- How to install PostgreSQL on Ubuntu - July 13, 2023
- How to use the CROSSTAB function in PostgreSQL - February 17, 2023