SQL Server 2019 offers powerful new features to help in safeguarding your data and complying with various privacy regulations, which we’ll be covering in this article
SQL Server Management Studio 17.5 introduced a new feature for data discovery and data classification into different categories. This helps to discover sensitive data such as SSN number, credit card number, bank account details, personal records etc. It is very critical for the data to be secure and compliant under SOX, PCI, and GDPR for each organization. The Classify data features adds extended properties to the columns to specify the label and the information type.
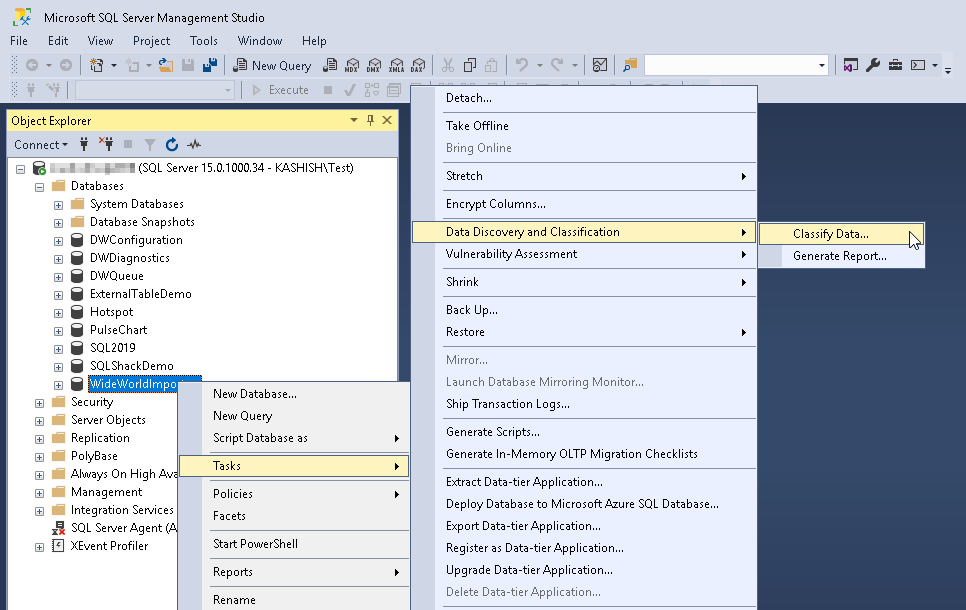
This option is available under (Right click on Database) Tasks->Data Discovery and Classification ->Classify Data in SSMS version 17.5 and above.
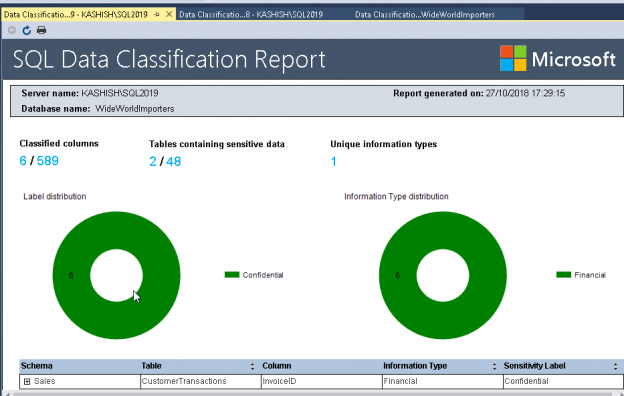
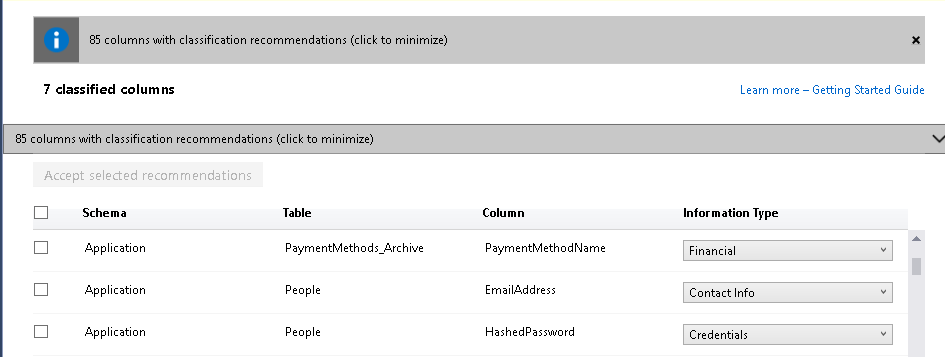
If we run the ‘Classify Data’ on WideWorldImporters database, we get the ‘Data Classification’ report.
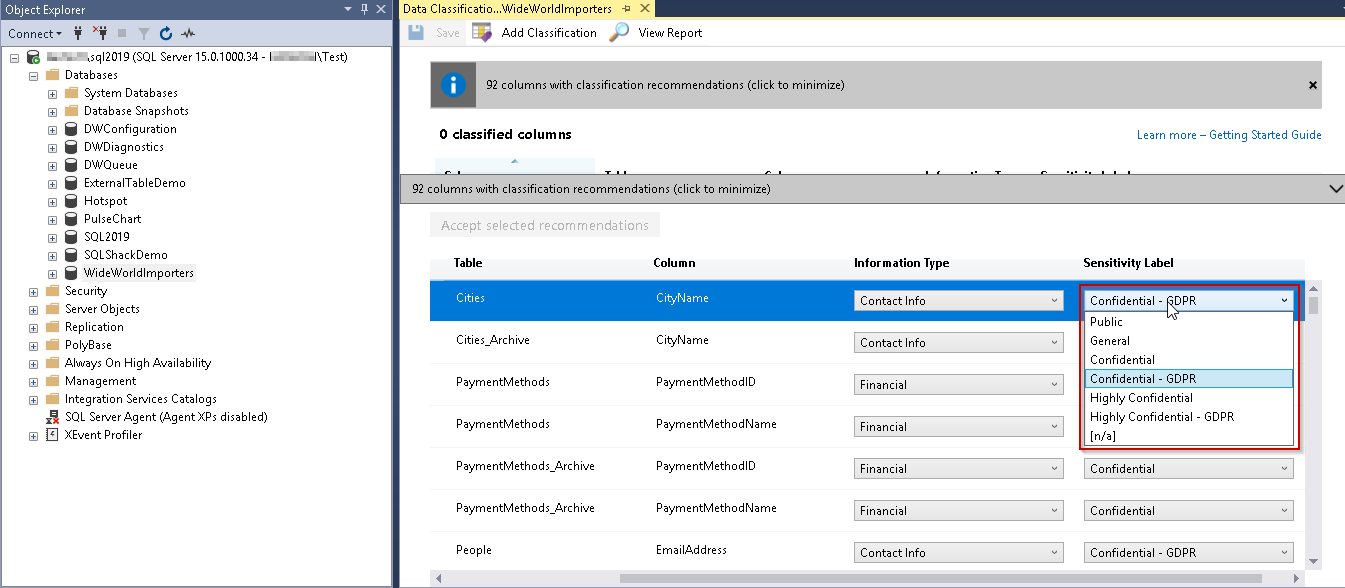
We can see that we have the option to classify the information type. We can decide whether this column contains contact info, banking, credit card, date of birth, financial, National ID etc.
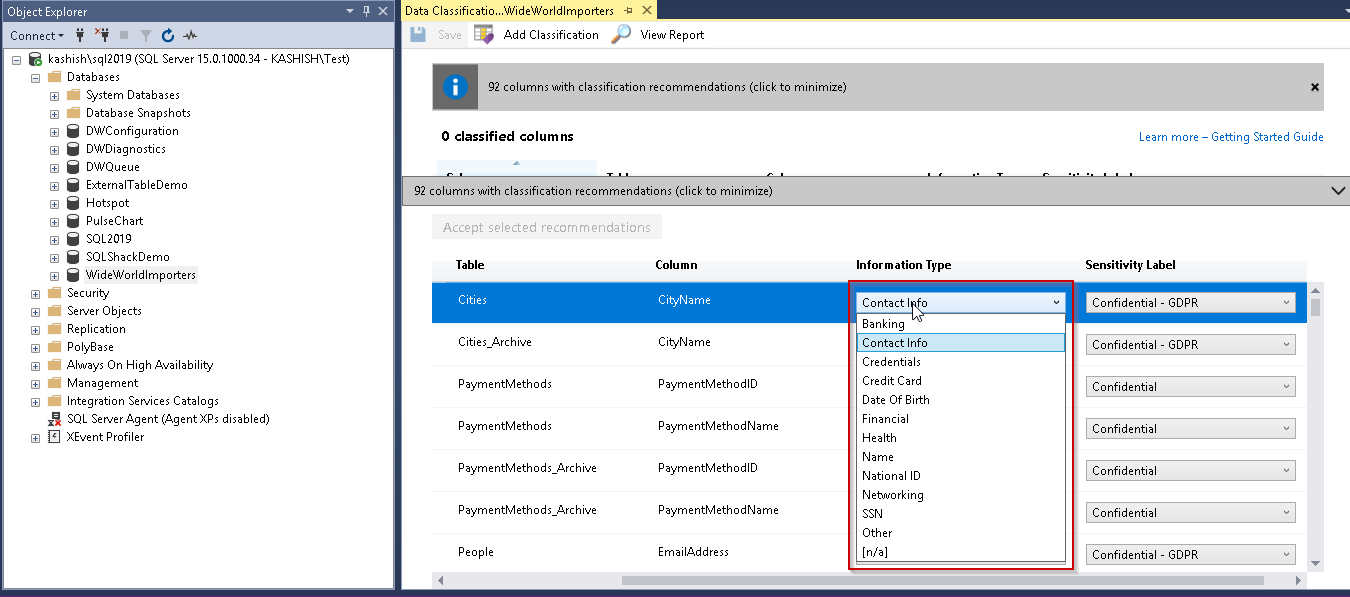
Similarly, we can choose the sensitive level as shown below:
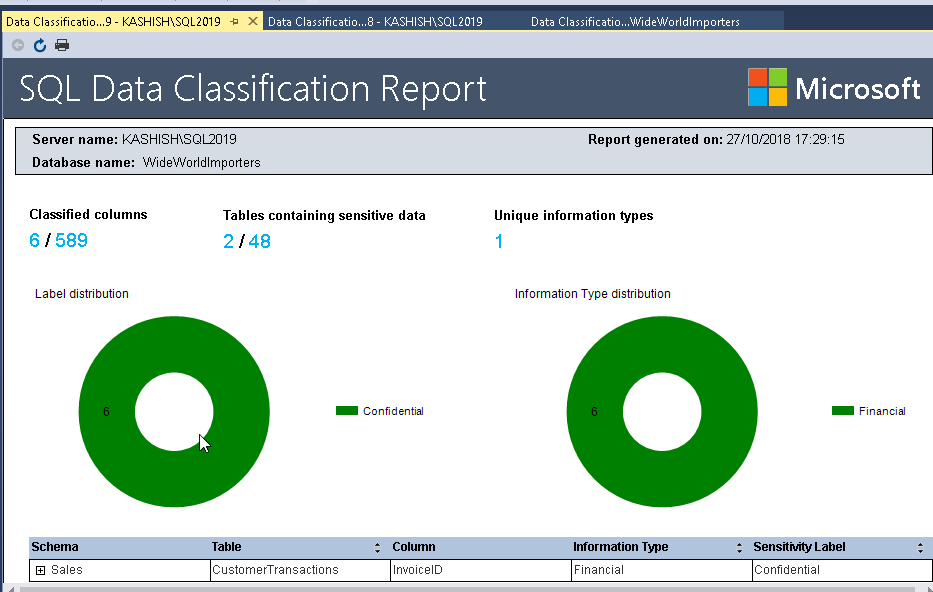
Therefore, we can choose the appropriate information type and sensitivity level and apply the recommendation accordingly. Once we apply and save the recommendation, we can view the SQL Data Classification Report that shows the information such as Classified columns, tables containing sensitive data.
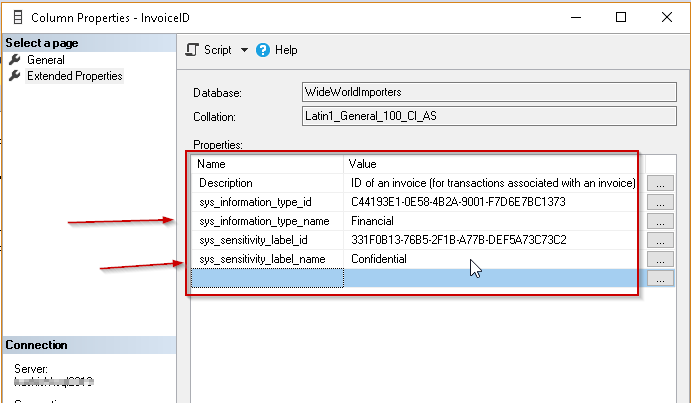
Once we have defined the information type and sensitivity level, we can go to particular column properties and can see that this information is added as part of extended properties as shown below:
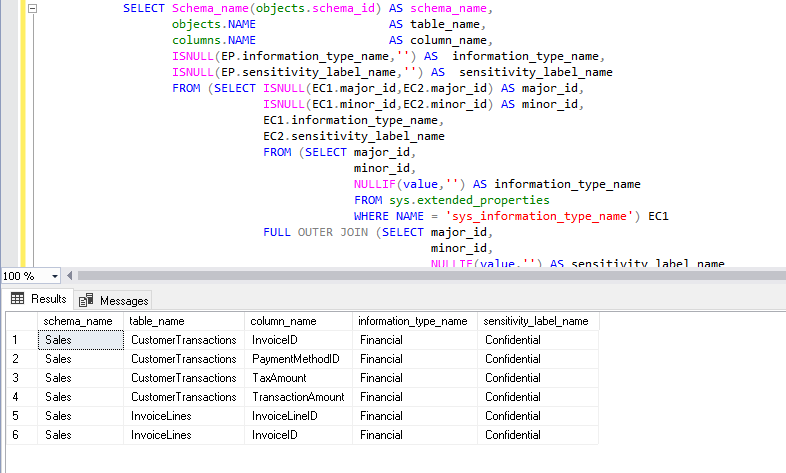
We can see all the columns in a database where we defined the data classification.
|
1 2 3 4 5 6 7 8 9 10 11 12 13 14 15 16 17 18 19 20 21 22 23 24 |
SELECT Schema_name(objects.schema_id) AS schema_name, objects.NAME AS table_name, columns.NAME AS column_name, ISNULL(EP.information_type_name,'') AS information_type_name, ISNULL(EP.sensitivity_label_name,'') AS sensitivity_label_name FROM (SELECT ISNULL(EC1.major_id,EC2.major_id) AS major_id, ISNULL(EC1.minor_id,EC2.minor_id) AS minor_id, EC1.information_type_name, EC2.sensitivity_label_name FROM (SELECT major_id, minor_id, NULLIF(value,'') AS information_type_name FROM sys.extended_properties WHERE NAME = 'sys_information_type_name') EC1 FULL OUTER JOIN (SELECT major_id, minor_id, NULLIF(value,'') AS sensitivity_label_name FROM sys.extended_properties WHERE NAME = 'sys_sensitivity_label_name') EC2 ON ( EC2.major_id = EC1.major_id AND EC2.minor_id = EC1.minor_id )) EP JOIN sys.objects objects ON EP.major_id = objects.object_id JOIN sys.columns columns ON ( EP.major_id = columns.object_id AND EP.minor_id = columns.column_id ) |
So far, we have explored the way Classify Data in SQL Server Management Studio using the extended properties in the columns. Now let us view the enhancements in the SQL Server 2019.
SQL Server 2019 and Data Classification
Before we move further, you can go through below articles to get familiar with SQL Server 2019.
- SQL Server 2019 overview and installation
- SQL Server 2019 – New DMF sys.dm_db_page_info
- SQL Server 2019 Enhanced PolyBase – Part 1
- SQL Server 2019 Enhanced PolyBase – Part 2
SQL Server 2019 provides enhancements to Data classification feature. SQL Server 2019 provides new command ‘ADD SENSITIVITY CLASSIFICATION’. We can define the information type and label for our sensitive data similar to SQL Server Management Studio 17.5 and above Classify data. We will see the difference in the later section of the article.
The syntax for command ‘ADD SENSITIVITY CLASSIFICATION’ is as shown below.
|
1 2 |
ADD SENSITIVITY CLASSIFICATION TO [Object names] WITH (LABEL = [Label type], INFORMATION_TYPE = [Information Type]); |
[Object names] | [schema_name].[table_name].[column_name] |
Label |
|
Information Type |
|
Now we will define the data classification using SQL Server 2019 ADD SENSITIVITY CLASSIFICATION.
Run the below query to define the data classification for the above table and columns.
|
1 2 3 4 5 6 7 8 |
ADD SENSITIVITY CLASSIFICATION TO APPLICATION.PaymentMethods_Archive.PaymentMethodName WITH (LABEL = 'Confidential', INFORMATION_TYPE = 'Financial'); ADD SENSITIVITY CLASSIFICATION TO APPLICATION.PEOPLE.EMailAddress WITH (LABEL = 'Highly Confidential', INFORMATION_TYPE = 'Contact Info'); ADD SENSITIVITY CLASSIFICATION TO APPLICATION.PEOPLE.HashedPassword WITH (LABEL = 'Highly Confidential- GDPR', INFORMATION_TYPE = 'Credentials'); |
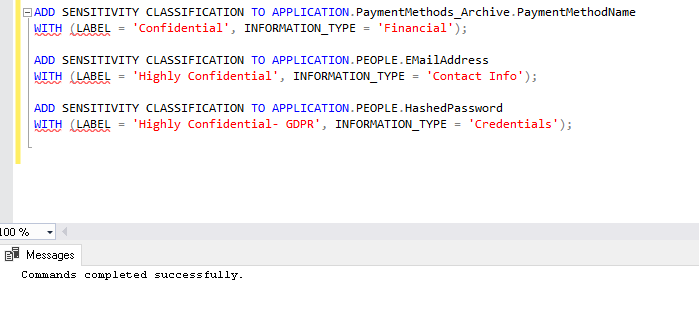
In this example, we defined data classification individually for each table. Let us assume that we want to define the same label and information type for two columns from different tables. We can either run the separate statement or club them into a single statement.
In the below example, we will define the same data label (Confidential) and information type (Financial) for the SpecialDeals and StockItems table.

Therefore, we can run the below query. In this query, we have added both the tables in a single statement of ‘ADD SENSITIVITY CLASSIFICATION’.
|
1 2 3 4 |
ADD SENSITIVITY CLASSIFICATION TO Sales.Invoices.InvoiceID, Sales.SpecialDeals.DiscountAmount WITH (LABEL = 'Confidential', INFORMATION_TYPE = 'Financial'); |
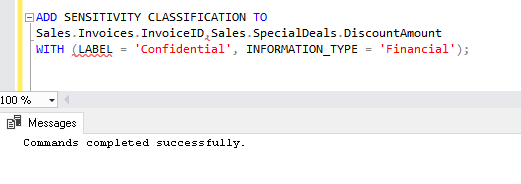
Now, let us look at the column property similar way we checked above after specifying data classification using SQL Server Management Studio 17.5. We do not find any extended property in SQL Server 2019 way of classifying data.
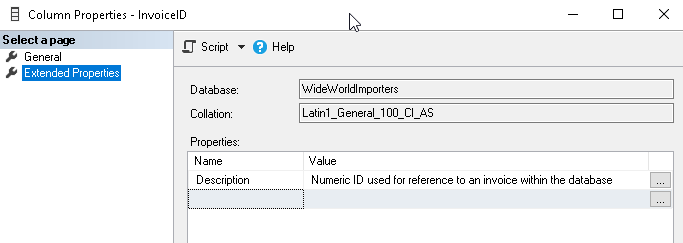
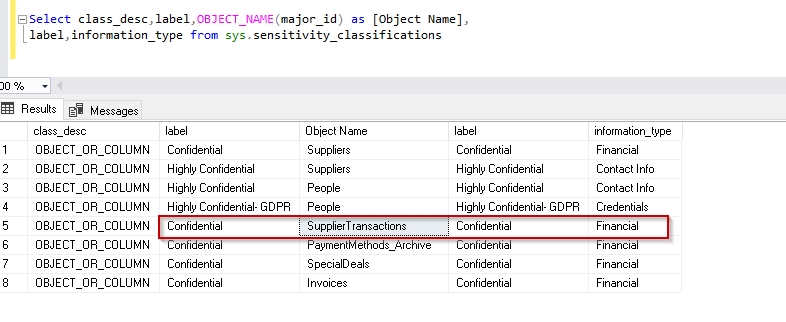
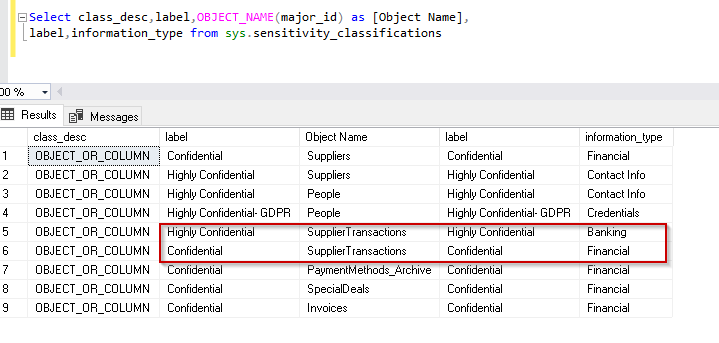
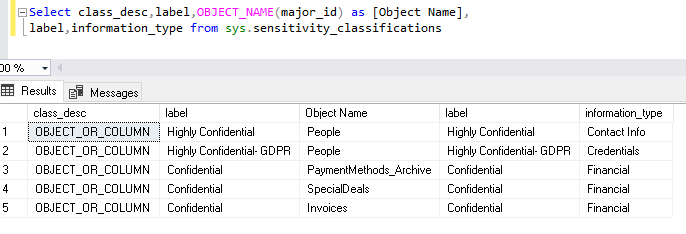
SQL Server 2019 does not store information as the extended properties. Instead, it adds metadata about the sensitivity classification information as per defined columns. We can view the information about classified columns from the system view sys.sensitivity_classifications.
|
1 2 |
Select class_desc,label,OBJECT_NAME(major_id) as [Object Name], label,information_type from sys.sensitivity_classifications |
Audit behaviour for classified data in SQL Server 2019
Suppose we have defined auditing on the database table. Later we have defined the data classification using ADD SENSITIVITY CLASSIFICATION. Do we need to make changes in the data auditing in order to capture the related information about the data classification?
Firstly, we can see that the on below columns we have not defined any data classification. We will define it later.

Now let us create the SERVER AUDIT first using below query:
|
1 2 3 4 5 6 7 8 |
USE master; GO CREATE SERVER AUDIT DataClassficationSQL2019 TO FILE (FILEPATH = 'C:\sqlshack\Audit\'); GO ALTER SERVER AUDIT DataClassficationSQL2019 WITH (STATE = ON); GO |
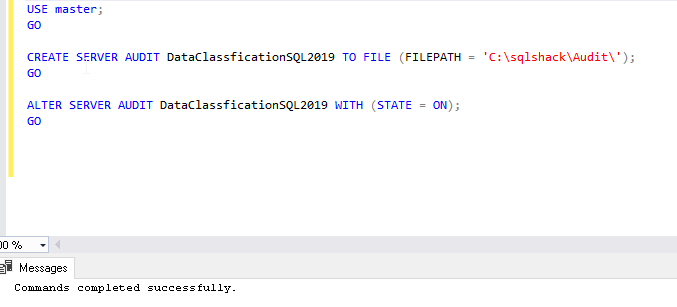
This query creates the audit file in C:\sqlshack\Audit folder. We can see a server audit file in this path.

- Define Database Audit on object level and specify the operation we want to capture for example select, insert, update etc.
|
1 2 3 4 5 6 |
USE [WideWorldImporters] GO Create DATABASE AUDIT SPECIFICATION [PurchasingSuppliersTransactions] FOR SERVER AUDIT DataClassficationSQL2019 ADD (SELECT ON [Purchasing].[SupplierTransactions] BY dbo) WITH (STATE = ON); |
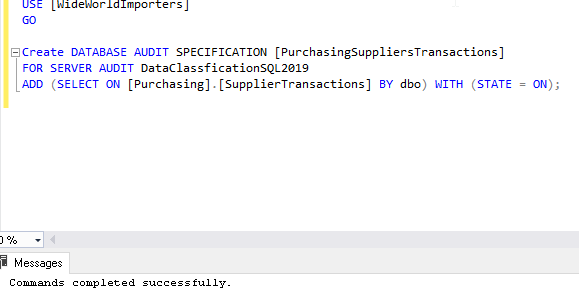
This database audit will capture the event for select statements on the Application. People Table.
- Now let us classify data using ‘ADD SENSITIVITY CLASSIFICATION’ in SQL Server 2019 for the columns

- Perform some select activity on the [Purchasing].[SupplierTransactions] the table in the WideWorldImporters database. These select events will be captured by the database audit created in the above step
- Now let us analyze the database audit data collected in the file created on the path specified. We will analyze the Database Audit using the sys.fn_get_audit_file function
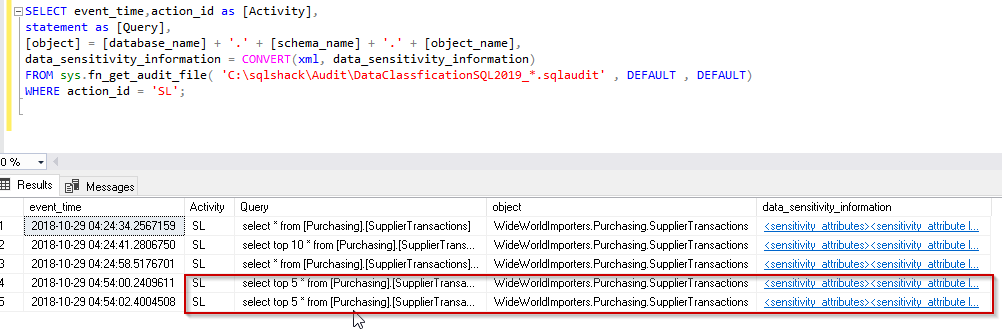
We observed so far that we have not made any changes in the database audit. SQL Server 2019 adds a new column data_sensitivity_infomation in the audit file to analyze the database audit.
In the below query, we can see that we provided input to the function as audit file created by the database audit.
sys.fn_get_audit_file( ‘C:\sqlshack\Audit\DataClassficationSQL2019_*.sqlaudit’
In addition, in the output, we will analyse the information from data_sensitivity_information column.
data_sensitivity_information = CONVERT(xml, data_sensitivity_information)
|
1 2 3 4 5 6 |
SELECT event_time,action_id as [Activity], statement as [Query], [object] = [database_name] + '.' + [schema_name] + '.' + [object_name], data_sensitivity_information = CONVERT(xml, data_sensitivity_information) FROM sys.fn_get_audit_file( 'C:\sqlshack\Audit\DataClassficationSQL2019_*.sqlaudit' DEFAULT , DEFAULT) WHERE action_id = 'SL'; --SL filtered out events for select statements. |
We can see that the select statement is captured in the database audit. Let us click on the XML link in the data_sensitivity_column. It returns the below information for the label and information_type.

<sensitivity_attributes>
<sensitivity_attribute label=“Confidential” information_type=“Financial” />
</sensitivity_attributes>
Now let us verify the same using the sys .sensitivity_classification. we can see the database audit collected the same information without modifying anything in the audit.
- Now let us add data classification to one more column in this [Purchasing].[SupplierTransactions] table.
LABEL = ‘Highly Confidential’, INFORMATION_TYPE = ‘Banking’
|
1 2 |
ADD SENSITIVITY CLASSIFICATION TO [Purchasing].[SupplierTransactions].[SupplierInvoiceNumber] WITH (LABEL = 'Highly Confidential', INFORMATION_TYPE = 'Banking'); |

- Let us view the database audit result again:
Click on the XML link and we can view both the label and information type for the table.
<sensitivity_attributes>
<sensitivity_attribute label=“Highly Confidential” information_type=“Banking” />
<sensitivity_attribute label=“Confidential” information_type=“Financial” />
</sensitivity_attributes>

We can verify the same information in below image as well.
Conclusion
Add sensitivity classification is a nice enhancement in SQL Server 2019. We can identify the columns from the SQL Server Management Studio Classify Data report and add the metadata without the extended properties. You can work on this to take a step closer to achieving full data privacy regulation compliance.
- Understanding PostgreSQL SUBSTRING function - September 21, 2024
- How to install PostgreSQL on Ubuntu - July 13, 2023
- How to use the CROSSTAB function in PostgreSQL - February 17, 2023

