
- Download SQL Server 2012 or SQL Server 2014 media
- Download all the needed SPs, CUs and Hotfixes that you want to “embed”
- Put all of the .exe files in one directory
- Launch the setup.exe from CMD by issuing the command:Setup.exe /Action=Install /UpdateEnabled=TRUE /UpdateSource=”path_to_the_directroy_where_the_hotfixes_are” I think the first step is quite self-explainable and does not need us spend more time discussing it. However, the second step is something we should discuss further. When you download the fixes that you want, for SQL Server 2012 and 2014 there is a huge chance the packages will look like this:
- Extract the SQL Server media into a folder on your machine by using 7zip or any other software you like that is capable of extracting .iso files.
- Create a new folder inside of the extracted media folder and paste inside all of the fixes you will need
- Create an ISO from that folder with the help of software like MagicISO.
 In order, however, for us to be able to use those fixes for our installation we have to first extract them by just double clicking and pointing to a folder where the installer should extract the final .exe file. That could be a simple directory somewhere on your machine or probably the directory that we are going to later point out in the cmd command – the one that I described as “/UpdateSource=path_to_the_directroy_where_the_hotfixes_are”. So once you have done that you should see something like the below – these are the hotfixes that I want to include in my installation for my SQL Server 2012 deployments. Yours may be different.
 Now you are ready to fire up the installation, so let’s go ahead and see what the difference is.
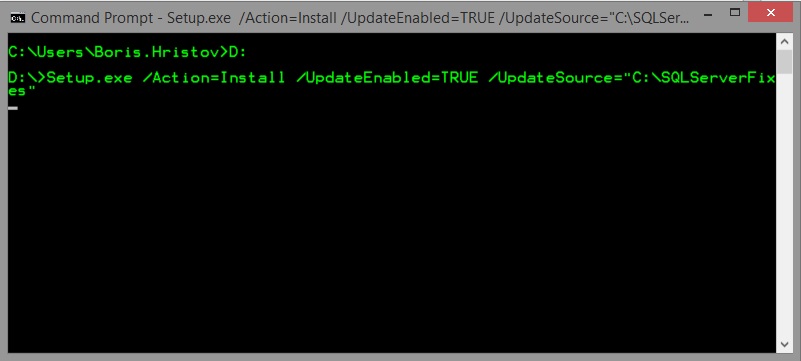
Open cmd.exe and locate to the drive and folder where your SQL installation is. In my case that is D:\ drive. Going back to step 4 my command to fire up the installation should be this one:
Setup.exe /Action=Install /UpdateEnabled=TRUE /UpdateSource=”C:\SQLServerFixes”
Now you are ready to fire up the installation, so let’s go ahead and see what the difference is.
Open cmd.exe and locate to the drive and folder where your SQL installation is. In my case that is D:\ drive. Going back to step 4 my command to fire up the installation should be this one:
Setup.exe /Action=Install /UpdateEnabled=TRUE /UpdateSource=”C:\SQLServerFixes”
 The setup starts and the first difference we see is on one of the first screens that we are presented with:
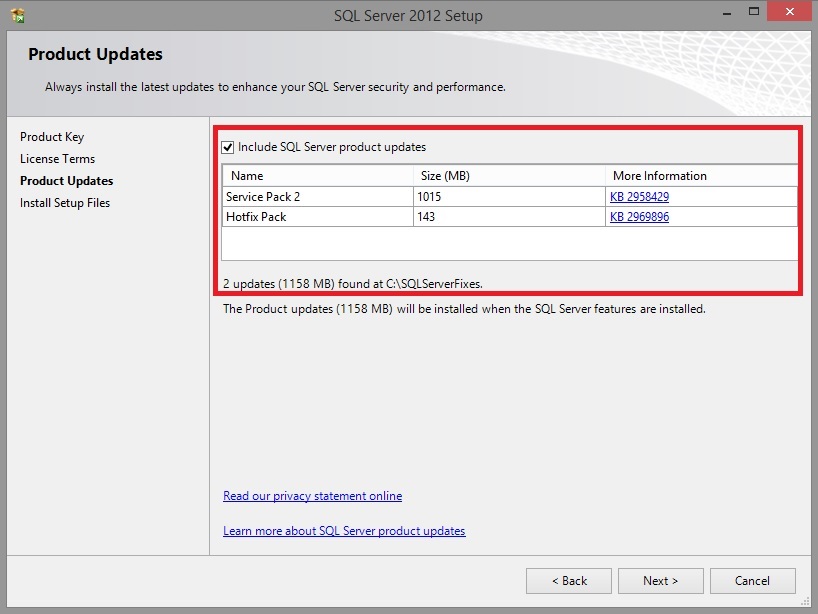 This is the moment SQL Server tells you: “Yeah, I know you want those fixes and I am going to install them for you!”. Once you move forward and do all the needed configurations, there is another point at which you may see a slight difference confirming that you are on your way and you have successfully done the slipstreaming:
 Update Version is the destination version to which your instance will be patched. If you go and verify which version is this, you will find that this is SQL Server 2012 with SP2 and hotfix KB2969896 and that’s exactly what I need. From here, just move forward and complete the installation.
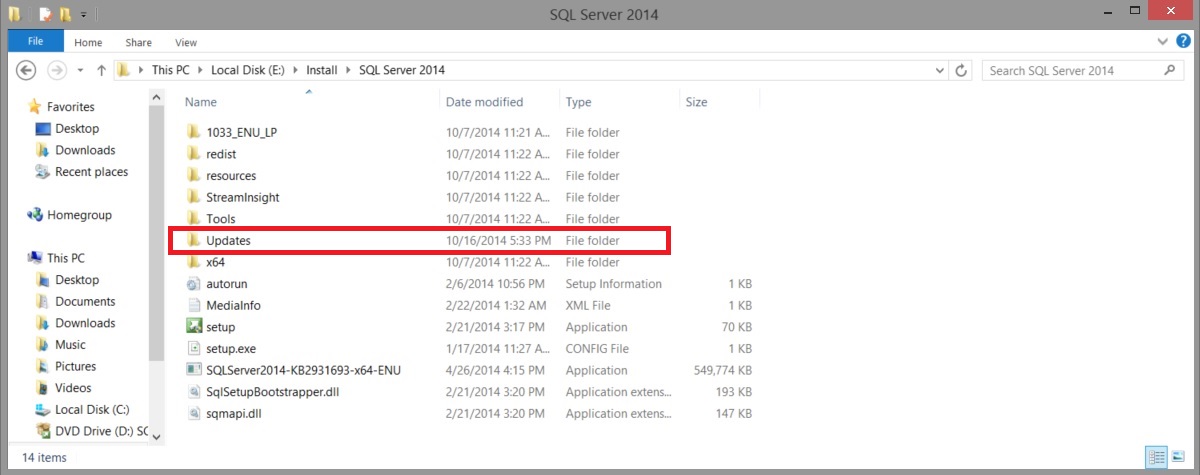
Now, you may think – that’s great, but that also means that every single time I want to install a new instance, I will have to upload all of the fixes on that machine in order to use this “technique”. However, let me help with a suggestion. Why don’t you copy all of the needed fixes to the media itself? This way, you will just attach/upload the media and just change the CMD command to point to a folder inside the SQL installation. Here is what you need to do:
Update Version is the destination version to which your instance will be patched. If you go and verify which version is this, you will find that this is SQL Server 2012 with SP2 and hotfix KB2969896 and that’s exactly what I need. From here, just move forward and complete the installation.
Now, you may think – that’s great, but that also means that every single time I want to install a new instance, I will have to upload all of the fixes on that machine in order to use this “technique”. However, let me help with a suggestion. Why don’t you copy all of the needed fixes to the media itself? This way, you will just attach/upload the media and just change the CMD command to point to a folder inside the SQL installation. Here is what you need to do:
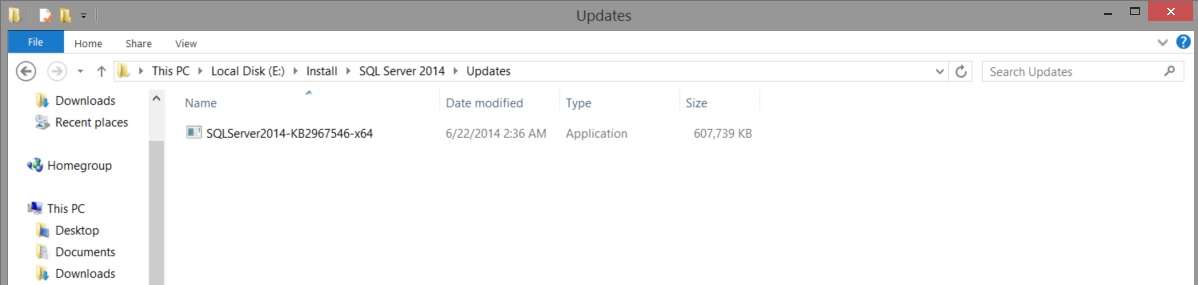 Once I create the .iso file based on this folder, I just run CMD and execute the below:
Setup.exe /Action=Install /UpdateEnabled=TRUE /UpdateSource=”.\Updates”
That’s it! Now you know how to save precious time when you are deploying a new SQL Server instance. No more you are required to manually start every single Service Pack then Cumulative update and Security Hotfix you need! Now you just put all of those in a folder and “point” SQL Server’s setup to that folder. In the next article I am going to share with you an even more advanced approach of installing SQL Server – one in which you will not even have to go through the installation wizard because you won’t see it at all!
Once I create the .iso file based on this folder, I just run CMD and execute the below:
Setup.exe /Action=Install /UpdateEnabled=TRUE /UpdateSource=”.\Updates”
That’s it! Now you know how to save precious time when you are deploying a new SQL Server instance. No more you are required to manually start every single Service Pack then Cumulative update and Security Hotfix you need! Now you just put all of those in a folder and “point” SQL Server’s setup to that folder. In the next article I am going to share with you an even more advanced approach of installing SQL Server – one in which you will not even have to go through the installation wizard because you won’t see it at all!

Boris is a SQL Server Consultant and Pluralsight Author from Bulgaria who you can regularly see speaking at conferences all across Europe.
He is also training companies and students in the “Art of SQL Server” and loves to share his knowledge online as part of podcasts, webcasts or on his blog – http://borishristov.com/blog/.
The fastest way you can reach him is on twitter where he writes under @BorisHristov and you can even join him for a SQLHangout which are video conversations that he hosts with people from the SQL Server community
View all posts by Boris Hristov
Latest posts by Boris Hristov (see all)
- Unattended installation of SQL Server - December 11, 2014
- Slipstreaming SQL Server 2012 and 2014 - November 12, 2014