
This article explores locks to prevent unexpected changes in Azure SQL Database resources.
Introduction
Suppose you manage multiple critical Azure SQL Server resources. As an administrator, you don’t want any user to delete or update the resource accidentally. For example, you do not want anyone to modify the service tier of the Azure database. Similarly, consider the scenario where a user accidentally deletes the Azure SQL Server or Azure SQL Database. We cannot afford application downtime until you recover your database. Definitely, you want to prevent any such accidents.
This article configures the available locks and their impacts for safeguarding Azure SQL databases or Azure resources.
Azure lock types
Azure provides the ability to lock the subscription, resource group or specific resource for any accidental modifying or deleting the critical resources. It provides the following locking mechanism.
Read-only
- The Read-Only lock specifies that an authorized user can access the resource, but they cannot update or delete activity. It is similar to assigning a reader role for users
Delete lock
- The delete lock allows users to read, modify the resource; however, they cannot drop the resource
- Note: These locks do not restrict users from creating, updating or deleting objects in an Azure SQL Database
You can apply locks at a parent scope or an individual resource. The child resource inherits the same locks. For example, if you place a lock on the Azure SQL Server level, all databases inherit the lock configuration.
- Note: The users with the Owner and User Access Administrator role can create or delete the locks
Configuration of the Read-only Lock using the Azure Portal
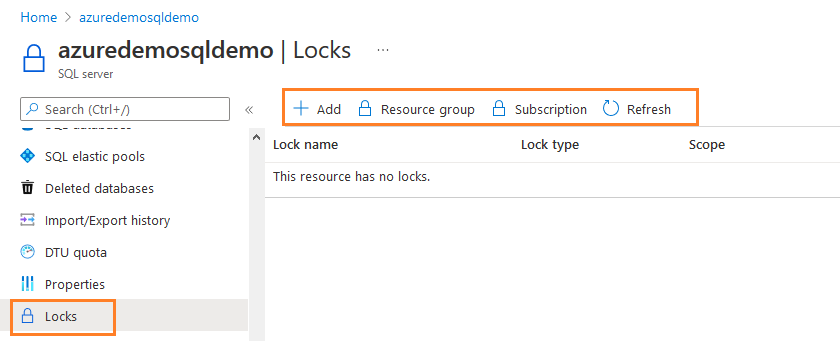
Suppose we want to configure the locks for Azure SQL Server. To configure the locks using the Azure portal, navigate to the Settings blade and select Locks.
Currently, the resource has no locks configured, as shown below.
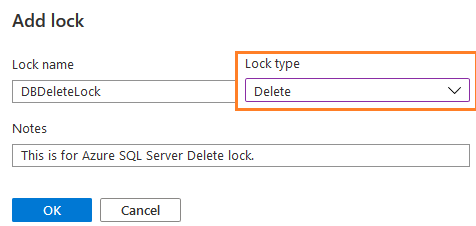
To configure a lock, click on Add. In the Add lock box, enter the following information.
- Lock name: Enter a suitable name for the lock
- Lock type: Select the lock type from Read-only or Delete from the drop-down values
- Notes: Enter the notes for reference purposes. It is an optional field
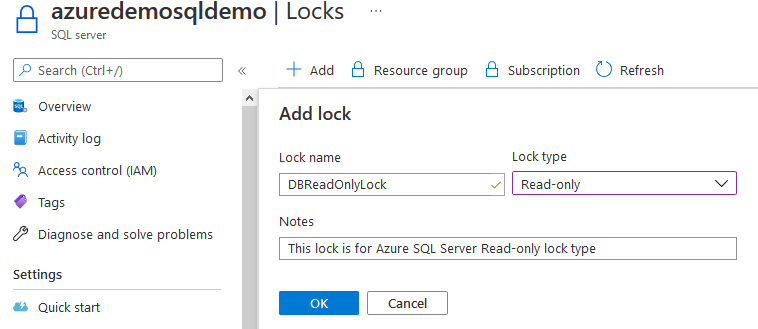
Click Ok, and you have configured a read-only lock to protect Azure SQL Server resources. The scope column specifies the resource on which the lock is configured.

We configured the lock at Azure SQL Server. Therefore, it inherits the lock configuration of all databases in this server. To validate, click on Locks for the Azure SQL Database.
It displays the parent lock with a warning message –“ Parent resource lock can’t be edited here”. You cannot make any changes in the parent resource lock from the child resource.

Test the Read-only lock functionality
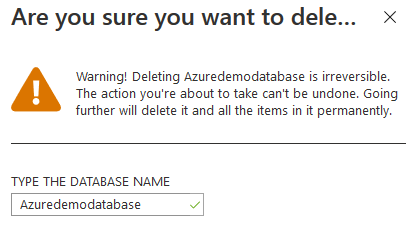
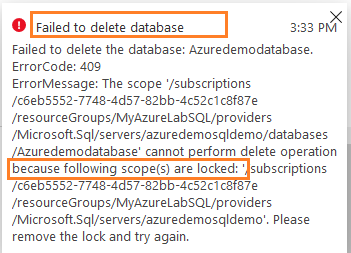
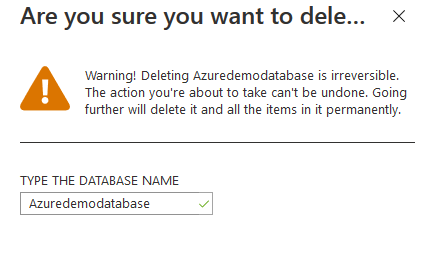
Once we have configured the read-only lock on Azure SQL Server, let’s try to delete an Azure SQL Database from the Azure portal. On the Overview page, click on Delete as highlighted in the following image.

Azure gives you a warning message because this operation is irreversible. Enter the database name to delete it.
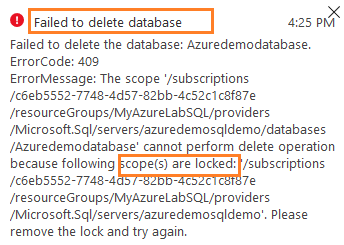
Click on Delete. You get a dialogue box stating that the delete database operation is failed. The message states that you need to remove the lock before trying to delete the database.
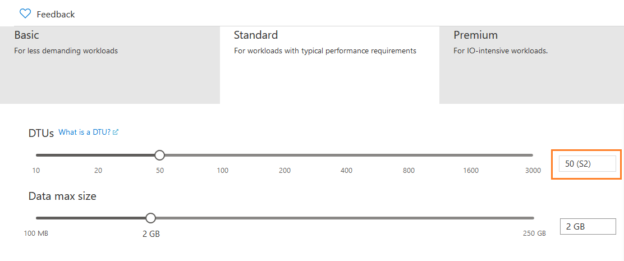
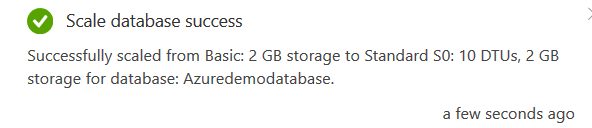
Similarly, suppose a user tries to modify the service tier from Basic to Standard for Azure SQL Database. We don’t want users to change the service tier because it incurs higher costs for you.
Current pricing tier: Basic
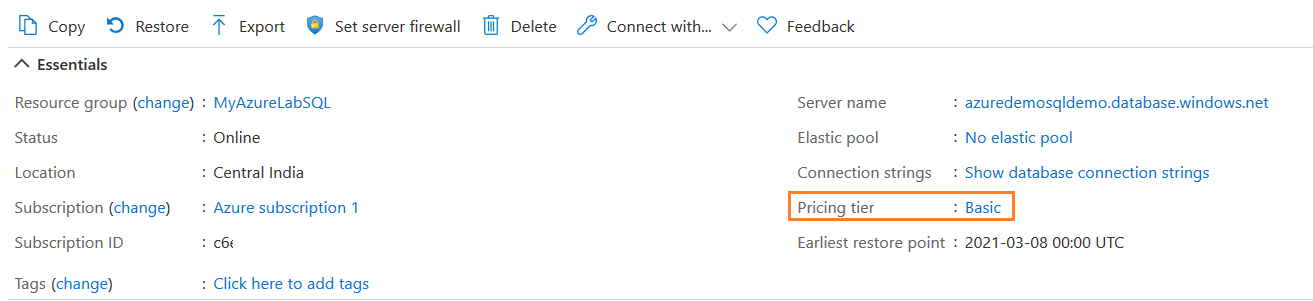
To modify the service tier, click on Basic and select your required pricing tier. Here, we choose the Standard (S2) service tier.

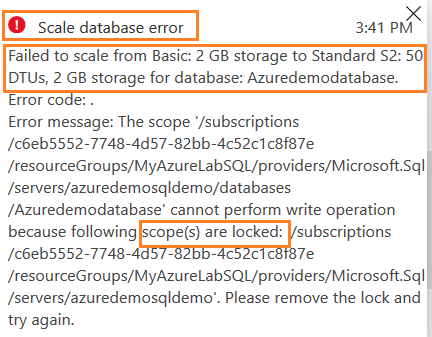
Click on Apply. You get the scale database error because Azure failed to scale Azure SQL Database from Basic 2 GB storage to Standard S2: 50 DTUs,2 GB storage for database [AzureDemoDatabase]. Since we have placed a read-only lock on Azure SQL Server, it did not allow database scaling.
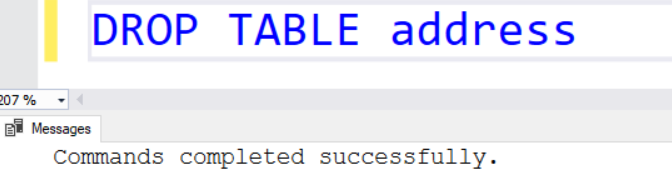
As specified earlier, these lock does not restrict users from performing create, alter, delete statements in the SQL Server database. For example, as shown below, the user with appropriate permission can successfully drop the table inside the database.
To delete a specific lock, click on the Delete button in front of the lock. It will delete the read-only lock that was assigned to the resource.

Configuration of the delete Lock using the Azure Portal
In this part, create a new Delete lock in the Azure portal similar to the read-only lock.
Once we have configured a lock, it shows up in the console, as shown below.

Test the delete lock functionality
Now, the user cannot delete the database or the Azure SQL Server resources.
We cannot delete the Azure SQL Database because it is locked, as shown in the following notification message.
However, with this delete lock, the user can modify the resource. For example, let’s try to change the pricing tier from Basic to Standard.
Lock resources using the Azure PowerShell
Previously, we used the Azure portal to specify the lock resource configuration in the read-only or delete mode. This section configures the lock configuration for the Azure SQL Server or Azure SQL Database using the Azure PowerShell. You use the Azure cloud shell from the Azure portal for running the PowerShell, or CLI commands.

In the Azure portal, click on the cloud shell icon, configure the storage account, and launch the PowerShell terminal as shown below.
In the Azure PowerShell, we can use the New-AzResourceLock cmdlet for the configuration.
- Note: You can refer New-AzResourceLock cmdlet documentation for more details
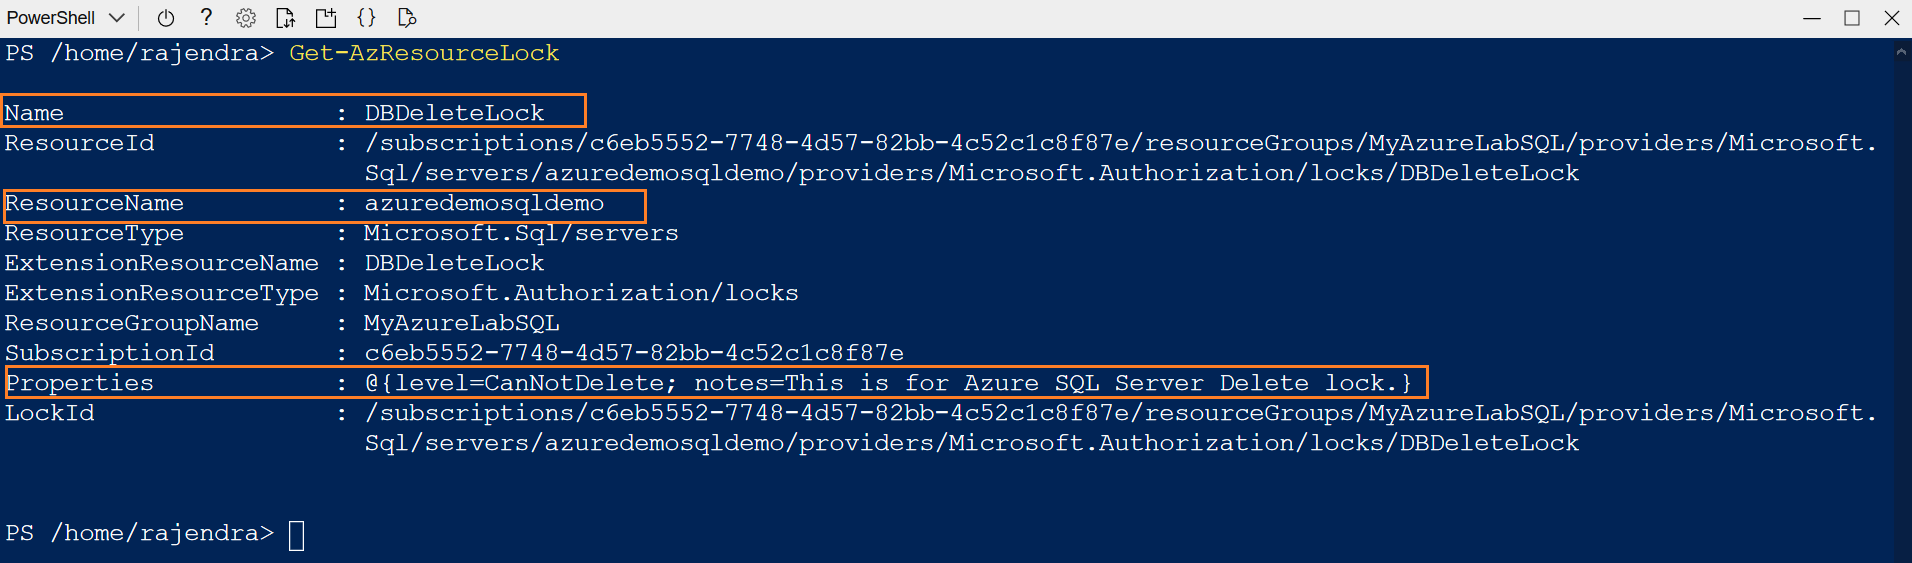
To get all locks information in Azure subscription, use the Get-AzResourceLock cmdlet.
- Note: You can refer Get-AzResourceLock cmdlet documentation for more details
Previously, we configured the “DBDeleteLock” lock using the Azure portal. Therefore, the Get-AzResourceLock returns the name, locked resource name, its properties. As shown below, it uses Microsoft.Authorization/locks Azure resource extension.
Suppose we want to place a delete lock at the Azure resource group [MyAzureLabSQL].
- Note: In the Azure portal, you see Delete lock type, but the Azure PowerShell accepts a value as CanNotDelete
|
1 |
New-AzResourceLock -LockName LockGroup -LockLevel CanNotDelete -ResourceGroupName MyAzureLabSQL |
Run the above command in the PowerShell, and it prompts you for confirmation. In the query output, it returns the lock group name, resource type, and its properties.

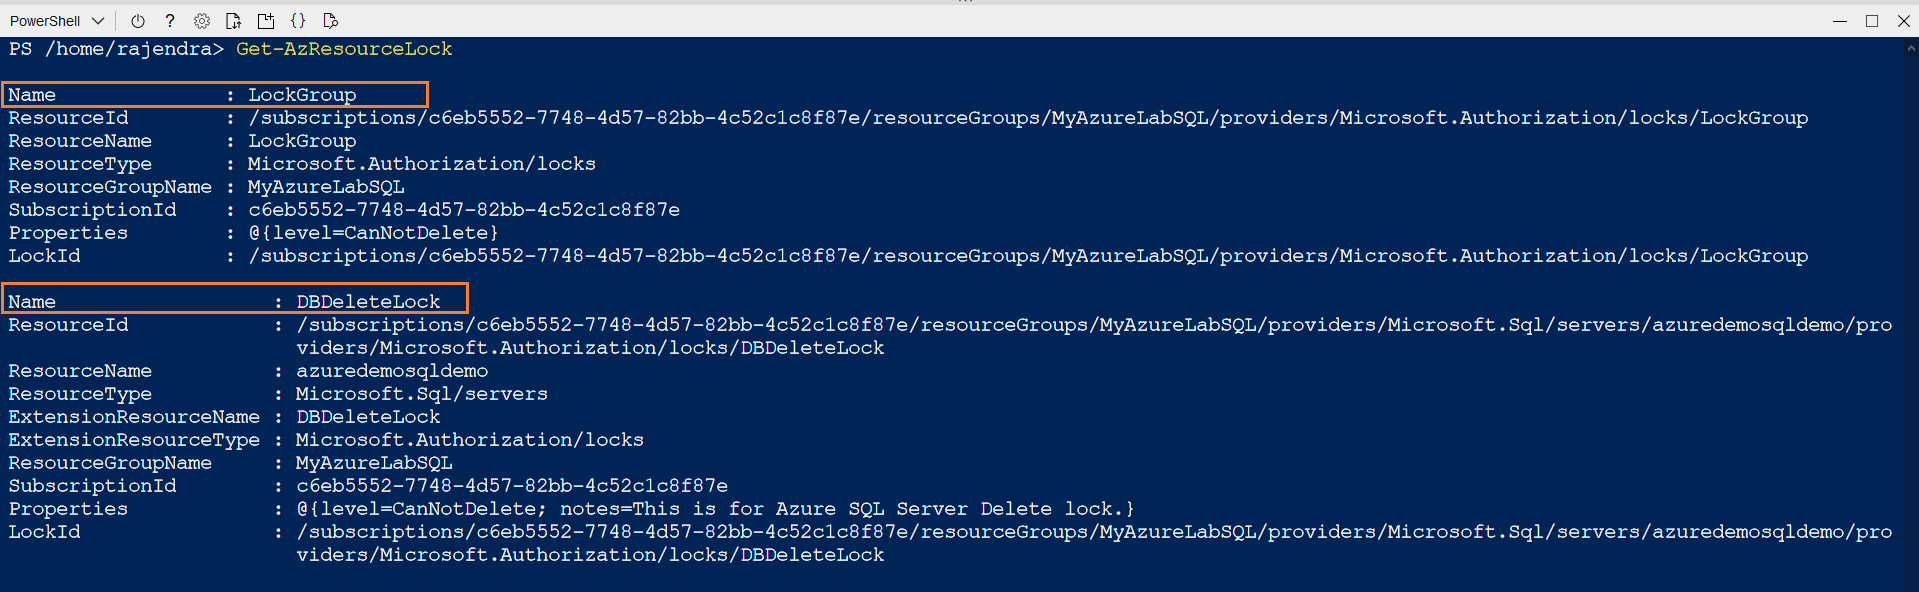
Re-run the Get-AzResourceLock command, and you have two resource locks – LockGroup and DBDeleteLock, as shown below.
You can verify it from the Azure portal as well.

Suppose we want to remove the lock named LockGroup using the Azure PowerShell. To do so, first, retrieve the lock id and then remove it using the Remove-AzResourceLock cmdlet.
|
1 2 |
$lockId = (Get-AzResourceLock -ResourceGroupName MyAzureLabSQL).LockId Remove-AzResourceLock -LockId $lockId |
Similarly, to remove the lock from a resource, use the following PowerShell command.
|
1 2 3 |
$lockId = (Get-AzResourceLock -ResourceGroupName resourcegroupname -ResourceName resourcename -ResourceType Microsoft.Web/sites).LockId Remove-AzResourceLock -LockId $lockId |
Lock resources using the Azure CLI
In the Azure CLI, you can use az lock list to list out the existing resource locks in the JSON format.

Similarly, use the az lock create command to configure a new lock with a specific lock type- CanNotDelete.
|
1 |
az lock create --name LockGroup --lock-type CanNotDelete --resource-group MyAzureLabSQL --notes "This lock is placed using the Azure CLI" |


The following script creates a read-only lock on the [MyAzureLabSQL] resource group.
|
1 |
az lock create --name LockGroup --lock-type ReadOnly --resource-group MyAzureLabSQL --notes "This lock is placed using the Azure CLI" |


- Note: You can refer to az lock command documentation for more details
Conclusion
This article explored the concept of Azure locks for safeguarding your Azure resources against unexpected changes. Read-only locks prevent users from doing any resource modification. Similarly, the delete lock prevents the accidental removal of resources. You can use Azure portal, Azure CLI as well as Azure PowerShell for it. You can use these locks at the resource, resource group, or subscription level. The lock mechanism has no impact on the Azure SQL database DML or DDL operations. The locks at the resource level are for protecting unintentional modification or deletion of the resources.

I am the author of the book "DP-300 Administering Relational Database on Microsoft Azure". I published more than 650 technical articles on MSSQLTips, SQLShack, Quest, CodingSight, and SeveralNines.
I am the creator of one of the biggest free online collections of articles on a single topic, with his 50-part series on SQL Server Always On Availability Groups.
Based on my contribution to the SQL Server community, I have been recognized as the prestigious Best Author of the Year continuously in 2019, 2020, and 2021 (2nd Rank) at SQLShack and the MSSQLTIPS champions award in 2020.
Personal Blog: https://www.dbblogger.com
I am always interested in new challenges so if you need consulting help, reach me at rajendra.gupta16@gmail.com
View all posts by Rajendra Gupta
- Understanding PostgreSQL SUBSTRING function - September 21, 2024
- How to install PostgreSQL on Ubuntu - July 13, 2023
- How to use the CROSSTAB function in PostgreSQL - February 17, 2023