
I will explain how to restore an Azure SQL database in case you need to recover some data, or somebody has deleted your database in this article. Databases restore is the common activity a DBA performs in his day-to-day activities to meet various business requirements. We should also perform regular restores to ensure our backups are healthy and restorable in case of any emergency. Here, I will create an Azure SQL database named TestDB along with a table Employee inside this database and then recover them by restoring its automatic backups.
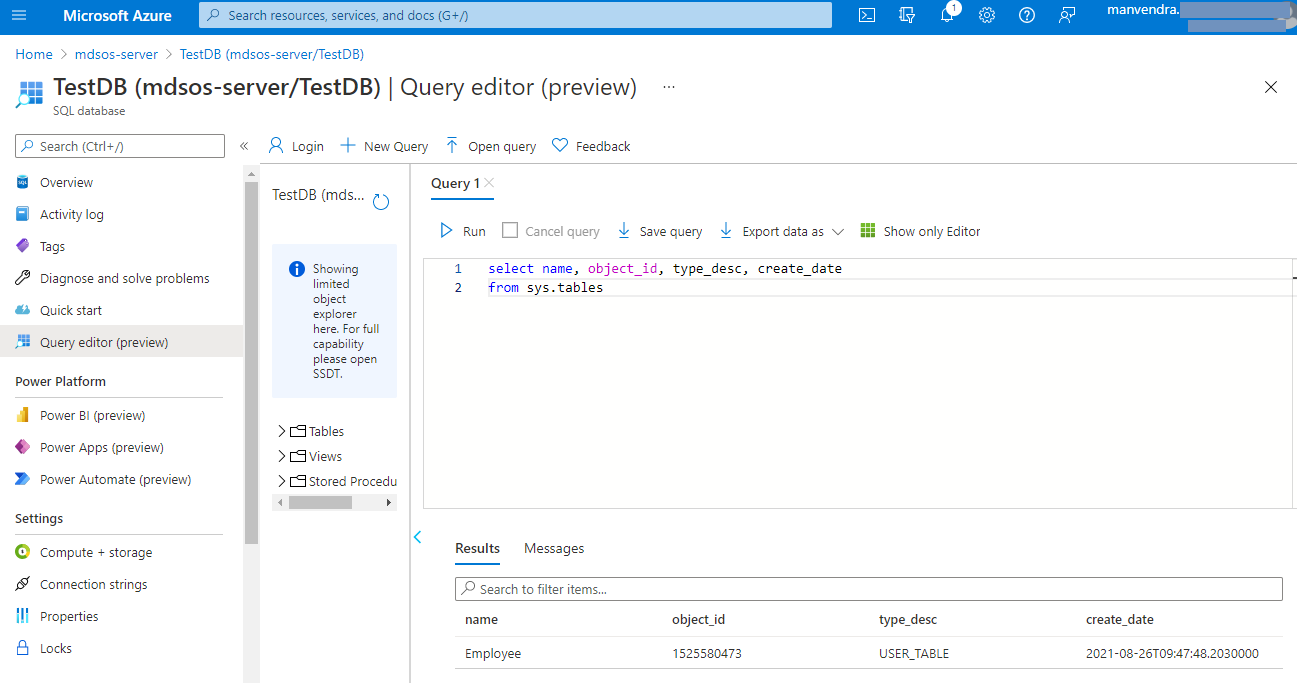
I used the existing Azure SQL database which is named “TestDB“. I then created a blank table “Employee” inside this database. Next, executed below T-SQL statements to check table is created or not.
|
1 2 3 4 |
--Verify table employee has been created SELECT name, object_id, type_desc, create_date From sys.tables GO |
We can see table employee has been created in the database “TestDB“. You can insert few rows in this table if you want to store some data inside this table.
Somebody has dropped this table or deleted some inserted data from this table. Now, you have to recover it without impacting other database objects. To do this, we must restore this database with a different name and copy the table from the newly restored database or only deleted rows to our main database.
Let’s restore this database with the help of its automatic backups in the next section.
Restore Azure SQL database with a different name
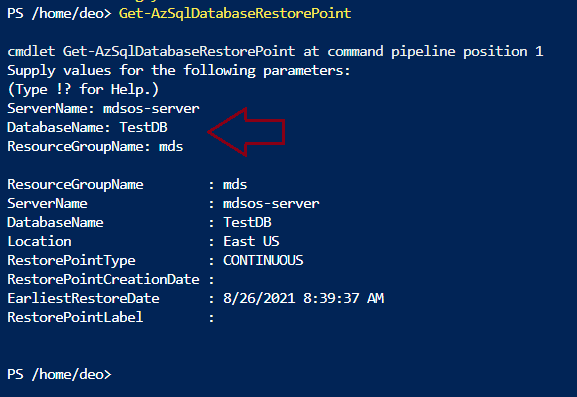
Here, I will restore the TestDB database with a different name using the Azure portal. First, we will check the status of automatic backup which will be required to restore this Azure SQL database. Use PowerShell cmdlet Get-AzSqlDatabaseRestorePoint to display the backup status of database TestDB. Pass server name on which TestDB database is hosted, database name TestDB along with its resource group name. I have executed this cmdlet and get the below output which shows “RestorePointType” is CONTINUOS which means the point in time recovery is possible for this database.
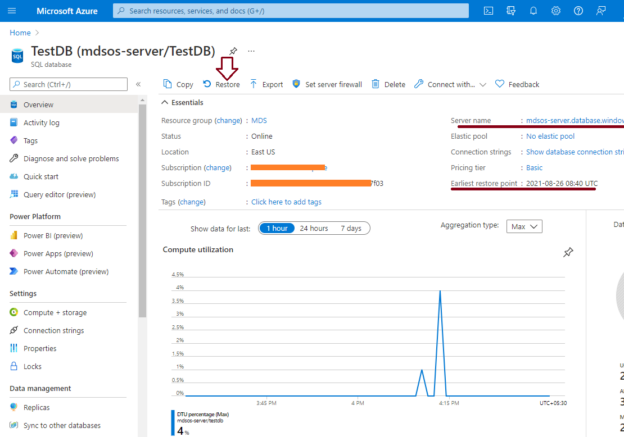
Now, login to the Azure portal and access the Overview page of Azure SQL database TestDB. You can see there is a Restore tab on its overview page in the right-side pane. You can use this tab to initiate the database restore.

The below screen will appear once you will click on the “Restore” button of the above image. You can see almost all the details are appearing with prefilled data and all source details are greyed out which cannot be changed.
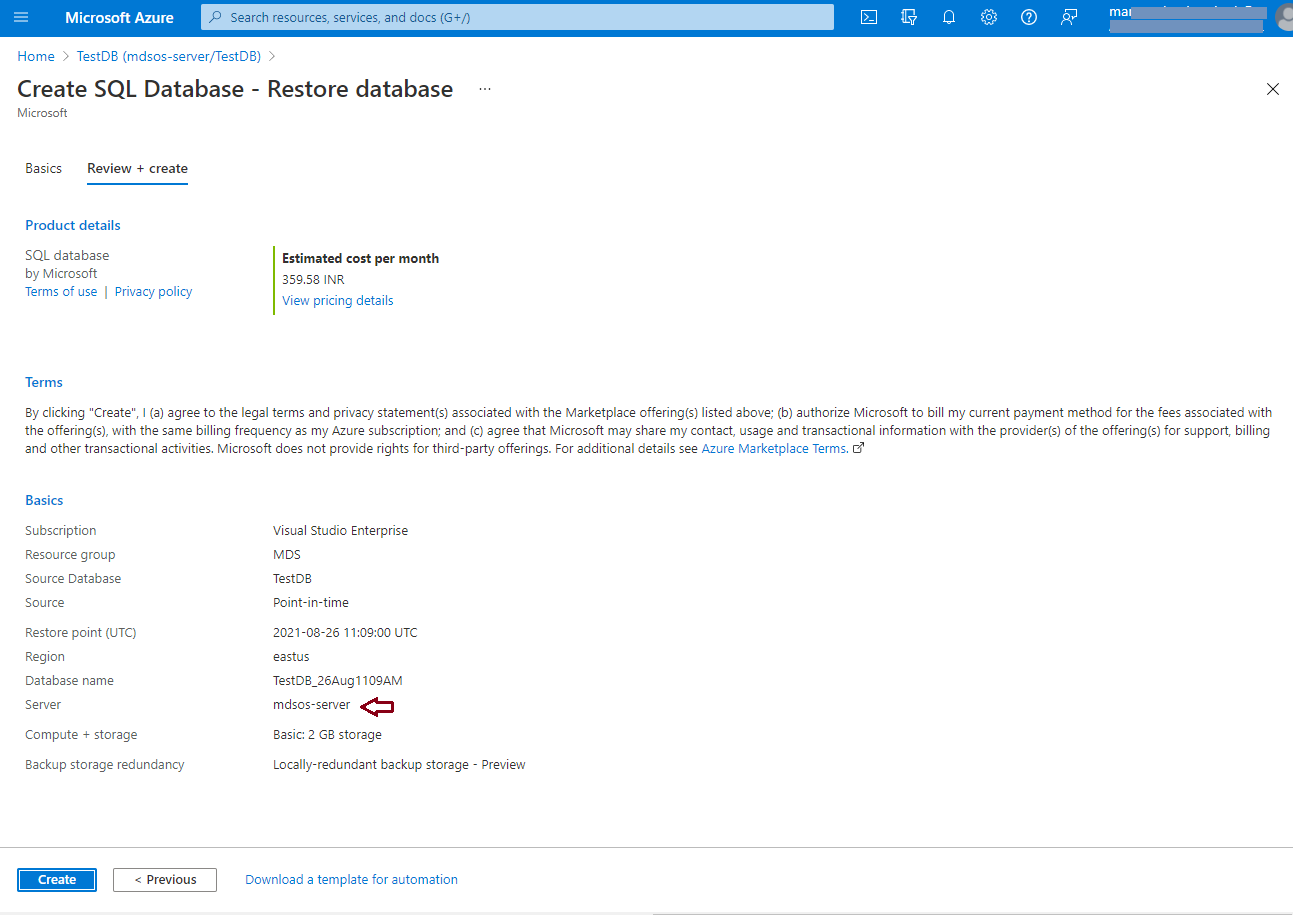
You must validate all details highlighted with the dark red arrow and modify them according to your requirement. You can change restore point time, target database name, compute, and storage size, etc. Fill in the details in the below screen as per your choice and click on the Review + create button.
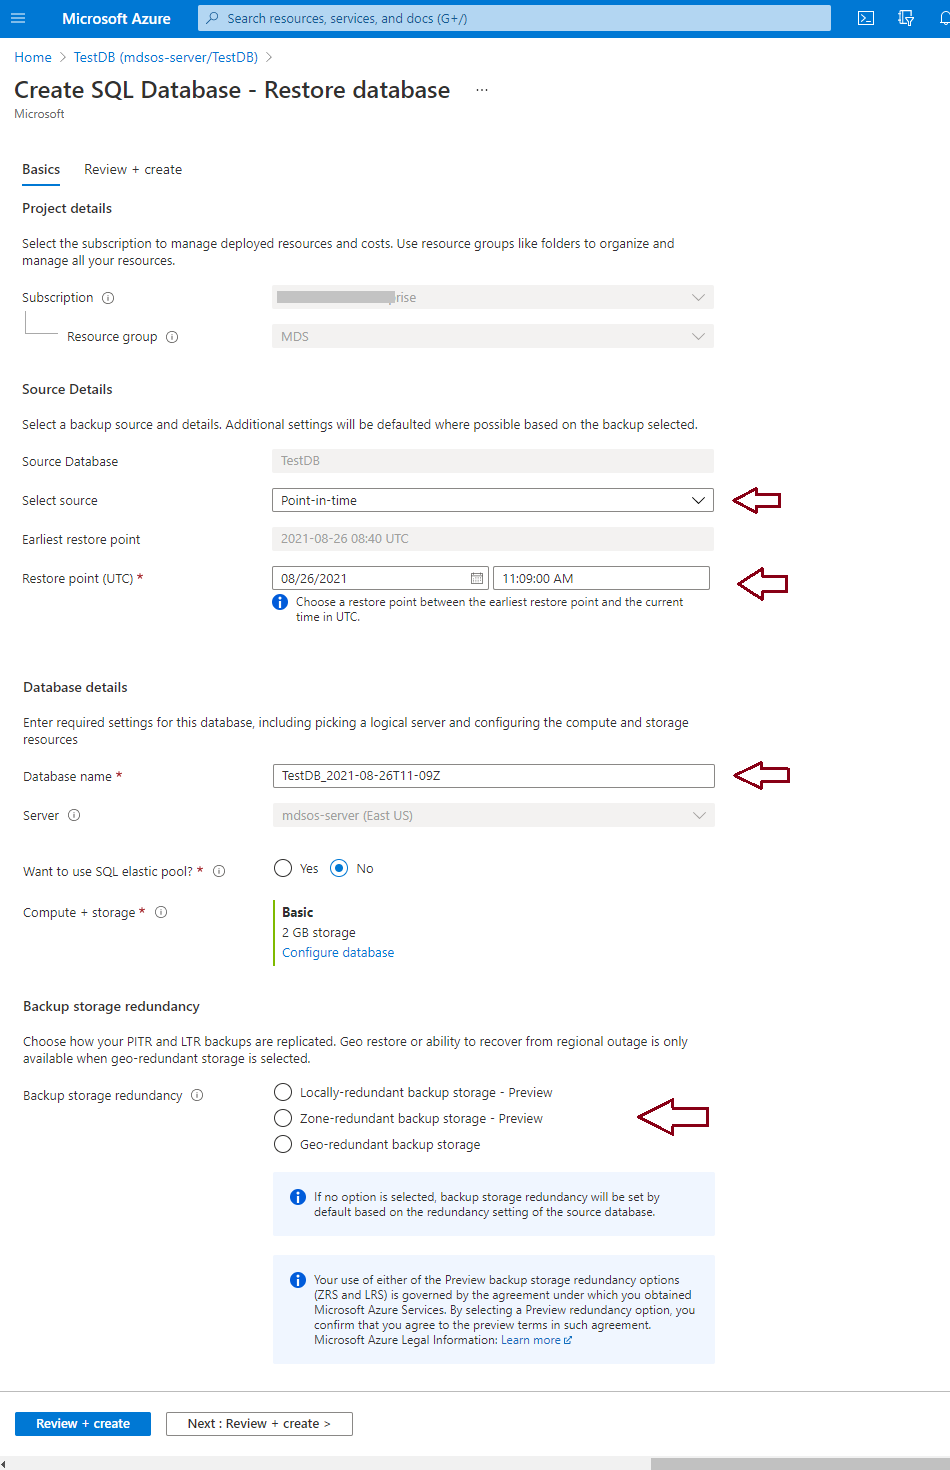
I have changed target database name as TestDB_26Aug1109AM and kept remaining details as it is. You can also see that we are restoring this new database on the same logical server where our source database is hosted. Have a look at the below image where I have highlighted it in the dark red arrow. Verify the rest of all details from source and target details and hit the “Create” button to create this new database with a copy of our source database TestDB.
Restore might take some time depending on the compute type you have chosen. Once the database will be restored, you will get the below screen.
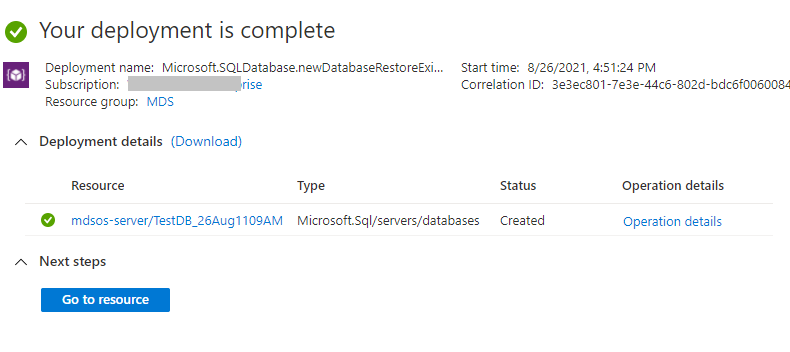
Now click on the “Go to resource” button showing in the above image to switch to the overview page of this newly created database. Additionally, if we want to check all databases hosted on the same logical server mdsos-server or whether this newly restored database is restored on this logical server or not then we should access this logical server overview page and click on the “SQL databases” tab showing under Settings option in the left side pane. We can see newly restored database TestDB_26Aug1109AM is showing on this database server.

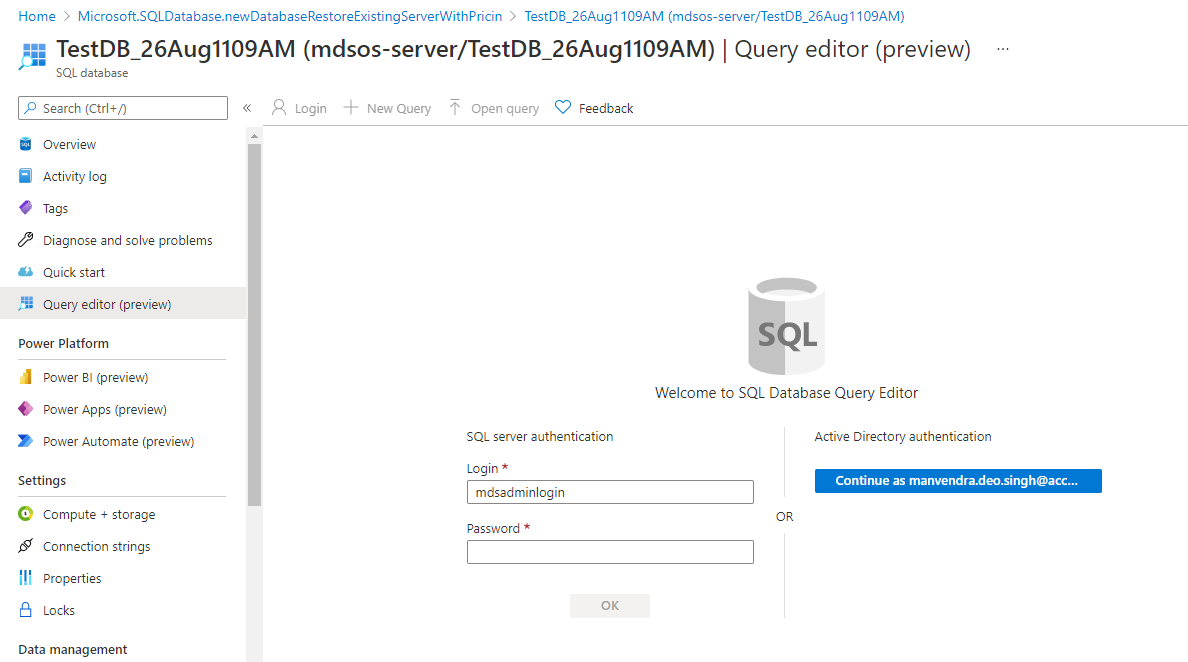
Click at “Query editor” from the left side pane from the database overview page of the newly restored database TestDB_26Aug1109AM.
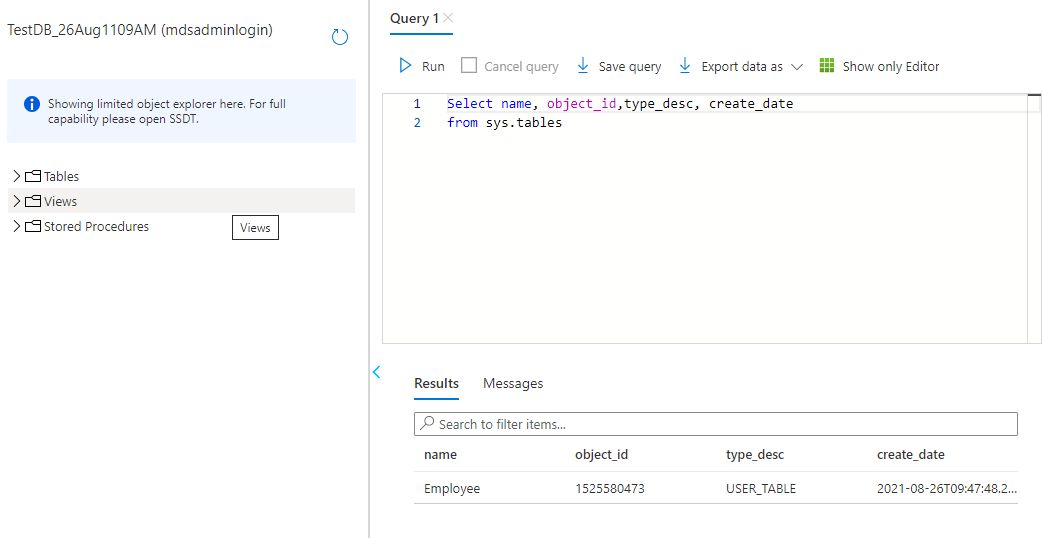
We will run the same command which is shown in the first screenshot of this article to ensure our table Employee is recovered along with this restore.
Once you click on “Query editor” it will ask you to choose authentication mode. I have chosen SQL Server authentication and entered my id and password to establish a database connection to this newly restored database.
You can see dropped table “Employee” has been restored in this database. You can copy the data from here to your main production database from a recovery standpoint or you can use this database for your testing or other business needs.
If you want to replace the same database (TestDB) with the help of its backup, then you need to follow the above steps and once the new database will be restored with a copy of your source database then you need to rename this newly restored database with the one you want to restore or replace. Make sure to keep the same compute size and pricing tier whiling replacing the database with its point-in-time backups.
Restore deleted Azure SQL database
This section will explain the steps involved in restoring a deleted SQL database. If somebody has dropped your SQL database, then you can recover it easily using the Azure portal.
Let’s first delete the above database that we had restored with the name TestDB_26Aug1109AM. You can delete it using the Azure portal by accessing the database overview page as showing in the below image. Click on the “Delete” option showing near the dark red arrow in the below image to delete this database.

You can also use PowerShell cmdlet Remove-AzSqlDatabase to drop this database. It will ask you to pass the database name that has to be deleted, the server’s name where it is hosted, and the resource group name under which these resources are created. I have passed all details as shown in the below image and the database is dropped using this PowerShell cmdlet.
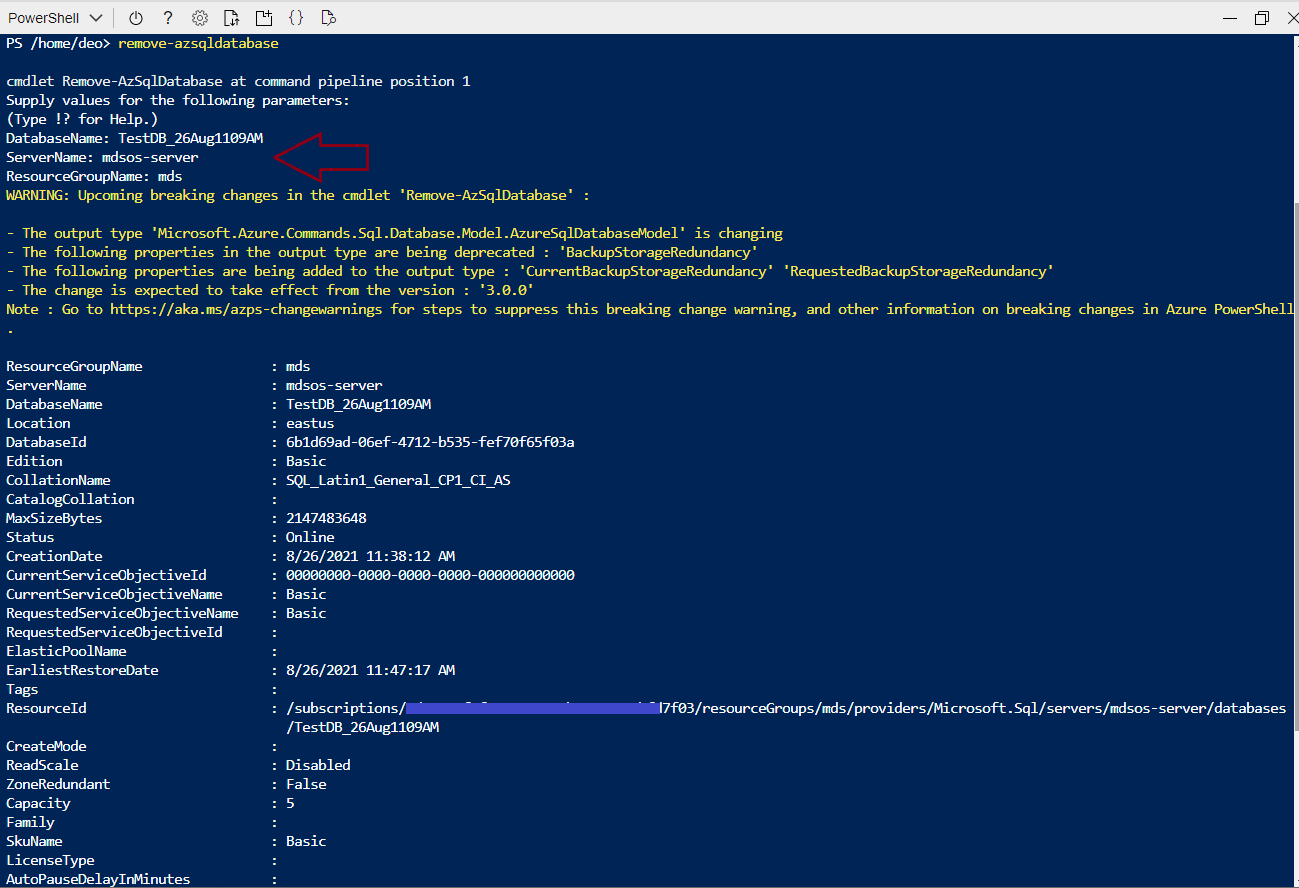
Next, we can verify whether SQL database ‘TestDB_26Aug1109AM’ has been removed from logical server mdsos-server or not. Now, you can try to access this database dashboard or overview page, you will get the below errors while accessing this database.
The resource was not found, it may have been deleted. If this was launched from a pinned tile on the dashboard, it should be removed.
Resource ID: /subscriptions/**************bfd7f03/resourceGroups/MDS/providers/Microsoft.Sql/servers/mdsos-server/databases/TestDB_26Aug1109AM
Status Code: 404
Status Message: The Resource ‘Microsoft.Sql/servers/mdsos-server/databases/TestDB_26Aug1109AM’ under resource group ‘MDS’ was not found. For more details please go to https://aka.ms/ARMResourceNotFoundFix
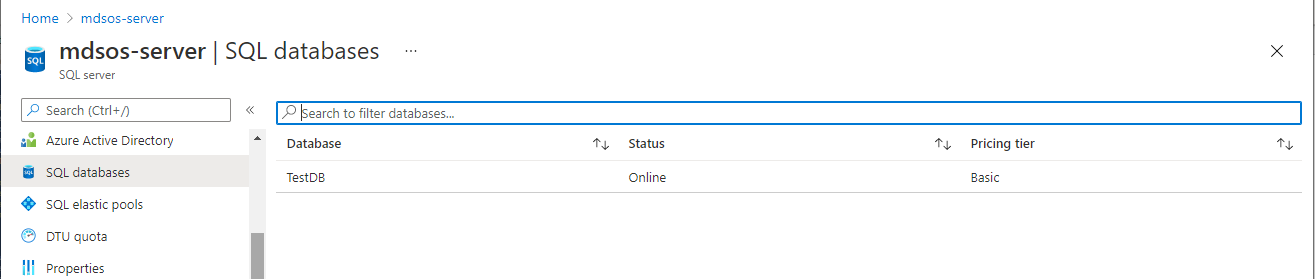
Another way to ensure that database is dropped is by looking at all SQL databases hosted on logical server mdsos-server. Now, we can see only one database is showing on this server. It means the database ‘TestDB_26Aug1109AM’ has been successfully deleted.
Whenever you delete an Azure SQL database, the details of the deleted database are captured under the “Deleted databases” tab of the “Data management” option. We can also use the “Deleted databases” page to restore any deleted database. I will show you how to do it in this article.
Let’s access the “Deleted database” tab of the “Data management” option of logical server name mdsos-server where the above-deleted database was hosted. Below is the image of this screen. If you want to restore this deleted database, you must click on the database name “TestDB_26Aug1109AM” showing with a hyperlink in the below image. This link will let you switch directly to the restore page of this database where you need to verify some details and restore this database to its point in time when it was dropped.

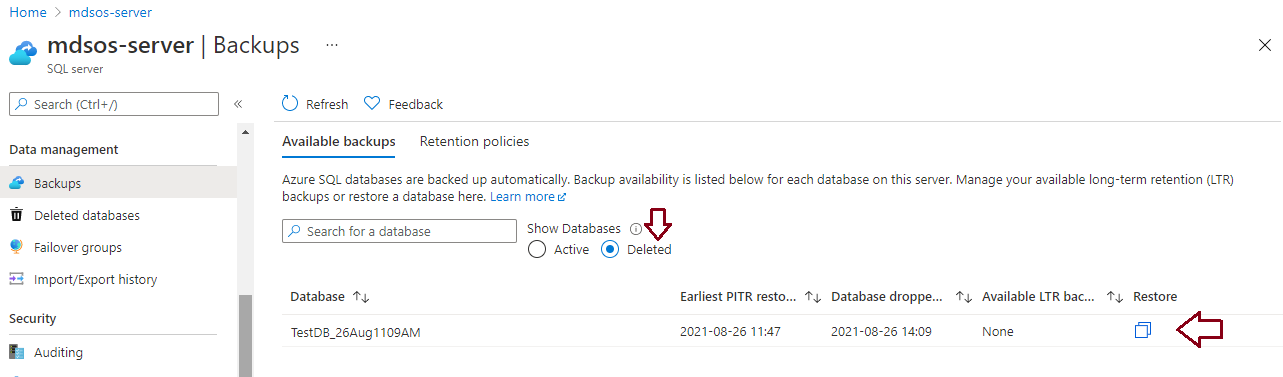
There is one more option from where we can see all deleted databases and can restore them using a restore link attached with each deleted database. This option is available under the “Backups” option showing just above the “Deleted databases” in the above image. Click on this Backups option to get its page.
The select radio button “Deleted” from the right-side pane of the “Backups” page. It will display all deleted databases with a restore page link which can be used to open the restore page of this database. These restore pages are the same as they will come through Deleted databases tab. You can use any approach to restore your deleted database. You can also see when your database was deleted with the actual point in time. You can use this time for point-in-time recovery. Now go ahead and click on the link attached for the “Restore” option showing near the dark red arrow.
The below screen will appear once you click on either database name TestDB_26Aug1109AM from the “Deleted databases” page or the restore link showing in the above screen near the dark red arrow. Verify all details showing in dark red arrow in below restore database page.
Make sure to verify you are restoring this database at the same time when it was dropped in case you have to recover it completely. You can get database dropped time from the above images which are showing as 2.09 PM. If you want to restore this database with the same name it was hosted earlier then change its name under the Database details section of the below image.
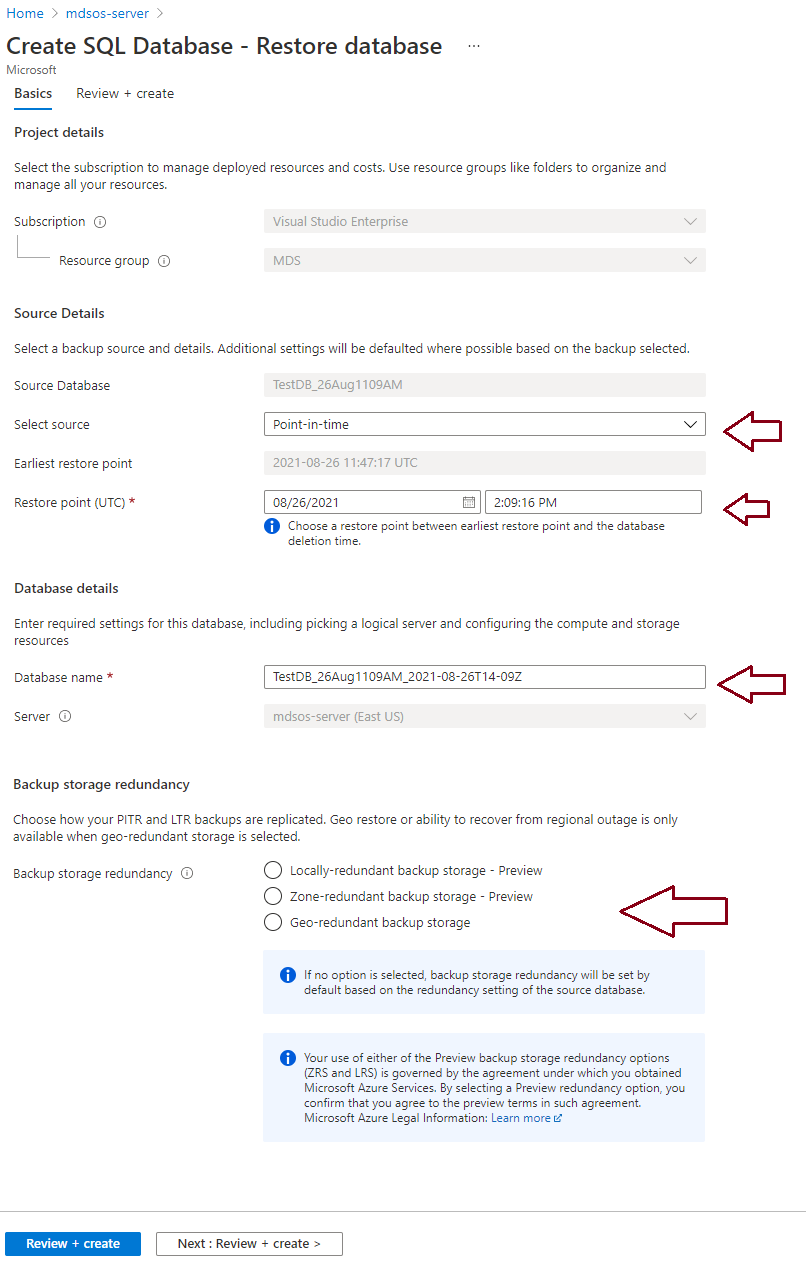
Click at Review + create option showing in the above screen to restore this database. The deleted database will be restored at the point it was dropped once the above deployment will be completed. You have successfully restored a deleted Azure SQL database using the Azure portal. Now, you can ahead and use this database for your requirements.
Conclusion
Databases restore is a critical task that must be regularly performed to ensure you have robust recovery plans in case something happens to the database environment and you need to recover them to a specific point. This exercise also ensures that backups are healthy and can be used for point-in-time recovery. Existing databases cannot be replaced using these backups as part of the restore exercise. We should restore these backups while creating a new database. Azure SQL has also offered great features to restore a deleted SQL database using Deleted databases or Backups features from the logical server page where the database was hosted. Go ahead and use these steps to recover your databases or perform restore activities with the help of automatic backups.

He loves to talk and write about database technologies. He has lead and delivered many projects from designing to deployments on Migrations to the cloud, heterogeneous migrations, Database consolidations, upgrades, heterogeneous replication, HA / DR solutions, automation, and major performance tuning projects.
You can also find him on LinkedIn
View all posts by Manvendra Singh
- Configure backup storage redundancy for Azure Cosmos DB account - May 15, 2024
- Difference between SQL SELECT UNIQUE and SELECT DISTINCT - January 16, 2024
- How to do a group by clause - April 12, 2023